Posted on Leave a comment

Penguin Love with the Gorgeous Abstract Background BetterPress Plate

Hey friends!  I have another card using the new BetterPress plates that Alex Syberia Designs just launched!  I just can’t stop playing with them!  And this one is even MORE fun because it has a coordinating stencil!

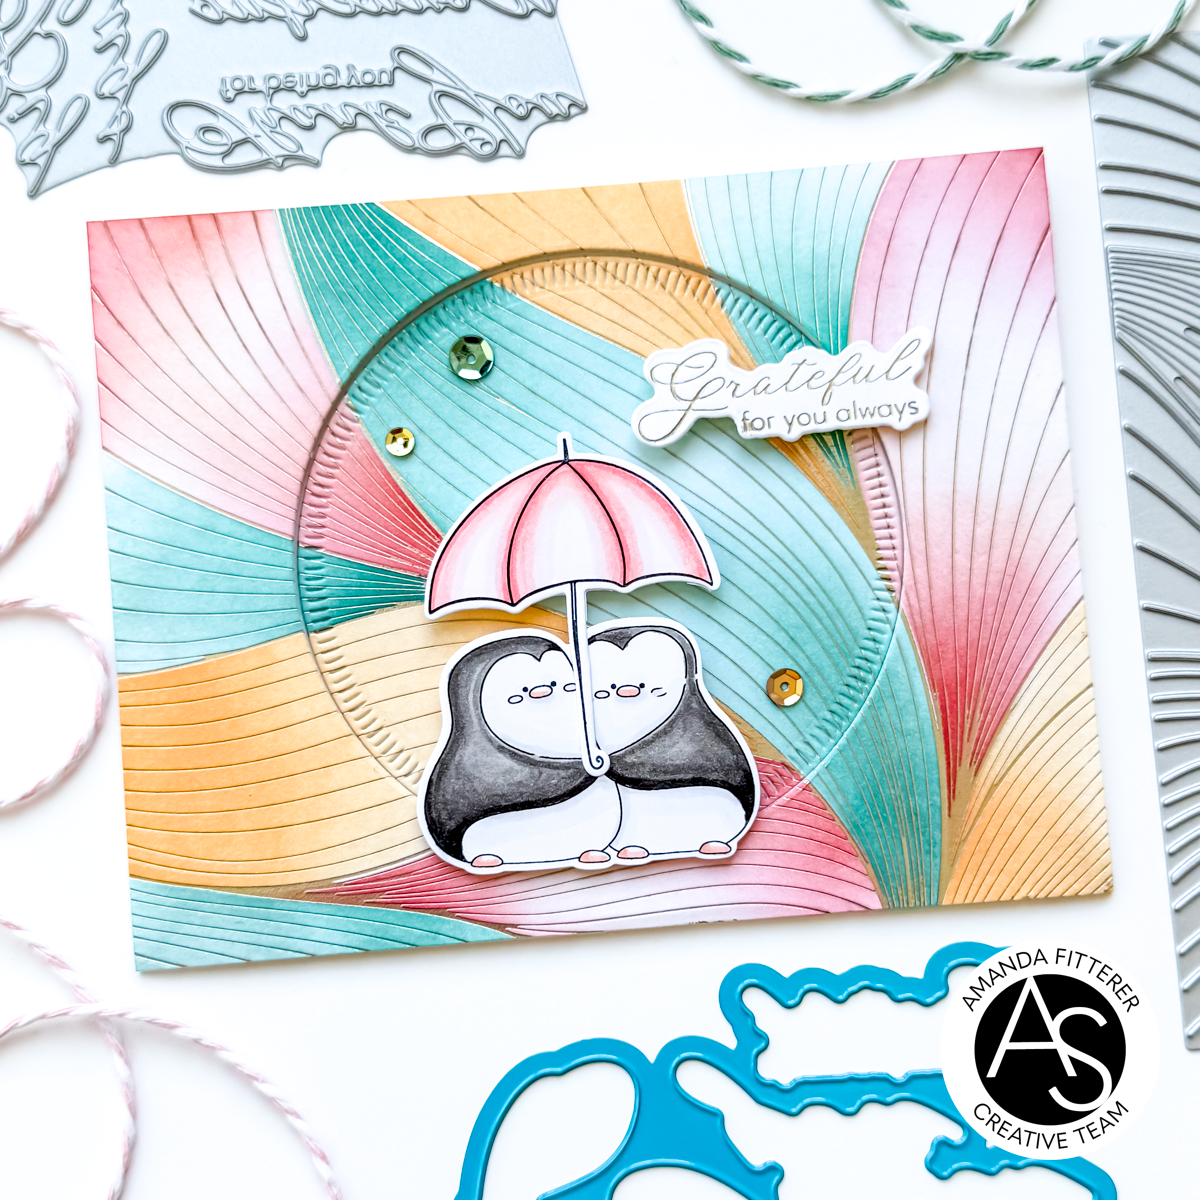
I started by heating up my Glimmer Hot Foil System and trimming a piece of gold foil to A2 size (4.25″x5.5″).  Then, I hot foiled the Abstract Background Plate onto a piece of 110lb cardstock.  I also hot foiled the Classic Sentiments Plate and used the coordinating dies to cut them out.

Then, I used the coordinating stencil to ink blend Catherine Pooler’s Apricot, Clay Mask, Terracotta, Hot Tub, and Skylight inks.  

Once I was finished ink blending, I used the smaller of the Nested Stitched Circle Dies to cut out the center of the panel.

I stamped the cute little couple from the Penguin Love Stamps.  The umbrella is from the Sweet Friend Stamps.  I colored the images with Copic Markers and then die cut them out with the coordinating dies.

Next, I glued the inner circle directly to an A2 card base.  Then, I put 3D foam strips behind the outer panel and adhered it to the card base.  I put foam squares on the back of the images and sentiment and then adhered them to the card.  I added a few sequins using my favorite glue.

I love that background so much!  Stay tuned because I have another amazing card using the Charming Flora Background Plate next Thursday!

This blog post does contain some affiliate links!  If you use them, I’ll get a small percentage of your entire order (but it won’t cost you anything!)  Thanks for using my links, if you decide to!

Xx, Amanda

Posted on Leave a comment

Holy Cow! You’re Pretty Llamazing!

Hello, crafty friends! I hope your week is off to an amazing start!! If it’s not, hopefully this bright and happy card will cheer you right up!

To make this card, I started by blending my beautiful sky background on a piece of A2 cardstock. I spritzed it with water and added some white paint drops. Next, I used my Stitched Slopey Joe Border Dies and blended them with inks as well.

I just love that the Fence Border Die works with the Slopey Joe Dies! So, I just cut that guy out with white cardstock and didn’t add anything to it.

Next, I cut my pieces from the Boats and Barns Die, including 2 barn structures. I ink blended one of the barn structures very dark red and the other barn a lighter red. I placed my darker one behind to be the “inside” of the barn. The lighter red die cut, I cut out the barn door opening and the window opening and added my other die cut pieces with glue.

Once I had my background all set, I stamped my images from the Llamazing Llamas and Udderly Fabulous Stamp Sets. Then, I colored them with Copic markers and die cut them out with the coordinating dies.

The last step is to assemble the card! I grabbed my Glubert Glue and 3D foam squares and strips and got to work!

That’s it for me today! I hope you enjoyed this post! Enjoy the rest of your week!

Xx, Amanda


Heffy Doodle – Heffy Cuts – Dies – Fence Border
Heffy Doodle - Heffy Cuts - Dies - Boats and Barns Heffy Doodle - Clear Photopolymer Stamps - Llamazing Llamas Heffy Doodle - Clear Photopolymer Stamps - Udderly Fabulous Heffy Doodle - Precision Craft Glue - Glubert Heffy Doodle - Foam Strips - Double Sided - 3mm Deep

Just a note to say that by clicking the links in my blog post, you may be using my affiliate link! This is great for me, because I get a teeny percentage of your sale. And it’s great for you because it doesn’t cost you anything at all and you’re helping a friend!

Shop Scrapbook.com Scrapbook.com's Coupons Page