Shipping Update: Orders placed after July23rd will begin processing on July 31st.
(Normally, ships SAME or NEXT Day!) Free US shipping on orders of $100 or more! Dismiss
Hey there, crafty friends! Today is an exciting day! Alex Syberia Designs has a NEW RELEASE!! Woohoo! We have a Blog Hop AND an Instagram Hop happening to kick off the excitement!
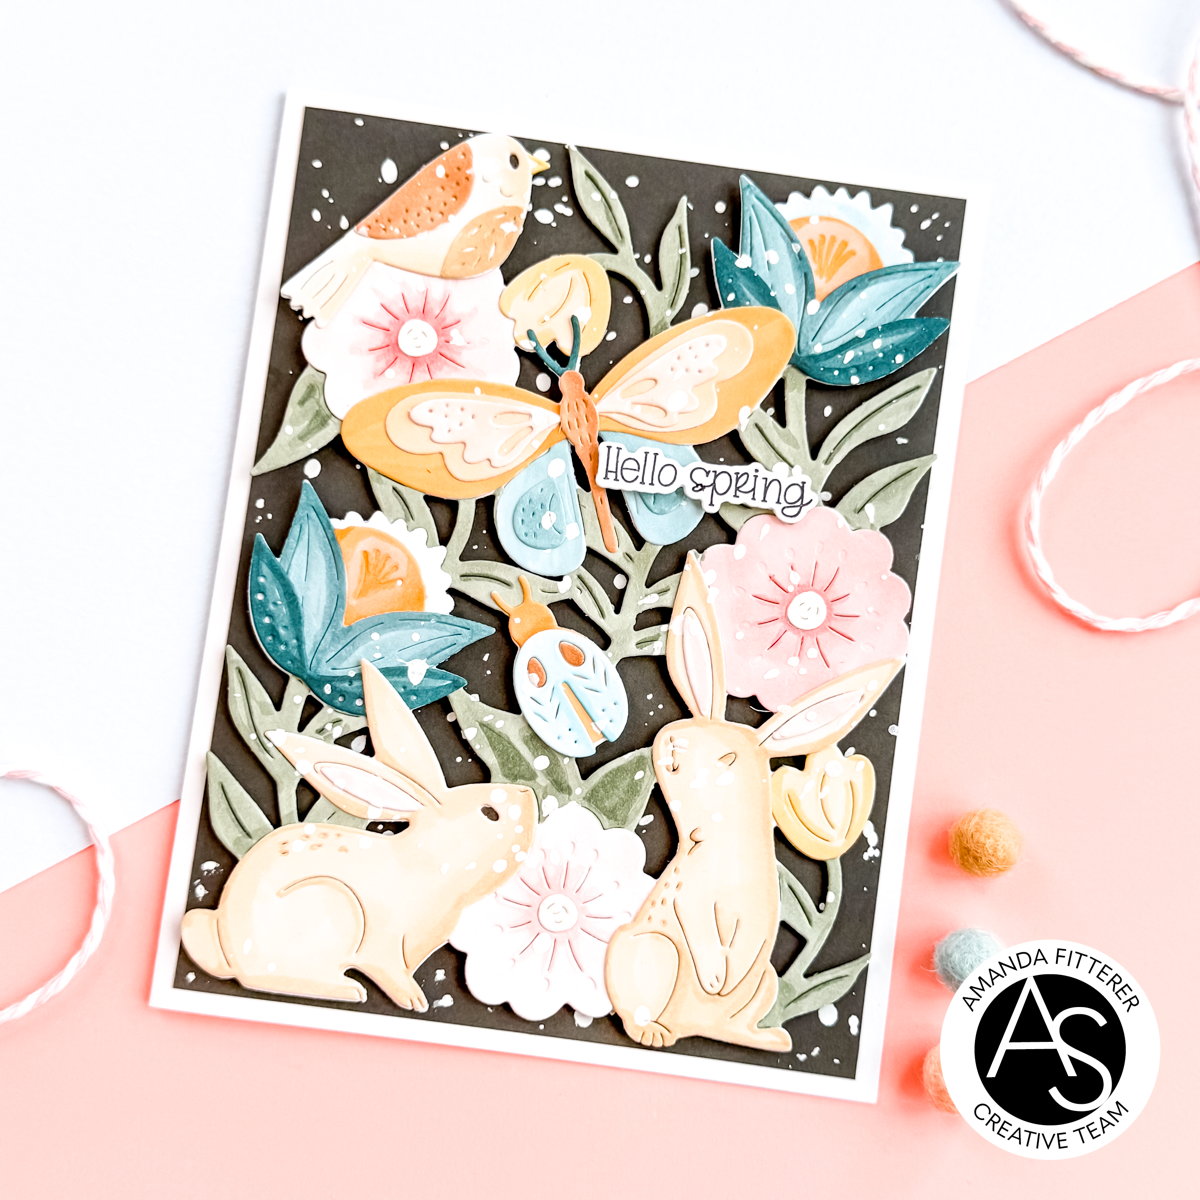
I have created this stunning card using the new Spring Meadow Dies, Cheerful Meadow Dies, and the sentiment is from the Hoppy Easter Stamps! You can shop the New Release HERE!
To create this beautiful card, I cut all the pieces from the Spring Meadow Dies and Cheerful Meadow Dies. I colored each piece with Copic markers.
I glued the pieces together with liquid glue and then put 3D foam strips behind the entire thing. I adhered it to a piece of dark gray cardstock. I flicked white acrylic paint all over the card with a paintbrush.
Giveaway Info! Alex Syberia Designs is giving away a £30 (or $30 for U.S. winners) gift certificate to one winner, and a £15 (or $15 for U.S. winners) gift certificate to three lucky winners. This giveaway is open internationally. Prizes will be awarded in GBP (£) for non-U.S. winners and USD ($) for U.S. winners.
All four winners will be drawn from participants who enter this Blog Hop by midnight BST April 27th, 2025. Winners will be announced on the Alex Syberia Designs blog ‘Giveaway Winners’ page on April 28th, 2025.
My affiliate link for shopping is here. This gives me a small percentage of your total purchase, but doesn’t change anything for you! I appreciate you using my links, if you decide to! Xx, Amanda
Hey crafty friends! Today is a really run kick-off Blog Hop for the Alex Syberia Designs New February Release! I’m so grateful to be a part of it! There are so many cute and fun products!
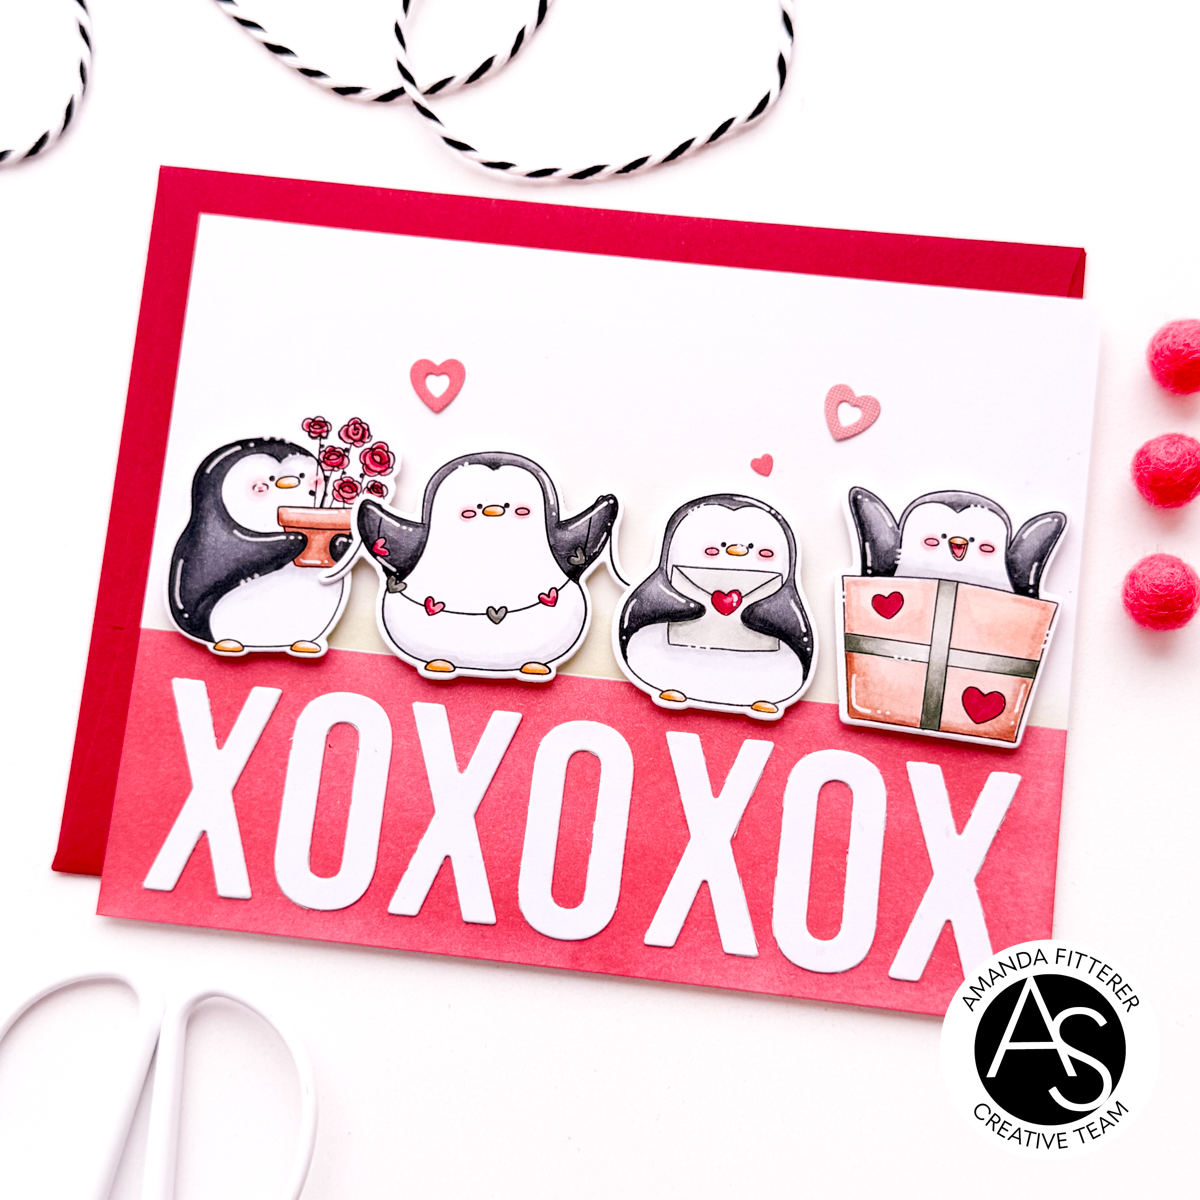
For the Blog Hop today, I’m sharing this sweet card that could be for any love event – wedding, bridal shower, Valentine’s, anniversary, and more! I have used the new Penguin Love Stamps, theEndless Hearts Dies, and the Love and XOXO Dies.
Using some Heffy Memo Tape, I masked off the bottom of my card and very lightly blended Catherine Pooler Matcha ink. Then, I used the tape to mask off the top of the card and blended Catherine Pooler Polished ink.
I cut the XOXO’s out using the Love and XOXO Dies. I glued them to the bottom of the card, spacing them as evenly as possibly.
Then, I stamped my penguins from the Penguin Love Stamps. I colored them with Copic markers and added some highlights with a white gel pen. I put 3d foam squares behind them and added them to the card.
The little hearts are from the Endless Hearts Dies and I glued those directly to the card panel.
Giveaway info:
Alex Syberia Designs is giving away a $50 gift certificate to 1 winner and a $15 gift card to 3 lucky winners.
Open internationally. All 4 winners will be drawn from the entrants that have played along with this Blog hop by midnight GMT March 8th, 2025. Winners will be announced on the Alex Syberia Designs blog ‘Giveaway Winners’ page on March 9th, 2025.
Good luck!! I hope you win!! Please subscribe to my Blog to get alerts when I post!
The links in this blog post may be affiliate links. That just means that when you make your purchase, I’ll get a small percentage of it. Thanks for using my links! I appreciate your support!!
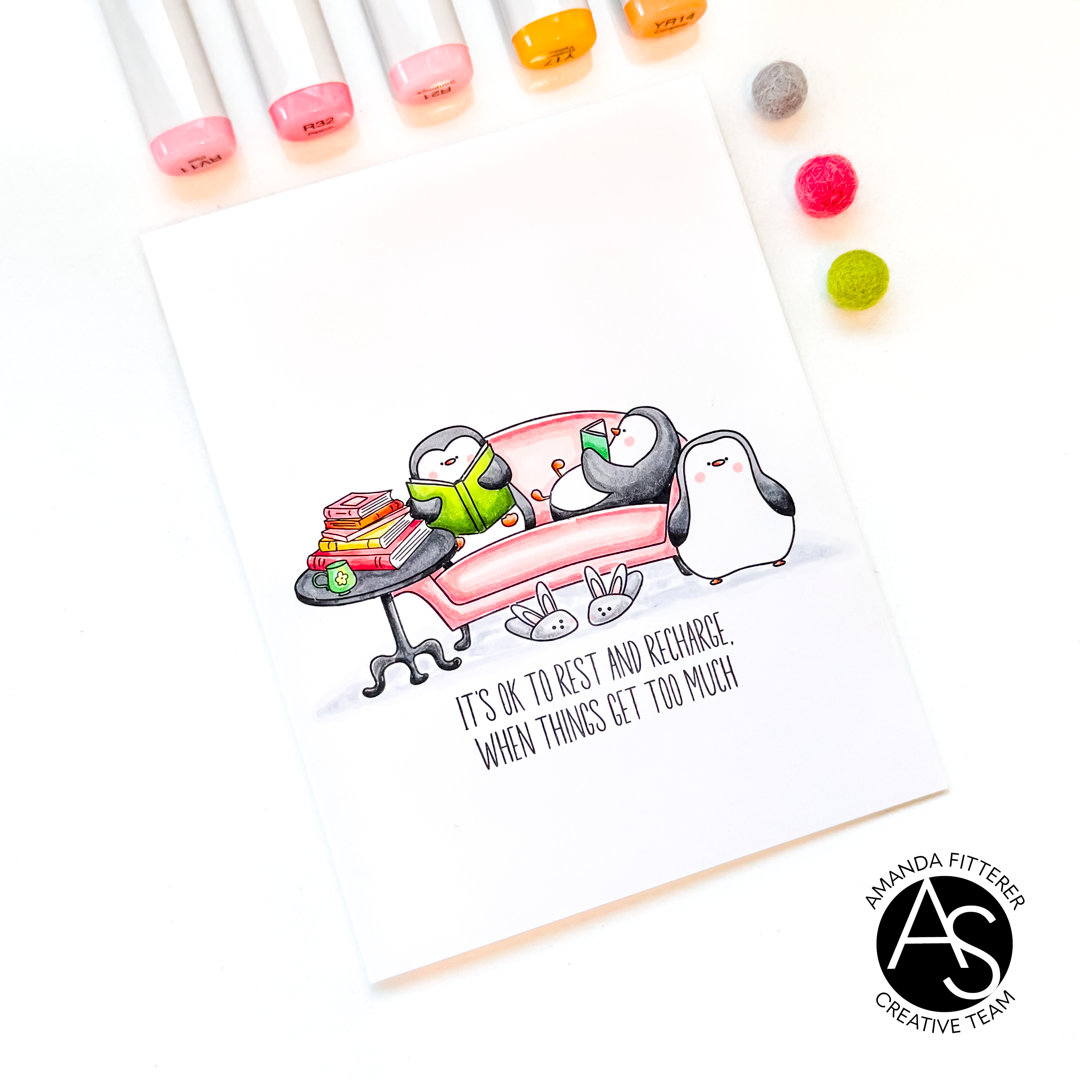
What do you think about these adorable penguins!? They are included in the “Smile More” stamp set! This stamp set also has some super cute fox critters!
I created this card using a masking technique. First, I stamped the end table, slippers, and the standing penguin. Then, I used some Heffy Doodle Memo Tape to mask off those images. To do this, I stamped the images on the Memo Tape and then cut on the lines. I placed the masks on the stamped images and then stamped my couch & penguins image. Then, I removed the masks and was left with this sweet little scene!
I colored the images with Copic markers and then stamped my sentiment underneath!
Alex Syberia Designs is giving away a $50 gift certificate to 1 winner and a $15 gift card to 3 lucky winners.
Open internationally. All 4 winners will be drawn from the entrants that have played along with this Blog hop by midnight BST October 31st, 2024. Winners will be announced on the Alex Syberia Designs blog ‘Giveaway Winners’ page on November 1st, 2024.
If you kindly use the affiliate links in this blog post to shop the New Release, I’ll get a tiny percentage of your entire order! When you do this, I get to buy more crafty goodies to keep making posts for YOU! I love what I do and I hope you do, too! Xx, Amanda
Happy 9th Birthday, Sunny Studio!! I am SO happy for you and your wonderful success! Today, I get to take part in a Blog Hop to celebrate and I’m so glad YOU are here to help celebrate as well!!
I have SO many cards I made using this New Release! Everything is just so stinking cute! Today, though, I am sharing just one card! (But don’t worry, you’ll see many of my other cards on my Instagram and on the Sunny Studio Blog over the next month or so!!)
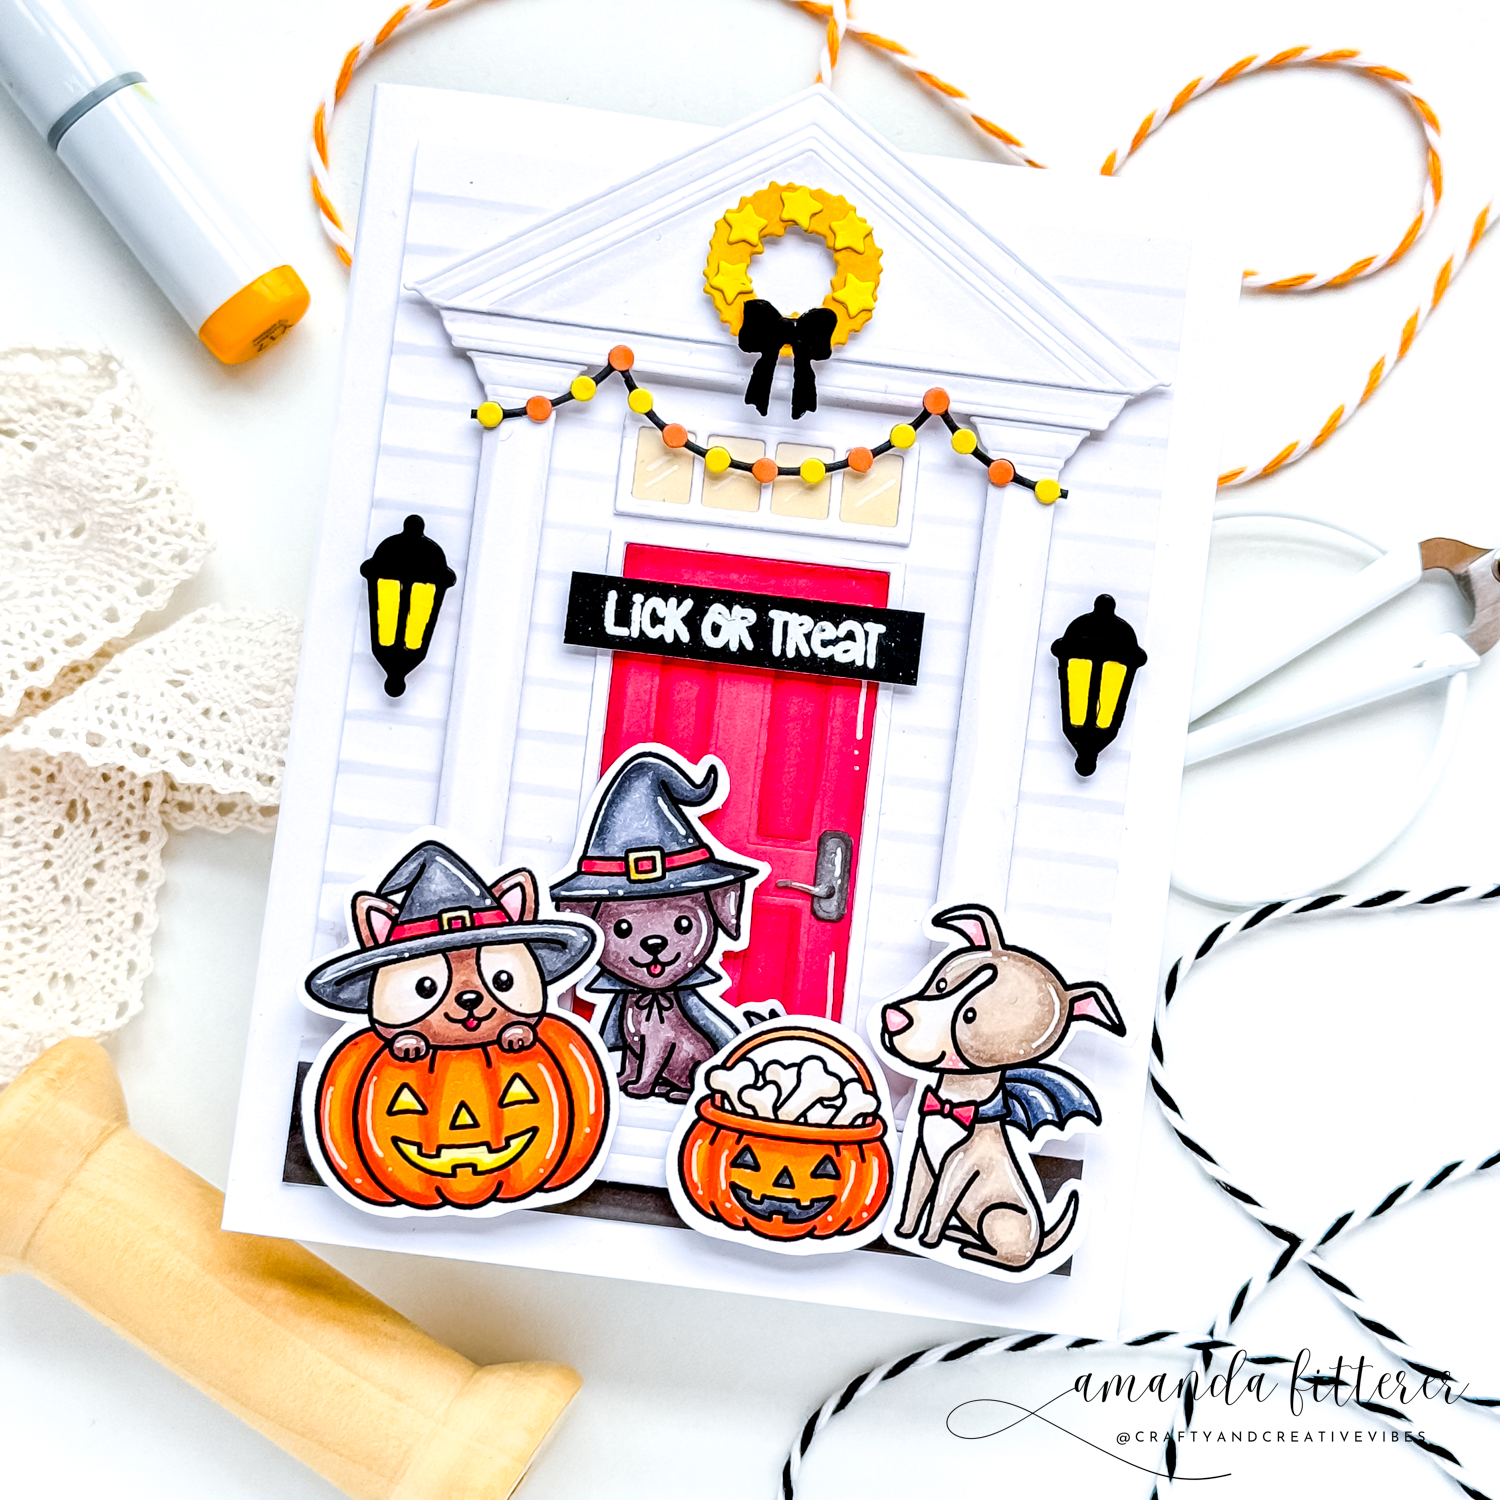
How adorable are these puppies in their costumes?! These cuties are part of the Happy Howl-o-ween Stamps!
I colored my pups in with Copic markers and used scissors to fussy cut them out. However, there are coordinating dies available to make your life easier!
There will be $325 worth of prizes up for grabs! All you have to do is comment on all the Blog Hop posts from the Designers in the Blog Hop Lineup (below). You’ll be entered to win on each stop that you comment on! The winner from each Blog Hop Stop will win a $25 gift code to the Sunny Studio Shop!! (Imagine all the goodies you could buy!!)
PLUS, Sunny Studio is offering 20% OFF on Sunny Studio branded products (excluding clearance and new release products.). You just have to use discount code NINEYEARS at checkout through Aug 30th.
PLUS.. Sunny Studio is giving away a FREE new mini snowflake die on all orders!
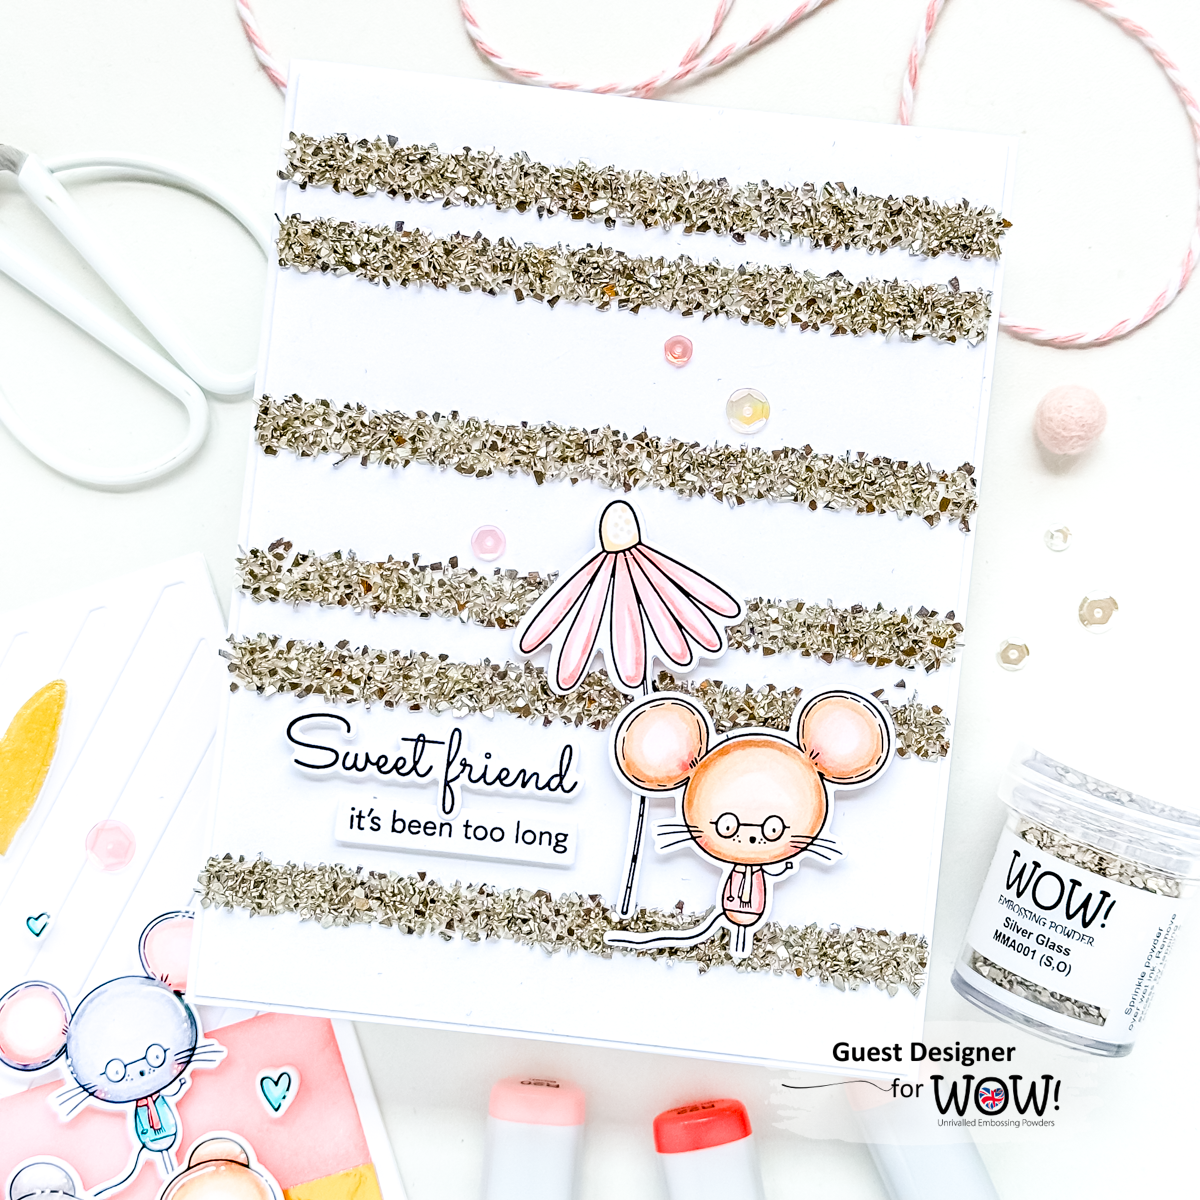
I’m excited to be joining WOW Embossing Powder to celebrate their July 2024 release! It’s a BUMPER release, filled with Embossing Sparkles, Fab Foils and even a completely NEW product line; Mixed Media Additives!
The Design Team and special Guests are each sharing inspiration using this gorgeous new release and you’re invited to join the party! 🥳
WOW are generously offering THREE lucky winners the ENTIRE July 2024 release, and you can get all of the details on how to enter further down this post. First, let’s get straight to the inspiration!
We are so excited about this amazing new mixed media release, that we are hopping along over 3 different platforms to give YOU the best chance to win!
WOW are generously offering THREE goodie bags that will contain the entire July 2024 release, worth over $70!
This post is part of the Blog Hop, so you just need to leave a comment on this post before 6pm BST on the 1st August. You’ll find the link to the next awesome designer further down this post, or you can go straight to the WOW Embossing Powder Blog post to start from the beginning.
One lucky winner will be selected from the comments left across this hop, so the more posts you leave a comment on, the more chances you have to win!
Don’t forget to find us on Instagram and Youtube for even more chances to be a lucky winner! (Further details are included on the WOW Embossing blog post.)
Thank you for checking out my post today, if you like what you see then don’t forget to follow/subscribe/join my mailing list so you don’t miss any of my content!
I hope you enjoy hopping around with all the wonderful designers!!
Hey guys! Want a chance to win prizes from both Pear Blossom Press and Picket Fence Studios?! In March, we’ll have THREE different Hops for you to enter to win!!
Today we’re kicking off the BLOG HOP!
Come hop along with us and see some awesome light-up cards! Plus, each company will be giving away $25 PRIZES! All you have to do to be entered to win is to leave a comment at each stop along our Hop Lineup before March 29th at 11:59 PM EDT. Winners will be announced on the Pear Blossom Press & Picket Fence Studios Blogs on 3.31.24!
I have created this fun light-up card using products from both companies! Read on to see how I created this card! You’ll be amazed at how EASY it is!!
Next, I stamped my images from the Sugar and Calorie Free Stamp Set. I colored them in with Copic markers. I stamped my sentiment onPerfect Sentiment Cardstock – Black with Embossing ink and then sprinkled white embossing powder on it. I melted the powder with my heat tool and then die cut the sentiment out with the coordinating die. I also used the coordinating dies to cut out my cakes. I used the same dies to cut out 2 plain black pieces of cardstock. I glued the cakes and their black counterparts together on a slight angle, to give the effect of a shadow!
On my card base, I made 3 little pencil dots where I wanted the candles’ flames to be. I also made a little pencil dot where I wanted the ON button to be. For this card, I’m using the Pear Blossom Press EZ-Lights. I used double sided tape to adhere my battery and button where I wanted it. Then I used masking tape to hold my wires and lights in place.
Once I had everything in place, I placed Pear Blossom Press’s World’s Best Foam Tape everywhere except over the lights and battery/button case.
On my card front, I poked 3 holes where my lights are. I placed my Pear Blossom Press Yellow Candle Flame Gems over the lights using liquid glue. Then, I placed my Clay Candles under the flames and adhered them with liquid glue.
Thanks for using my affiliate links! You all are the BEST! Using an affiliate link in this post above or down below costs you nothing, but it gives me a teeny percentage of your sale to buy more crafty goodies to continue to share card tutorials with YOU! So, thank YOU! Xx, Amanda
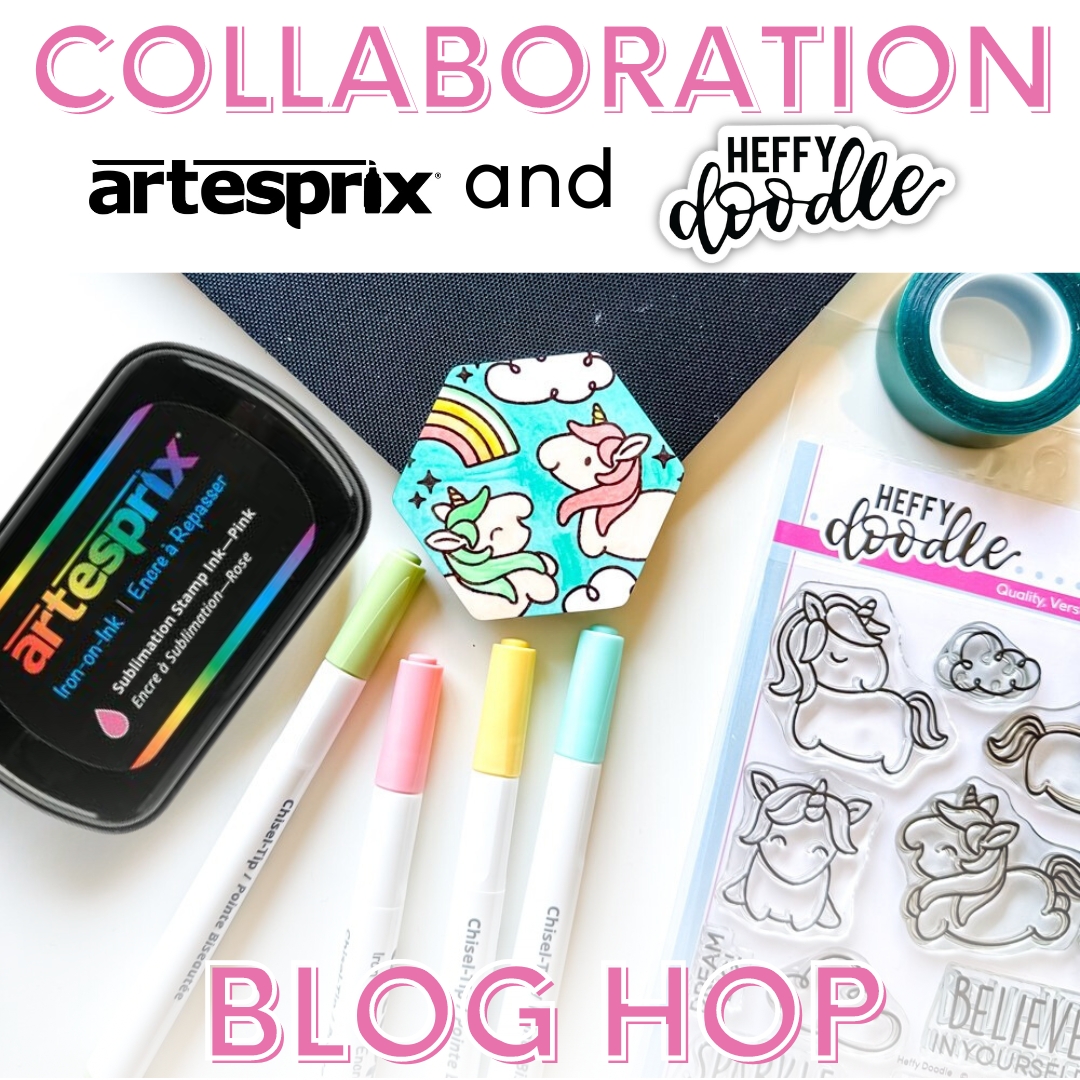
Welcome to the Heffy Doodle and Artesprix Collaboration Blog Hop! Did you know you could use your clear stamps with Iron-on Sublimation from Artesprix? This Collaboration Blog Hop is full of ideas doing just that!!
I have created 3 different projects to share with you! I’ve made a luggage tag, a magnet, and a bookmark!
Here’s a link to Artesprix’s Directions for using their products: Link
Blog Hop Giveaway Deets:
To be entered to win the giveaway, all you need to do is comment at each stop along the Blog Hop! Artesprix will be giving away $30 (US addresses only) and Heffy Doodle £20 to their stores! Be sure to comment before 11:59 PM EST on November 27th to be entered to win!
Each company will post their random winner on November 29th at 10AM EST! Make sure to check the Heffy Doodle Blog and Artesprix blog to see if you’re a winner!
Have a fabulous time hopping around to see all the amazing creations! Xx, Amanda
Thanks for using my affiliate links! You all are the BEST! Using an affiliate link in this post above or down below costs you nothing, but it gives me a teeny percentage of your sale to buy more crafty goodies to continue to share card tutorials with YOU! So, thank YOU! Xx, Amanda
👇🏻👇🏻 Subscribe 👇🏻👇🏻 to be alerted of new posts by yours truly!
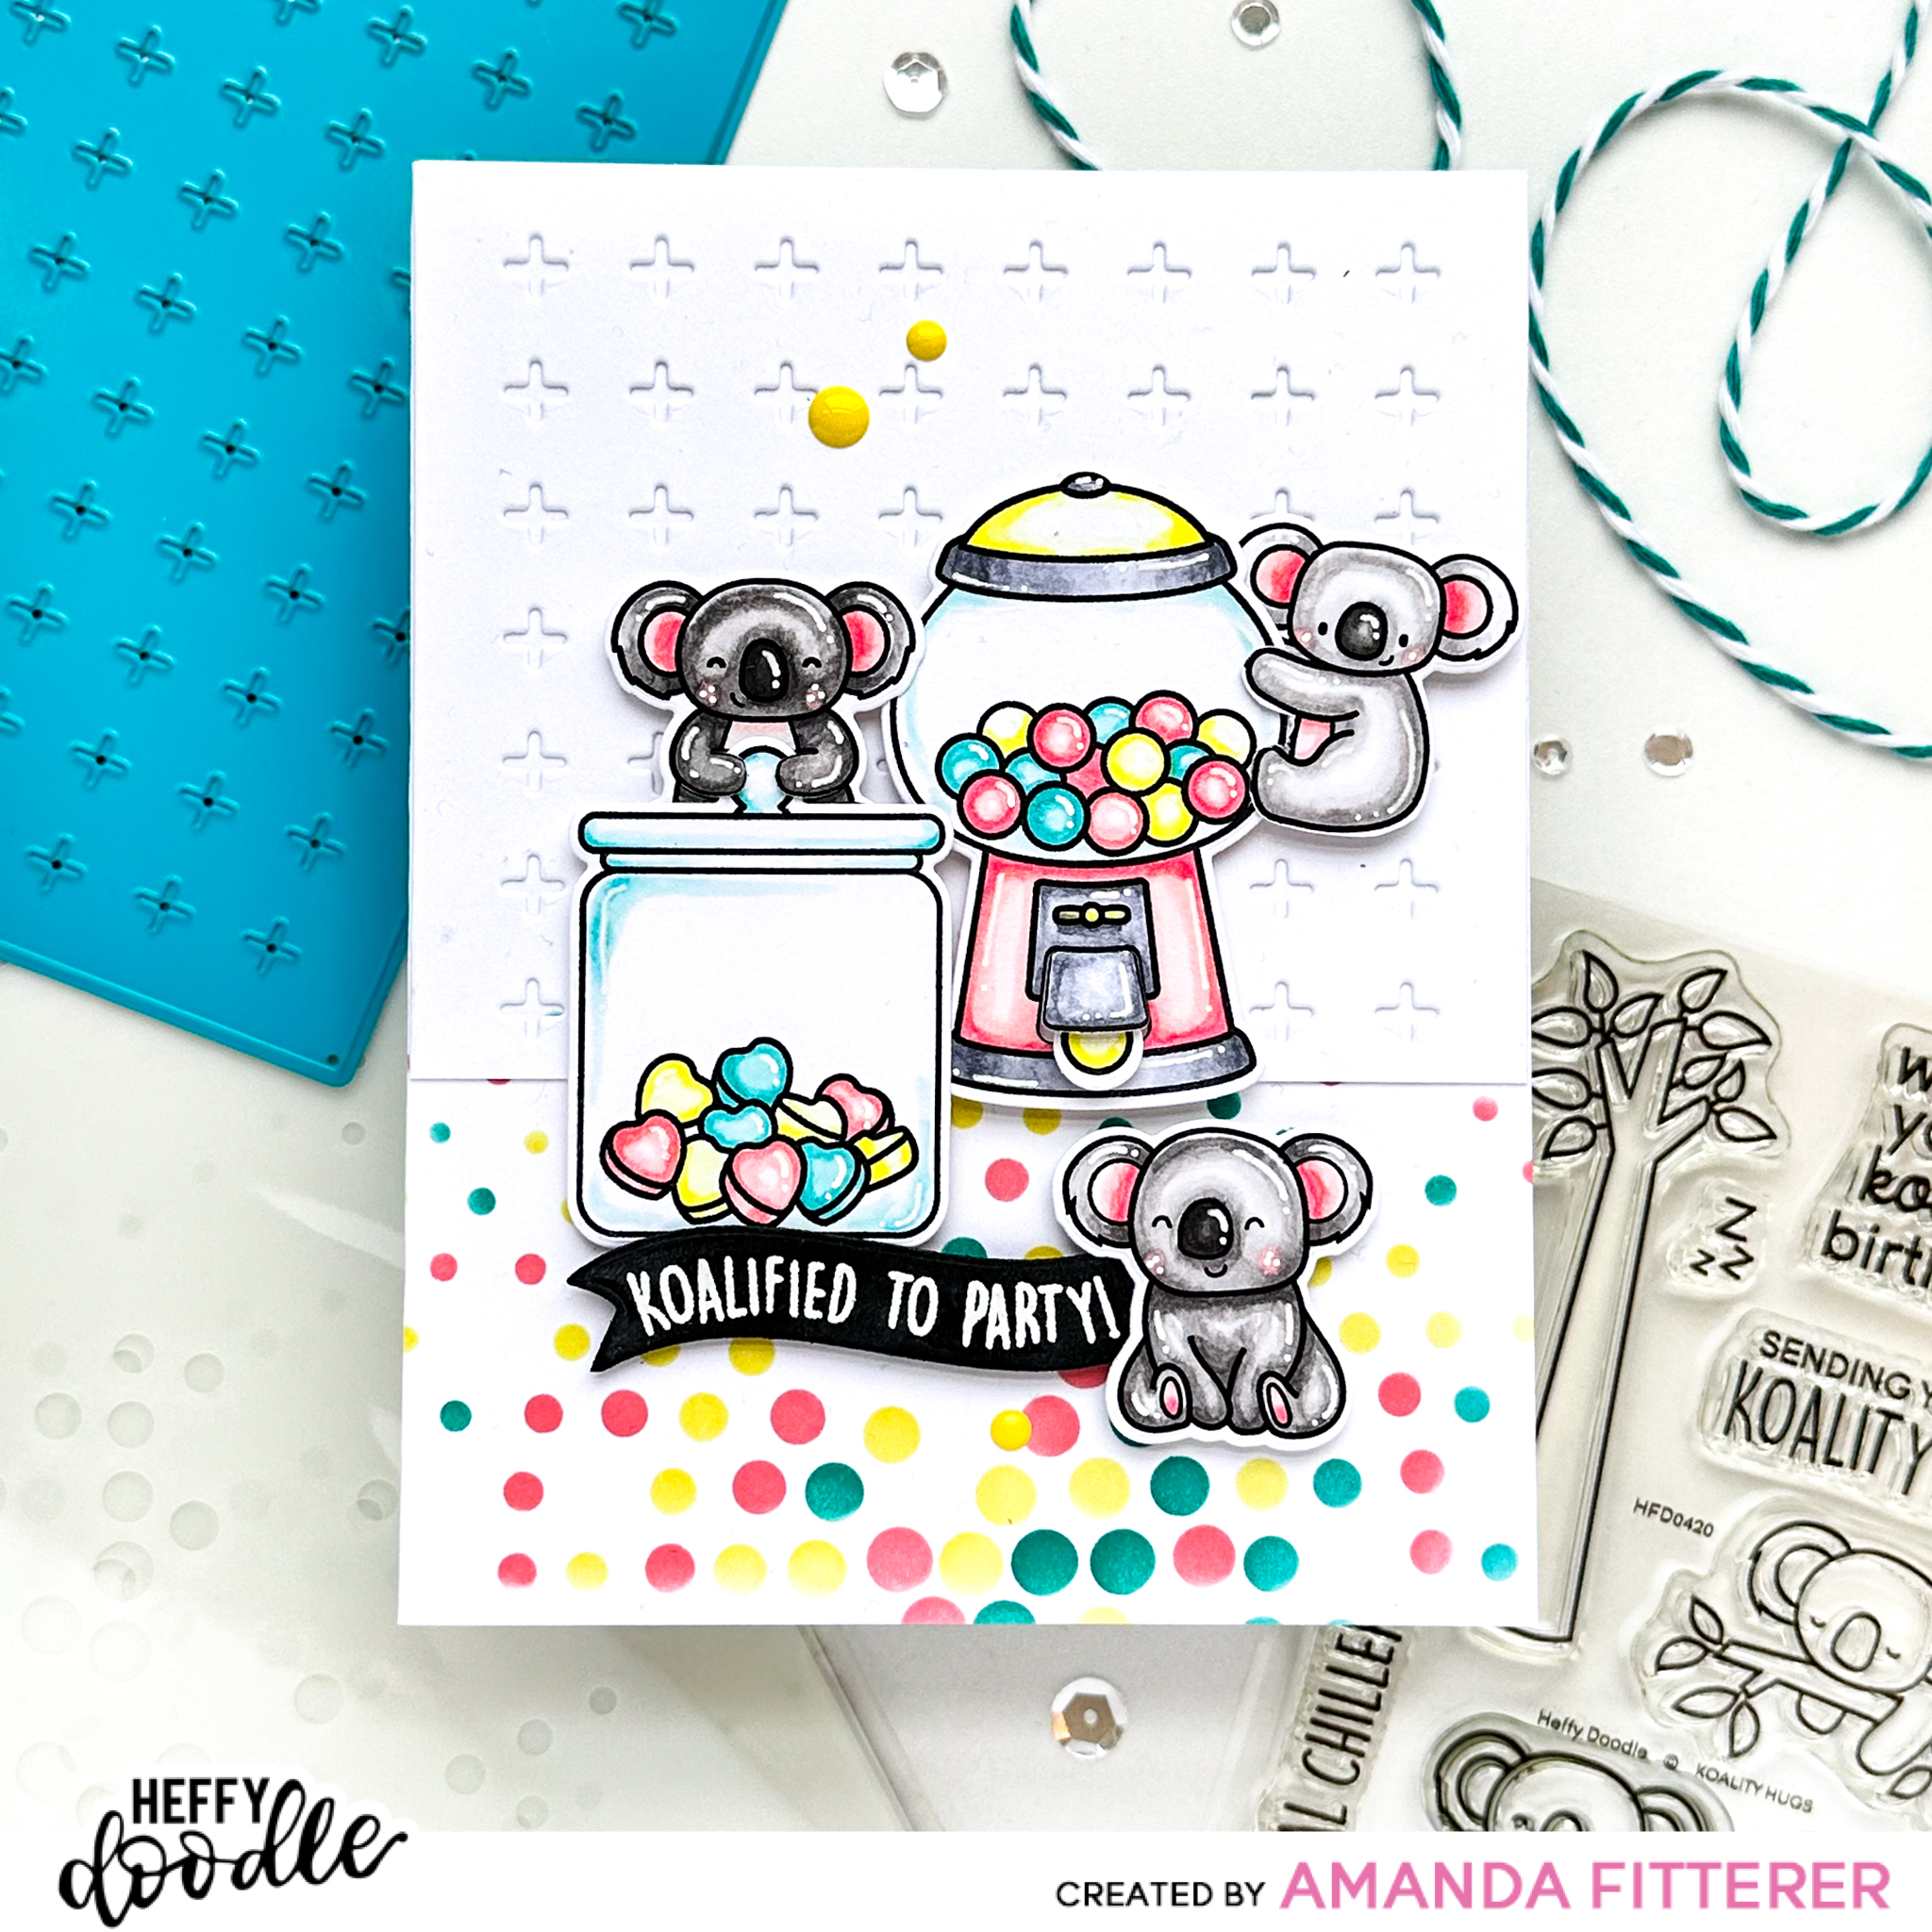
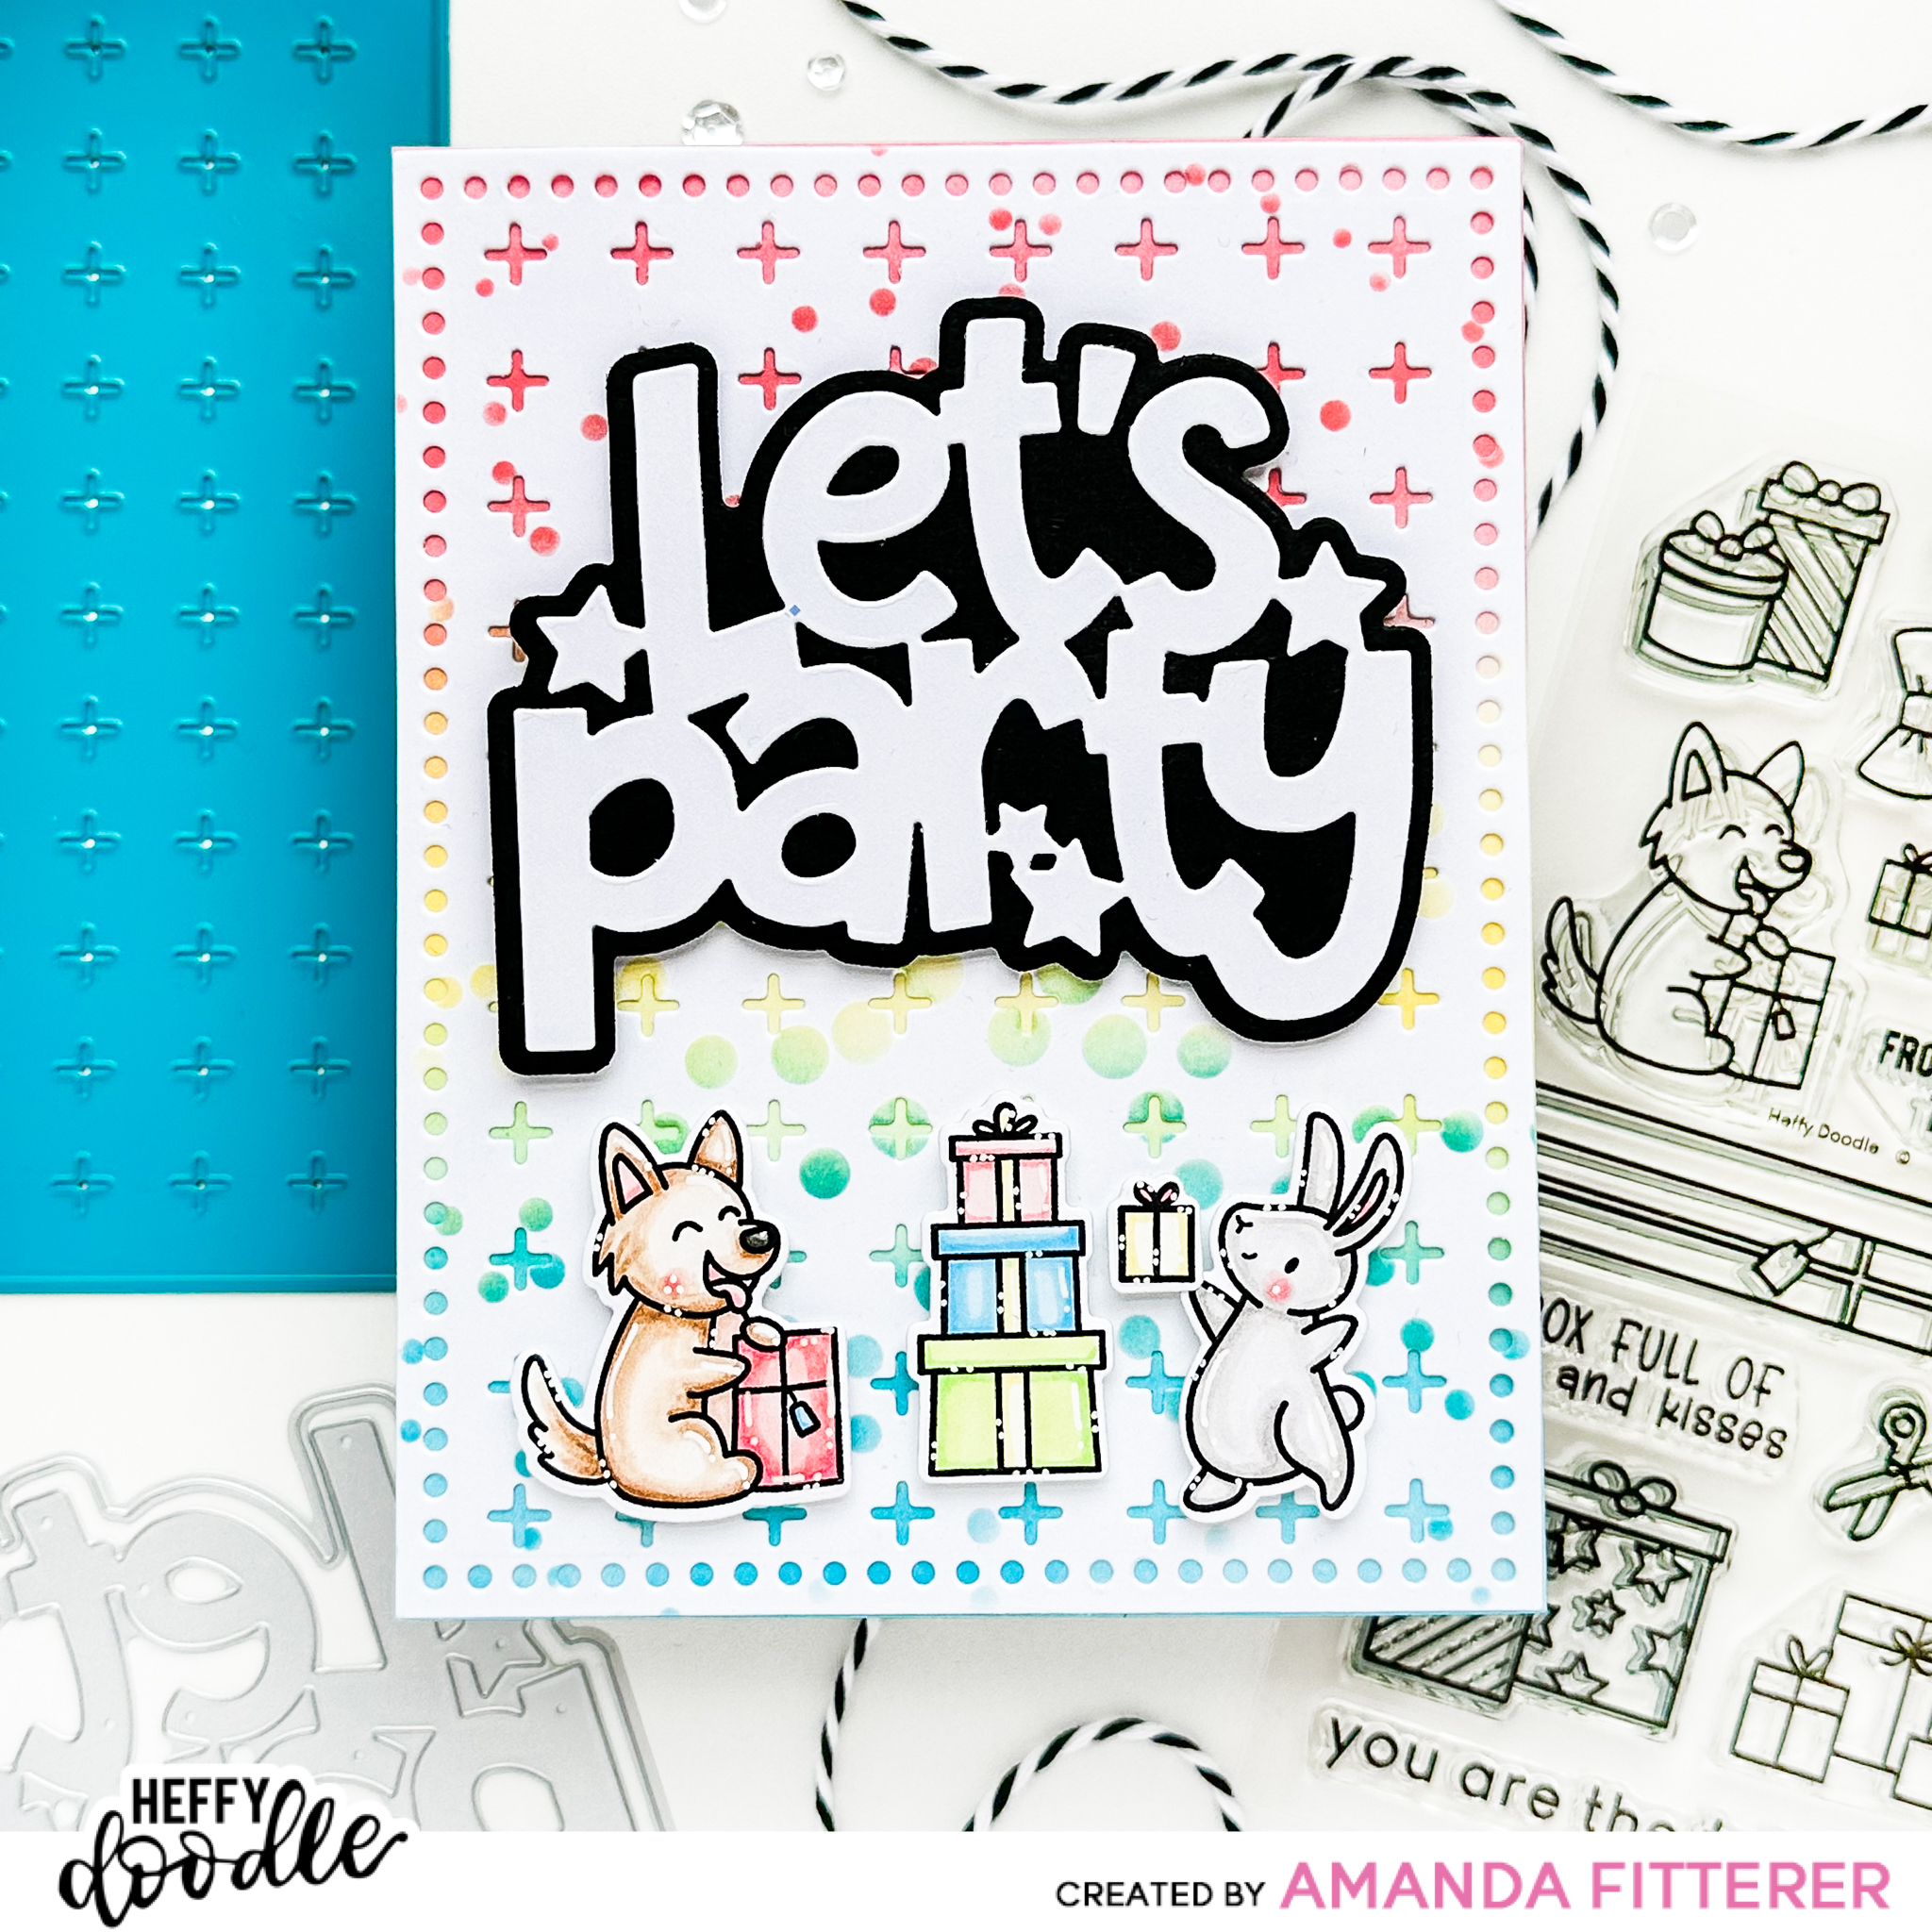
Welcome to the Heffy Doodle and Alex Syberia Designs Collaboration Blog Hop! Design Team members from both companies are sharing inspiration using products from both companies!
I’m going to stamp my sentiment on black cardstock with Wow! Embossing Glue and then apply white embossing powder. I’ll heat the powder with my heat tool to melt the powder.
To be entered to win the giveaway, all you need to do is comment at each stop along the Blog Hop! Alex Syberia Designs and Heffy Doodle will be giving away £20 to their stores! Be sure to comment before 11:59 PM EST on June 6th to be entered to win!Each company will post their random winner on June 8th at 10AM EST! Make sure to check the Heffy Doodle Blog and Alex Syberia Designs Blog to see if you’re a winner!
Thanks for using my affiliate links! You all are the BEST! Using an affiliate link in this post above or down below costs you nothing, but it gives me a teeny percentage of your sale to buy more crafty goodies to continue to share card tutorials with YOU! So, thank YOU! Xx, Amanda
Welcome to the Heffy Doodle and Alex Syberia Designs Collaboration Instagram Hop! Design Team members from both companies are sharing inspiration using products from both companies on Instagram!
Thanks for using my affiliate links! You all are the BEST! Using an affiliate link in this post above or down below costs you nothing, but it gives me a teeny percentage of your sale to buy more crafty goodies to continue to share card tutorials with YOU! So, thank YOU! Xx, Amanda
Welcome to the Heffy Doodle and WOW! Embossing Powders Collaboration Blog Hop! Design Team members from both companies are sharing inspiration using products from both companies!
I’m super excited to be taking part in the collaboration because I get to use products from two of my FAVORITE companies! I’m going to walk you through how I made this fun GLOW IN THE DARK Halloween card!
Cut out a circle using either a punch or circle die. Any size will work!
10. Color your images with any medium (I prefer OLO or Copic markers!)
11. Die cut your images with the coordinating die sets.
12. Use 3D foam squares to adhere your images and sentiment to your card!
13. Turn off the lights and see how amazing the WOW! Glow in the Dark Embossing Powder looks!
To be entered to win the giveaway, all you need to do is comment at each stop along the Blog Hop! WOW! Embossing Powders will be giving away $25/£25 and Heffy Doodle will be giving away £25 to their respective stores! Be sure to comment before 11:59 PM EST on Oct 25th to be entered to win!
Welcome to the Heffy Doodle and Time for Tea Collaboration Blog Hop! Design Team members from both companies are sharing inspiration using products from both companies!
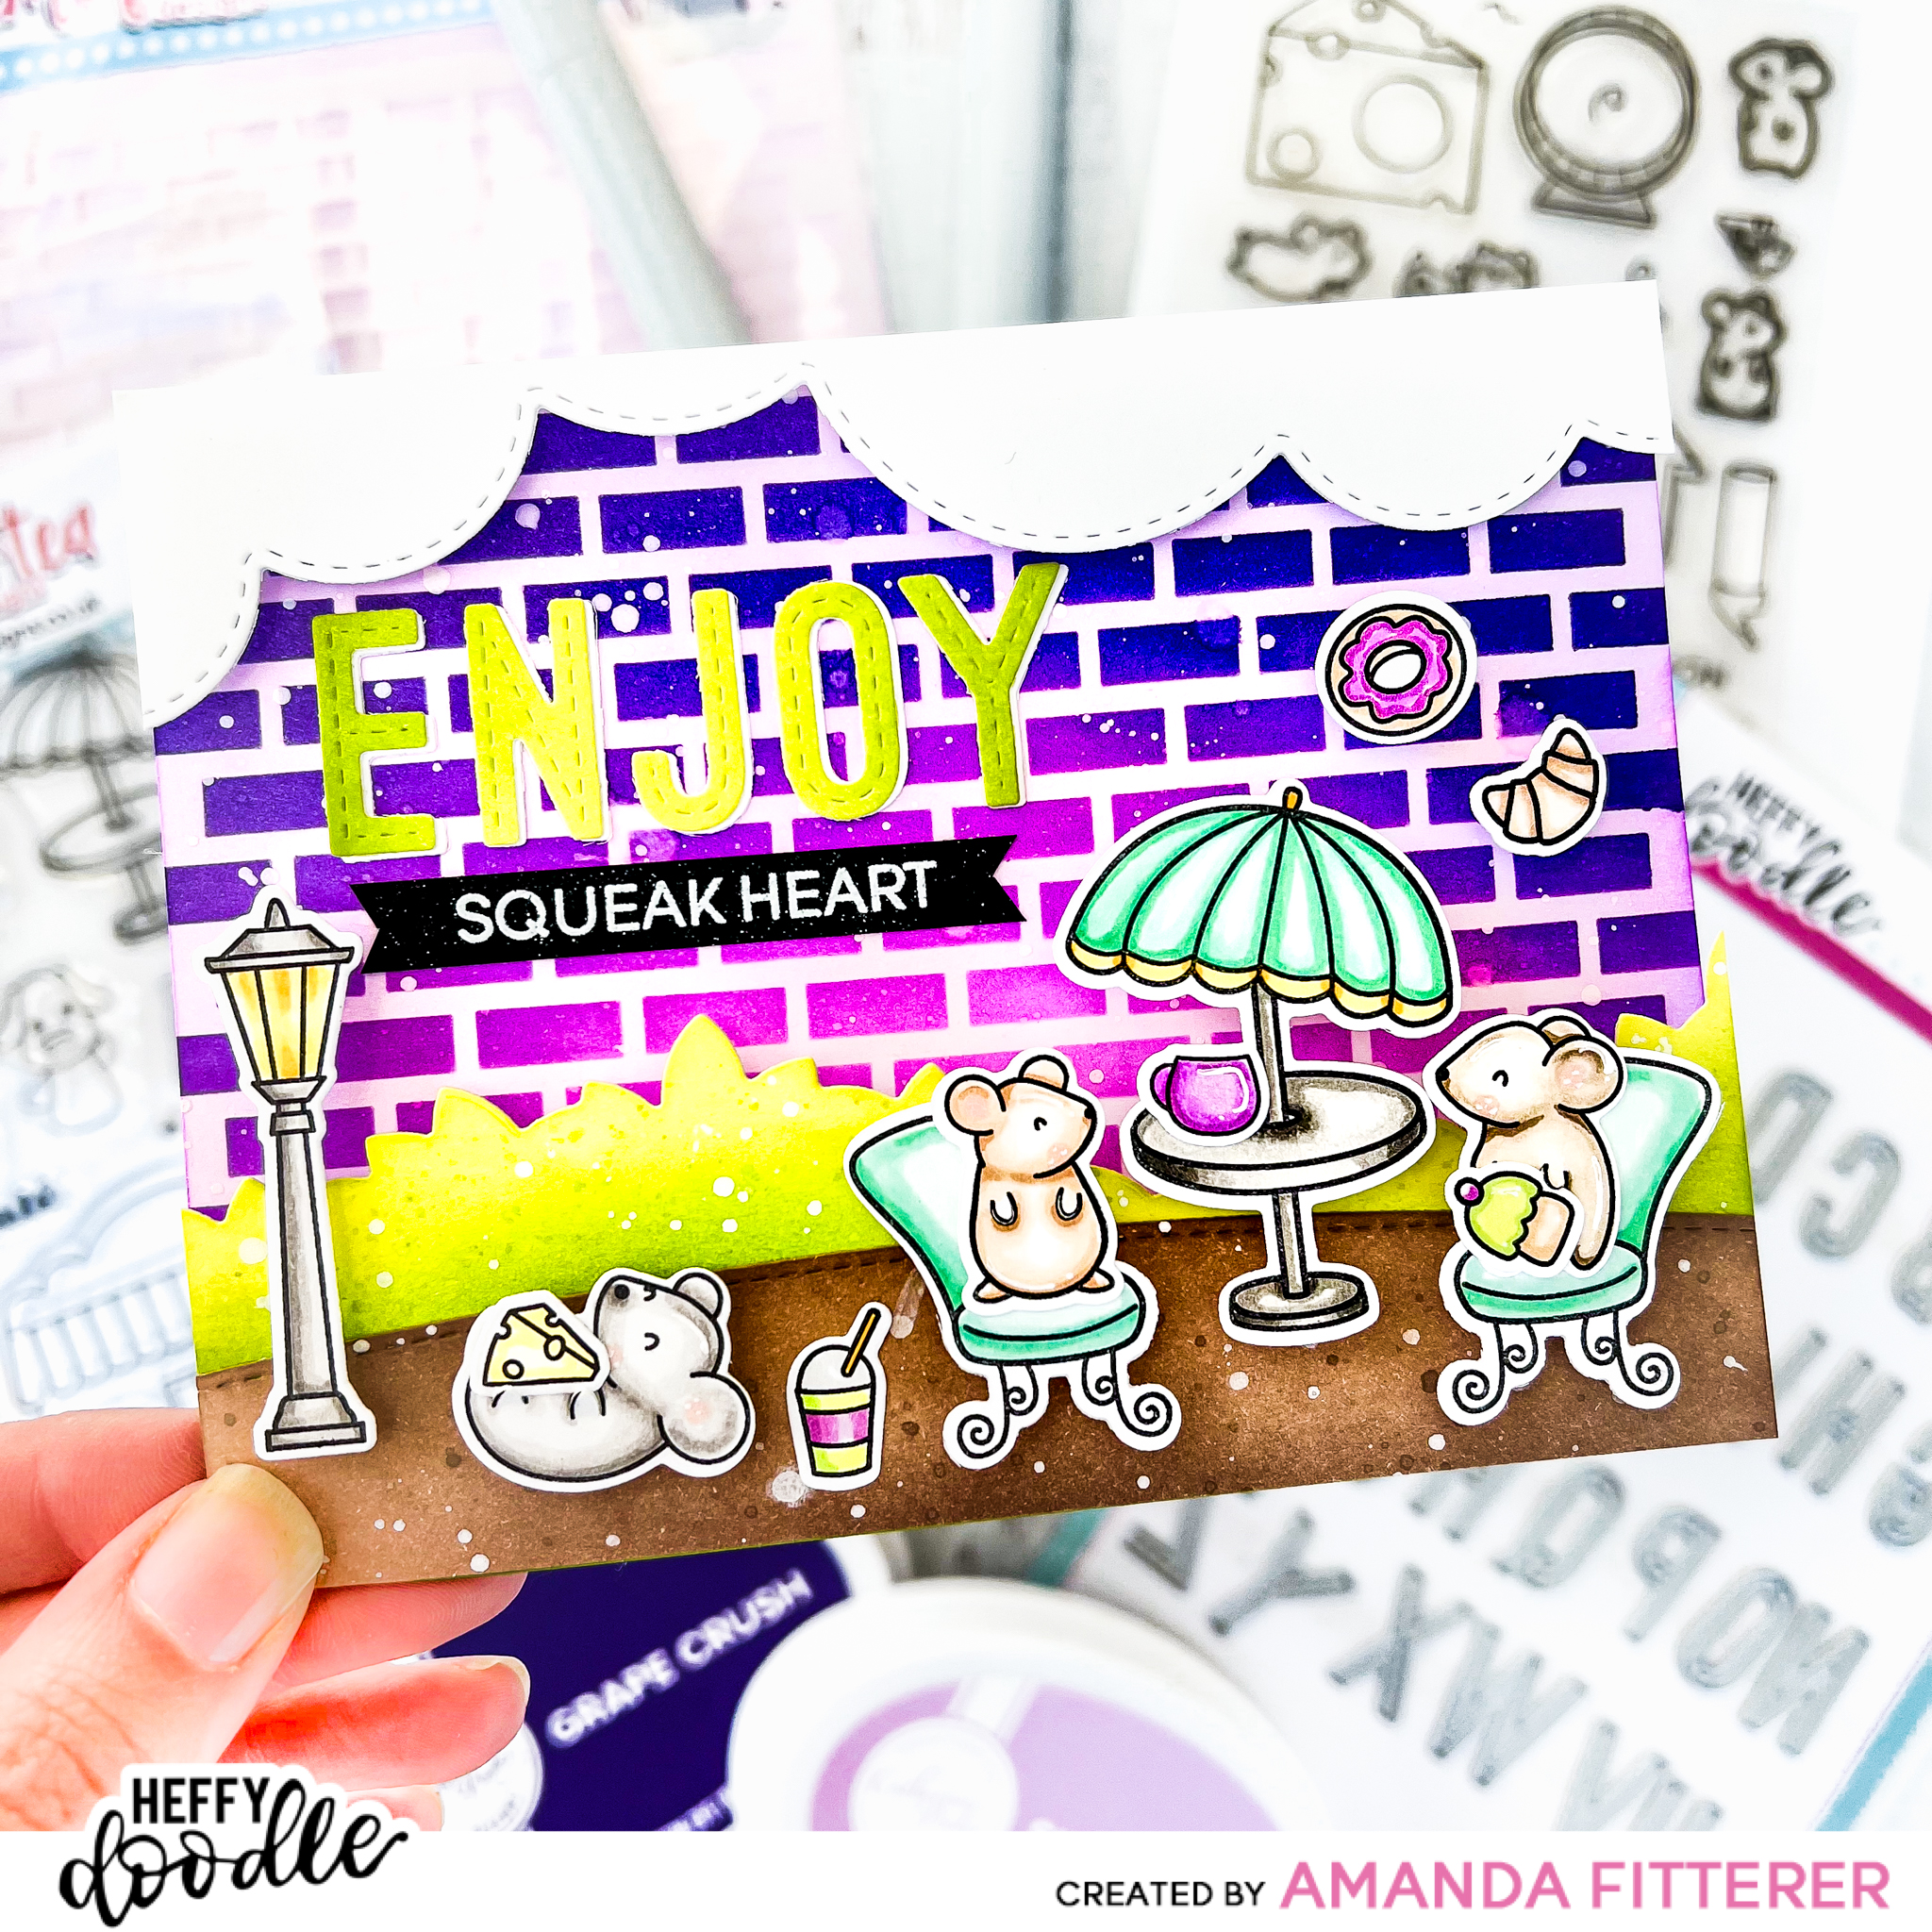
I’m so excited to share this card I made with you! I absolutely adore both of these companies’ products! They work SO WELL together! Can you guess which products are from which company? Read on to see!
To create my super vibrant background, I am blending Sixteen Candles, Pixie Dust and Grape Crush through the Time for Tea Tiled Wall Stencil. Once that’s done, I am going to very gently go over the entire background with a blending brush that has leftover Sixteen Candles ink on it.
To create the forefront of my scene, I am using the leaves from the Heffy Doodle Tree-mendous Peekaboo Tree Die and blending Melon Ice and Lime Rickey onto my cutout. For the dirt hill, I am using the Heffy Doodle Slimline Scenery Dies and blending Sand Castle and Over Coffee ink onto it. I am then splattering some white acrylic paint mixed with water using a small paintbrush. I’ve also used the Silver Linings Border Dies to create some clouds for the top portion of my scene and have left them white.
Now I’m ready to stamp my little cuties! I am grabbing the Heffy Doodle Hello Squeakheart Stamp Set and the Time for Tea Cafe Critters Stamp Set. I’m coloring them with my Copic markers using purples, greens, and yellows.
I’ve cut out the word “ENJOY” using the Heffy Doodle Stitched Alphabetters Dies and used Melon Ice and Lime Rickey to color them. Once I’ve cut my stamped images out using the coordinating dies, I’m ready to start assembling my card! I’m using Heffy Doodle’s Deep Foam Tape and Glubert Glue. I’m also creating one last sentiment by stamping the word “SQUEAKHEART” from the Hello Squeakheart stamp set on black cardstock with Versamark watermark ink. Then, I’m applying white embossing powder to it and cutting the sentiment into a ribbon using my scissors.
And, voila! Don’t those little cuties look so cute?! 🙂
That’s it for me on this Hop! I hope you enjoyed my card and all the love I put into it!
GIVEAWAY INFO: To be entered to win the giveaway, all you need to do is comment at each stop along the Blog Hop! Time for Tea will be giving away £25 and Heffy Doodle will be giving away £25 to their respective stores! Be sure to comment before 11:59 PM EST on Mar 2nd to be entered to win!
Each company will post their random winner on Mar 3rd at 10AM EST! Make sure to check the Heffy Doodle Blog and Time for Tea Blog to see if you’re a winner!
Welcome to the Heffy Doodle and Miss Ink Stamps Collaboration Blog Hop! Design team members from both teams are sharing some crafty inspiration using products from both companies! Plus, both stores will be giving away prizes!
Now, let’s get crafty! I couldn’t handle all the cuteness of all the stamps, so I ended up making 3 cards!
I adhered everything to my card base with 3D foam squares, strips, and liquid glue!
Thank you so much for stopping by my blog post! I hope you enjoyed my cards!
Make sure to comment along the way for your chance to win! Miss Ink Stamps will be giving away $25 and Heffy Doodle will be giving away £25 to their respective stores!
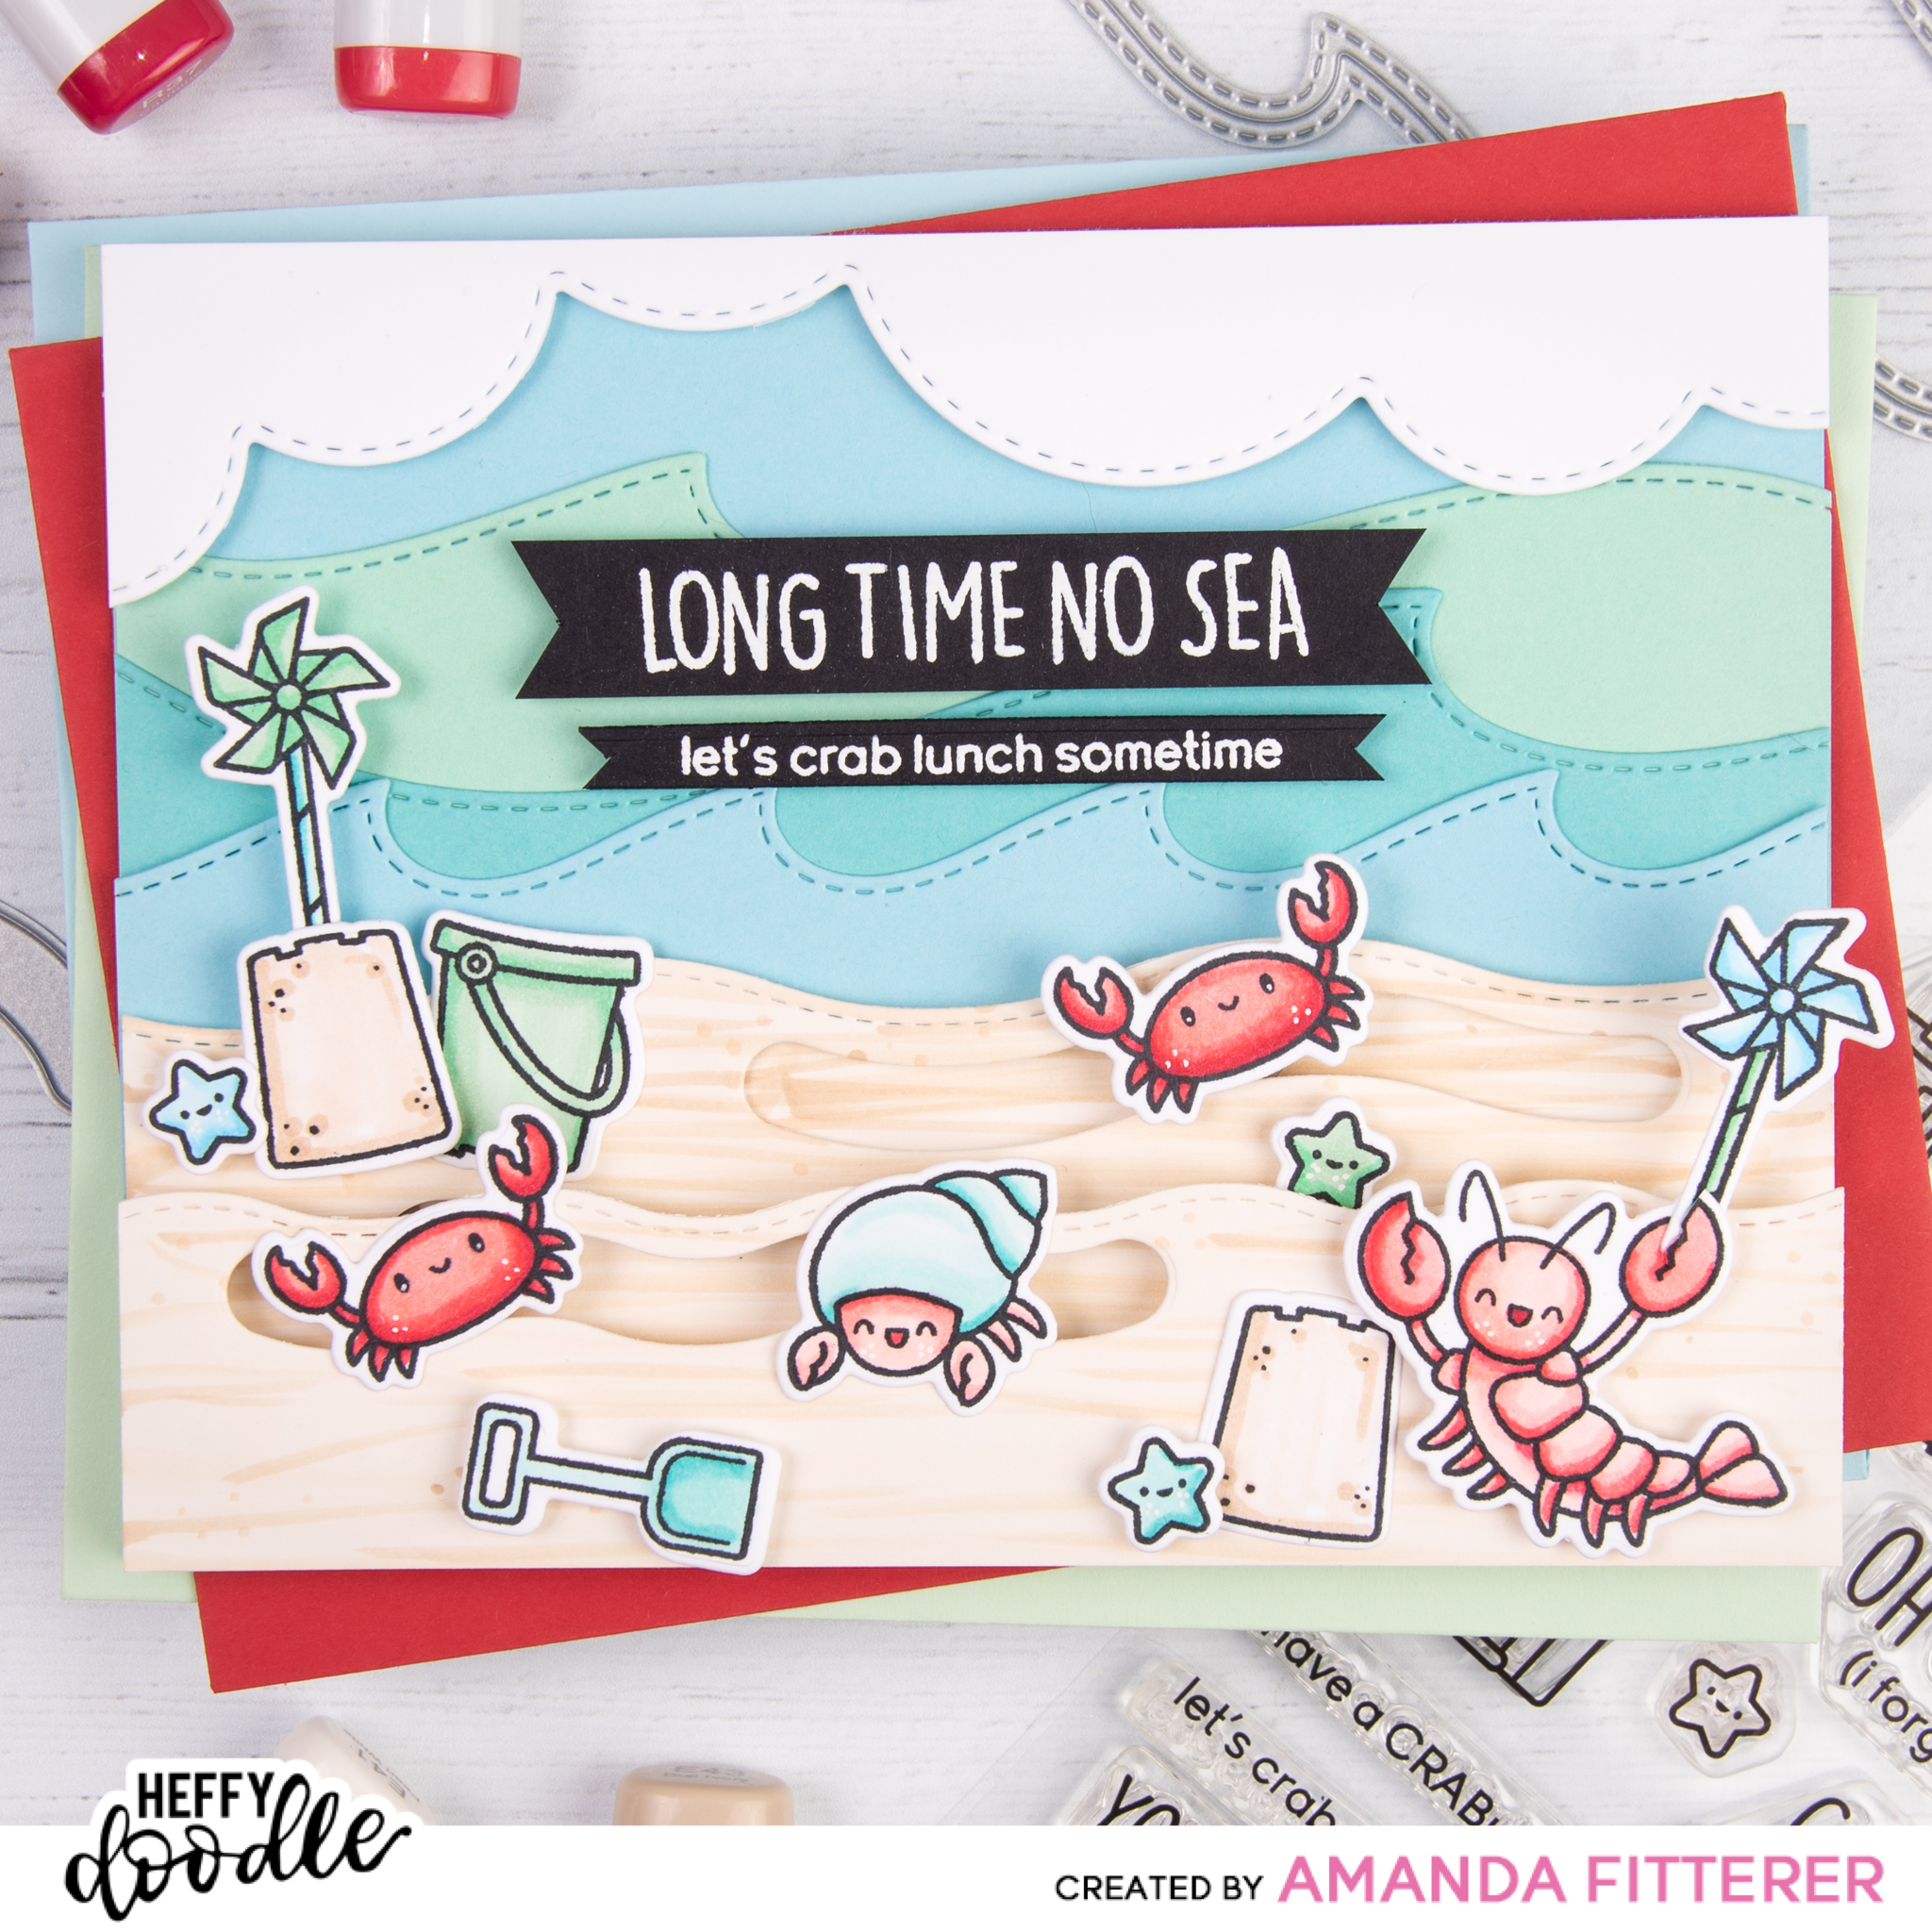
Hi everyone and welcome to the Heffy Doodle Release Blog Hop! The new release is now available for purchase from Heffy Doodle and official retailers, and we are celebrating with lots of inspiration and a giveaway, too!
To make this fun interactive card, I’m going to set up my background. With the Breaking Waves Border Dies and the colored cardstock from Heffy Doodle. I’m using 2 of my wave dies as sand, instead of water. For those 2, I’m going to add a little dimension with my Copic E41 and E42 markers. I’m also going to create my slides for my critters using the coordinating Wavy Water Slides Dies.
I stamped my A Little Shellfish images with Memento Tuxedo Black ink and am coloring my images with Copic markers and a white Gelly Roll pen. Blues: B000, B00, B02 Reds: R30, R32, R35, R27 Greens: G12, G02 Blue-Greens: BG10, BG11, BG13 Earth: E41, E42
After laying everything out, I’ve decided to get rid of the dark blue background and use some Silver Linings Clouds and another light blue background instead.
For my sentiments, I’m using Versamark Watermark ink and white embossing powder on black cardstock. I am using scissors, a paper trimmer, and More Strips of Ease die to cut them down.
Now I’m ready to start putting the card together! I’m cutting my lobster’s claw open so he can hold the pinwheel. I’m using buttons and 3D foam squares to adhere my sliding critters. I’m also doubling and tripling up on 3D foam adhesive so the critters can move smoothly! And voila! All done!
GIVEAWAY INFO: To celebrate the new release Heffy Doodle will be giving away a £50 voucher to the Heffy Doodle Store!! Make sure to comment on each stop in the hop to be entered for your chance to win. The winner will be selected randomly and announced on the Heffy Doodle blog on July 25th.
In addition, you can get the free Lil Lighthouse stamp set with any order over £30! If you spend £45, you’ll get the dies free too!