cards · heffy doodle

Heffy Doodle Catherine Pooler Collaboration Blog Hop

Hi everyone! Welcome to the Heffy Doodle and Catherine Pooler Designs Collaboration Blog Hop! Our design teams have come together to share some inspiration with the new Heffy Doodle and Catherine Pooler releases, and there is a prize up for grabs, too!

I had such a fun time playing with the new releases! The Catherine Pooler inks are so juicy and amazing! I had to make more than just one card!

Card 1

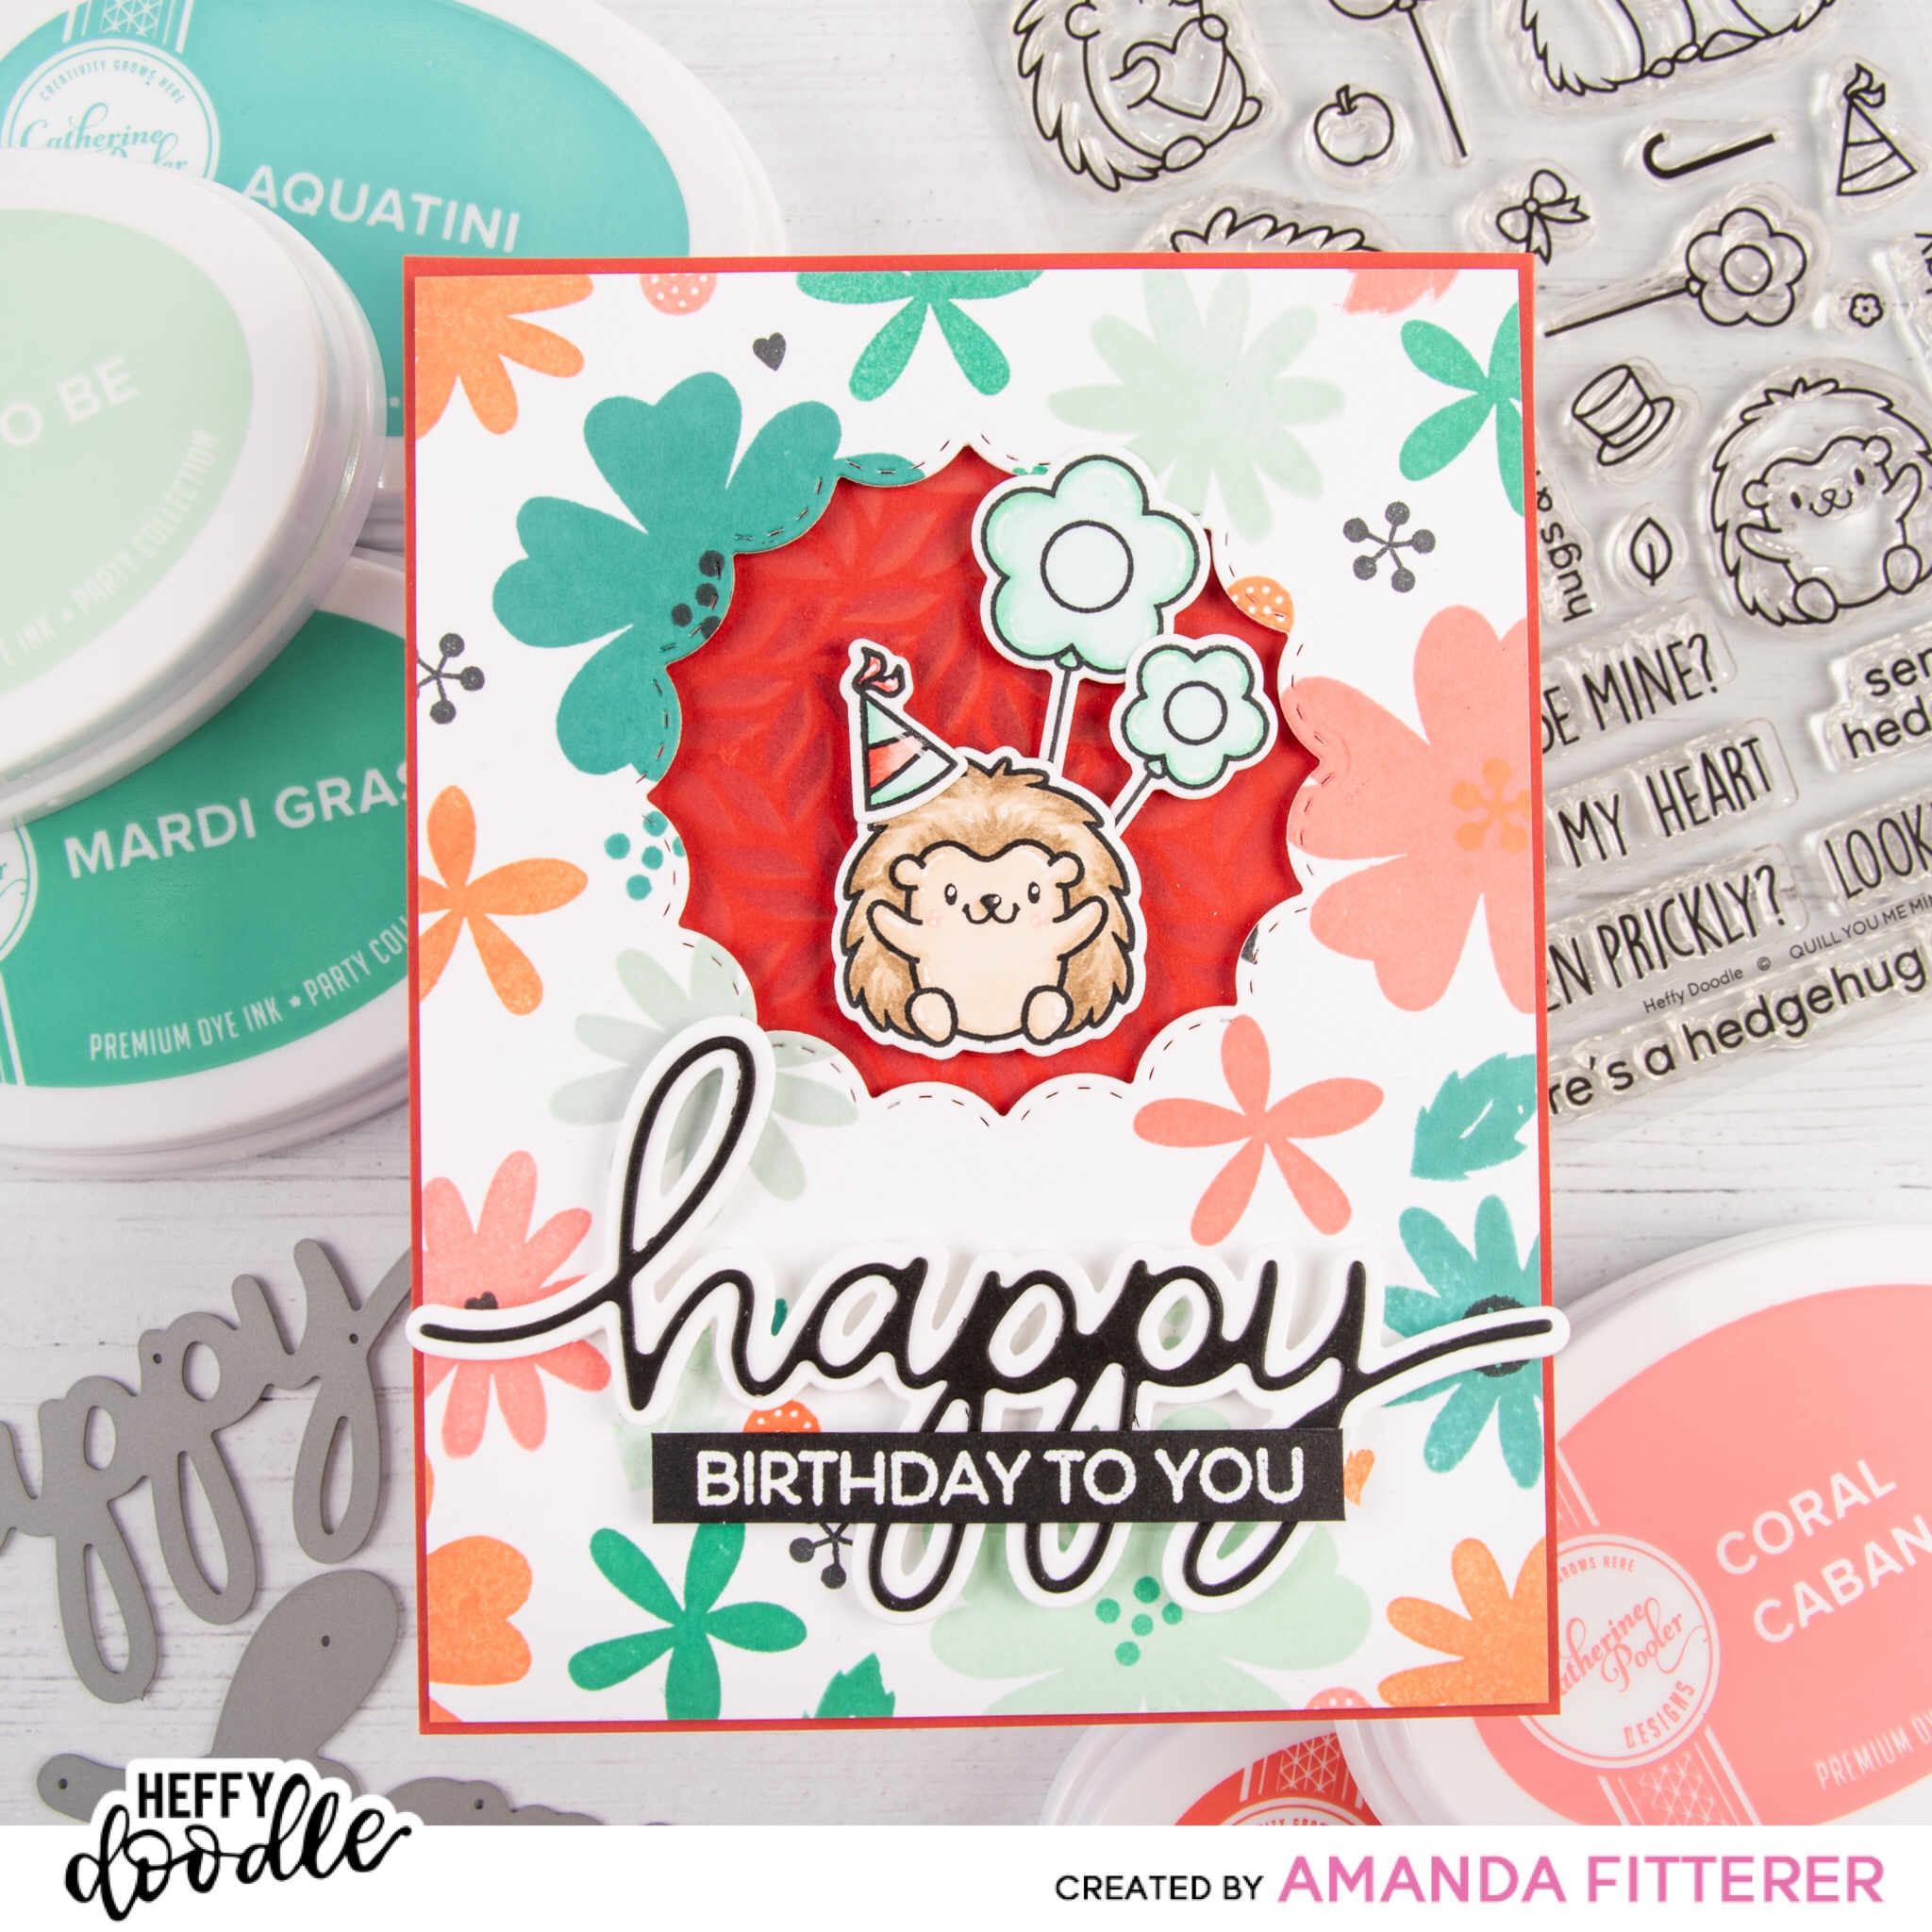
For the first card, I’m starting with these beautiful colors of Catherine Pooler inks: Mardi Gras, Aquatini, Mint To Be, Tutti Frutti, and Coral Cabana. The flowers are from the So Happy stamp set.

I am using one of the dies from the Fancy Nancy Frames set to create a cutout in the center of the top of my card front.

I’m using the Happy X Three dies to cut out a black inline and a white outline for my sentiment.

On a piece of Heffy Doodle Cherry on Top cardstock that I cut down to A2 size, I am placing my Fancy Foliage stencil and blending the pattern using Candied Apple and Fired Brick distress ink/oxide.

Now, I’m ready to stamp my Quill You Be Mine images with Memento Tuxedo Black ink. This ink works well with Copic markers, which I will use to color in my stamped images.
Body: E41, E42, E43, R21, white Gelly Roll pen
Quills: E44, E43, and E42
Balloons (on 2nd attempt!): G0000, G00, and G02

After using the coordinating dies to cut my images out, I’m ready to start putting my card together. I’m using foam tape and squares to create a 3D layers.

I’m stamping my sentiment on black cardstock using Versamark Watermark ink. I’m adding white detail embossing powder and using my heat gun to emboss it. I am cutting down small strips of 1/8” foam tape and putting it on the back of my “happy” piece.

Now I’m ready to add my sentiments and it’s all done!

Card 2

For the next card, I’m going to make a slimline card, using the same Catherine Pooler inks and So Happy stamp set. I’m starting by laying out where I want things to be. I’m going to use some masking tape to cover the sentiment “HAPPY” because I’m going to stamp that in a different color. After stamping my sentiments, I’m using one of the Fancy Nancy frames to create some peek-a-boo cutouts. I’m using the Mint to Be ink pad to blend a background that will be peeking through my cutouts.

I’m stamping my bugs from the Big Bug Hugs and coloring them with Copic markers.

Now, I’m ready to adhere everything to the card using 3D foam adhesive!

Catherine Pooler and Heffy Doodle will be respectively giving away a $25 and a 25£ gift certificate to their stores! Make sure to comment on each post in the hop for your chance to win!
Winner will be chosen randomly and announced on Tuesday, February 25th on the Heffy Doodle and Catherine Pooler blogs.

You’re next stop is Jen Carter!

BLOG HOP LINEUP:
Catherine Pooler Blog
Heffy Doodle Blog
Karen Baker
Davina Cantrell
Nanette Tracy
Amanda Fitterer (you are here!)
Jen Carter
Laura Volpes
Erica Andersson
Cassie Trask
Erin Thompson
Jenn Bena

cards

Just One More Chapter

Hey crafty friends!! It’s time for a new card! There is quite a mix of products in this card! Check it out!

The first thing I’m going to do is make a window using Dress My Craft’s Window and Pocket Die. I’m using the Heffy Doodle Fancy Foliage stencil to create a pattern on my curtain.

I’m going to create a background using Heffy Doodle’s Sun Moon and Stars Dies. I’m also going to blend a background with some distress oxides and my blending brushes. I’m creating some very light stars with white distress ink and the Heffy Doodle Starfall Stencil. For my foreground, I’m using a brick stencil that I made myself and distress oxide.

I’m ready to stamp and color my Mama Elephant Book Worm images and my Good Reads sentiment!

After adhering everything to the card, it’s all done!

Thanks so much for stopping by! Til next time!! Xoxo, Amanda

Uncategorized

You're the Sweetest Gift Card Holder

Hi friends!

This is just the sweetest little shaker card with a gift card holder on the inside!

See the tutorial below! (Scroll all the way to the bottom to see the Copic markers I used!)

Start with a piece of 10.25″ x 5.5″ white card stock. Score it at 4″, flip the card 180° and score again at 2″.

I used a super pointy tool to make a hole in my card front. I measure it with a ruler to make sure I centered it correctly.

Next, I rounded all the edges with corner punch. This amazing 3 Corner Punch is from Dress My Craft and has 3 different options. I used R7mm, but any corner punch will do.

For the gift card holder that goes inside the card, I cut a piece of card stock to 4.25″ x 2.5″. Then, I scored it at 1″ and 3.25″. Then, I turned it 180° and scored at the 2″ mark.

This adorable Mini Score Board is also from Dress My Craft. It is my go-to score board because it’s so tiny and doesn’t take up any space!

I cut a diagonal line and then a straight line to create a better fold.

Using some Stitched Circle dies, I created a shaker. These Angel Mix and Pearls shaker elements are from Dress My Craft. I blended everything with Shaded Lilac and Spun Sugar distress oxides.

After figuring out where I wanted to place my shaker circle, I needed to cut out a circle from the flap so that the card would close properly. I held my die in place with some purple tape and then ran it through my die cut machine.

I used a Dotted Hearts background stamp from Simon Says Stamp along with Shaded Lilac distress oxide. I blended the entire card using Shaded Lilac and Spun Sugar.

I made a smaller circle die cut for the top portion of the card. And then I made one tiny circle that will be used to wrap my twine around.

I blended all the circles with Distress Oxides.

I stamped, colored, and die cut my Avery Elle “Peek-a-Boo Pals”. Please see the end of the post for the colors used.

Next, I got my littlest circle ready for a brad and the twine.

Next, I stamped a few sentiments onto black card stock with Versamark watermark. I heat embossed with white embossing powder.

Next, I adhered all my components to the front of the card, using glue and 3D foam dots.

For the inside fo the card, I stamped a sentiment onto my gift card holder.

I used super sticky double sided tape to hold my gift card holder together and placed it in the center of the inside of the card.

Next I adhered my hippo, being sure that the gift card would be able to go BEHIND the hippo.

I cut a piece of white card stock and rounded the edges. I adhered it on the left flap.

All finished!! Here are some more photos! (Keep scrolling down for the Copic markers used.)

For the bunny: W00, W1, W2, W3, W4 and RV10.

For the Hippo: C00, C1, C3, C4, and RV10.

For the Monkey: E40, E41, E42, E43, E0000, E02, and RV10.

For the Party Hats: V12, V15, V17, BV000, BV02, and BV04.

I used a white Gelly pen for the highlights.

Uncategorized

Thanks for Bee-ing There

Hi guys! Amanda here!

I wanted to share this super cute bee card with you! Keep scrolling to see how I made this card!

I used 1 die from the Honey Bee’s “Hexagon Patterns” die set to create a honey comb pattern.

I used a pencil to trace my honeycomb pattern so i would know where to color.

Using different combinations of my yellow Copic markers, I colored in my honeycomb. I colored 2 of my die cut hexagons as well.

Using some Black Soot distress ink and a water brush, I made some black speckles on my card front.

I used a sentiment from Simon Says Stamp “Bee Yourself” stamp set. From the same set, I stamped 2 little bees and colored them with my yellow and gray Copic markers. Then, I die cut my bees with the coordinating dies.

After figuring out the placement of my bees, I stamped a few dotted lines (also from the “Bee Yourself” stamp set).

Here are some more photos! Thanks so much for stopping by!