
Hello all! If you attended the Hedgehog Hollowdays Event, you’ll know what this is for:

Hello all! If you attended the Hedgehog Hollowdays Event, you’ll know what this is for:


Hello there my fellow crafters! Have you received your February Subscription Box yet?? It’s FULL of all kinds of cute pet stencils, stamps, and paper!
To create these 2 cards, I cut down 2 pieces of black cardstock to 4″ x 5.25″. Then, I trimmed down the patterned paper that was included in the Subscription Box, leaving a small black border all the way around.
Grabbing the stamp sets from the box, I stamped a couple of cute images using black ink.


Using the Who Let the Dogs Out stamp set by Heffy Doodle, I stamped 2 puppies and colored them with Copic markers.

I cut out all the images and then put double sided foam adhesive on the back. I tied pink and white baker’s twine around the card fronts and then placed the images where I wanted them. As a finishing touch, I added a few pink hearts.

Then, I adhered my card fronts to the card base using 3D foam adhesive strips.
I love all the little paw prints! They’re just so sweet!
Thank you so much for stopping by my blog! Xoxo, Amanda
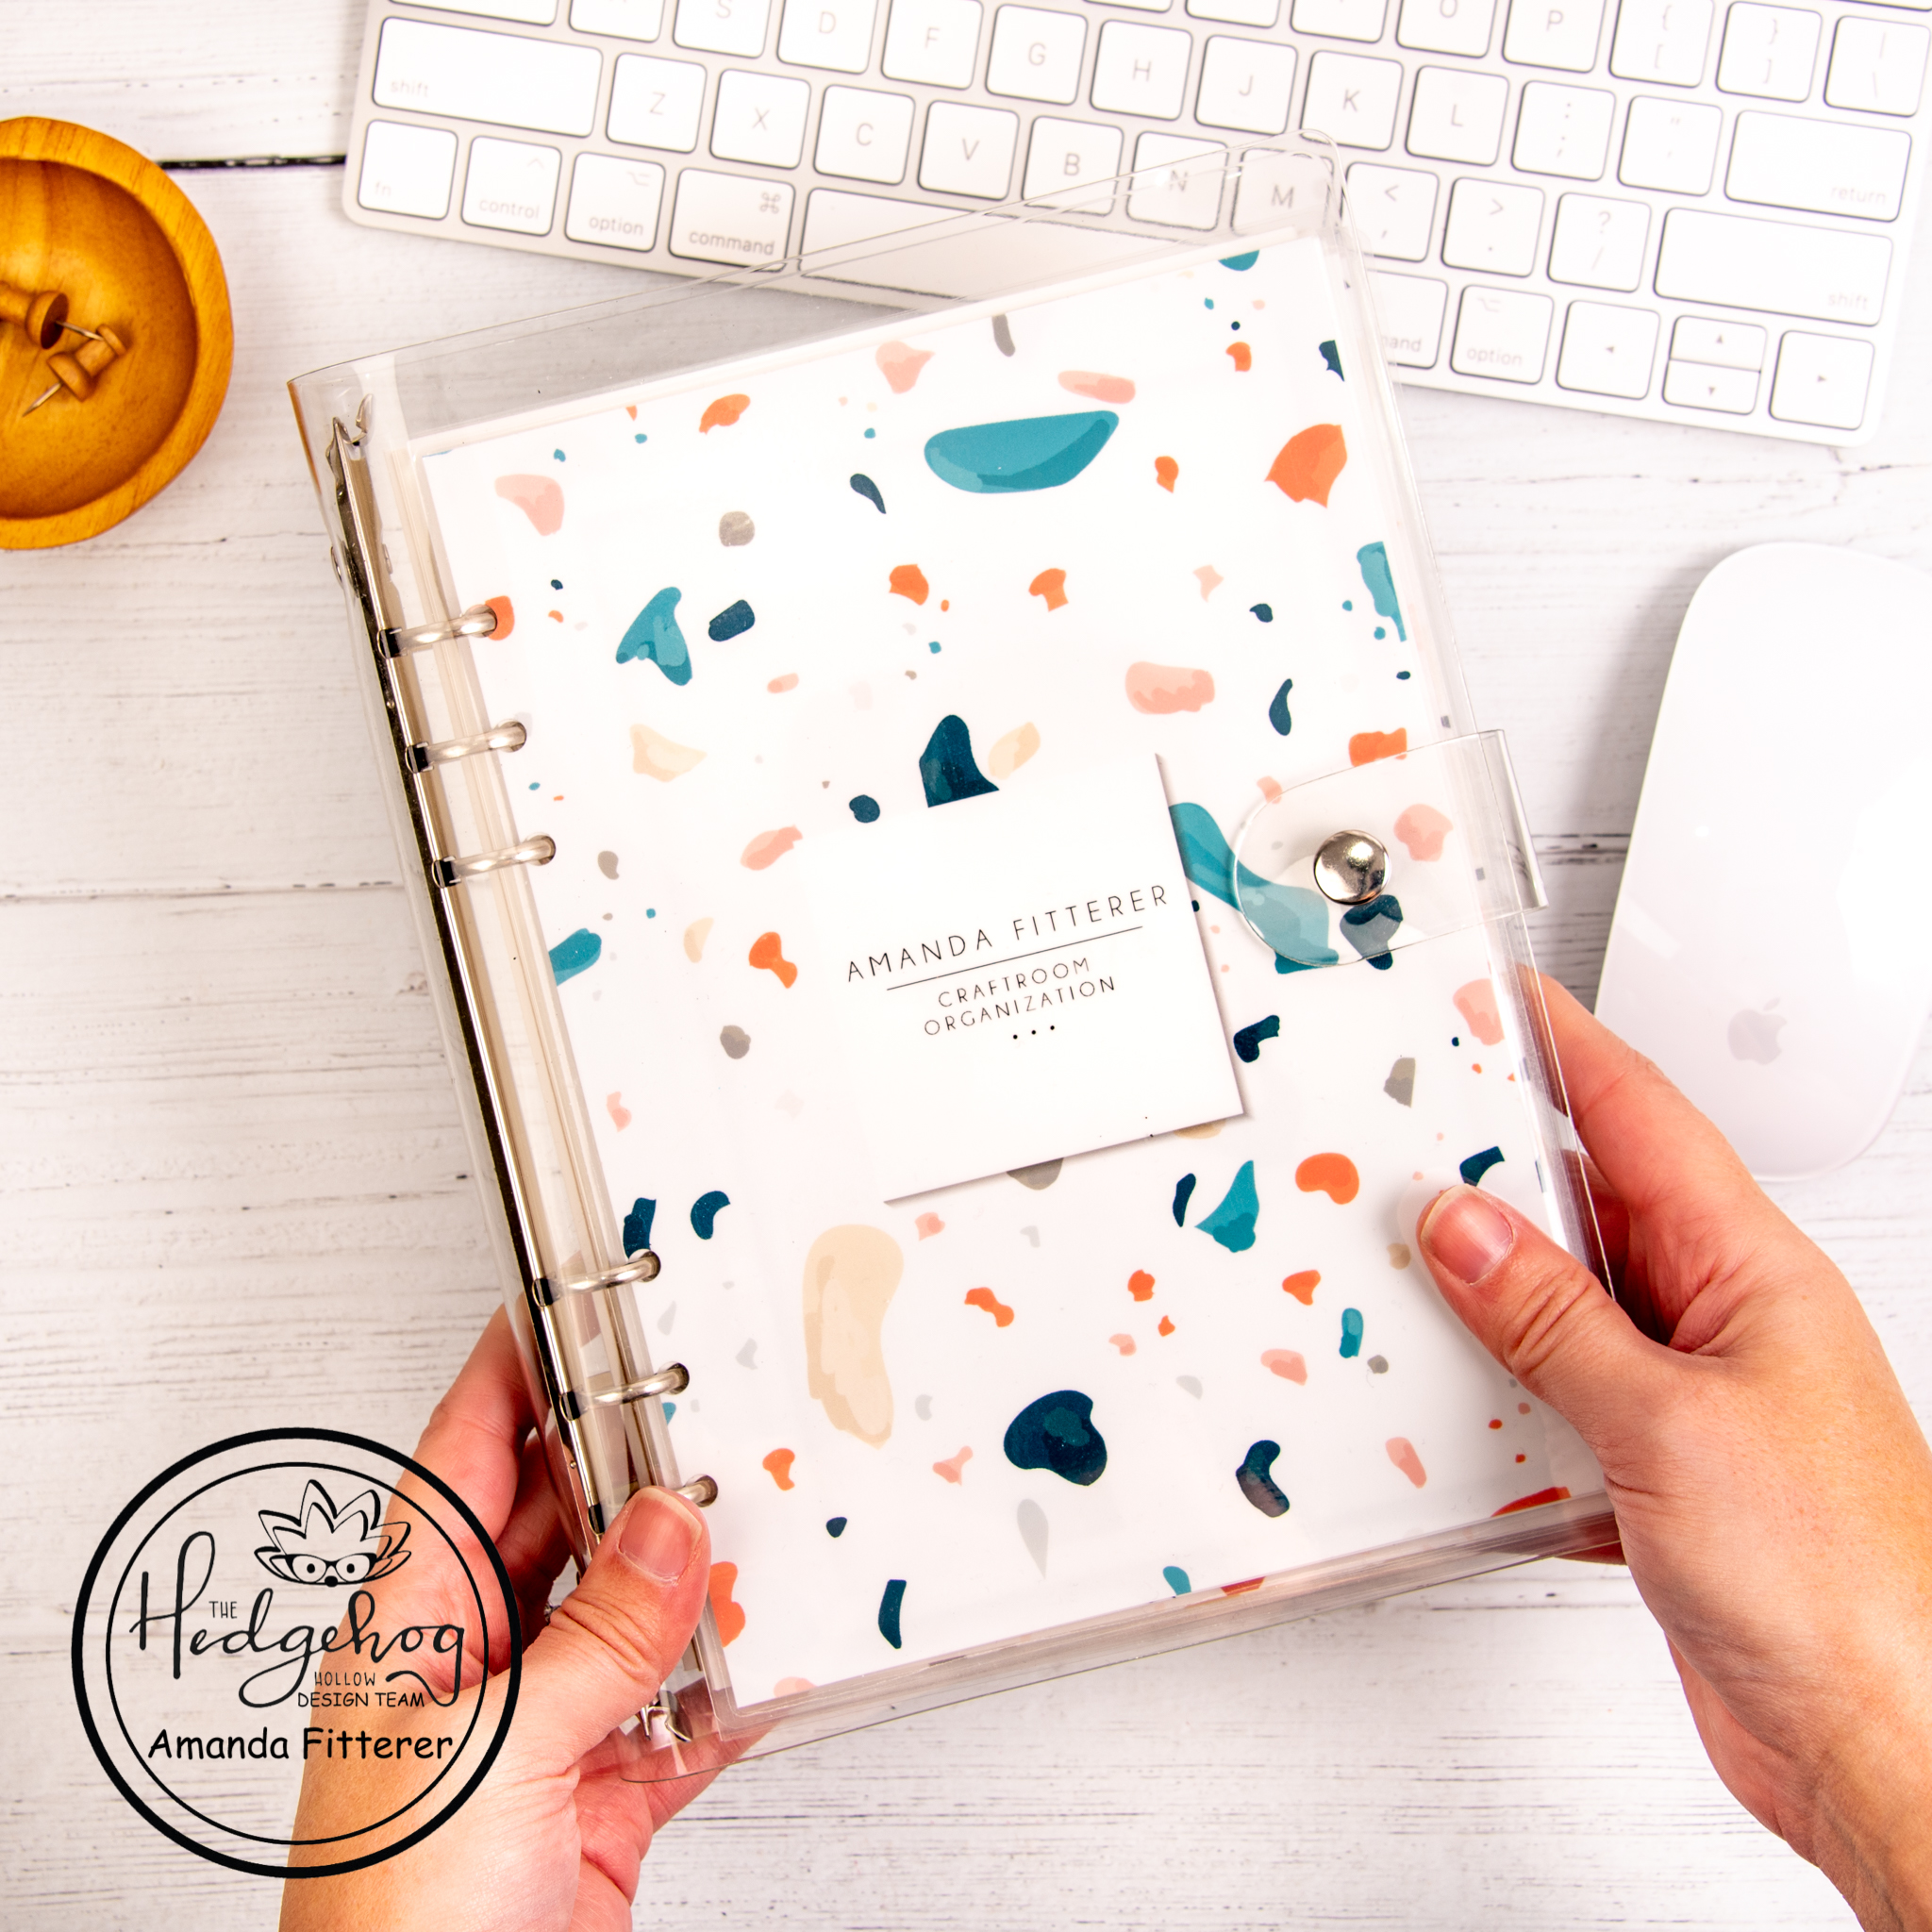
Well hello there! Thank you so much for coming by my blog today! I hope you love this DIY Craftroom Organization binder I made to share with you all!

The January 2021 Hedgehog Hollow Subscription Box included this awesome A5 clear binder and I KNEW I had to use it in a project! What better DIY project than Craftroom Organization?! I’ve been struggling with finding a better way to organize my crafty supplies and have everything within arm’s reach.
Here are some of the pages from my binder:


I made all of these pages from scratch – if you can believe it!
In Adobe Illustrator, I created art boards that were A5 size.
DIVIDERS:
For my dividers, I used some patterns I found online. Then, I created my headers for each page.
I printed these dividers on glossy photo paper and then used my laminator to laminate each one.
INSERTS:
Then, I designed each of my inserts, leaving room for holes on the left side. I printed these inserts on 80lb. Neenah Solar White cardstock, as that is the cardstock I use while making cards. This is super important for the accuracy of the ink pads and Copic markers.

Note: For my Copic hair and skin page, I used the “School Girl” digital stamp by Kinda Cute by Patricia Alvarez.
I used an adjustable hole punch to punch holes on all of my inserts and dividers.

For my Distress Inks and Oxides blends pages, I cut down 80lb. Neenah Solar White cardstock into 2″ squares. Then, I created my blends on them, used double sided tape on the back of them, and placed them in my binder.


For my Ink Pads, I used the Waffle Flower Color Combos for Ink Pads stamp set.


For my Copic Blends, I only needed my Copic markers!


Here are a few close-ups of each of the inserts:


There is so much more room to add more into the binder as well! I added some blank A5 sheets to the back for notes and whatnot! This organization thing can be quite time consuming, but it’s worth it!
I have some more ideas of inserts I will add:
Word Dies
Nuvo Drops
Cardstock Colors
Embossing Powders
Black Inks and their Properties
Do you have any more suggestions?! Please leave a comment and let me know!
Thank you again so much for stopping by!
Xoxo, Amanda
Disclaimer: Some links I’ve used above are affiliate links. Please use them to get your products that I LOVE, at no extra cost to you! It helps me to fund my crafting that I get to share with you!! 🙂
Hello there, Hollowers! I hope you are all having a fantastic Tuesday! I told you I’d be back with another fun project using the December 2020 Box and here I am! If you didn’t see my blog post from last week, you can find it here. I made a cute card using all the Forest Friends! Don’t forget to follow me on Instagram to see my other posts as well!
This week, I am sharing a video tutorial! I made a Shrinky Dink necklace and keychain. Plus, I made the gift packaging to put it in! This month’s subscription box is most definitely my fav so far! Did you get yours yet?!


You can watch the video tutorial here.
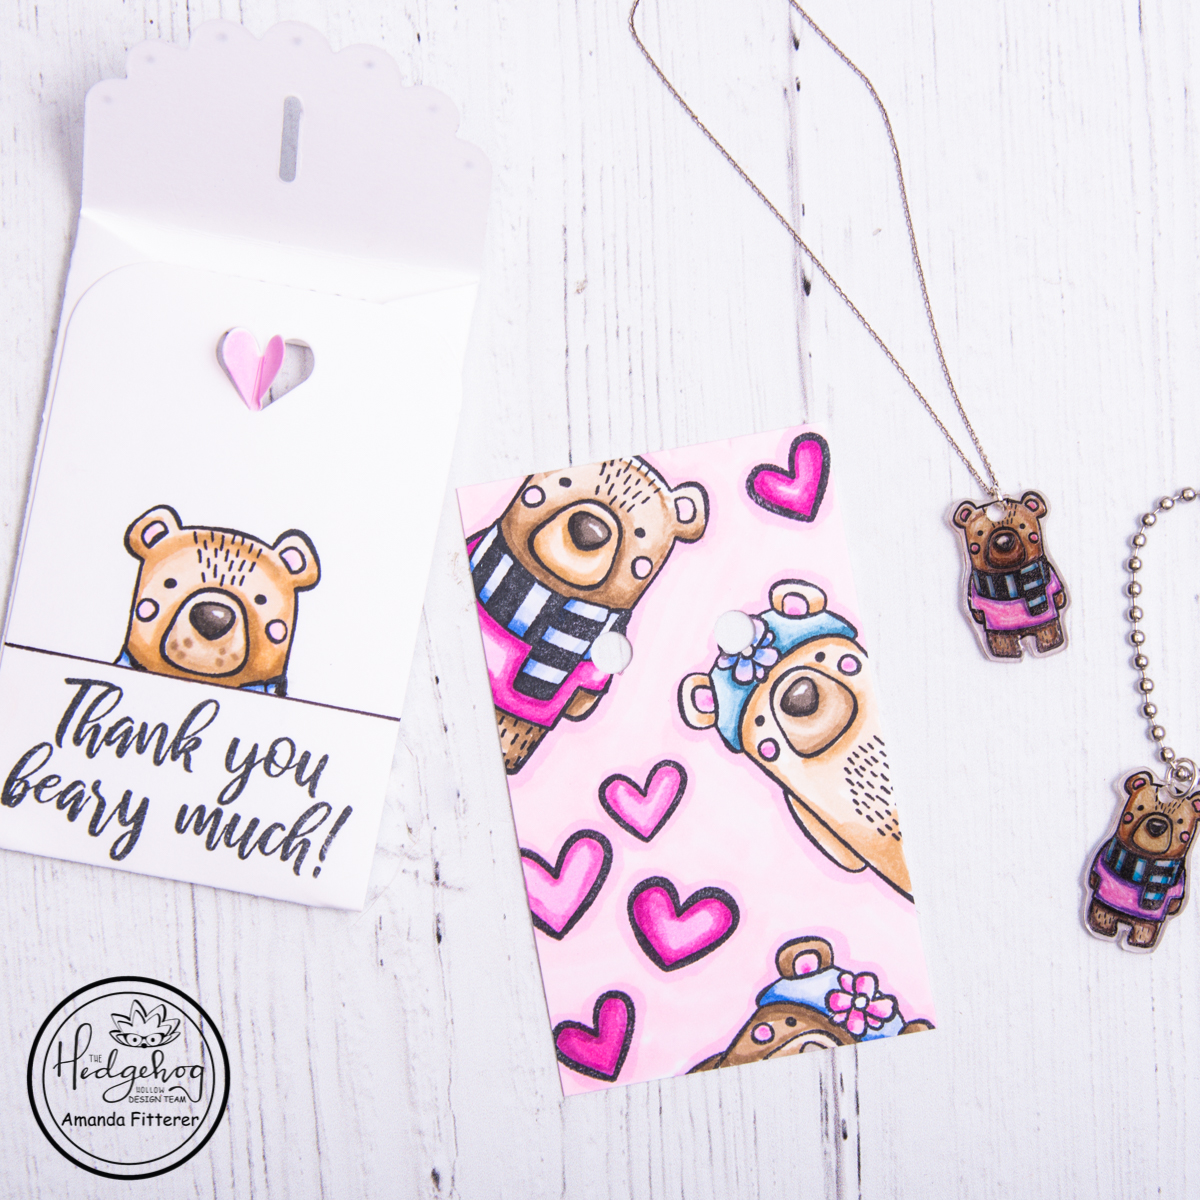
To create the gift packaging, I used the Heffy Doodle Gift Card Pocket Die. I created my own dot borders with a Sharpie pen.


For the bears and sentiment, I used the Forest Friends and Animal Greetings Stamp Sets that were included in the December Subscription Box. I colored the images with Copic markers.


To create my necklace and keychain, I used Dress My Craft’s Shrink Prink. I stamped the bear from the Forest Friends Stamp Set on the glossy side of the Shrink Prink with Staz-On ink. I, then, colored him on the frosted side of the Shrink Prink using colored pencils. I used a hole punch to create a hole BEFORE shrinking him down with my heat tool.


I just love the sentiment “Thank you beary much” with these sweet Forest Friends bears! My daughter has already stolen the keychain and hung it in her room!

I hope you enjoyed this tutorial and video! Looking forward to my post for next week! What could it be… what could it be… ?
Don’t forget, you only have until December 14th to order this box! What are you waiting for!?
Xoxo, Amanda 🙂
Hello there, crafty friends! Today, I am on the Hedgehog Hollow Blog sharing this absolutely adorable card that I made using items from the December 2020 Subscription Box! This box is probably my favorite one yet! I am a sucker for woodland animals and this box has 3 fun stamp sets! To see the stamp sets and the rest of the contents of the box, you can click here to see the reveal video!

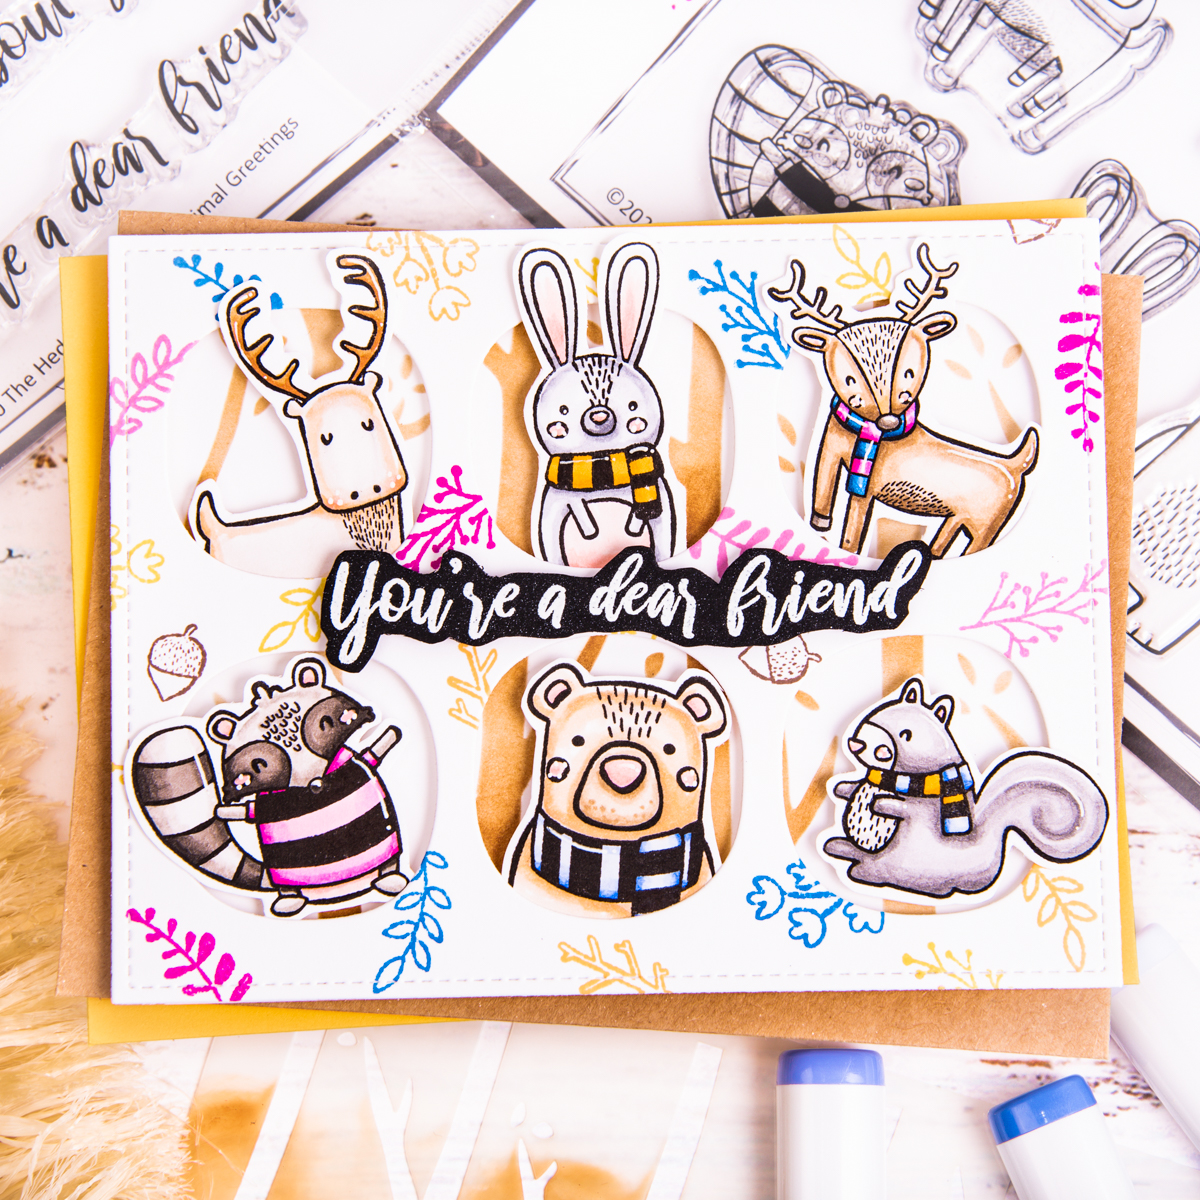
Now, onto the card tutorial! I started with the Mama Elephant Six Window Cover Creative Cuts Die. I stamped some pretty leaves, branches, and acorns from the Animal Greetings Stamp Set. This set was included in the December Box.


For my card base, I used the Trees Stencil that was also in the December Box. I blended the trees with Vintage Photo Distress Oxide.

Now onto my favorite part – The Forest Friends! I stamped my images with Hero Arts Intensified Black Ink and then colored them in with Copic markers. I used detail scissors to cut out each image. I really need to get a Scan n Cut machine, but fussy cutting can be relaxing when I have the time!

For my sentiment, I grabbed the Animal Greetings Stamp Set again and stamped the sentiment with Versamark Watermark Ink onto black cardstock. I used white embossing powder and my heat tool to melt the powder. I fussy cut this sentiment out as well.

I adhered everything to my card base with 3D foam strips and squares. Here are some close-ups of the finished card!


I hope you enjoyed this blog post! I am pretty excited to get back into the craft room and make some more Forest Friend creations! There’s another stamp set not shown in this project that is calling my name!
Remember, if you want these stamp sets and stencils, you have to get the December Subscription Box! You have until December 14th to buy it! To see all the Subscription Options, you can go here.
Thanks again for stopping by! Xoxo, Amanda
Hello all you crafty people! I hope you had a fantastic Thanksgiving! I guess it’s time to start thinking about Christmas cards now! I can’t believe how quickly Christmas will be here!
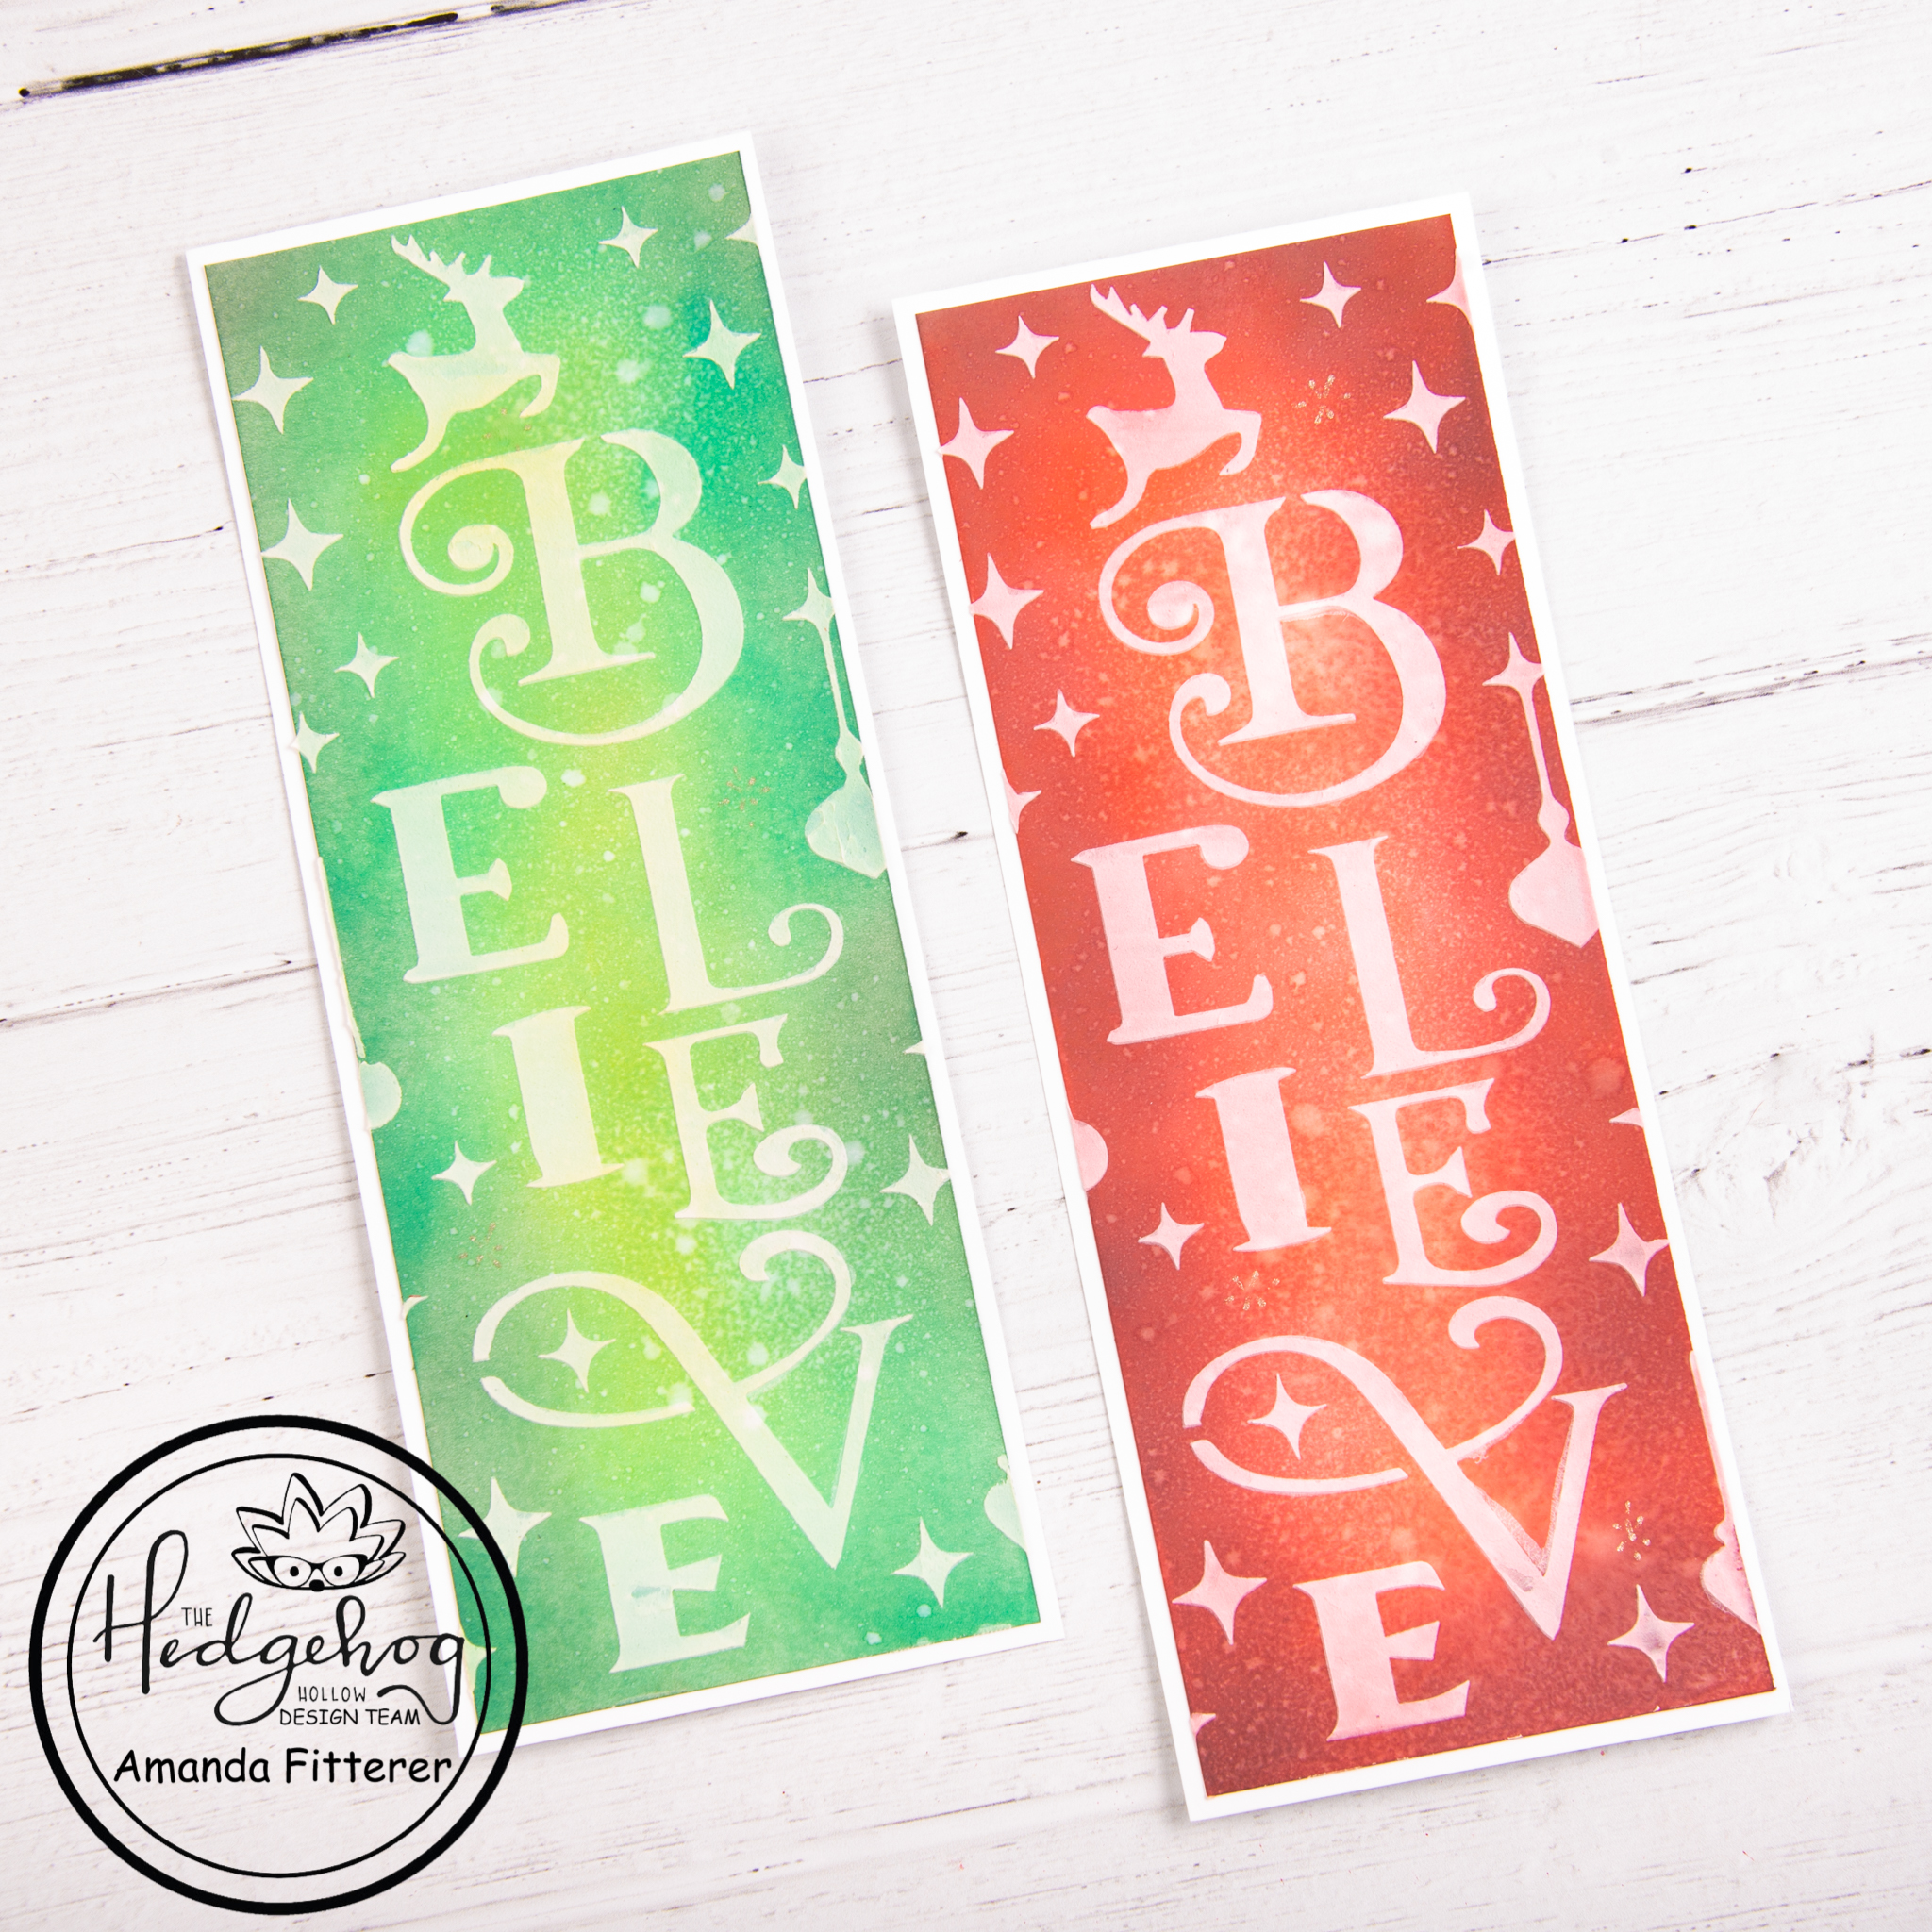
Today, I’m excited to share some slimline cards I made using some products from the November Subscription Box!

The Subscription Box came with some Maker Forte Perfect Blend Slimine Mini Strips. These are made specifically for Distress Ink and Oxide blending, so the colors go on super smooth!
For the green background, I blended Lucky Clover, Twisted Citron, and Black Soot. Once I was finished blending, I spritzed the card front with water.

For the red background, I used Candied Apple, Abandoned Coral, and Black Soot. Again, I misted some water on it to create a fun effect.

The November Subscription Box also had a “Believe” stencil included! This stencil is the perfect size for a slimline card! I used some embossing paste with the stencil to create a textured, 3 dimensional look. I used a white slimline card base to frame the card fronts.

These cards were so easy to make, but are so beautiful and elegant! They’d be perfect holiday cards to make in bulk, don’t you think?
The November box isn’t available now, but if you want to see the Subscription Box Options, you can click here to sign up for the December box! You can also check in December to see if the November box is available as a One-Off Box!
I can’t wait to see what the December box has in store for us! It’s always so exciting to see that package waiting for me in my mailbox! I love a good surprise!
Thanks again for stopping by my blog today! I hope you enjoy the rest of your weekend! Xoxo, Amanda

Hello friends and welcome back to The Hedgehog Hollow Blog! It’s Amanda Fitterer back today with some more holiday cards!
The November Subscription Box is available now, but you only have until November 14th to get yours! If you want to see the reveal video, you can find it here. The box is full of lots of goodies, including the double-sided patterned paper that I used for these cards! There’s also a really cool product called WoodUBend that is super fun to play with. If you haven’t seen my video using the product, you can find the post here.
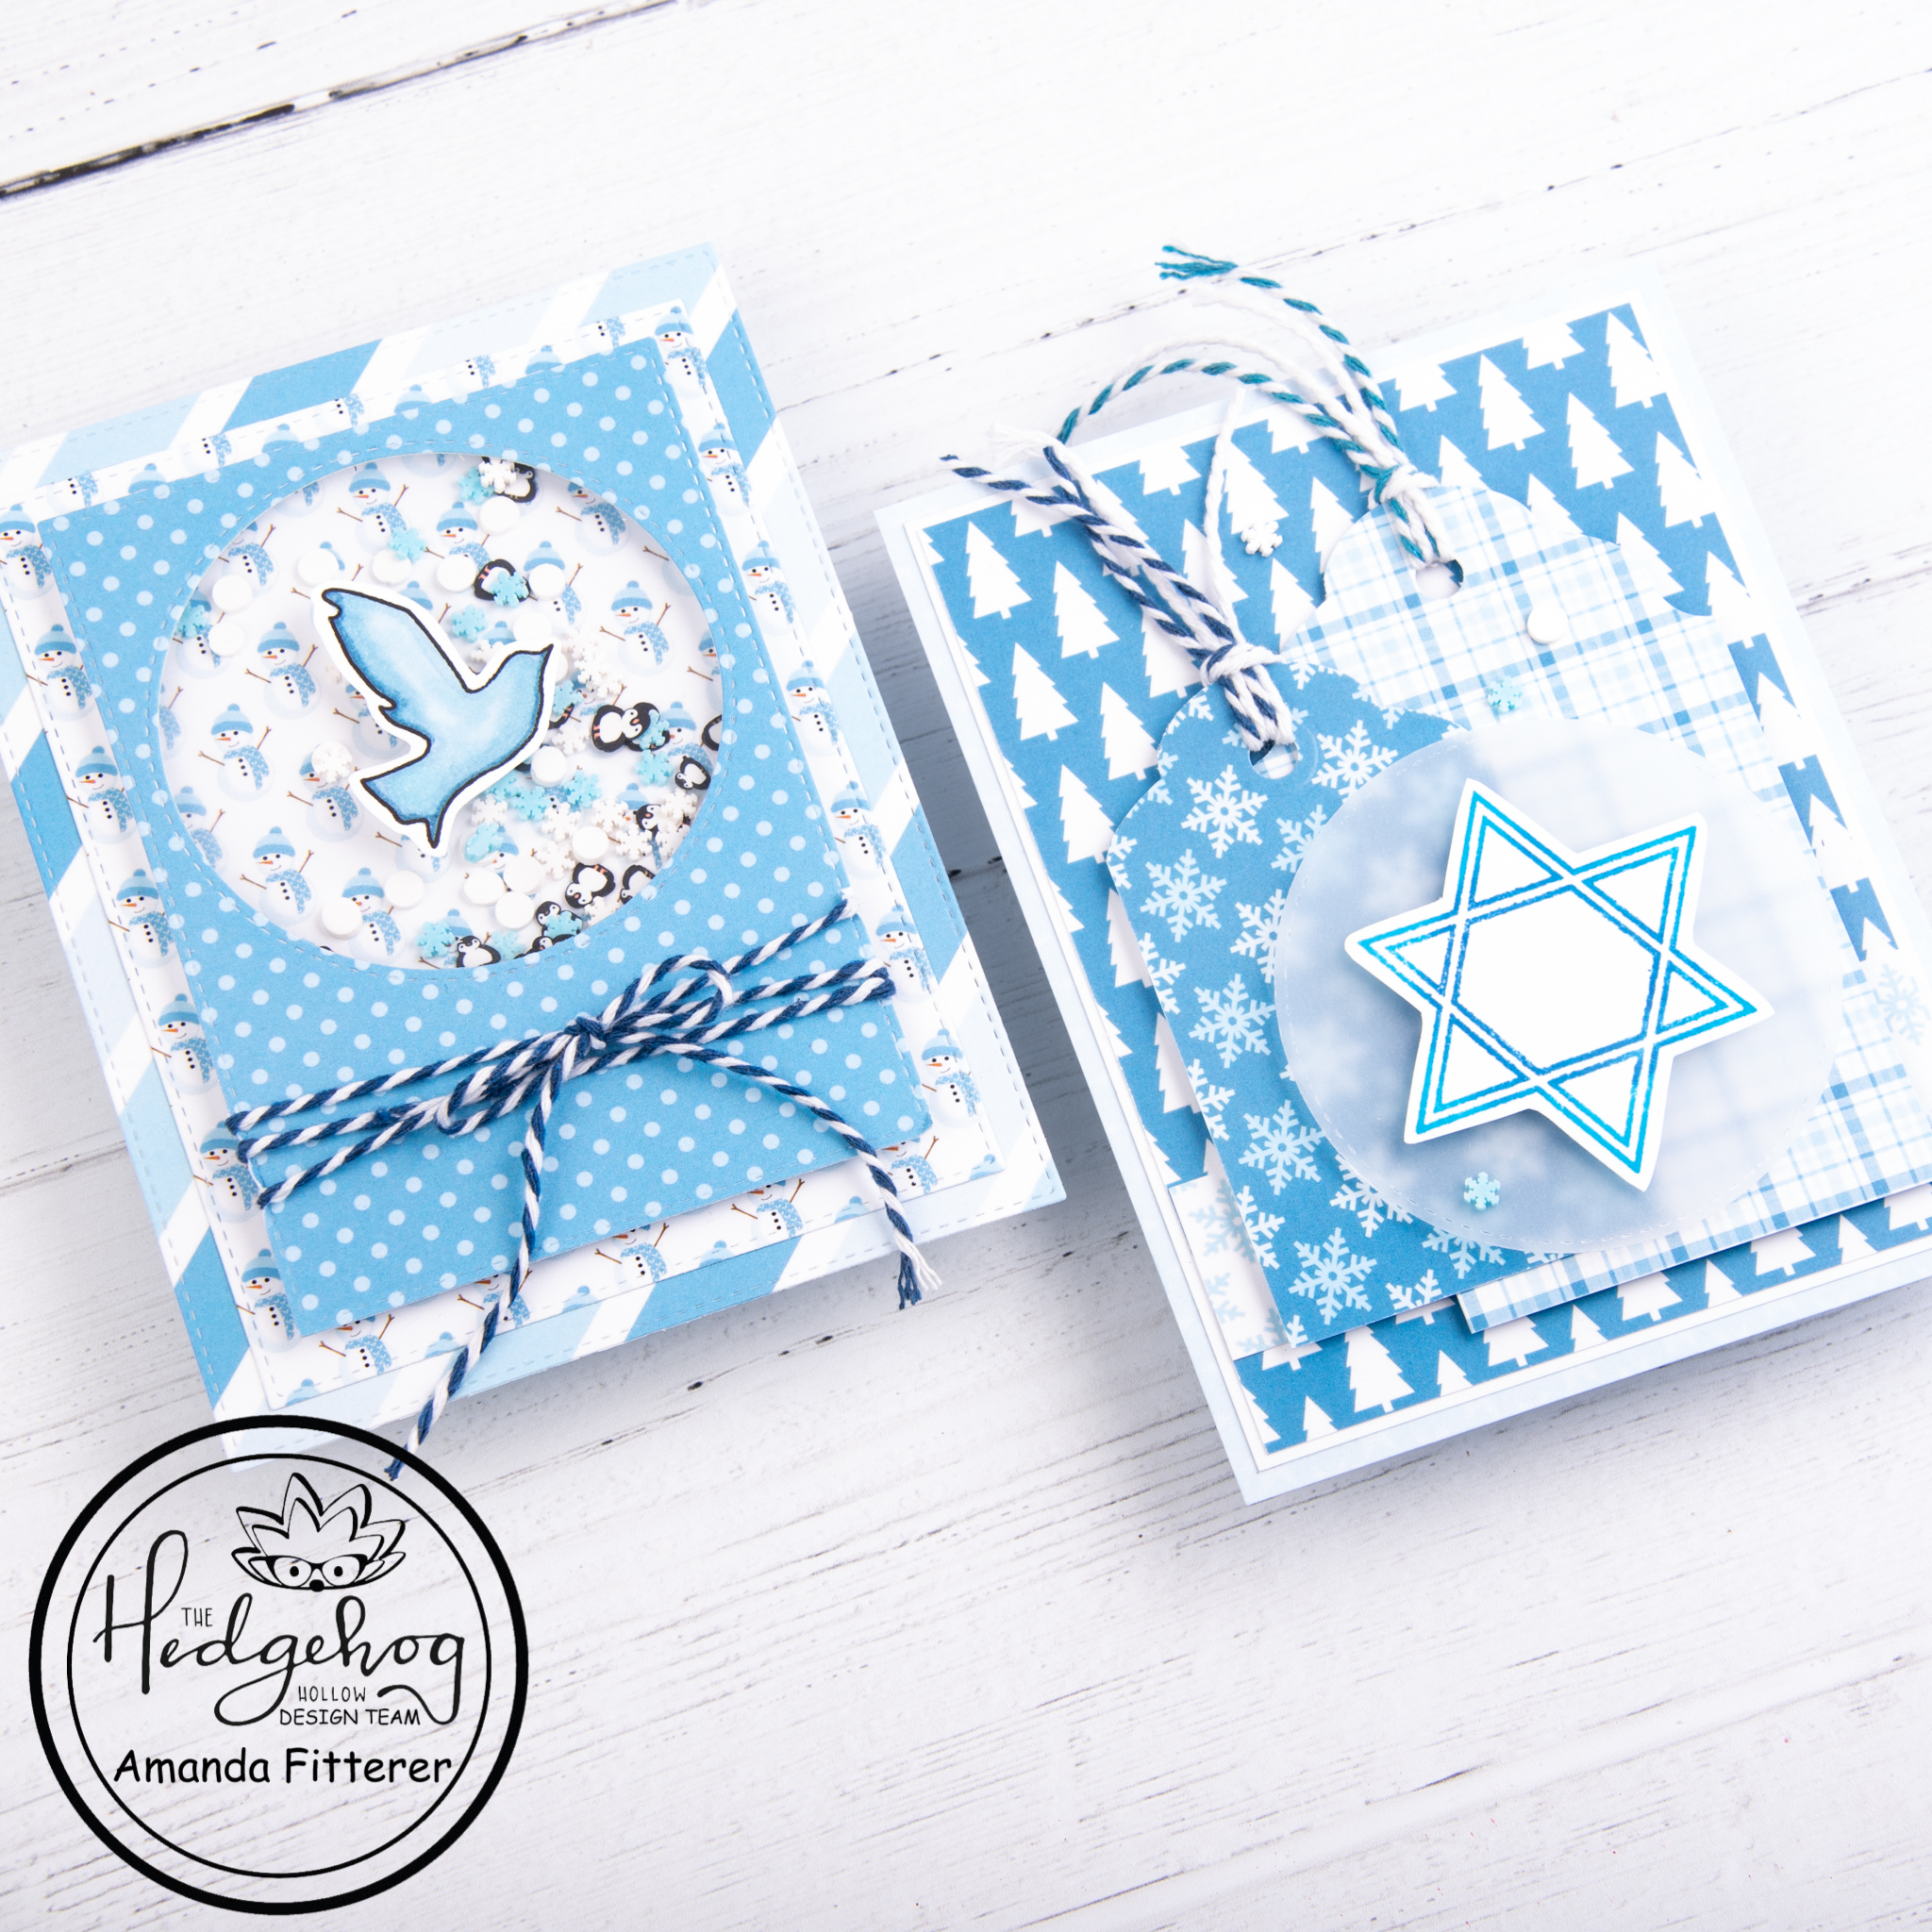
Now onto these beautiful Hanukkah cards!
To create my first card, I used the double-sided patterned paper with Dress My Craft’s Rounded Tag Punch. I tied baker’s twine to each of my tags and popped them up with 3D foam squares. I used Danube Blue and Bahama Blue Memento ink to stamp my image from the “Happy Hanukkah” stamp set. This stamp set is included in the November box and has loads of great images and sentiments. I cut a circle of vellum to frame my Star of David. I used 3D foam squares to adhere the Star and vellum to the front of the card. To finish the card off, I placed a few embellishments from Dress My Craft’s Penguins and Snowflakes Mix.


To create my shaker card, I used Stitched Dies and the double-sided patterned paper to create my frames and base. I filled my shaker with Penguin Slices and Penguins and Snowflakes Mix. I tied some baker’s twine to the bottom of the card. I stamped and fussy cut the Dove out from the “Happy Hanukkah” stamp set. I colored the image with B95, B93, and B91. I used 3D foam squares to adhere the image to my card.


And voila! You have 2 quick and easy Hanukkah cards!

Thank you so much for coming by The Hedgehog Hollow blog! It’s almost the weekend! Hang in there! I’ll have one more post on the November box on November 28th, so keep an eye out!
Xoxo, Amanda
Hello friends and welcome back to my blog! I hope you’re all doing well today and excited to see some DIY ornaments!


The November Subscription Box is available now! If you order before November 14th, you’ll get the November box which is full of so many goodies! If you want to see the reveal video, you can find it here.
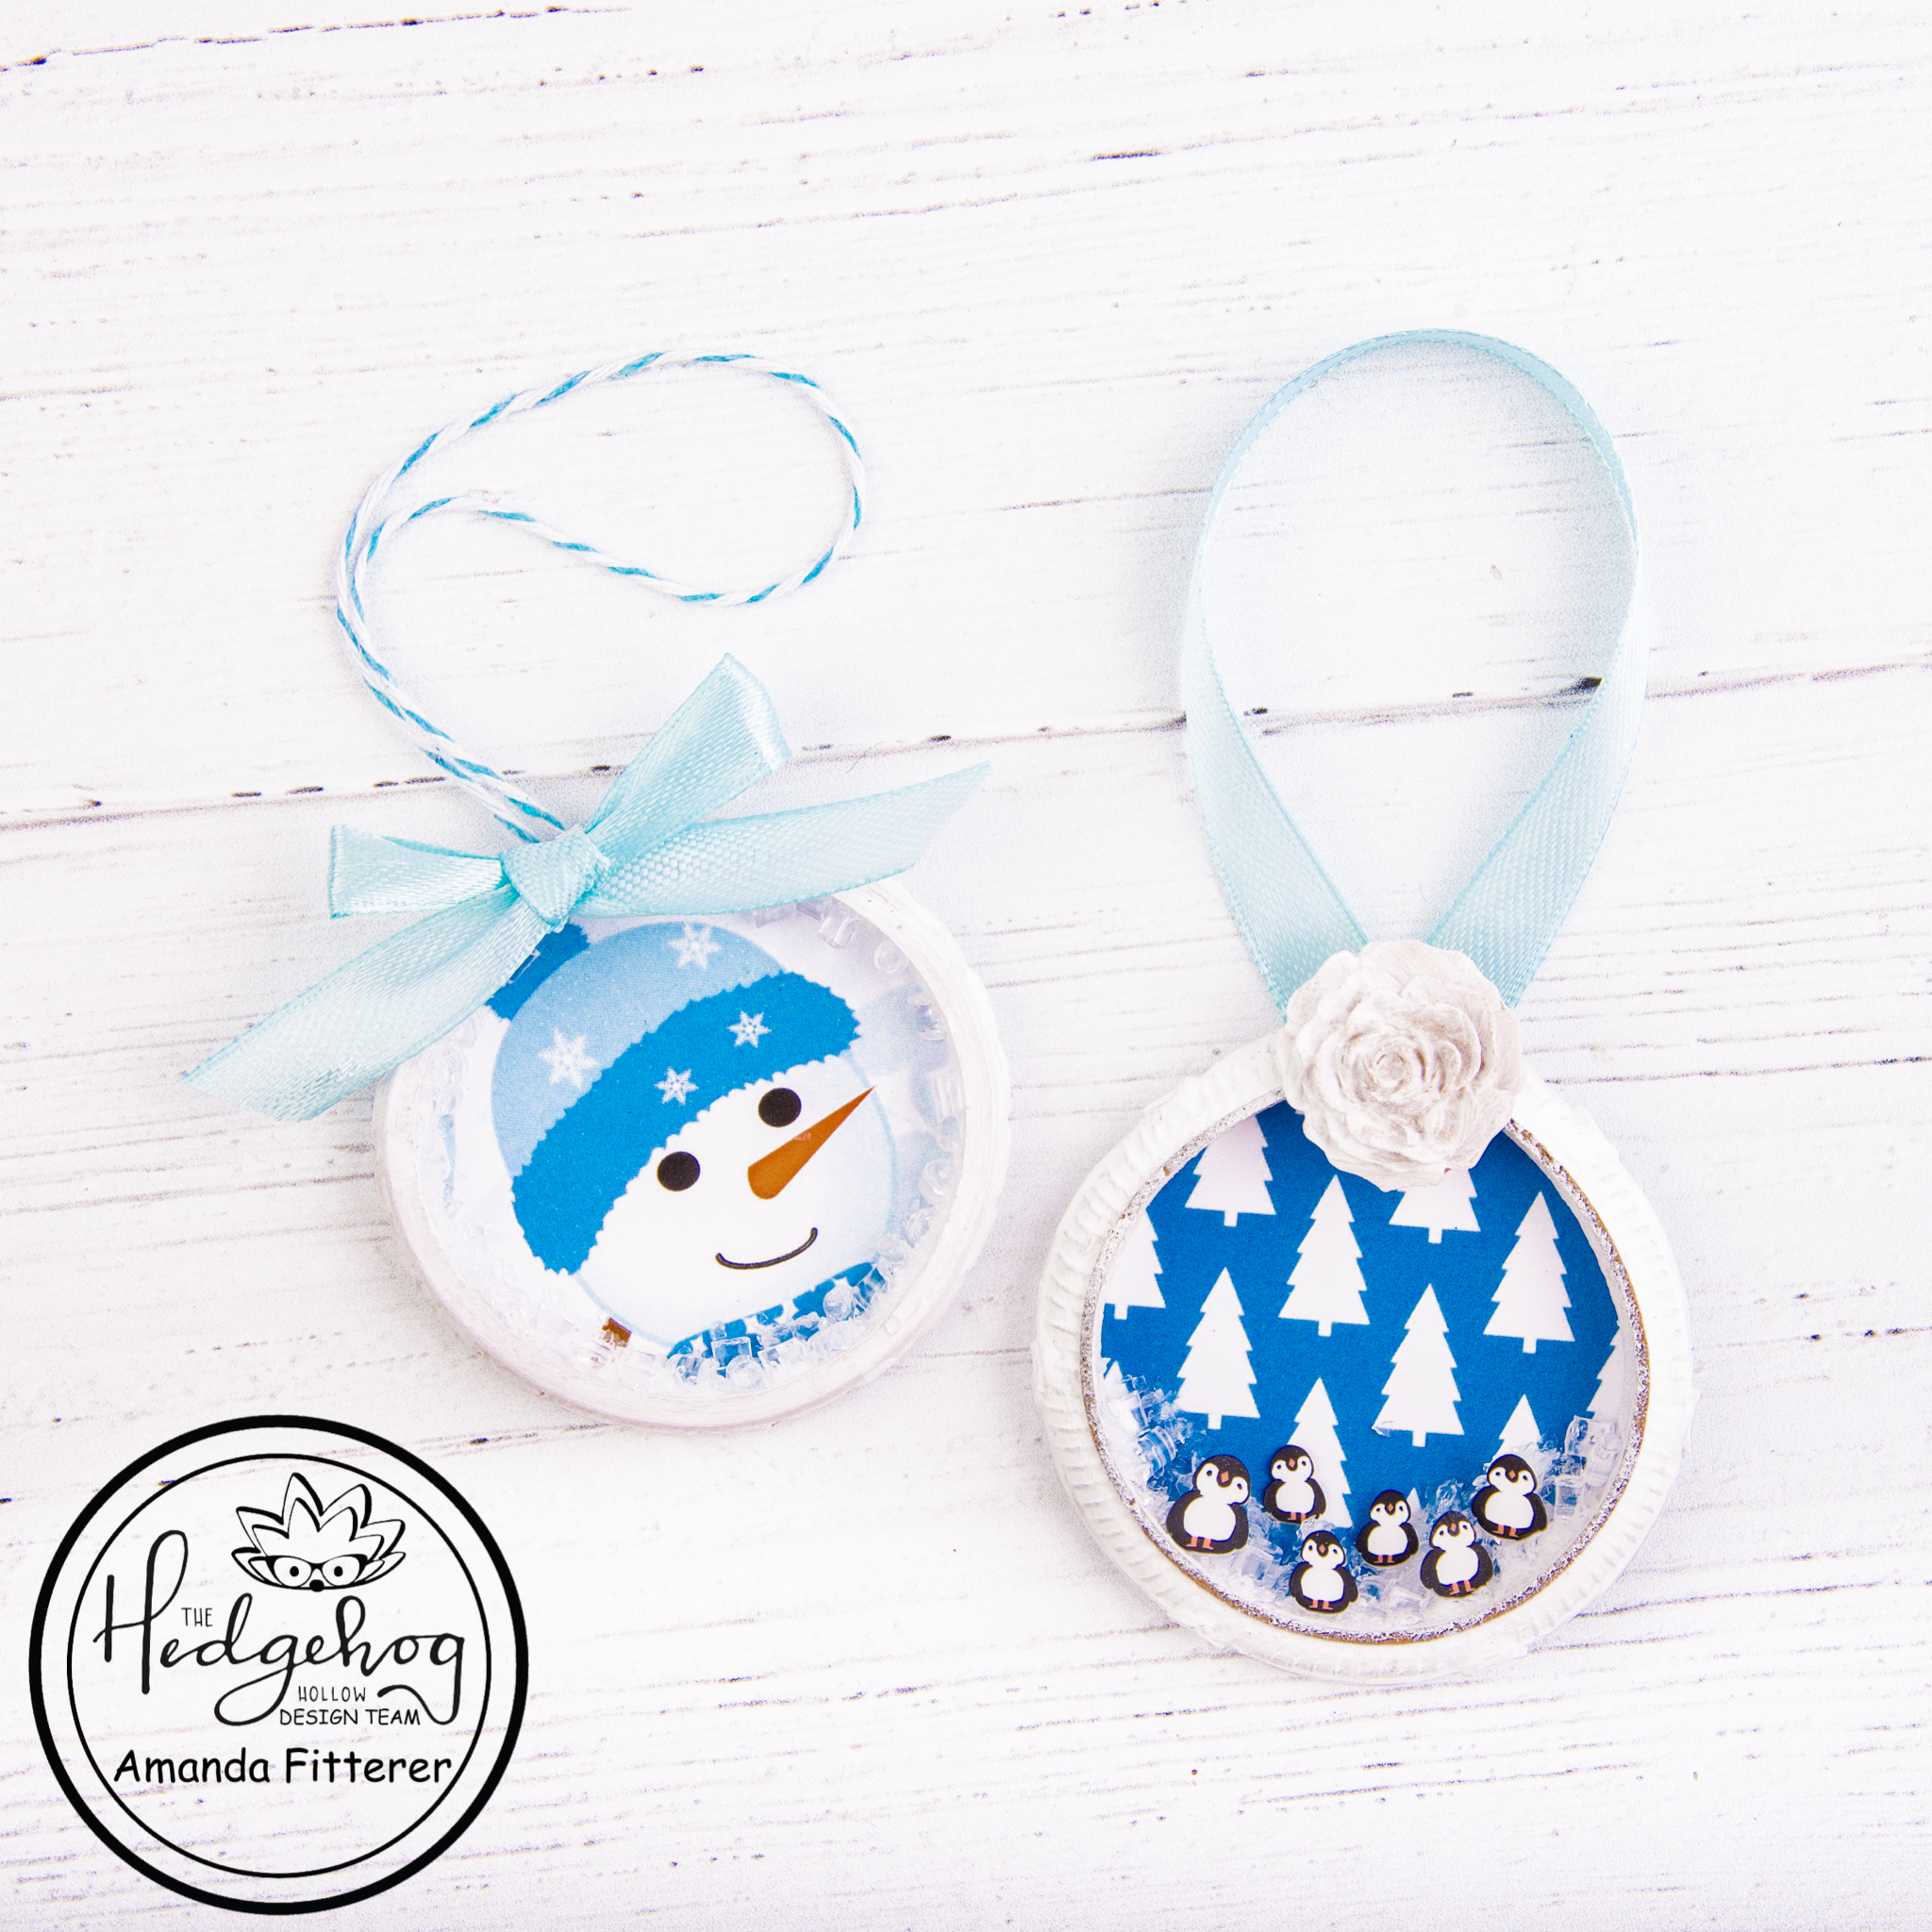
This new box includes a product called WoodUBend which is a heatable, bendable wood product. I created the ornament bases using the samples that were in the box! This product is SO neat and there are so many ways you can use it!
To create the ornaments, I painted the WoodUBend mouldings with White Gesso first. After the Gesso dried, I used an a knife to cut the moulding into 2 pieces.

To bend the pieces into a circle, I used a heat tool to heat the mouldings, and then bent them once they became flexible enough.

Using the patterned paper that was including in the November Subscription Box, I cut out backgrounds for each of my ornaments.

I added the twine and ribbon using a hot glue gun.

I added Frosted Sugar Powder and Crystal Ice Cubes to each of the ornaments using liquid glue. I also added some cute little Penguin Slices to the smaller ornament.


I am pretty excited to be put these on my Christmas tree this year! I hope you enjoyed the video tutorial and this blog post! If you like this project, I’d love to hear from you! Feel free to comment on this blog post or the YouTube tutorial! I love reading your comments!
Thank you so much for stopping by my blog! Don’t forget you only have until November 14th to order the November Subscription Box!
Hello, hello! Can you believe it is November already!? I am sad at how fast the holidays are approaching, but I am EXCITED about the new Hedgehog Hollow Box for November! It’s filled with lots of goodies!! If you didn’t catch the Reveal Video yet, you can find it here! You can also see a list of the products here. If you sign up before November 14th, you can still get this November box! What are you waiting for?!
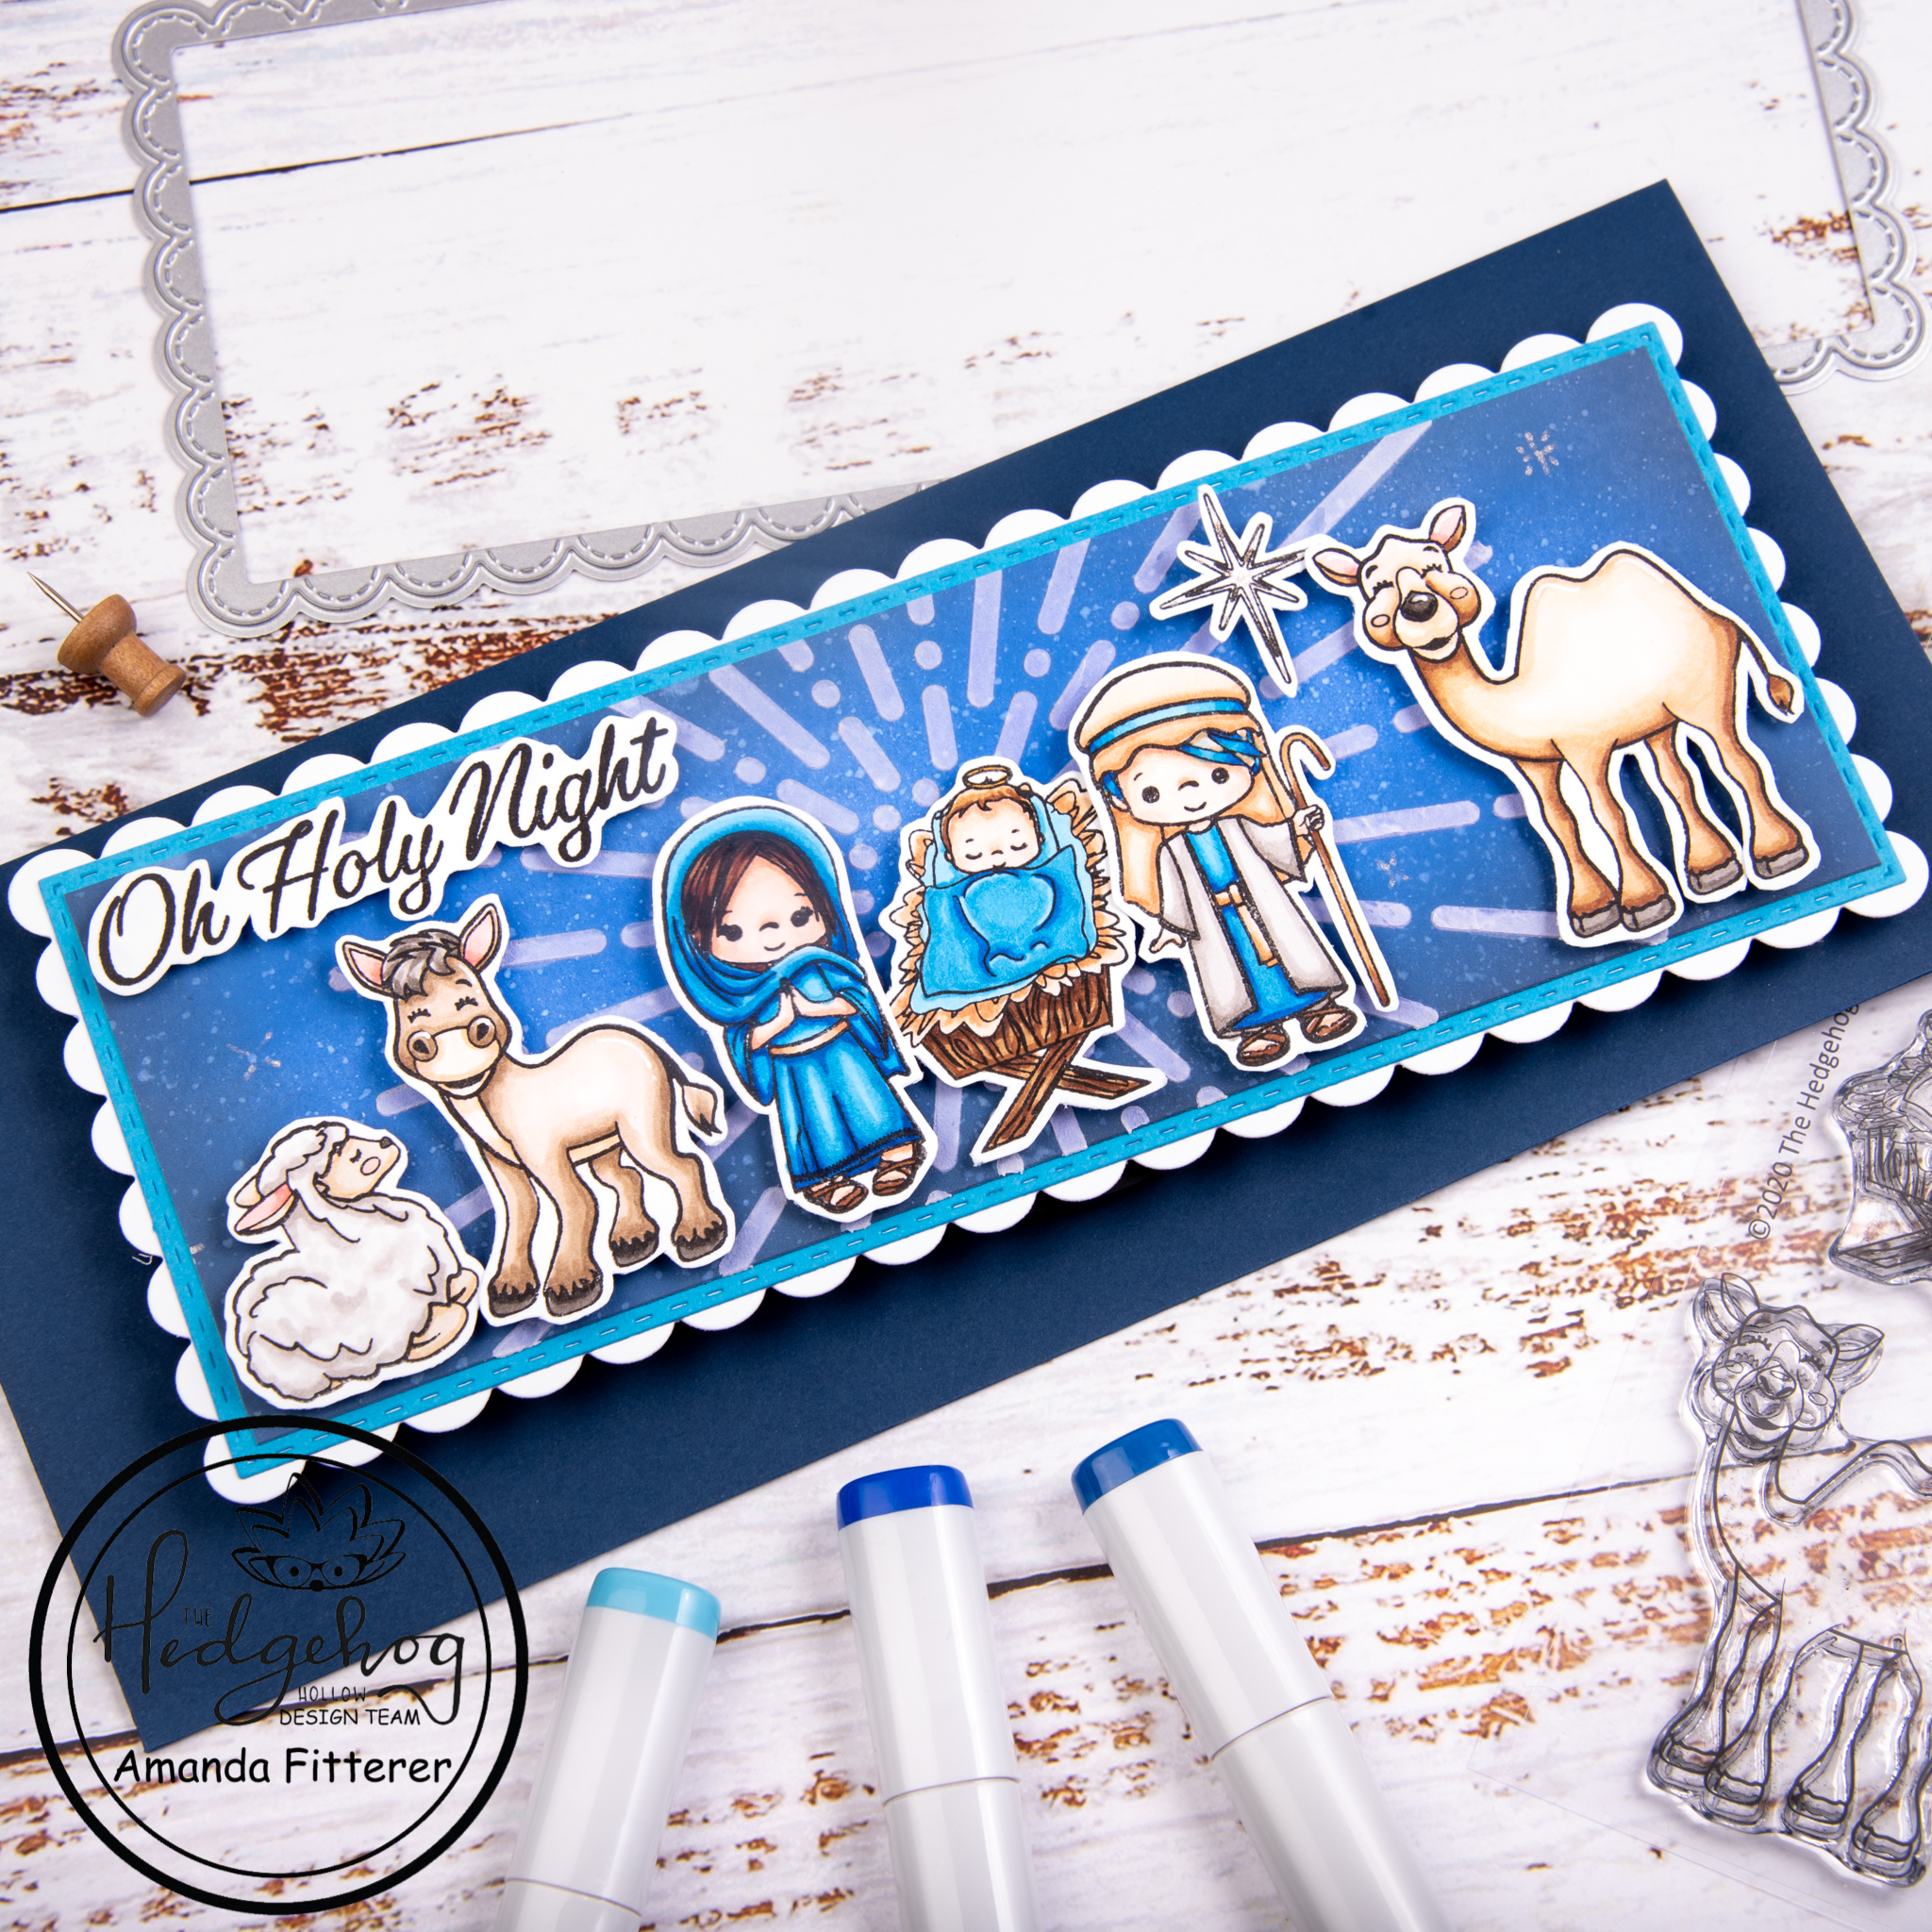
Today, I am sharing this Nativity Scene card with you! I think these images are just so sweet!


To create this card, I started with this AHHHHMAZING cardstock called “Perfect Blend Slimline Mini Strips” by Maker Forte. Blending Distress Inks and Oxides on this cardstock is just a breeze! I blended Faded Jeans, Blueprint Sketch, and Black Soot to create a dark background. I flecked water onto the background to create a “starry” effect.

I used the Simply Radiant Stencil from Heffy Doodle to create a starburst in my background. Using a spatula, I lightly applied some embossing paste.

While that dried, I stamped my images from the “Nativity” stamp set that was included in the November Subscription Box. I colored my images with Copic markers and then fussy cut each image out with detail scissors.


I adhered all my images using 3D foam squares. To create my card base, I used Pink and Main’s Stitched Slimeline Dies and Sympathy Slimline Dies.

I love the way all of these images from the Nativity stamp set go together! They make the perfect little Christmas scene!
I hope you enjoyed my post! If you’re not already following me on Instagram, you can find me here. Later this week, I will be back with another project using the November Subscription Box! I can’t wait to keep sharing some more inspiration!
Don’t forget to scoop up the November Subscription Box before it sells out!
Xoxo, Amanda


Happy Monday! I hope your week is off to a good start! I hope this sweet slimline shaker card puts a smile on your face!
Have you gotten your Hedgehog Hollow October subscription box?! I just love the “Around Winter” stamp set that is included in the box. It’s so versatile! In my post a few weeks ago, I used it as a background and a focal point on 2 different cards! For this interactive card, I used it as a patterned background! The little gift boxes are just so cute they make the perfect pattern!

To make this card, I am starting with a few slimline dies. For my card base, I’m using Pink and Main’s Stitched Slimline Dies. I also cut a border using Pink and Main’s Blessings Slimline Dies, which you can see in the photo below. In the end, I didn’t end up using the border for this card because it distracted from the rest of the card. I saved it for another project! The windows that I’ll use for the shaker portion of the card are created from Heffy Doodle’s Stitched Slimline Trio Dies. On my card base, I’m going to create a subtle green background for each of my windows using Twisted Citron Distress Oxide.


Now I’m going to grab my super adorbs “Around Winter” stamp set and the ever-juicy Catherine Pooler Tutti Frutti ink pad. I’m using a clear acrylic block to mount my stamp. I almost always use my MISTI while stamping with clear stamps because I know that with most inks and stamps, I will need to stamp it more than once. However, this ink pad is so juicy that I know I’ll get a perfect image the first time, so I am using the acrylic block to make the stamping go faster.

For my shaker elements, I’m loading each window up with Dress My Craft’s Carnival Candies and Red Hearts Sequins.

I have stamped my images using the Mama Elephant Santa Baby stamp set and alcohol-friendly ink. Now I’m ready to start coloring with my Copic markers!


After prepping my black cardstock with my anti-static tool, I’m going to stamp my sentiments with VersaMark Watermark ink. Using white embossing powder and my heat tool, I’m going to emboss my sentiment. Using scissors and my paper trimmer, I’ll cut these little guys down to fit on my card.

Now I’m ready to assemble my card! I am using 3D foam squares to adhere my images and sentiments to the front of my card.

Here are some close-ups of the completed card! I love a good shaker card, don’t you?


If you’ve made some cards with this Hedgehog Hollow October Box, I would love to see them! Tag me in the post @craftyandcreativevibes or leave a comment here on the blog with your IG account and I’ll check it out!
If you’d like to see a video of the October Box goodies, you can find it here. For all the subscription options, click here.
Remember, if you want this box, you must sign up by October 14th! Otherwise, check here to see if it’s available as a one-off!
Thank you so much for stopping by my blog! I still have one more project coming up next Monday with the October box! I hope you come back by and check it out! Xoxo, Amanda

Hello everyone! I hope you’re all having a great week so far!
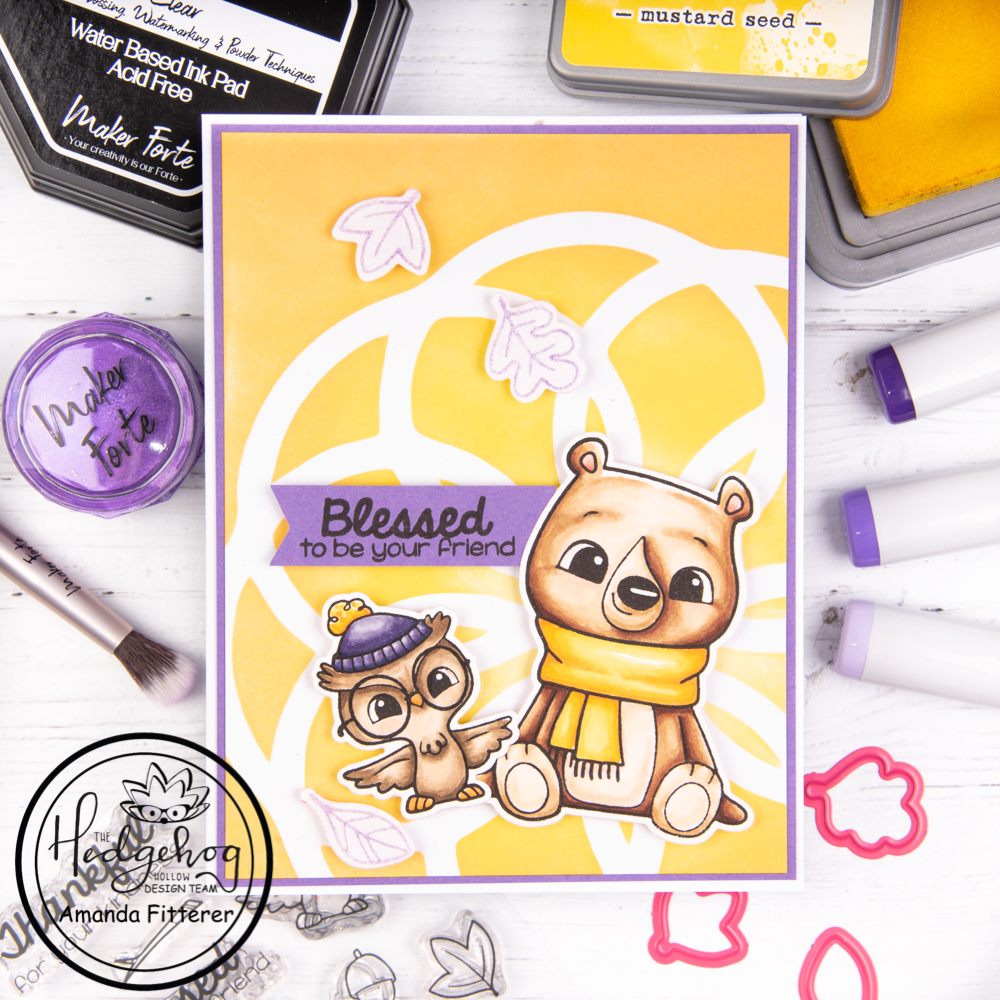
I am loving this card I made using Pink and Main’s Happy Fall stamp and die set! It is so simple, but yet so elegant! I love the idea of taking a non-traditional Fall color and using it to make a card that really stands out!
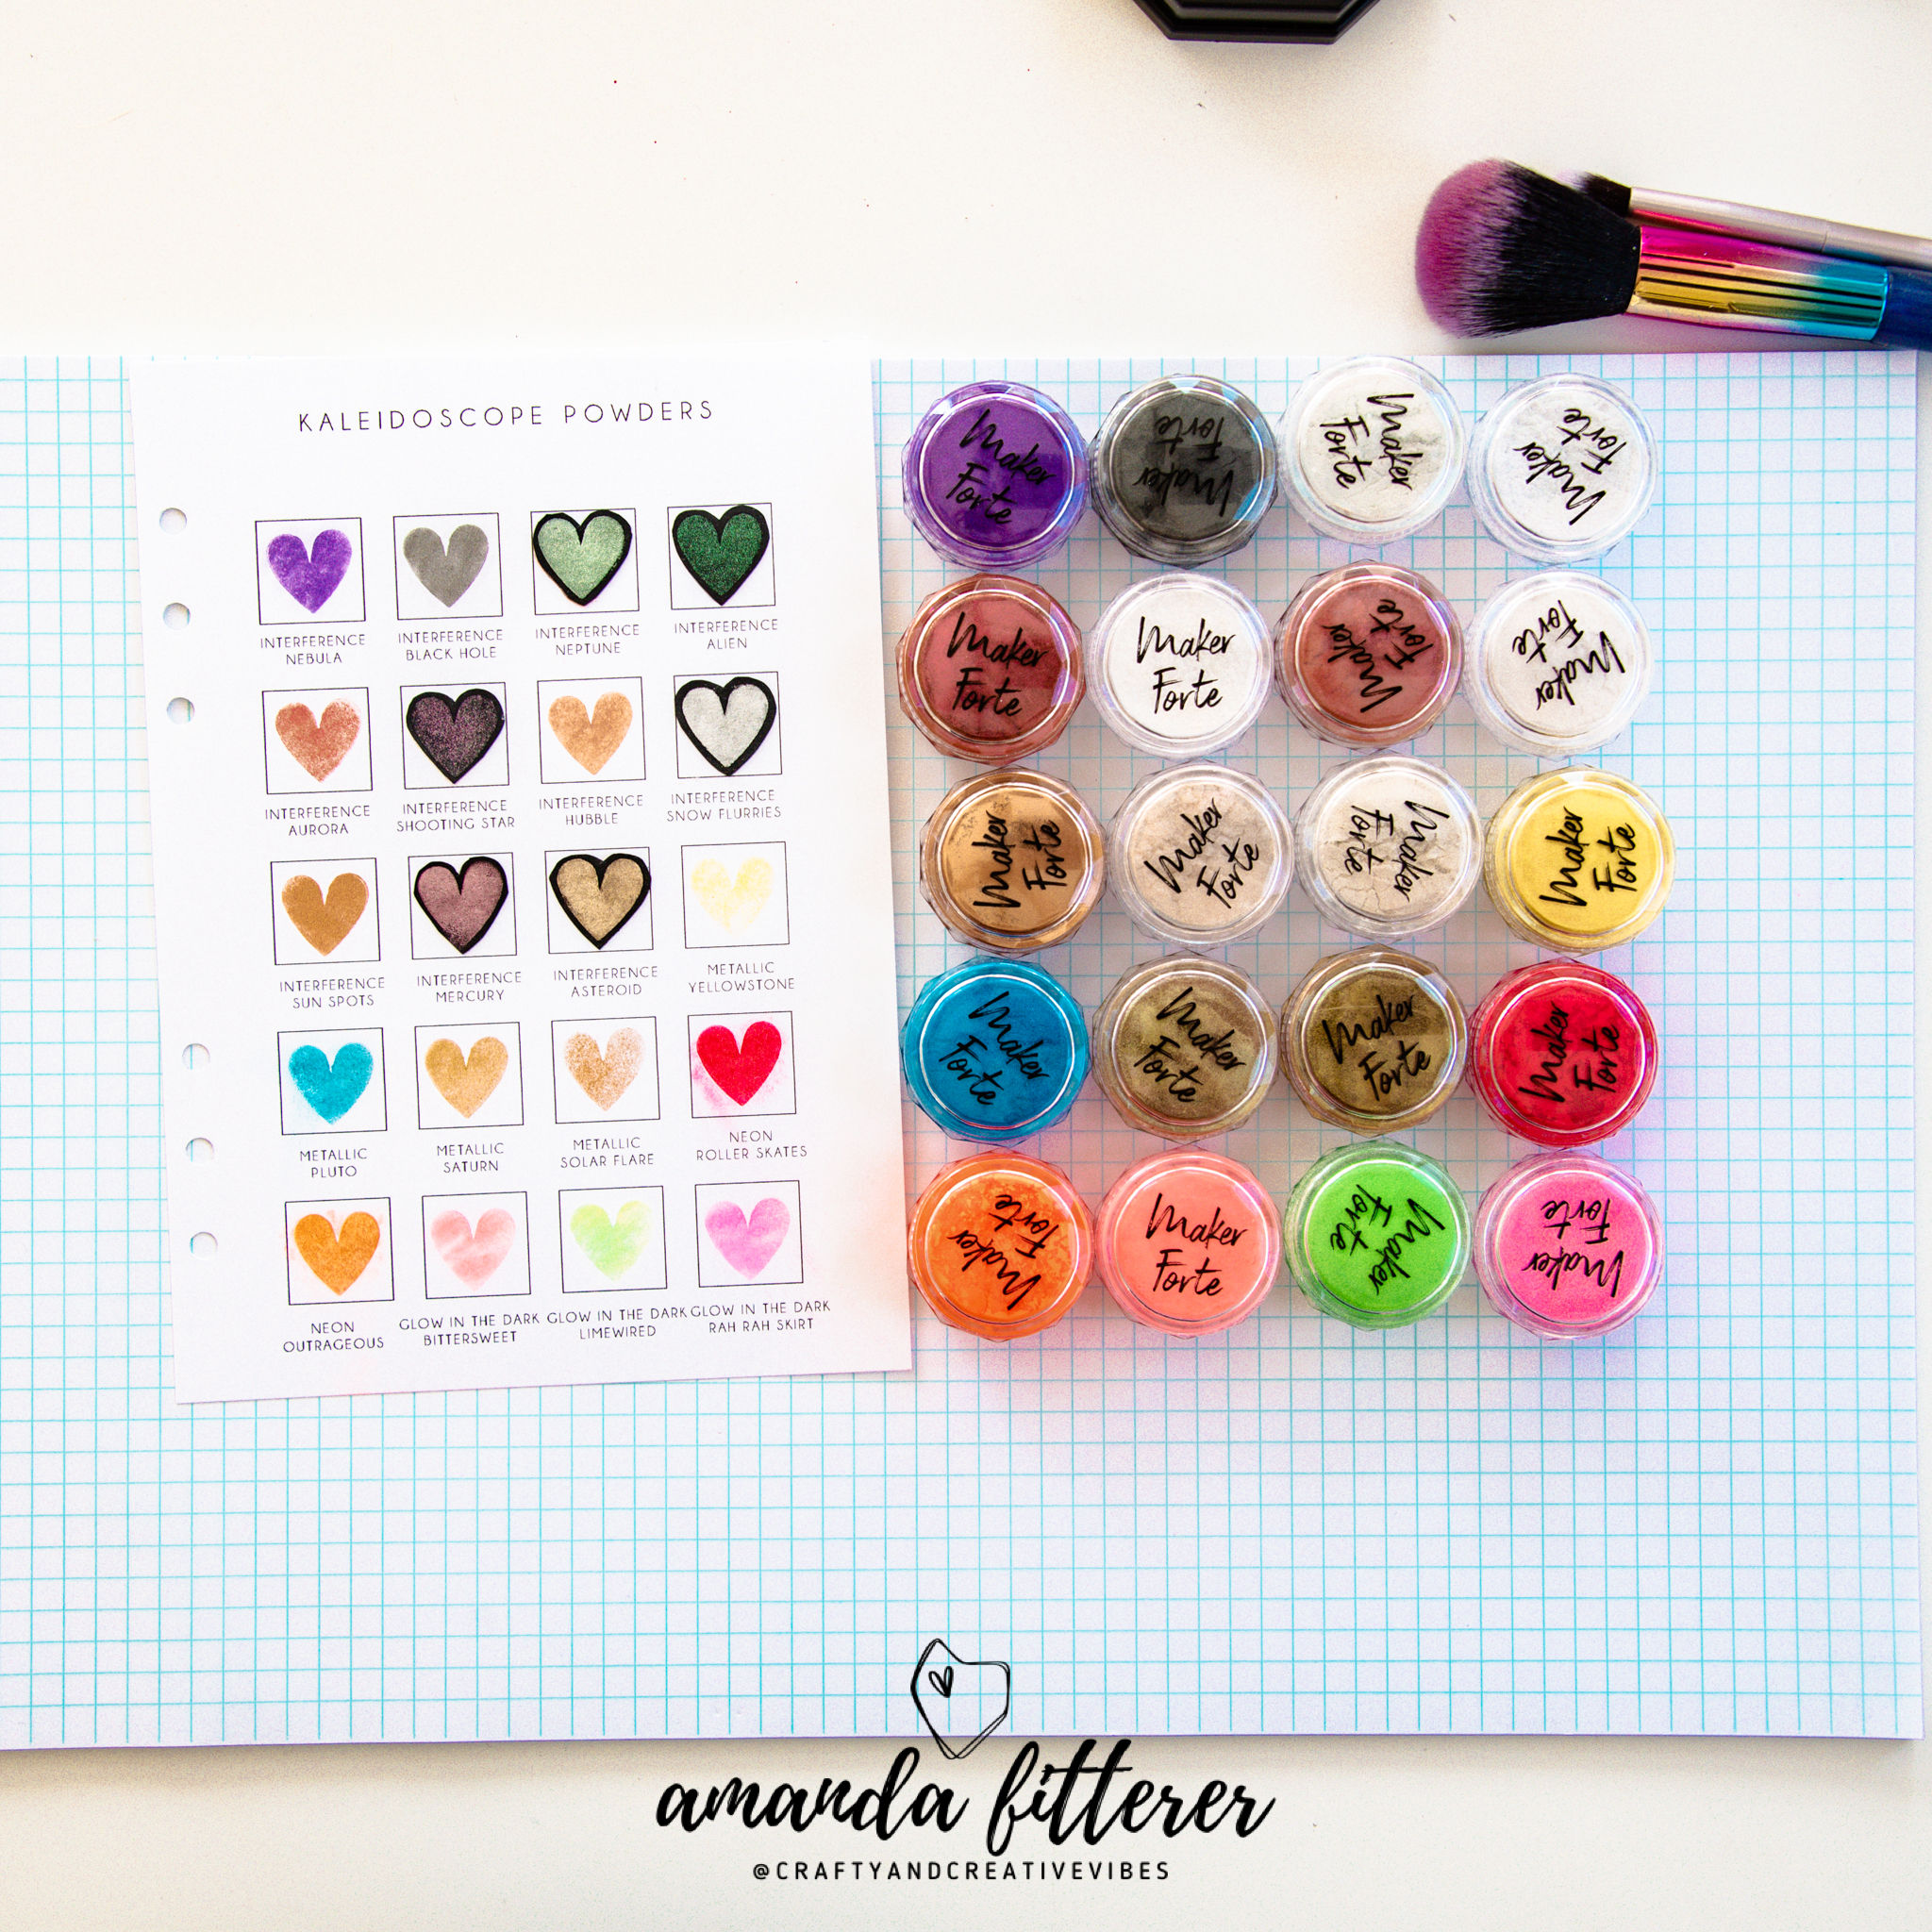
Plus, I used a few of Maker Forte’s newest gems: Kaleidoscope Powder – Interference – Nebula and Easy Watercolors by Hedgehog Hollow.

To make this card, I’m starting with the Kaleidoscope Powder – Interference – Nebula and a water brush. Putting a small puddle of water on my workspace, I am mixing in a bit of the powder. Using my water brush, I can mix it into a watercolor medium.
On a piece of watercolor cardstock, I am taking the largest of the Easy Watercolors by Hedgehog Hollow stamps and am brushing on my watercolor mixture straight onto my clear stamp. Once it’s completely covered, I can stamp the image. I am going to repeat this process twice to get a better coverage.


After waiting for that to dry, I am placing some leaf stamps from the Pink and Main’s Happy Fall stamp set on top of my watercolor. I am using the Color Hive Clear Embossing Glue Ink Pad to create a sticky image of the leaves. Then, I can apply my gold embossing powder to my images and melt it with my heat tool.


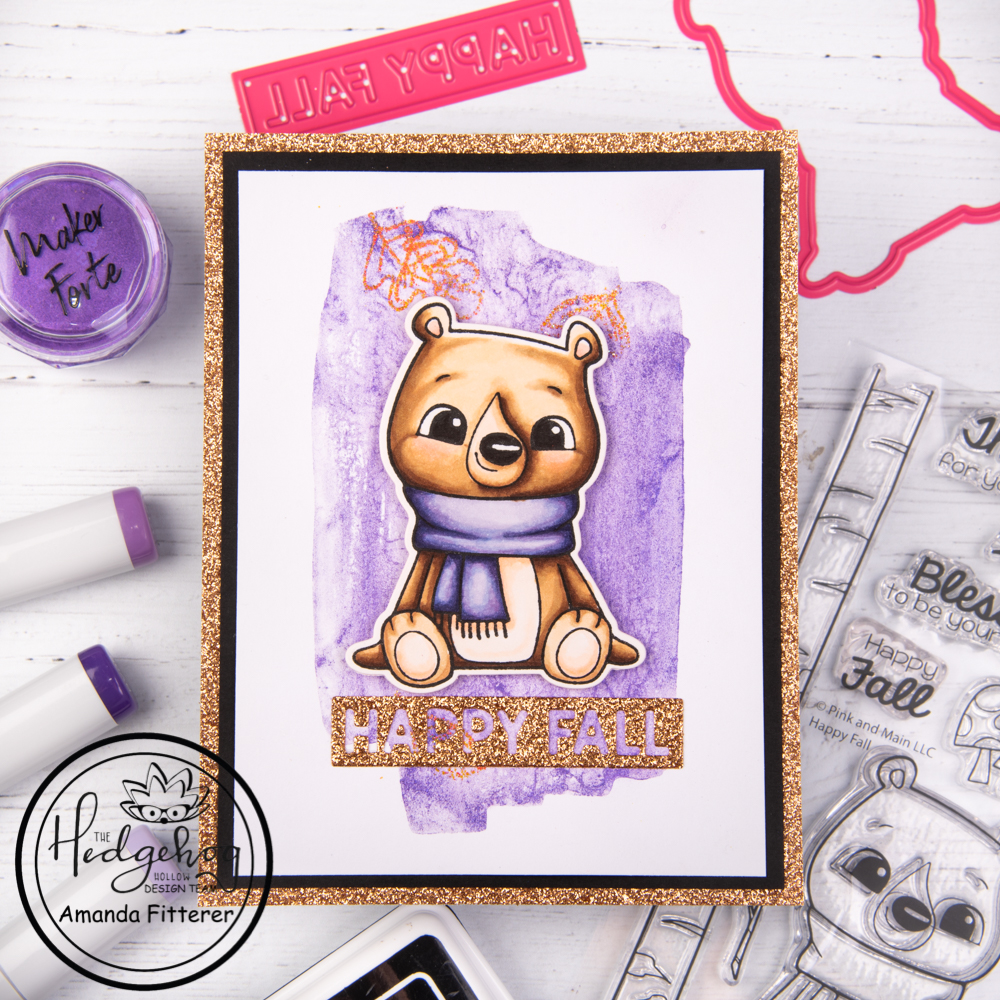
I’m ready to go ahead and stamp my adorable bear from the Pink and Main’s Happy Fall stamp set! (This bear is definitely the cutest bear EVER!) I am going to stamp him with Hero Arts Intensified Black ink and color him with Copic markers.


I cut my watercolor cardstock down to 3.75″ x 5″. Behind that, I’m layering a piece of black cardstock and a piece of gold cardstock.
The last thing I need to do is create my sentiment! I am using the same gold cardstock as I used for my base and cutting out the “Happy Fall” banner from the Pink and Main Blessings Slimline Die. I saved the little insides of the A’s and P’s to glue in after I get my sentiment down!

Next, I am ready to glue everything down and use 3D foam squares to adhere my bear!

I’d love it if you left a comment below or on my Instagram page to let me know if you enjoyed this post!
Don’t forget that you have until October 14th to get the October Subscription Box! It’s filled with some really fun stuff! If you didn’t get a chance to see the goodies, you can watch the video here! Or, if you’re already signed up for the subscription, you should be getting your box soon! Yipee!!
I hope you all enjoy the rest of your week! I’ll be back next Monday with another fun project!! I can’t wait! Xoxo, Amanda
Are you ready for the holiday season? I am most certainly not! That’s why I am not quite ready for the traditional reds and greens of holiday cards! The October Subscription box has the cutest Holiday stamp set, though, and I NEEDED to use it NOW! So, I used purples instead of the traditional colors! Sneaky sneaky, I know! I tricked my brain!

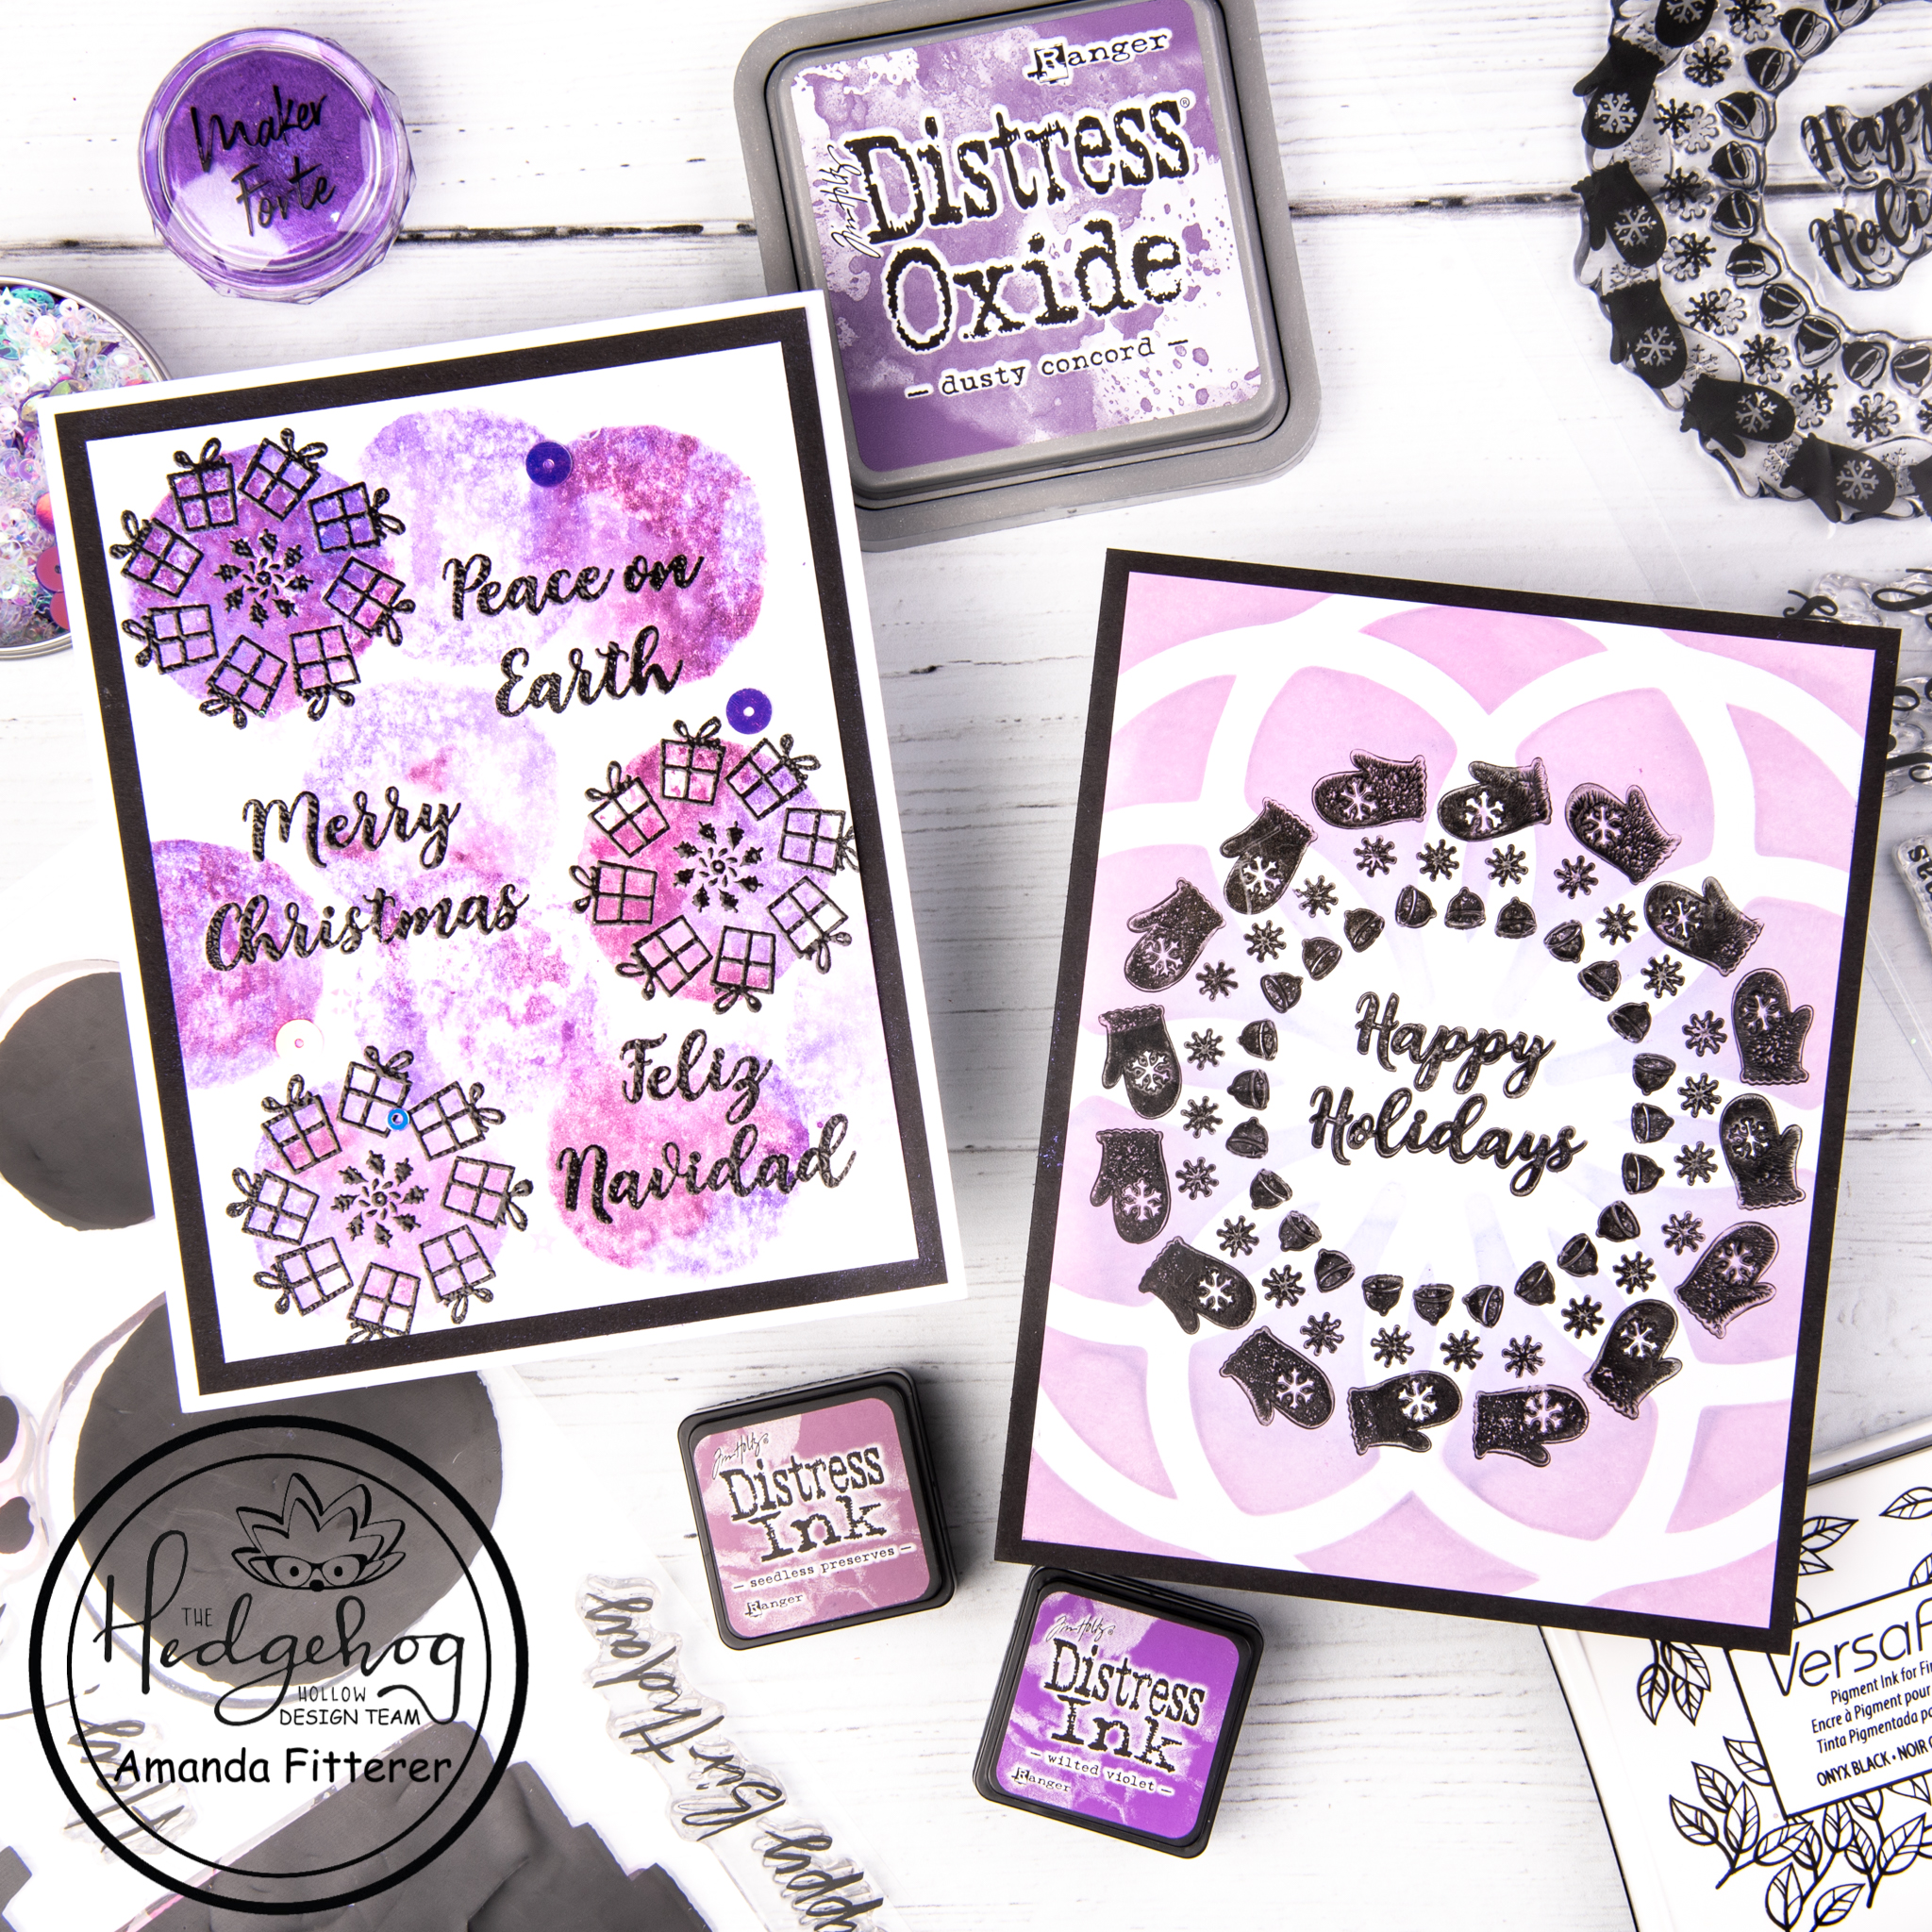
For the first card, I am stamping my sentiments and wreath from the “Around Winter” stamp set that is included in the October subscription box. I am going to use my MISTI to stamp everything with VersaFine ink, emboss it with clear embossing powder, and then melt the embossing powder with a heat tool. I am stamping on watercolor cardstock, because I’m going to use watercolors in the next step.

Now, I’m grabbing this newly released “Easy Watercolor” stamp set. I am mixing Seedless Preserves and Wilted Violet Distress Inks on the stamp, spritzing with water, and then stamping the image.

While I wait for this to dry, I’m going start on my next card!

For this second card, I am starting with a piece of Snow Flurries Perfect Blend Cardstock. This cardstock is AMAZING for ink blending! It has a sort of glossy finish, but not as glossy as photo or Yupo paper. The ink stays wet just a bit longer than normal cardstock so you have time to blend. It dries pretty quickly though, so it doesn’t slow down your cardmaking!
I am using Dusty Concord and Shaded Lilac Distress Oxides with this gorgeous stencil that was also included in the October subscription box.

Using the Around Winter stamp set again, I am going to stamp a wreath with the “Happy Holidays” sentiment in the center.

Now I’m ready to assemble and embellish my cards! I am going to trim my watercolor card front to 3.75″x4″ and then mount it to a piece of black cardstock that I cut down to 4″x5.25″. Then place on my white A2 card base. To add a little more balance, I am going to adhere a few Angel Mix Sequins.
For my wreath card, I am going to cut my card front down to 4×5.25″ and then mount it to a black A2 card base.


Are you signed up for the Hedgehog Hollow Subscription Box already? If so, you should be getting your box soon! What will you make with all those goodies!?
If you missed the live stream revealing the October Box goodies, you can find it here.
I’m off to go make some more fun projects for my blog post on Tuesday! See you then! Xoxo, Amanda
September is coming to a close and this is my last project with the September 2020 Subscription Box! I’m so excited to see what the October box looks like, though! It’s so exciting waiting for it to arrive!
If you didn’t get a chance to grab up the September Box, you can check here to see if it’s available as a One-Off!
For my project this week, I created a video tutorial using the 2 vinyl pieces that were in the box! Normally, I use my Silhouette Cameo with vinyl. I never thought to use my dies and die cutting machine for my DIY projects!


Here is the video tutorial:

Hello there friends! Today I’m sharing another project created using the September 2020 Hedgehog Hollow box!
To see the entire post, click here.
Happy Saturday, you all! I hope you’re all having a great day today! Thank you for coming to my blog to check out my card! Do you have The Hedgehog Hollow’s September subscription box?? It is SO fun!
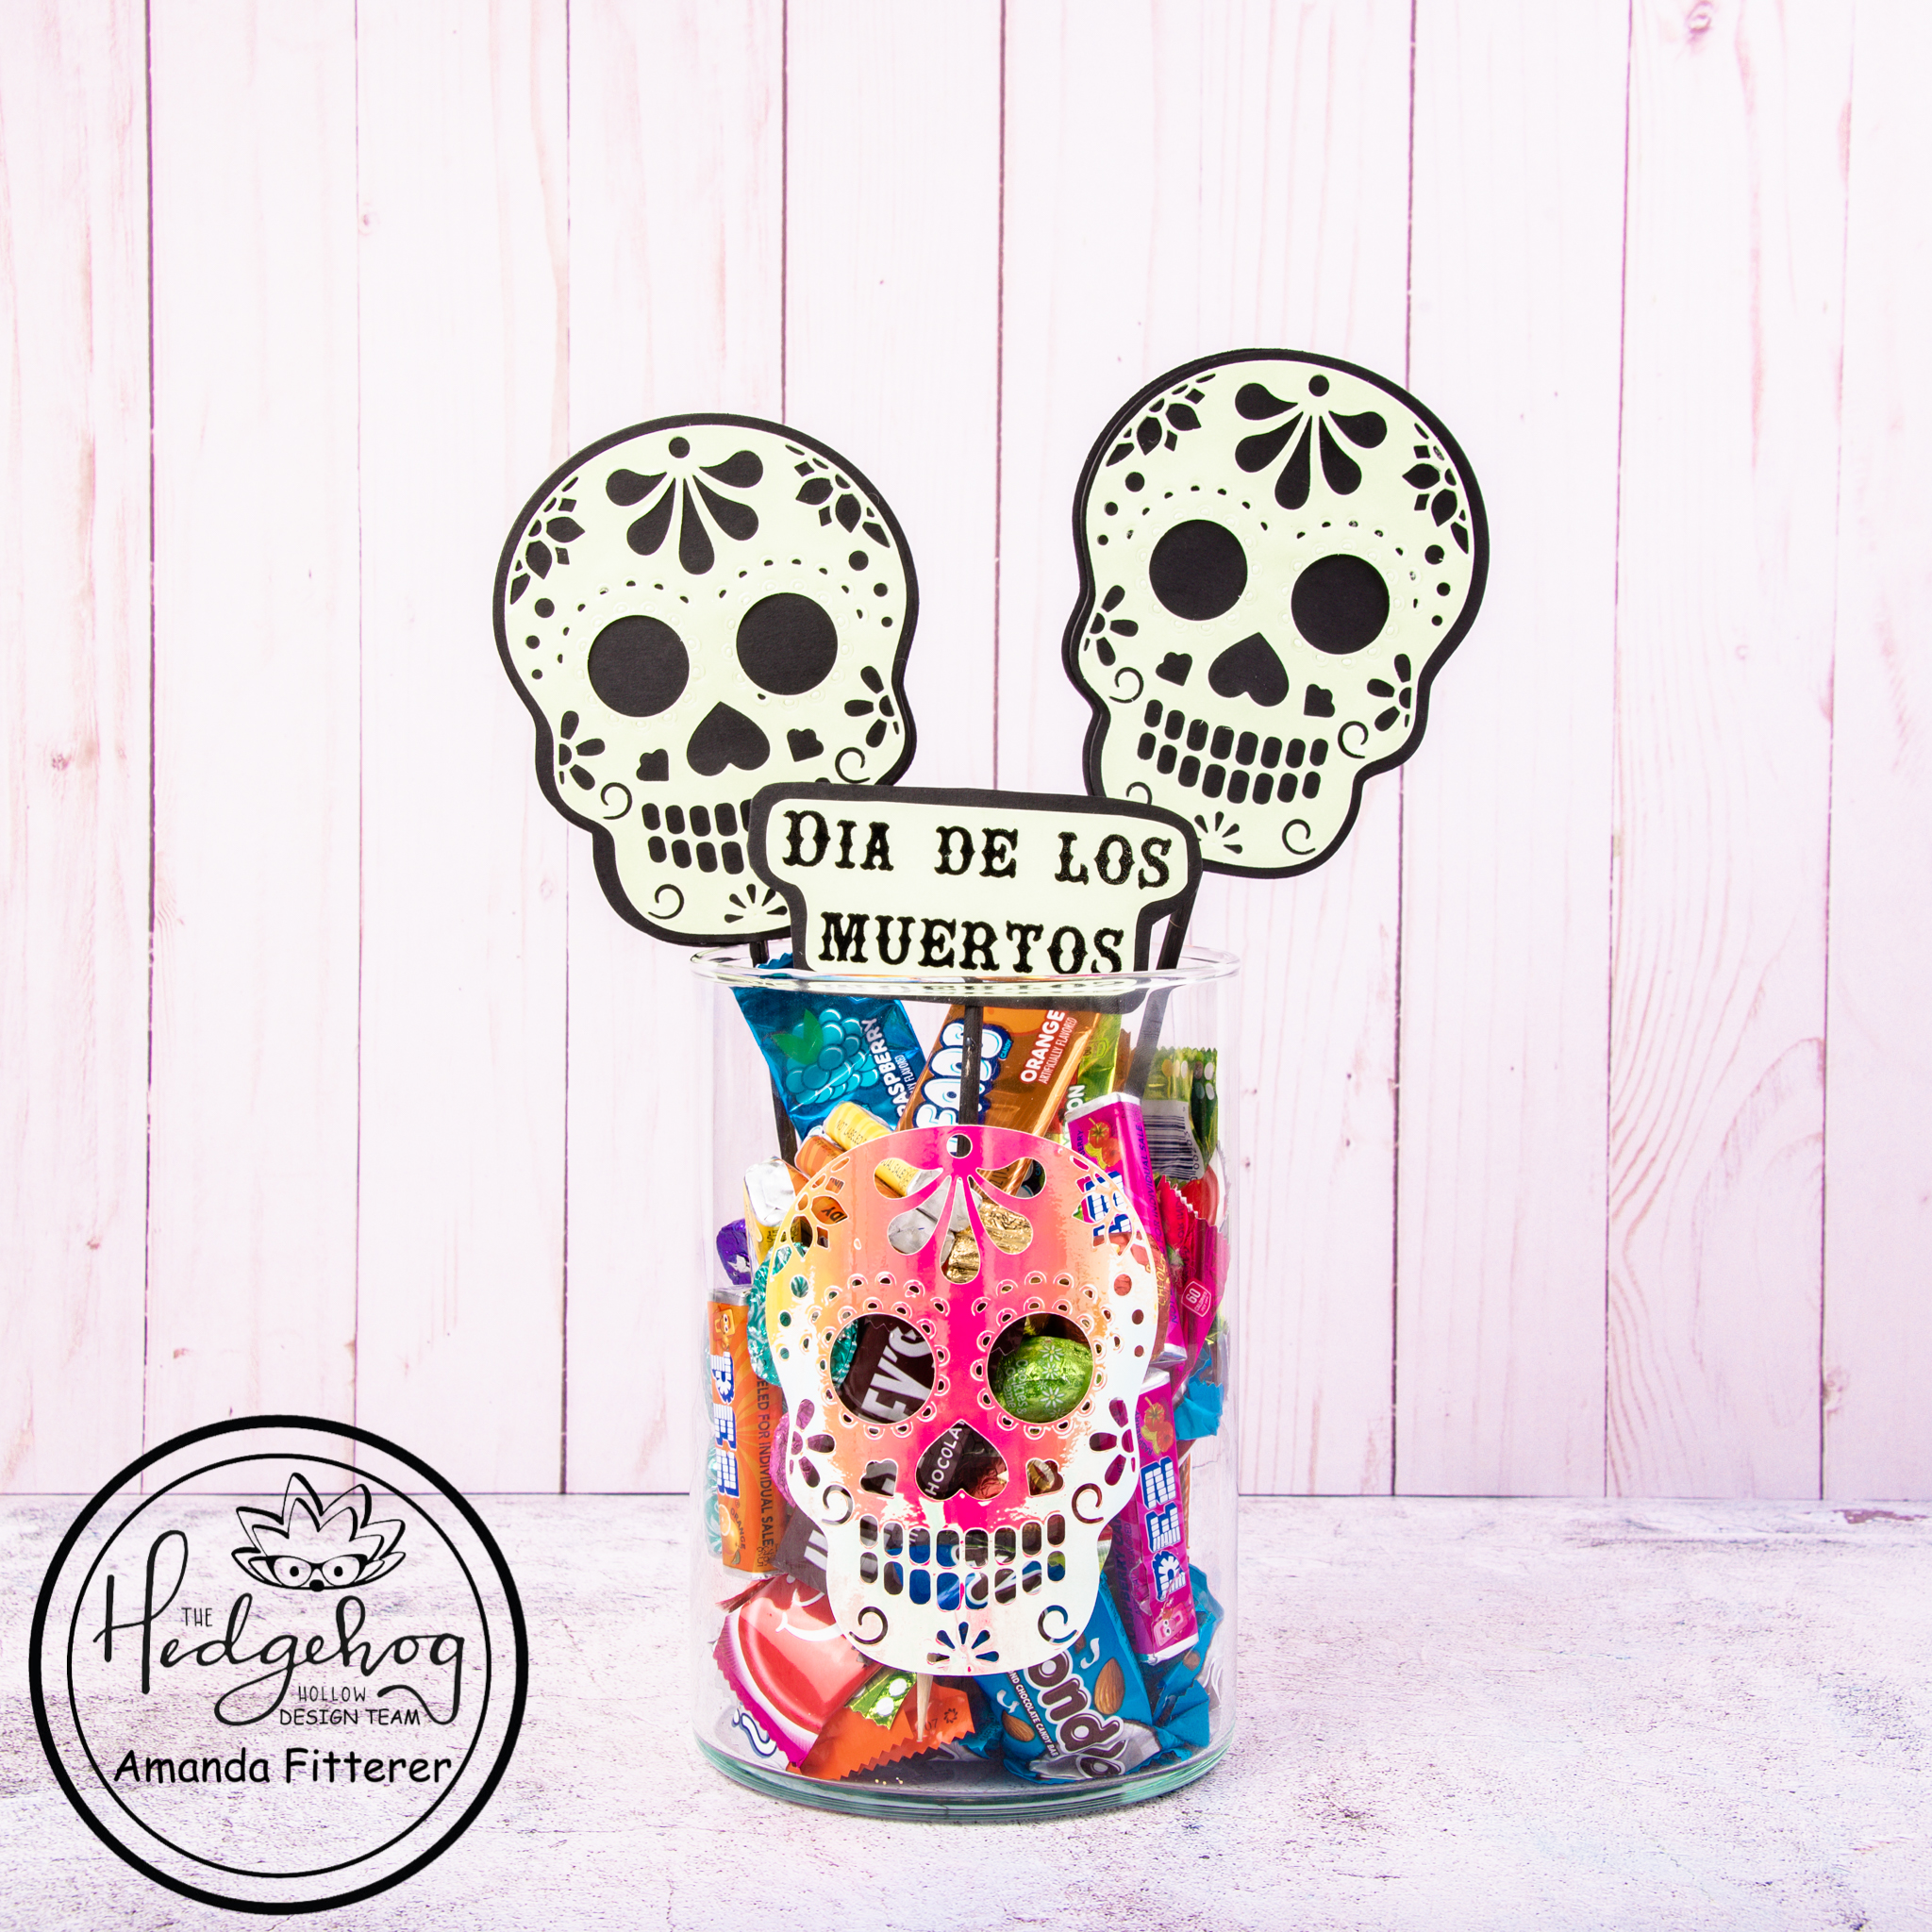
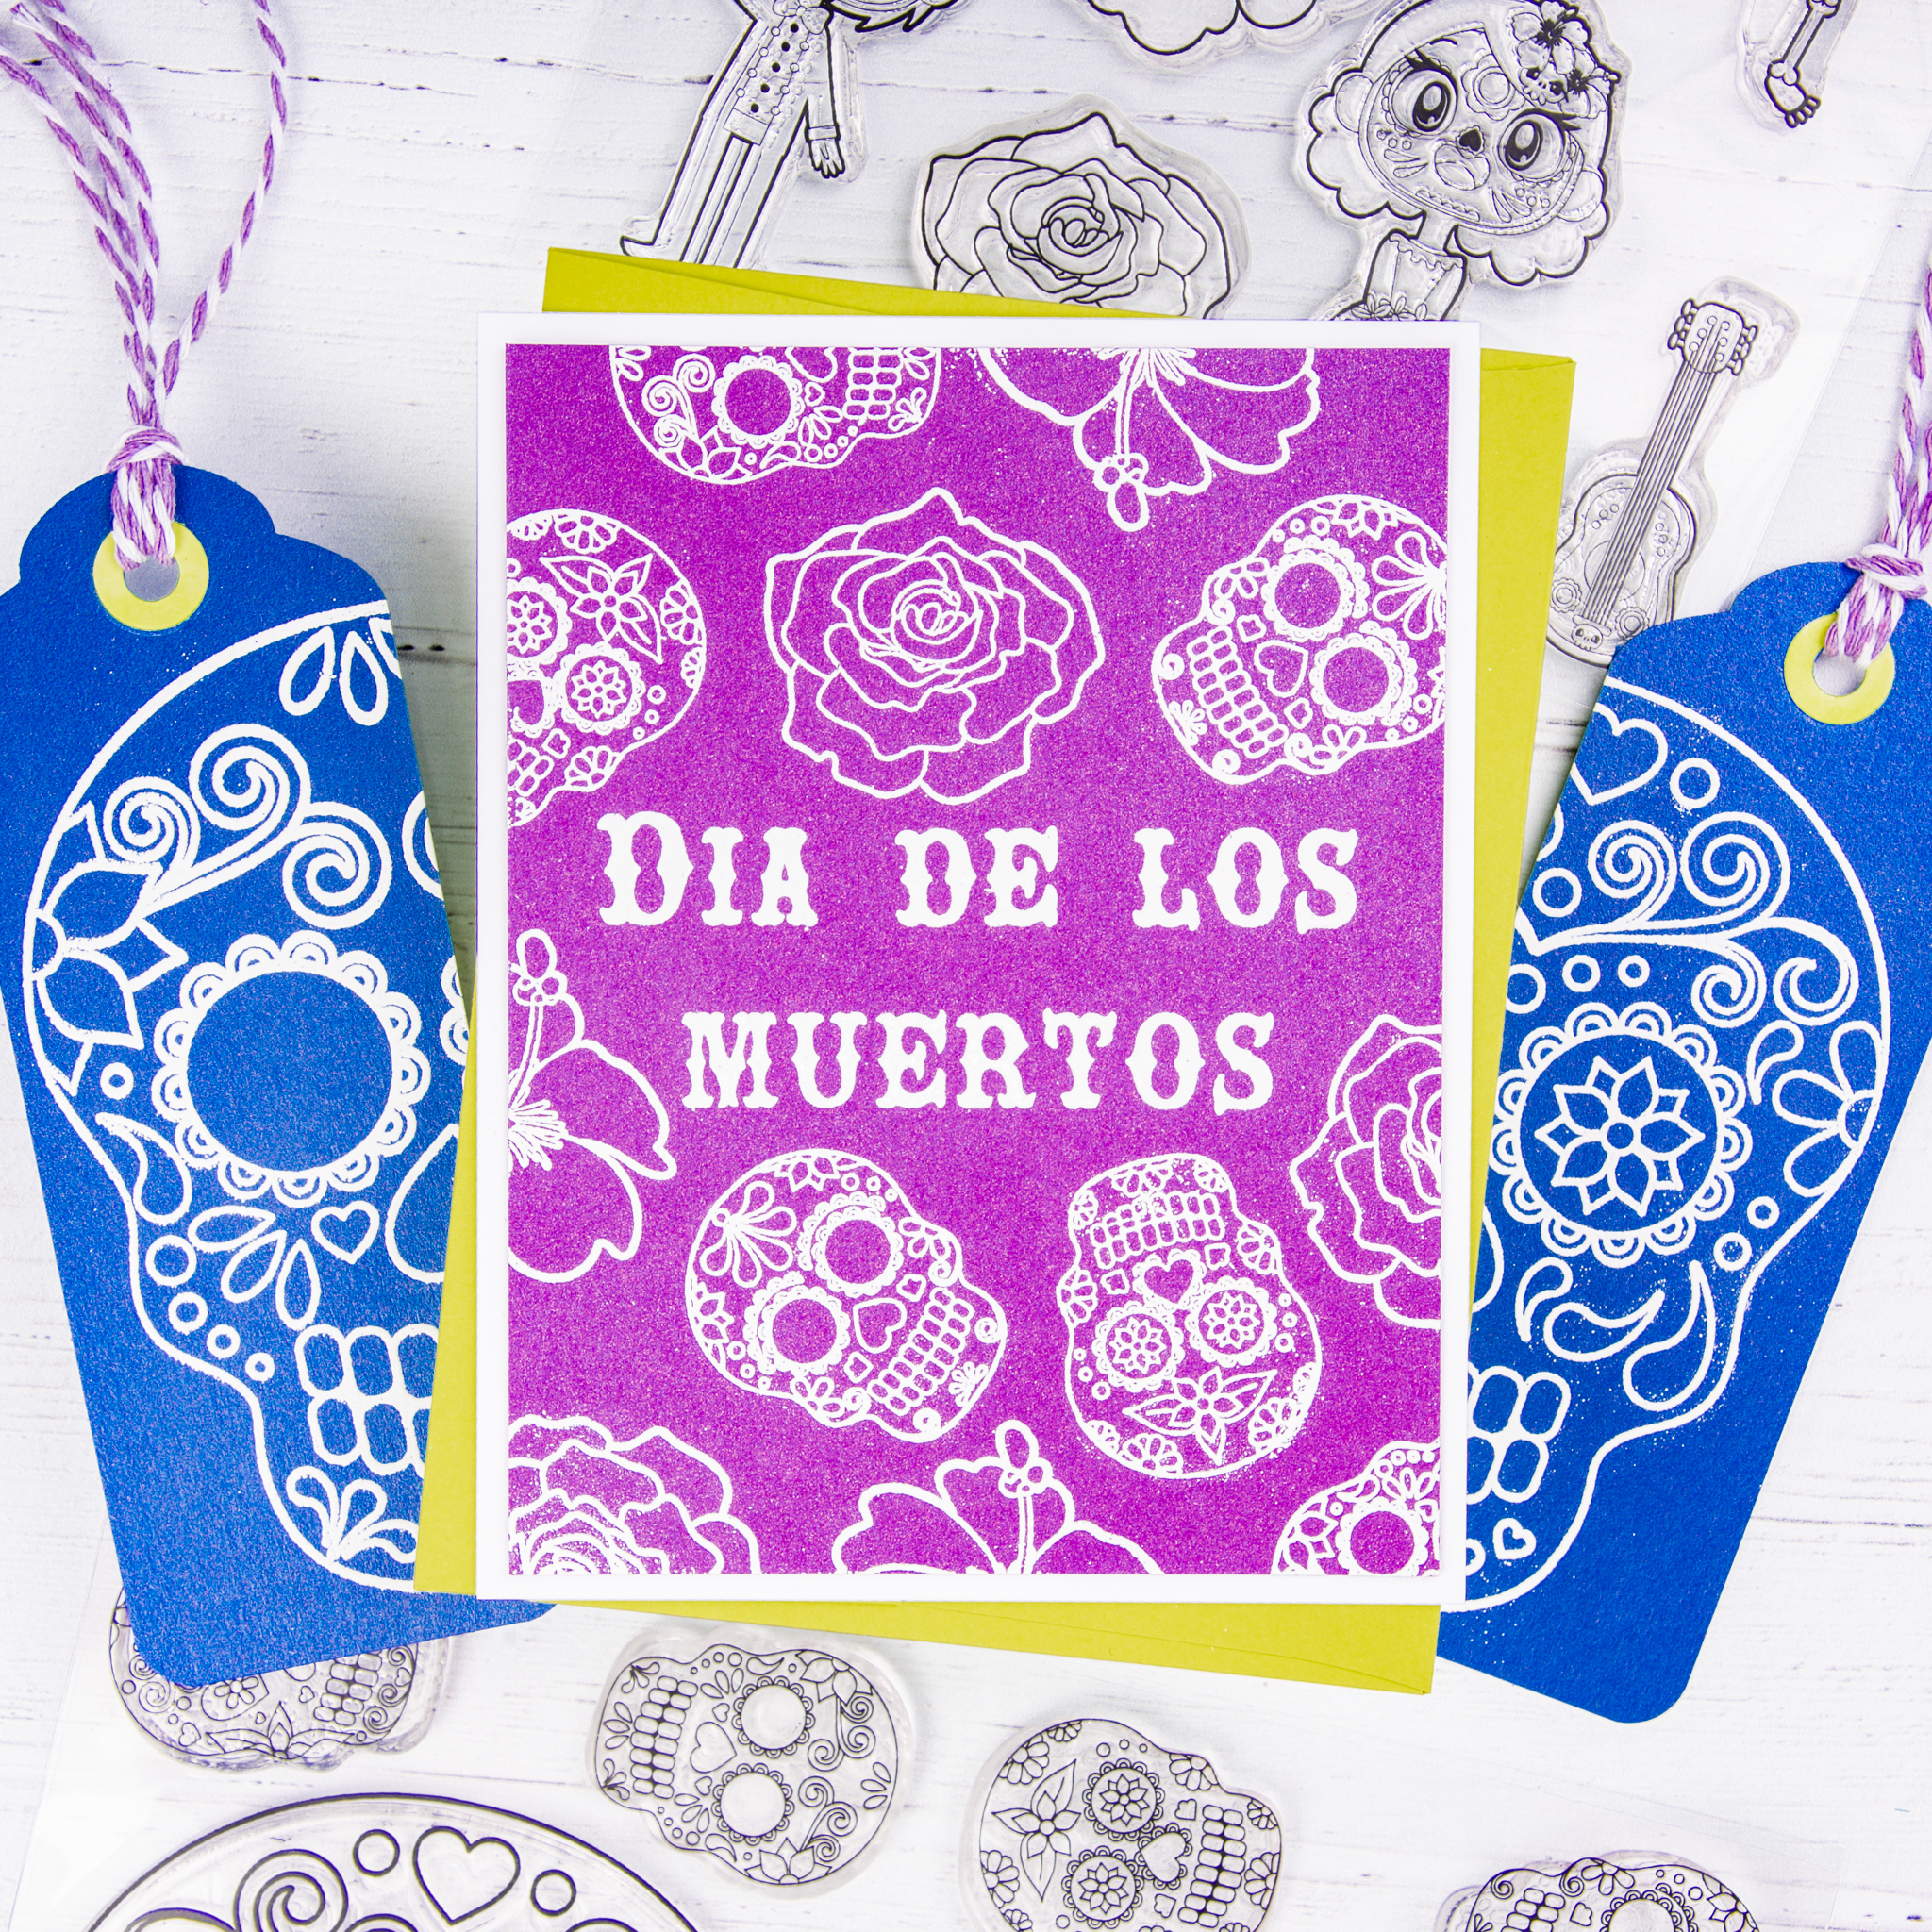
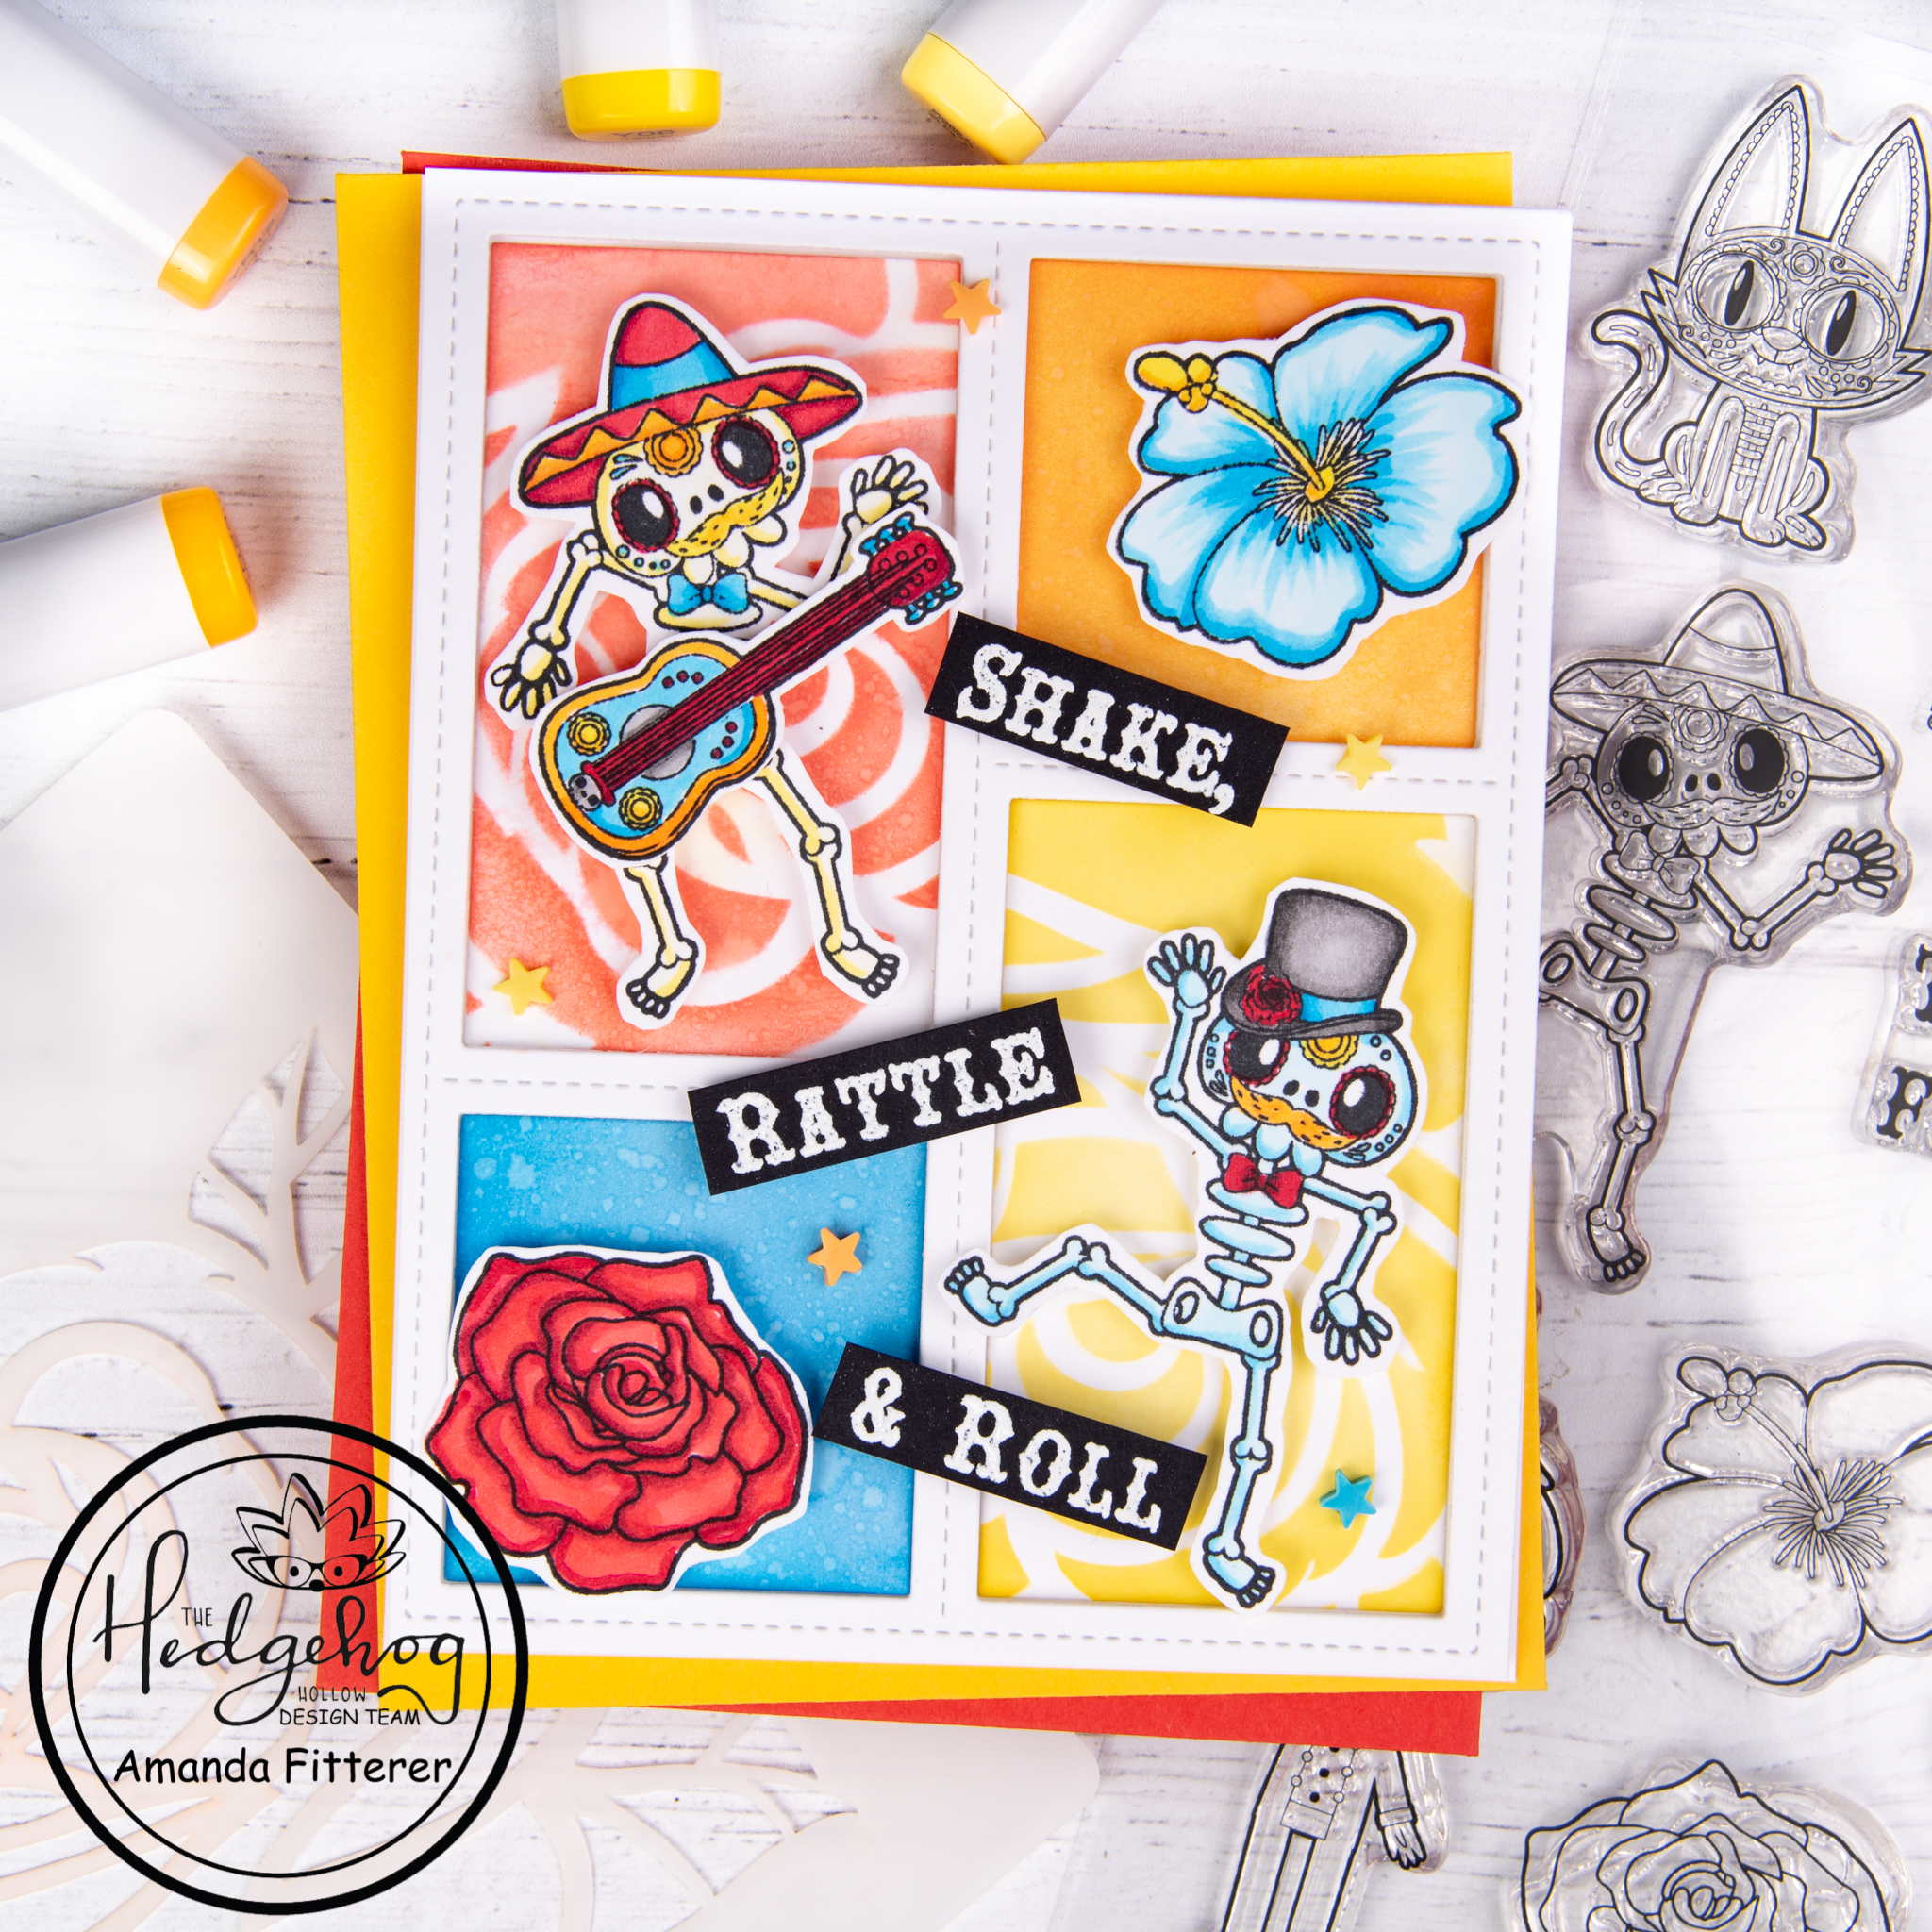
I just love this colorful card to celebrate the Day of the Dead!


Using the Dios De Los Muertos stamp set, I’m going to stamp my images and sentiment. I’m using my Copic markers to color my images. To finish the card off, I’m using glue, 3D foam squares, and some Multicolored Stars embellishments.


I think this card turned out so happy and bright! I hope you enjoyed this post and thanks again for coming to my blog!
I would love for you to follow me on Social Media!
My links:
Instagram | Website | YouTube
Don’t forget – this box is only available until September 14th! To see all the products you’ll get in the box, click here. To see the subscription options, click here.
‘Til next time!! Xoxo, Amanda
Hi friends! I’m back again with some more projects with the Hedgehog Hollow June 2020 subscription box! I had so much fun guest designing for them!


My first project is these adorable earrings I made using Shrink Prink (by Dress My Craft). I stamped the images using Staz-On ink so it would dry quickly and not smear.

I colored the images with colored pencils on the matte (opposite) side.

I cut the images out with precision scissors and then used a 1/8″ hole punch on both leaves to create a whole for my earring wires.

I used my heat tool to shrink them down and then added the earring wires.


The 2nd project I created was an elephant keychain. I used the same steps as the earrings, but used a 1/4″ hole punch instead.

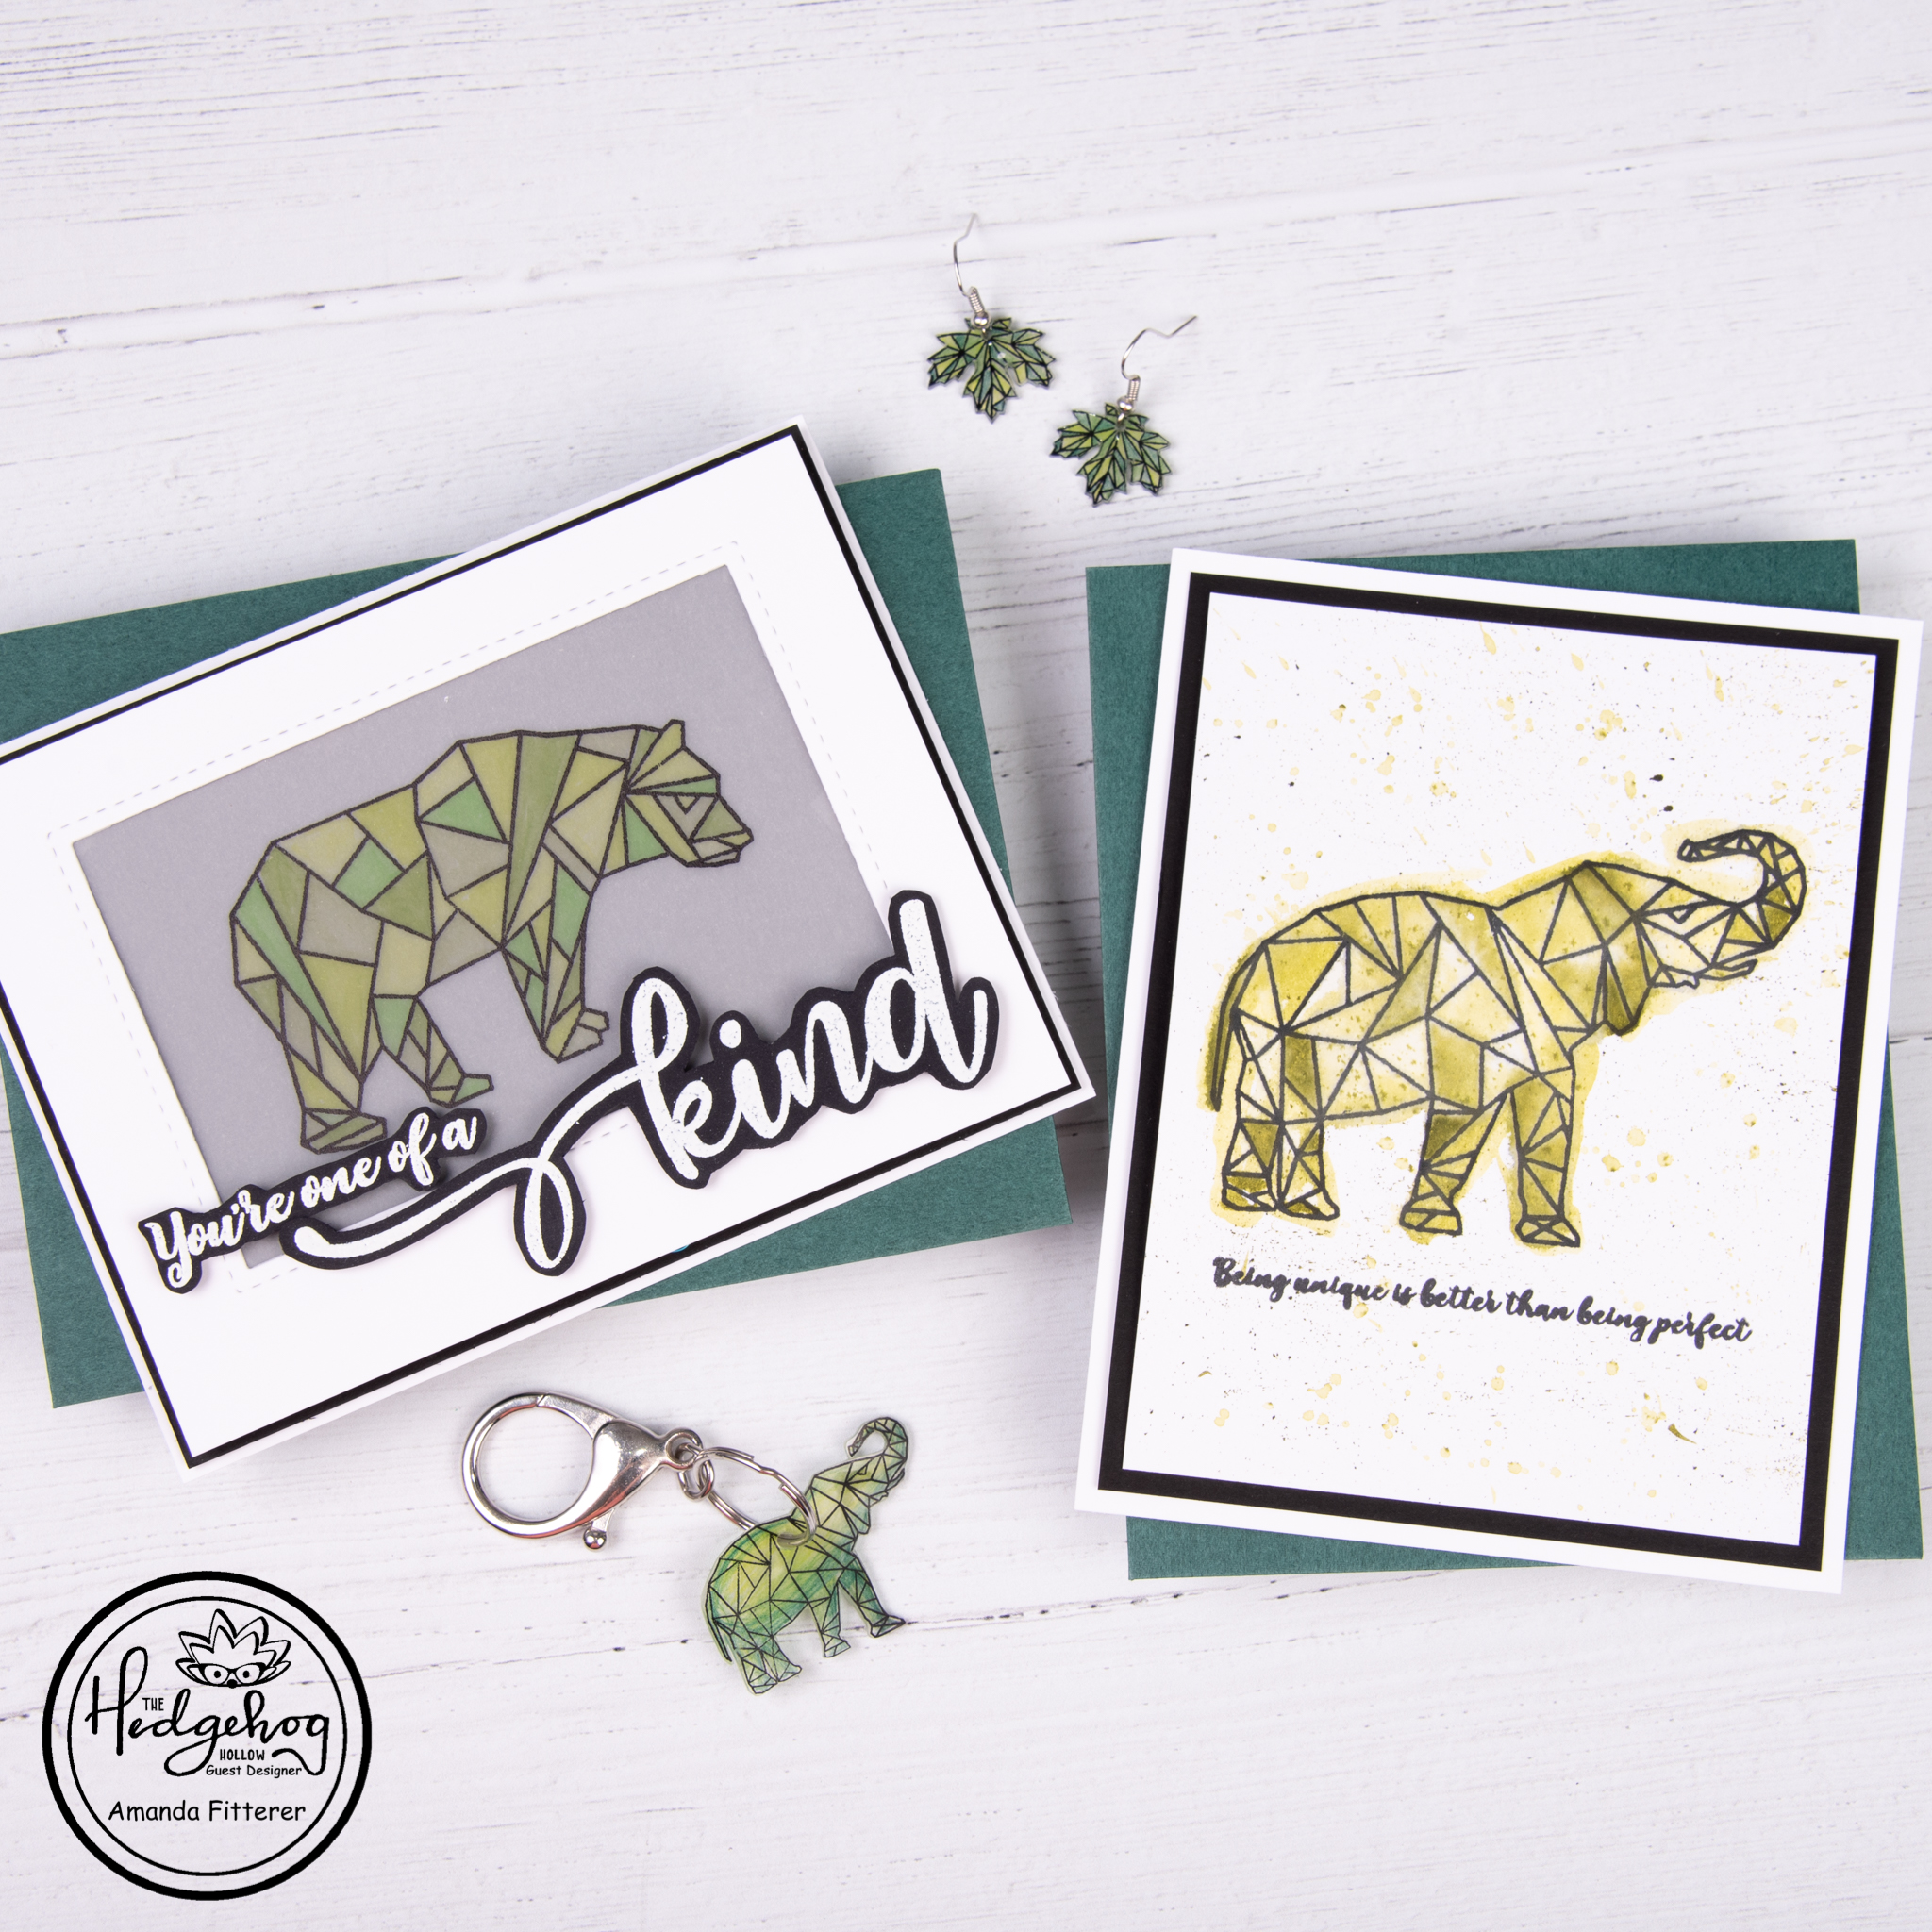
The next project I created was this beautiful watercolor elephant card.

I stamped the image with Catherine Pooler Midnight Black ink. This ink pad is waterproof so I don’t have to worry about the watercolor smearing the ink.

I used Altenew watercolor markers and a water brush to color the image. I then splattered the watercolor all over the card front.

The last project I did was a fun light-up card using Pear Blossom Press’s EZ Lights.

I used some dies to create a “window” for my card front. I cut down a piece of vellum and folded it in half to make it thicker.

I stamped my image with Staz-On ink so that it would dry quickly and not smear.

I colored the backside of the image with Copic markers.

I taped my vellum to the backside of the window with tape. I also stamped my sentiments on black cardstock with VersaMark Watermark ink. I used white embossing powder and heat embossed the sentiment with my heat gun. I used scissors to cut the sentiments down.

I added 3D foam strips to the back of my card and taped my EZ Lights onto my card. I used double sided tape and 3D foam strips to assemble the card so that when you press the sentiment “kind”, the card lights up!


I had such a fun time guest designing with this box! Thank you so much for checking out my posts! Xoxo, Amanda

Hey all my crafty friends! I hope you are all doing well!
Hedgehog Hollow asked me to guest design for them using their June 2020 subscription box.
I created a video showing all of the contents of the June 2020 box, as well as the process for making 3 fun geometric cards!

To make these cards, I stamped the images with Tuxedo Black Memento ink and used my Copic markers to color them in. I used precision scissors to cut each image out.

I stamped my sentiments out with Tuxedo Black Memento Ink and Frayed Burlap distress oxide. I cut them out with scissors as well.

I cut down my beautiful patterned paper and cardstock pieces down to fit my card base and layered them on top of each other. I adhered them to my card base with double sided tape. I used liquid glue to adhere my chipboard pieces and 3D foam squares and strips to adhere my animals and sentiments.
These cards were so simple to make, but ended up looking so sophisticated and beautiful!
I can’t wait to show you some more projects next week, right here on the blog! Xoxo, Amanda