blog hop · heffy doodle

Heffy Doodle and Sunny Studio Stamps Collaboration Blog Hop

Welcome to the Heffy Doodle and Sunny Studio Stamps Collaboration Blog Hop!
Design Team members from both companies are sharing inspiration using products from both companies!

I couldn’t choose just 1 card, so I decided to make 2!

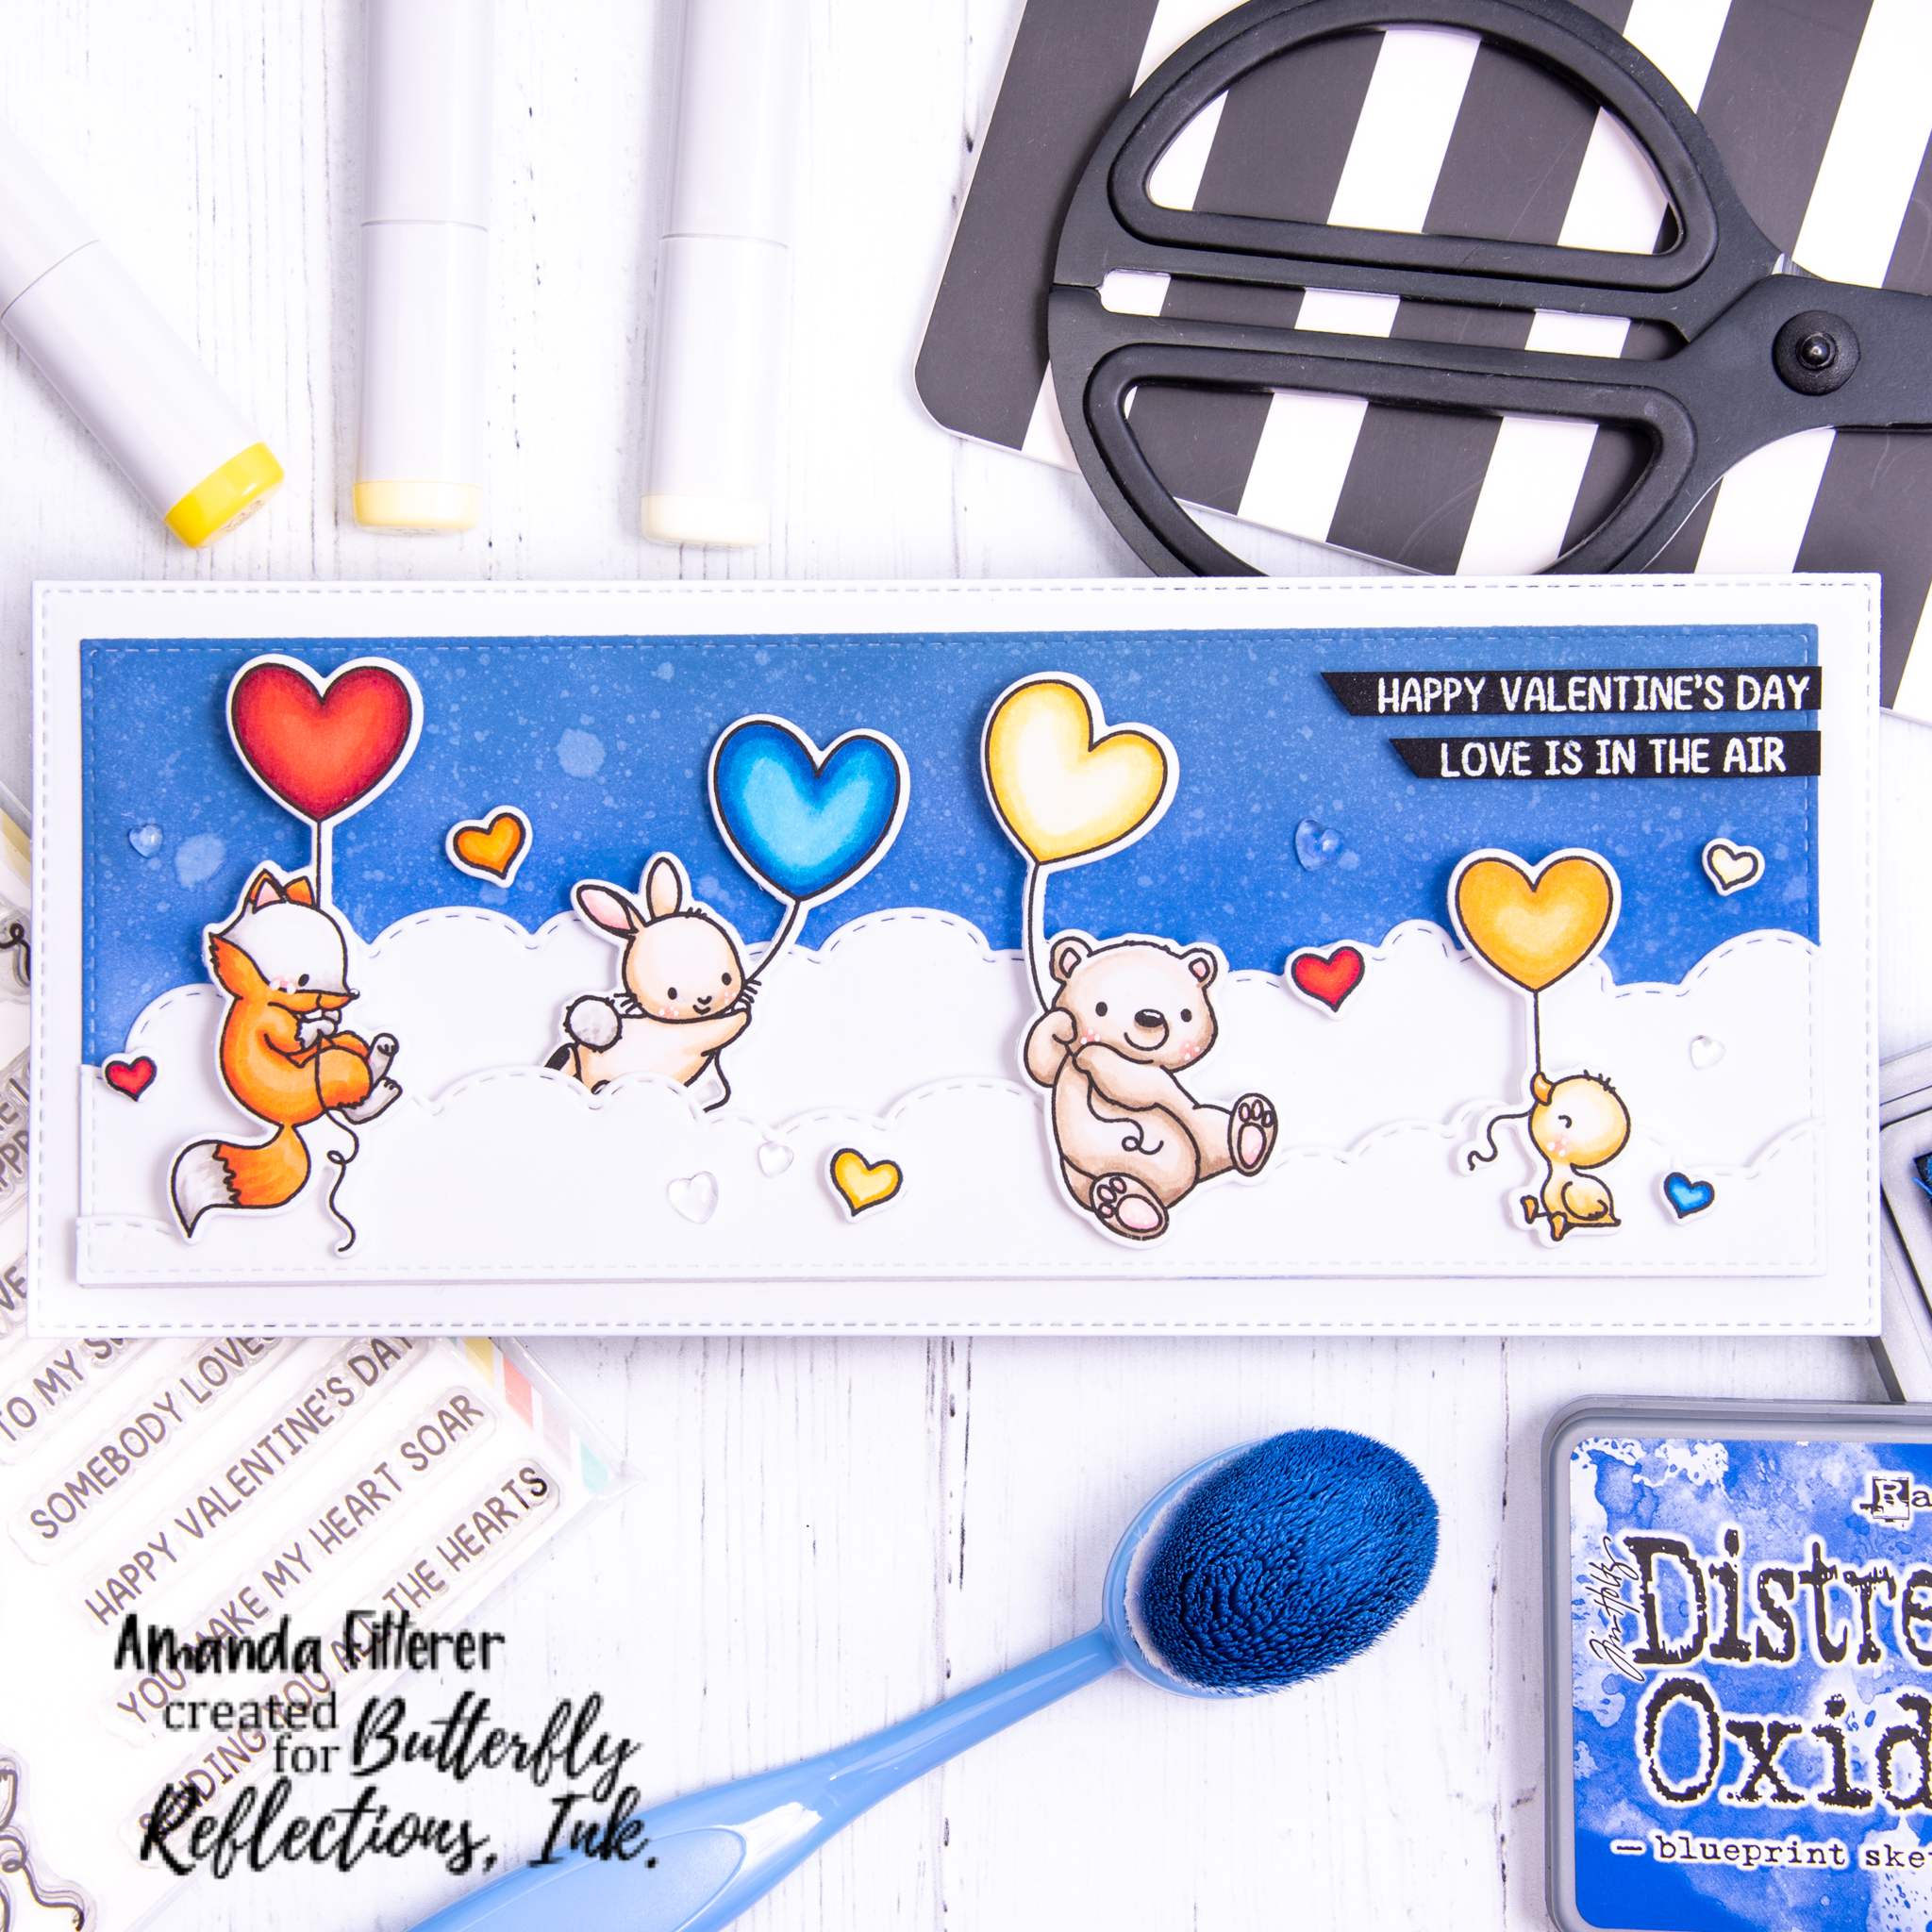
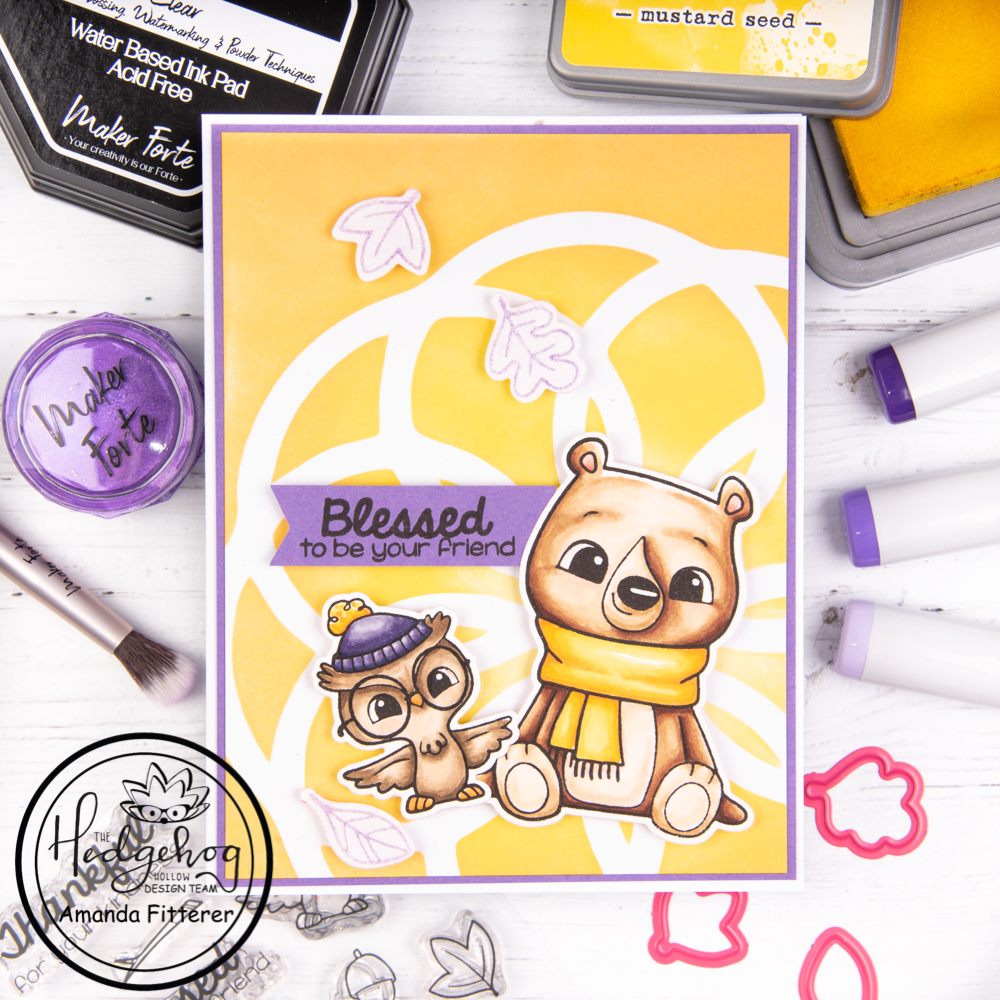
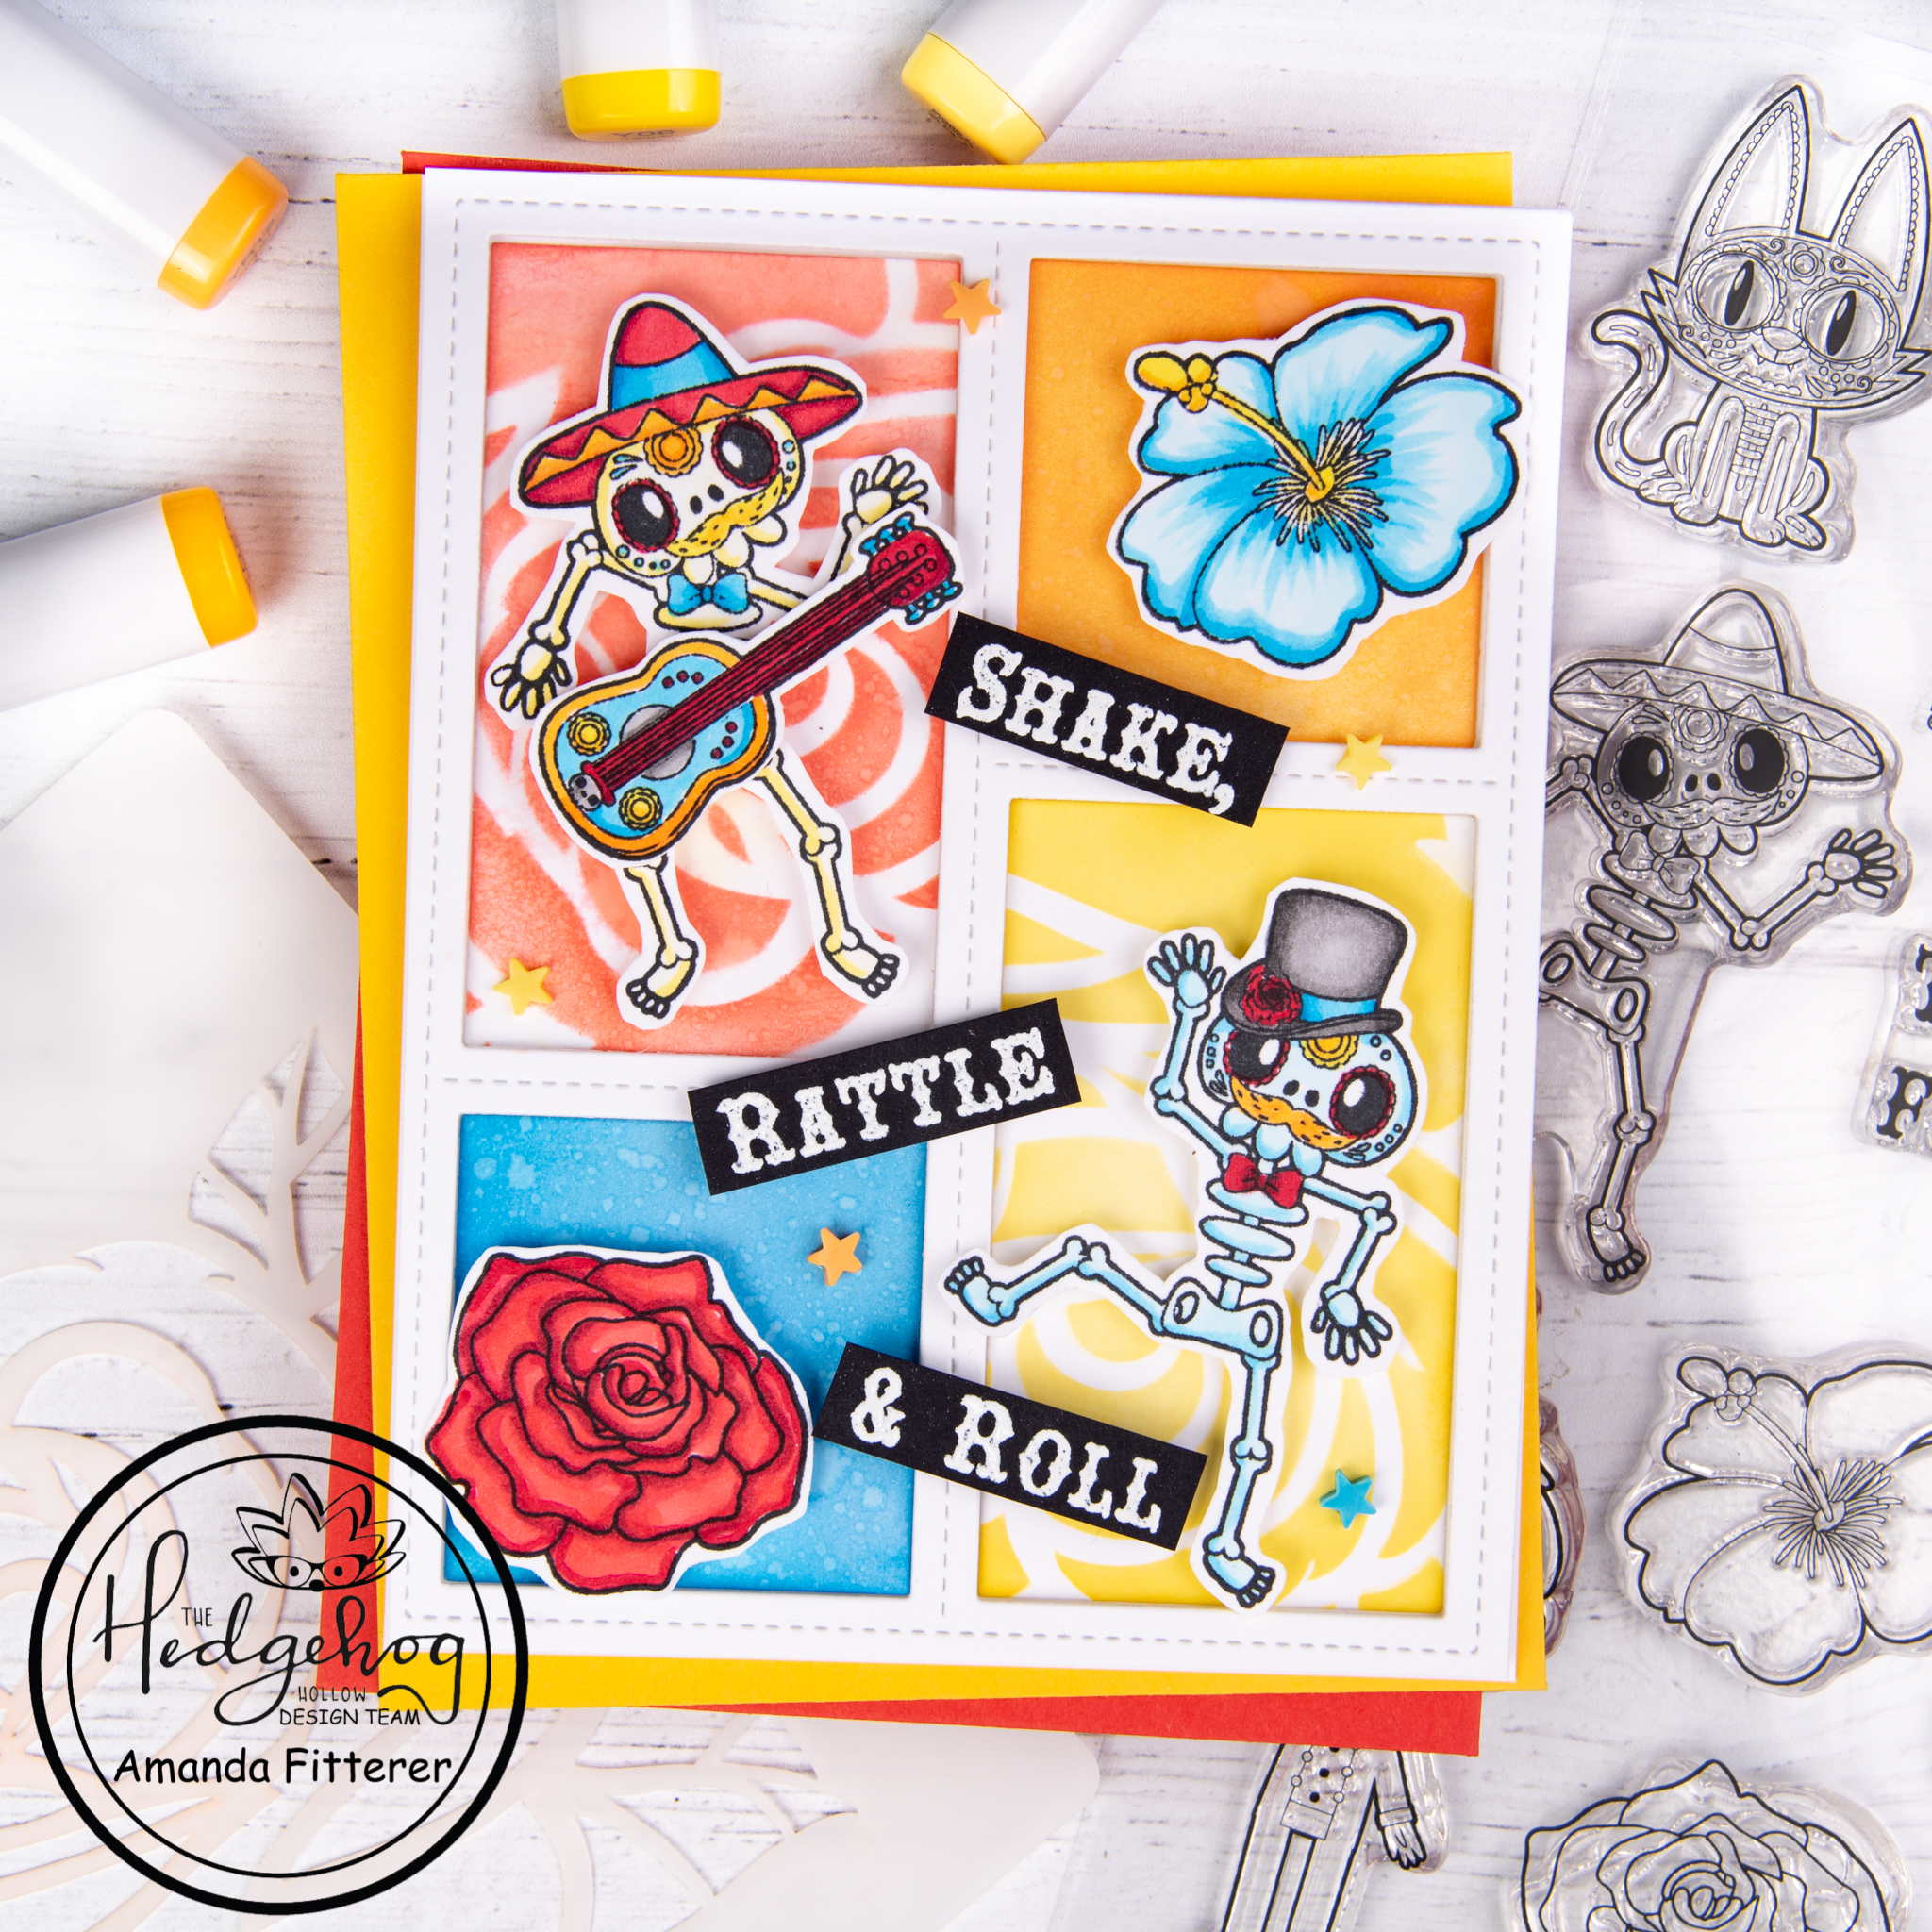
Whenever I’m starting a card, I like to lay my stamps out on my card base to get an idea of what the card will look like. After doing that, I got blended my background using Fossilized Amber, Worn Lipstick, and Dusty Concord Distress Oxides.

The next step is stamping and coloring! I stamped images from the Heffy Doodle Chimply the Best, Wingman, Hootiful, and Beary Big Heart stamp sets. From Sunny Studio Stamps, I stamped images from the Silly Sloths stamp set.

For my sentiments, I used the word bubbles from the Whatcha Sayin’ stamp set. I also used a sentiment from the Silly Sloth stamp set.

Once I had all of my elements ready, I used 3D foam squares and strips to adhere everything to my background.

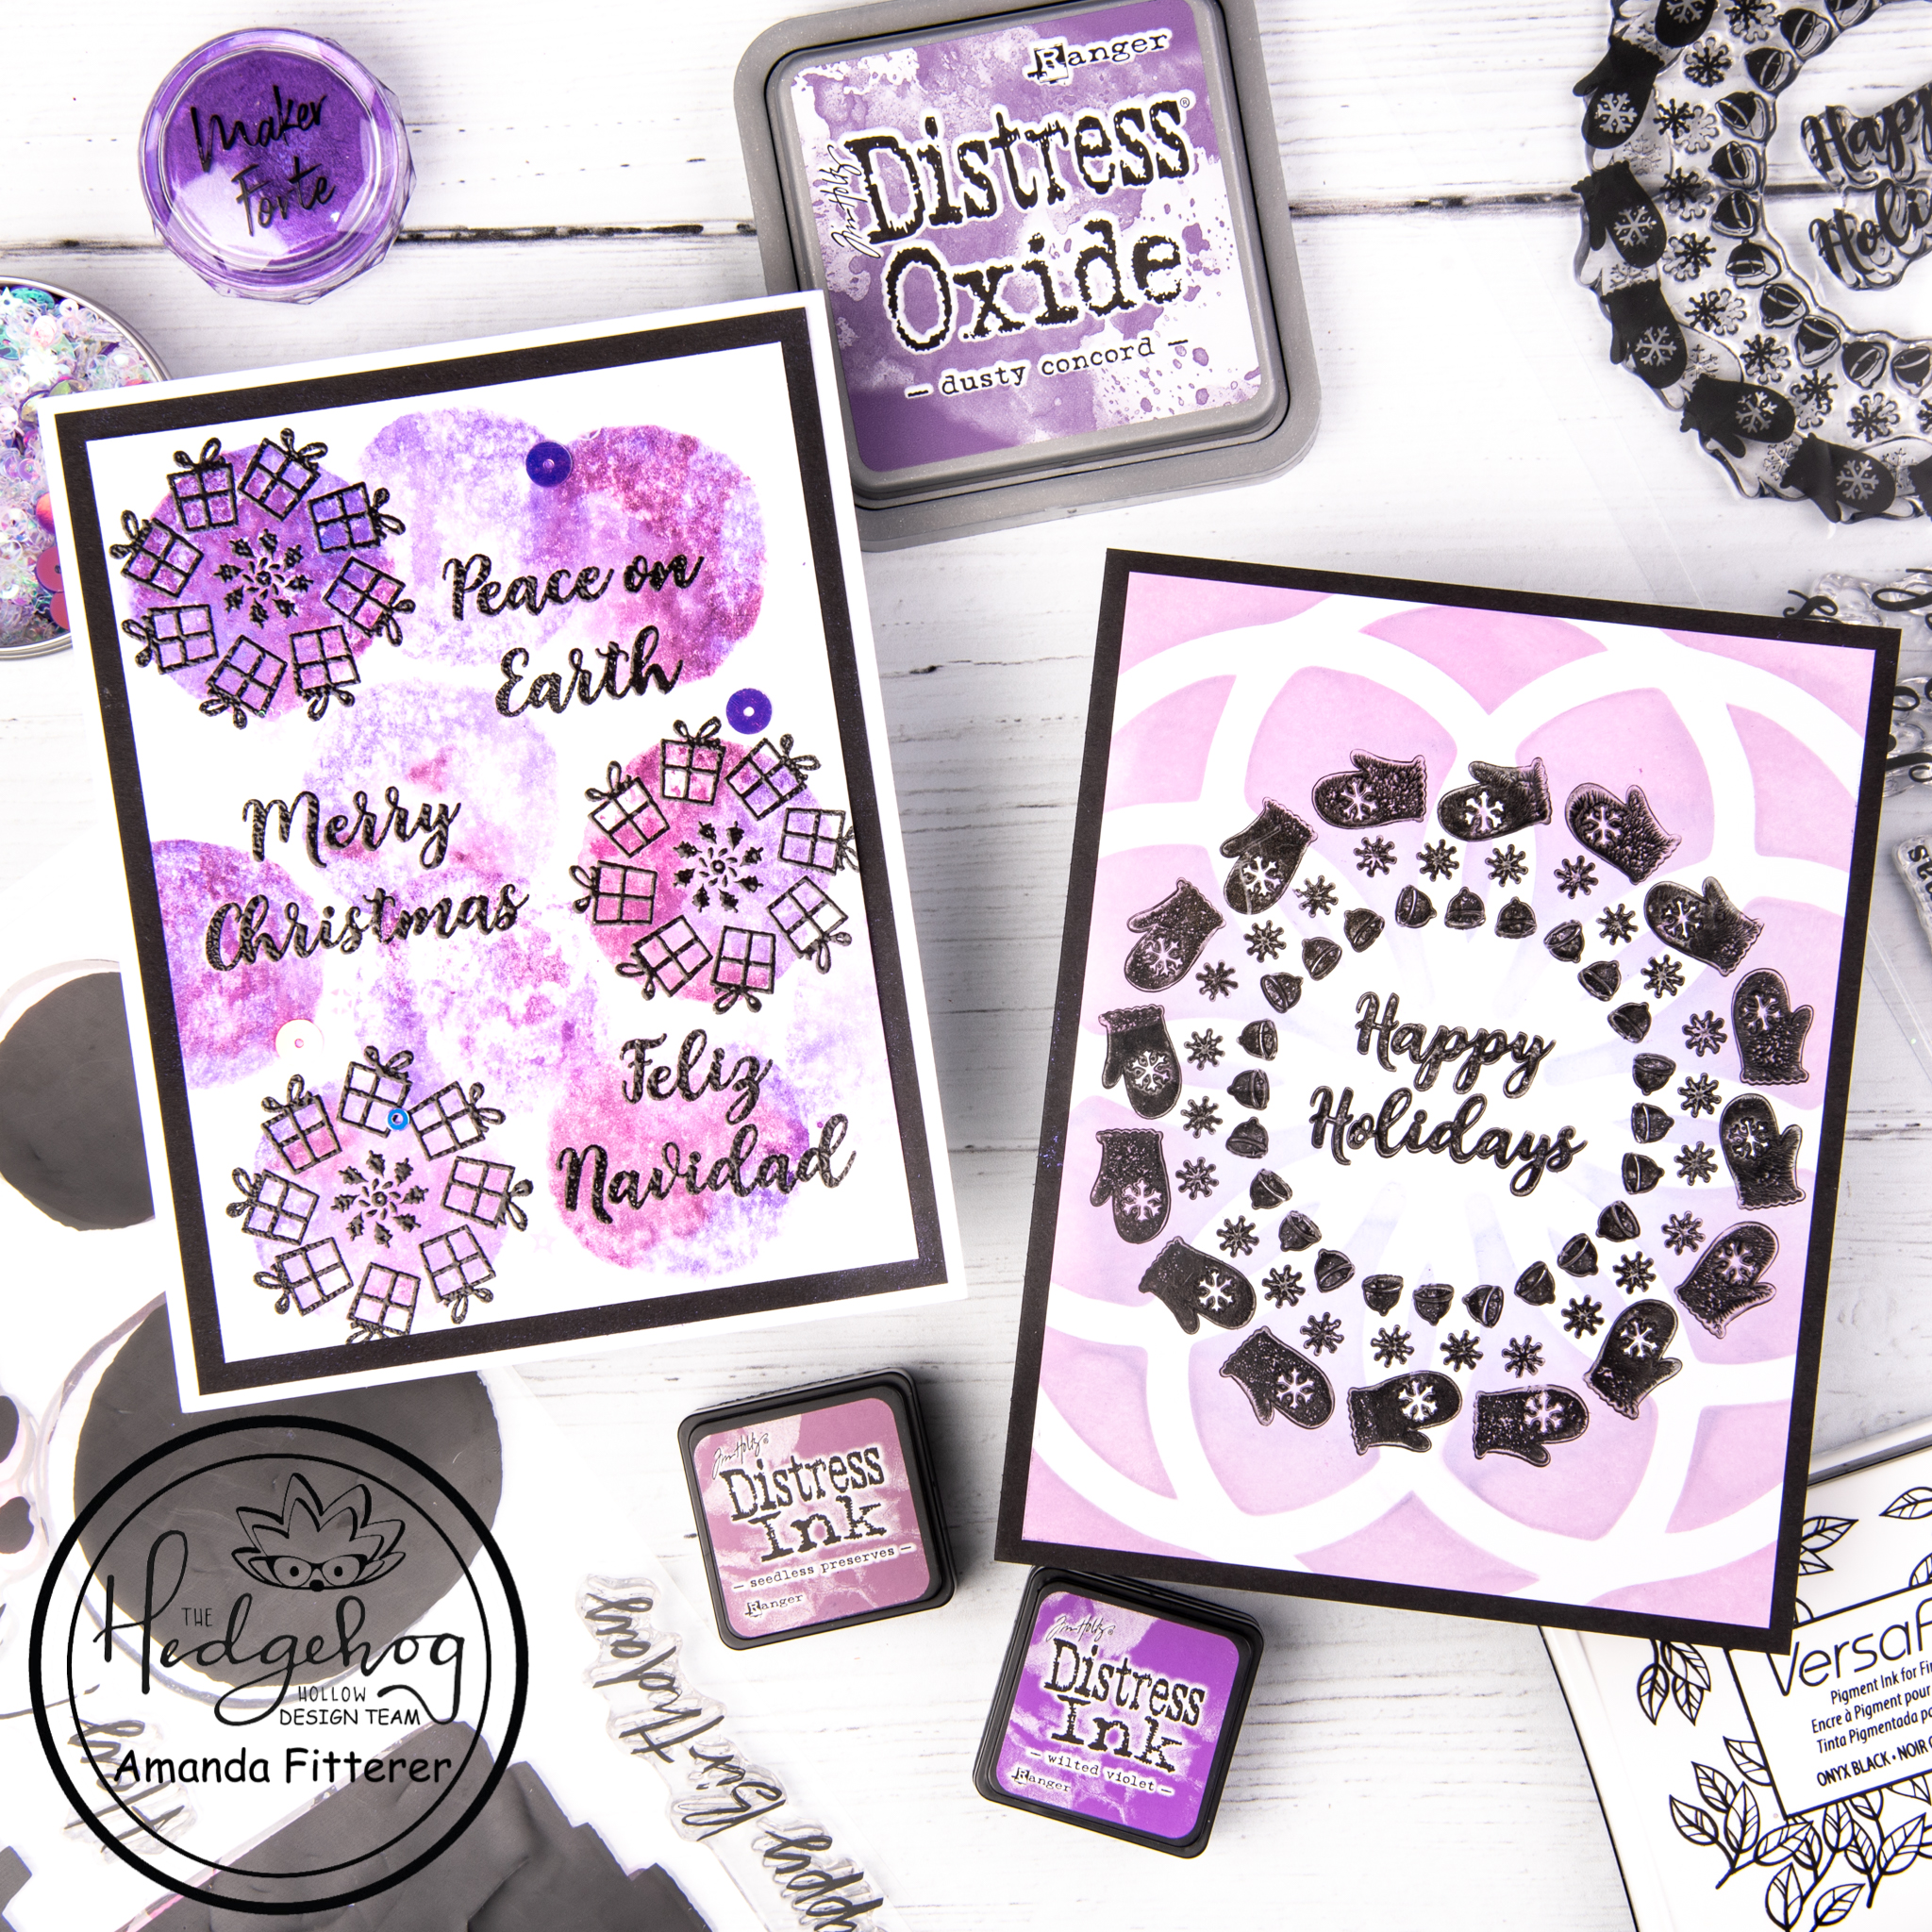
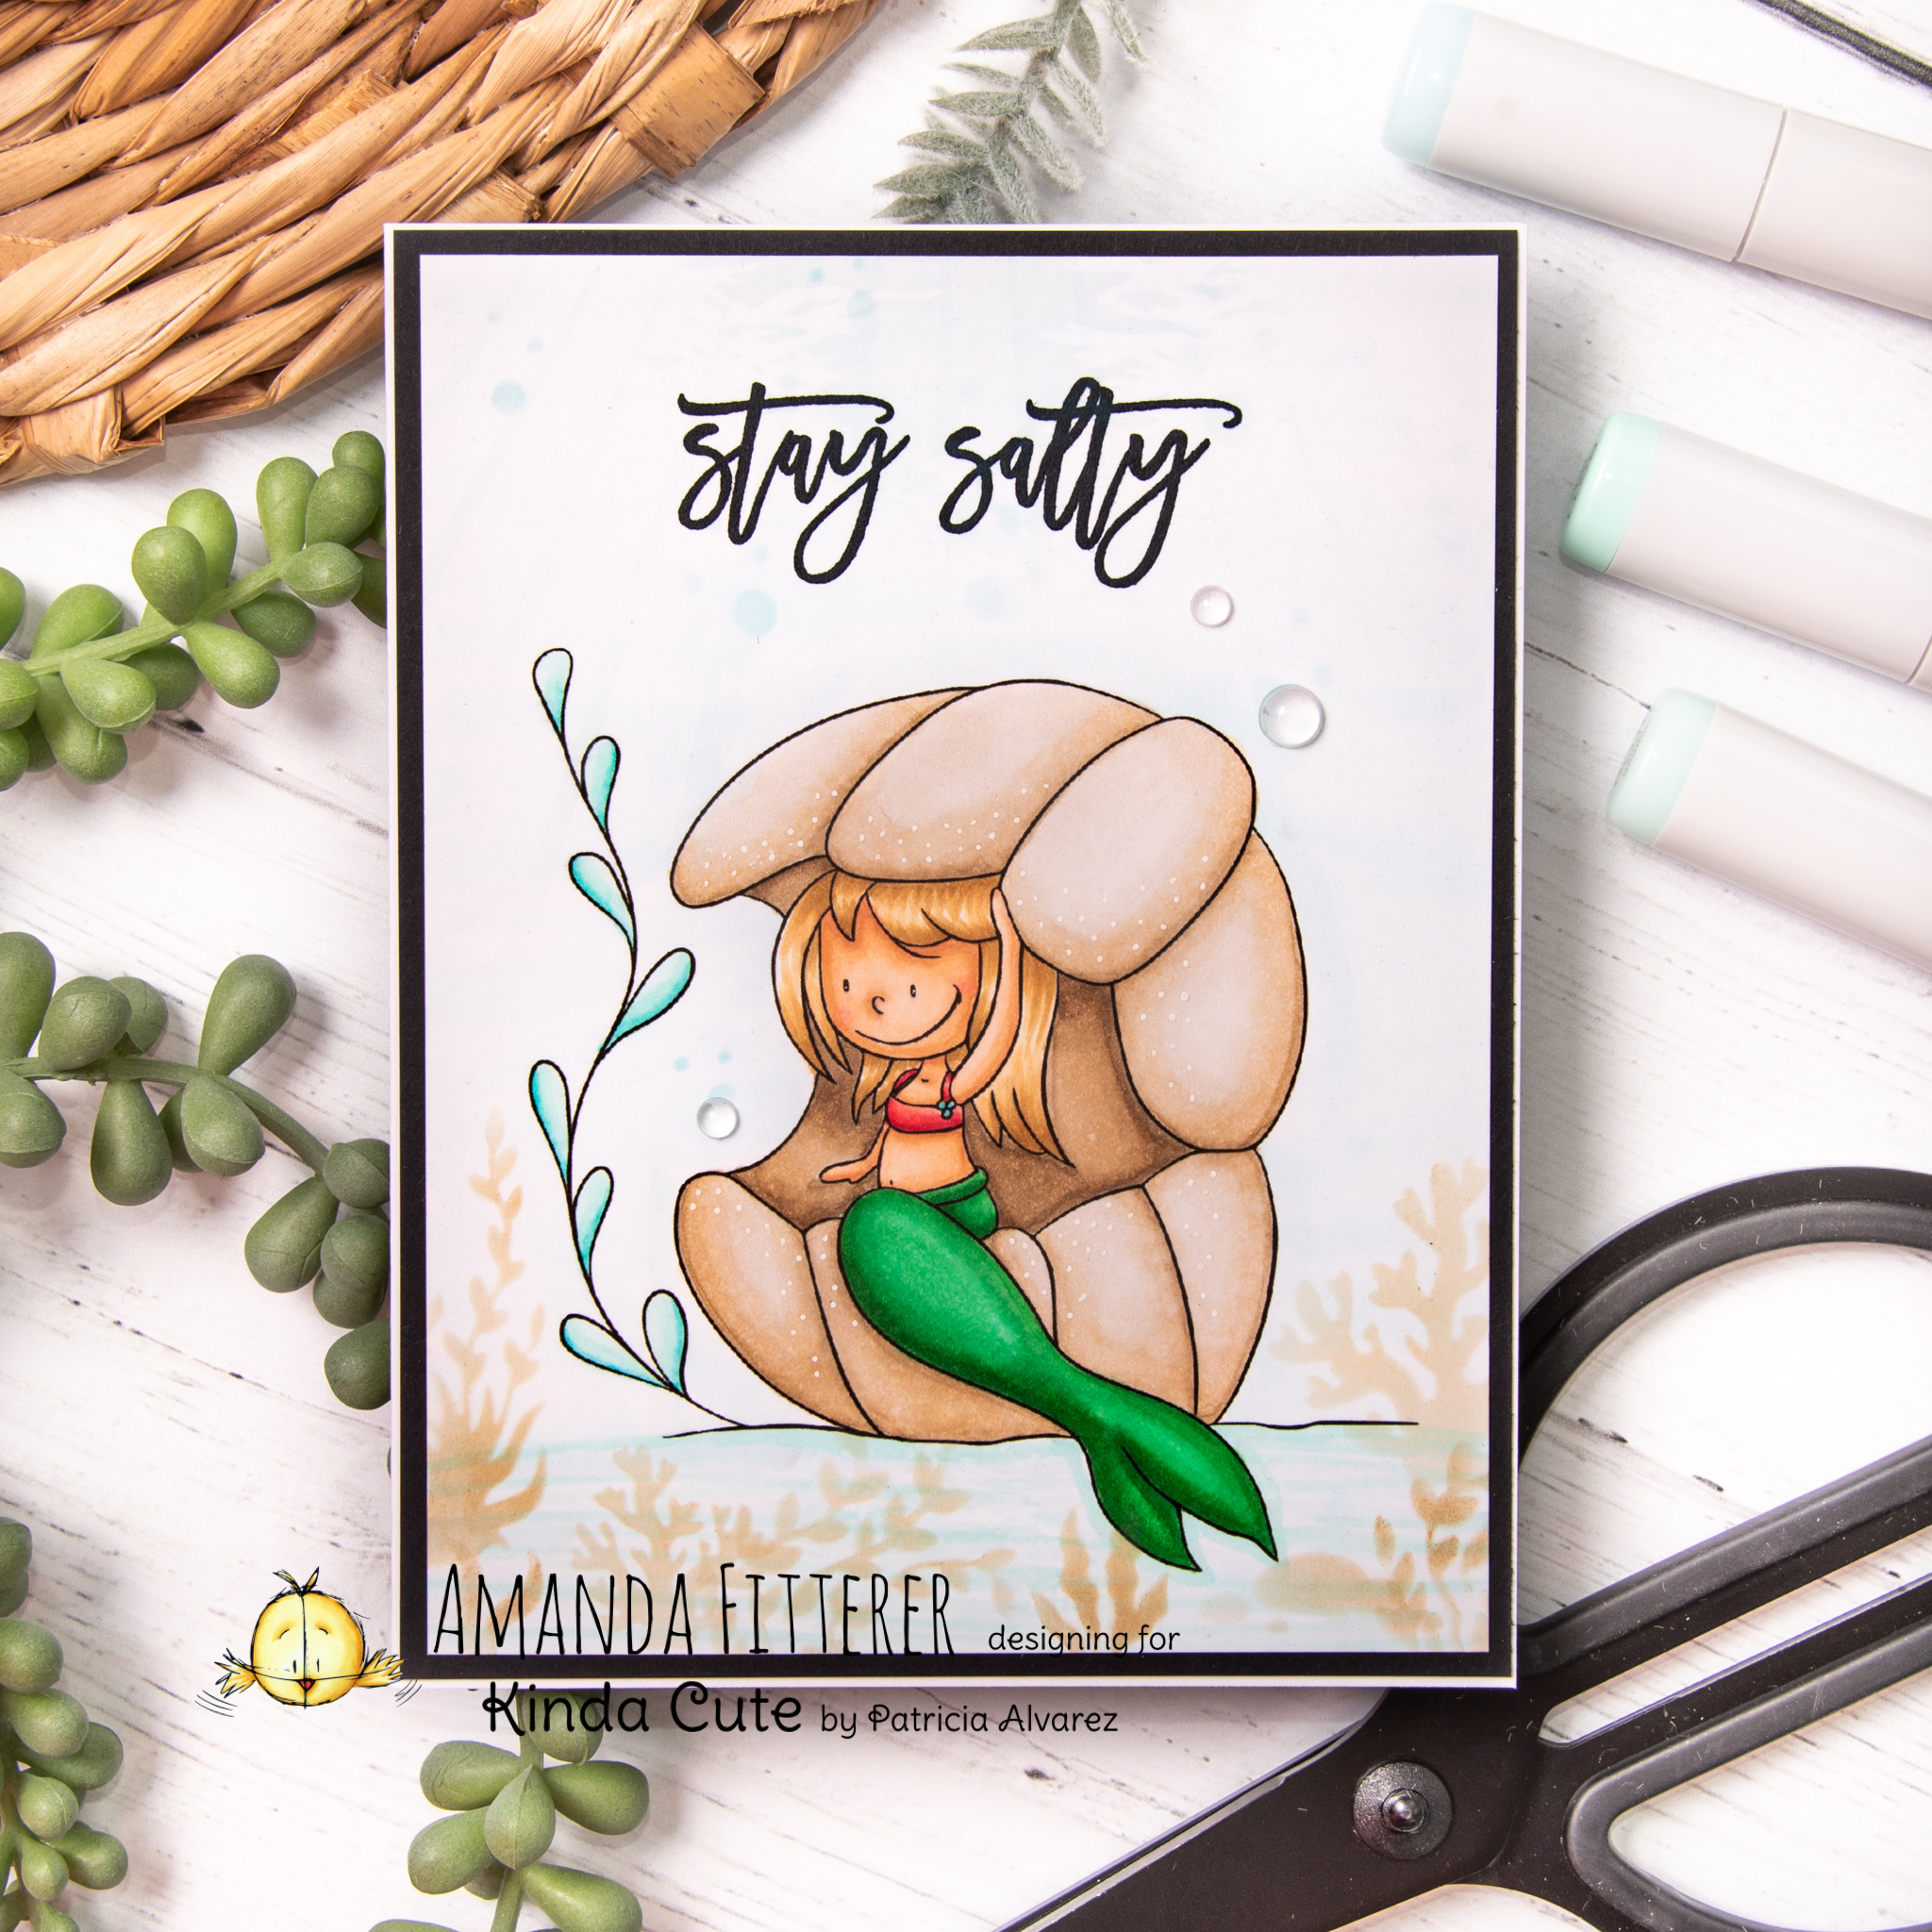
For my other card, I used Chimply the Best and Silly Sloths again. I stamped the images and colored them with Copic markers.

For my background and border, I used the UnbeLEAFable Stencil and the Stitched Rectangle Dies. I wanted my border to stick out farther than regular 3D foam adhesive, so I used the Deep Foam Tape.

I created leaves with the Amazonian Leaves Dies and Lucky Clover Distress Oxide. Finally, I started adhering everything to my card front with glue and 3D foam squares and strips.

To be entered to win the giveaway, all you need to do is comment at each stop along the Blog Hop!
Sunny Studio Stamps will be giving away $35 and Heffy Doodle will be giving away £25 to their respective stores!  Be sure to comment before 11:59 PM on March 3rd to be entered to win!

Each company will post their random winner on March 4th at 10AM EST!  Make sure to check the Heffy Doodle Blog and Sunny Studio Stamps Blog to see if you’re a winner!

Blog Hop Lineup:

Heffy Doodle Blog
Tallie Clewley
Mayra Duran-Hernandez
Mona Toth
Candice Fisher
Davina Cantrell
Julia Englich
Amanda Fitterer
Handmade by Kavya
Sunny Studio Blog

Pear Blossom Press

Magical Dragons Light-up Card with Video Tutorial

Hello my friends!! I’m here today to share a light-up card I made using the incredibly easy-to-use EZ- Lights!  I also have a video to share with you on how I added the EZ-Lights to my card!

Here’s the video tutorial:

I created this card using My Favorite Things’ Magical Dragons and Up in the Air stamp sets.  For my card front, I used Heffy Doodle’s Slimline Pull Tab Dies.  For my sky background, I blended Faded Jeans, Salty Ocean, and Tumbled Glass Distress Oxides and then spritzed it with water.

On my card base, I made marks where I wanted my lights to shine through and where I wanted the button to be.  Then, I adhered my button using double sided tape.  I held my lights down using tape as well, with the bulbs facing upwards.  I used Heffy Doodle Deep Foam Tape to prop my card front up so that there wasn’t a bulge where the button was.

I adhered my card front to my card base and tested to make sure the lights worked.  Then, I adhered all of the stamped images onto my card front.  Here’s another photo of the finished card!

Thank you so much for stopping by my blog today!  I hope you enjoyed my card and video!
Xoxo, Amanda

This blog uses affiliate links to help me fund my crafting! If you click through and make a purchase using one of the links above, I am able to receive a small commission from the sale! It won’t cost you any extra, but you will help be helping me out and I really appreciate that!

Kinda Cute by Patricia Alvarez

Birds of a Feather

Hello there, crafty peeps! I hope you’re all fully recovered from the holidays! I feel like I’m finally getting back into the hang of things and finally getting back into the craftroom after all the madness!

Today, I’m on the blog to show you this bright and cheery little card I made using the Kinda Cute “Cute Shaped Animals” digital stamp to create this card!

I printed the images on 80# Neenah Solar White Cardstock and then colored the little cuties in with Copic markers.

Then, I created a gorgeous and bright background using Squeezed Lemonade and Carved Pumpkin Distress Oxides.

To create some fun (albeit not true to life) clouds, I used the “Angel Eyes”Wow! Embossing Powder with Heffy Doodle’s “Head in the Clouds” stencil.

I created a white frame border using Stitched Rectangle Dies. I also cut some Lawn Fawn Bunting Borders for my birds to sit on.

I grabbed some sentiments from the Heffy Doodle “Wingman” stamp set and used white embossing powder on black cardstock. I adhered everything to my card using 3D foam strips and squares!

Here are a few close-up photos of the finished card!

Thank you so much for dropping by today! I hope you’re staying healthy and happy! Xoxo, Amanda

cards · Kinda Cute by Patricia Alvarez

Pandas Sending Good Vibes

Hey there crafty friends! I hope you are all having wonderful celebrations with your families for the holidays!

Today, I am sharing this bright and happy card using Kinda Cute by Patricia Alvarez Panda Bear Digital Stamp.

I printed the images on 80# Neenah Solar White cardstock and then colored the images with Copic markers. I cut the images out using precision scissors.

To create my card base and background, I used the Hello Bluebird Gallery Frames #4 Die. I created spots using the Heffy Doodle Dotty Lottie Stencil. I blended Twisted Citron, Rustic Wilderness, and Black Soot Distress Inks and Oxides for the background and only used Rustic Wilderness for my frame. I also cut some leaves using the Heffy Doodle Amazonian Leaves Dies.

I adhered everything to the card base using liquid glue, 3D foam squares and strips.

I love how cheery this card! I think it would brighten up anybody’s day, don’t you?!

Thank you so much for stopping by my blog today! I hope you have a wonderful New Years!

Xoxo, Amanda

Hedgehog Hollow

Believe Slimline Blended Cards

Hello all you crafty people! I hope you had a fantastic Thanksgiving! I guess it’s time to start thinking about Christmas cards now! I can’t believe how quickly Christmas will be here!

Today, I’m excited to share some slimline cards I made using some products from the November Subscription Box!

The Subscription Box came with some Maker Forte Perfect Blend Slimine Mini Strips. These are made specifically for Distress Ink and Oxide blending, so the colors go on super smooth!

For the green background, I blended Lucky Clover, Twisted Citron, and Black Soot. Once I was finished blending, I spritzed the card front with water.

For the red background, I used Candied Apple, Abandoned Coral, and Black Soot. Again, I misted some water on it to create a fun effect.

The November Subscription Box also had a “Believe” stencil included! This stencil is the perfect size for a slimline card! I used some embossing paste with the stencil to create a textured, 3 dimensional look. I used a white slimline card base to frame the card fronts.

These cards were so easy to make, but are so beautiful and elegant! They’d be perfect holiday cards to make in bulk, don’t you think?

The November box isn’t available now, but if you want to see the Subscription Box Options, you can click here to sign up for the December box! You can also check in December to see if the November box is available as a One-Off Box!

I can’t wait to see what the December box has in store for us! It’s always so exciting to see that package waiting for me in my mailbox! I love a good surprise!

Thanks again for stopping by my blog today! I hope you enjoy the rest of your weekend! Xoxo, Amanda

Hedgehog Hollow

Oh Holy Night Nativity Scene

Hello, hello! Can you believe it is November already!? I am sad at how fast the holidays are approaching, but I am EXCITED about the new Hedgehog Hollow Box for November! It’s filled with lots of goodies!! If you didn’t catch the Reveal Video yet, you can find it here! You can also see a list of the products here. If you sign up before November 14th, you can still get this November box! What are you waiting for?!

Today, I am sharing this Nativity Scene card with you! I think these images are just so sweet!

To create this card, I started with this AHHHHMAZING cardstock called “Perfect Blend Slimline Mini Strips” by Maker Forte. Blending Distress Inks and Oxides on this cardstock is just a breeze! I blended Faded Jeans, Blueprint Sketch, and Black Soot to create a dark background. I flecked water onto the background to create a “starry” effect.

I used the Simply Radiant Stencil from Heffy Doodle to create a starburst in my background. Using a spatula, I lightly applied some embossing paste.

While that dried, I stamped my images from the “Nativity” stamp set that was included in the November Subscription Box. I colored my images with Copic markers and then fussy cut each image out with detail scissors.

I adhered all my images using 3D foam squares. To create my card base, I used Pink and Main’s Stitched Slimeline Dies and Sympathy Slimline Dies.

I love the way all of these images from the Nativity stamp set go together! They make the perfect little Christmas scene!

I hope you enjoyed my post! If you’re not already following me on Instagram, you can find me here. Later this week, I will be back with another project using the November Subscription Box! I can’t wait to keep sharing some more inspiration!

Don’t forget to scoop up the November Subscription Box before it sells out!

Xoxo, Amanda

cards · Hedgehog Hollow

Blessed to Be Your Friend

https://youtu.be/7JGkraDBg-E


I have been busy playing with the October Subscription Box.

I’m sharing a video tutorial with you today making this super sweet fall card. I hope you have some time to watch it! If you’re interested in how to color with Copic markers, I walk through coloring in these cute little guys!

I used the stencil that was included in the October Subscription Box to create this bright and beautifully blended background! I blended Squeezed Lemon, Mustard Seed, and Carved Pumpkin Distress Oxides. To keep my stencil in place, I used Pixie Spray Adhesive. The cardstock that I use to get the BEST blending is the Snow Flurries Perfect Blend Card Fronts.

For my images, I used Pink and Main’s Happy Fall stamp set. I stamped using Hero Arts Intensified Black ink because it is alcohol-friendly ink. I colored the images with Copic markers and then die cut them using the coordinating dies.

To make these glittery leaves, I stamped the images with Color Hive Hexagonal Embossing Glue Ink Pad. I brushed on a bit of the Nebula Kaleidoscope Powder using the Rose Gold Dual Tip Powder Brush. All of these items were included in the October Subscription Box!


I trimmed the yellow stenciled background cardstock down to 4″ x 5.25″. I cut a piece of purple cardstock down so that it was just a bit larger. I adhered these card fronts to a card base that was 8.5″ x 5.5″. I adhered my stamped images to my card front using 3D foam squares.

If you weren’t signed up before October 14th and missed out on this box, you can check back later here to see if it’s available as a One-Off. All the subscription options can be found here.

I cannot wait to see what’s in the November box! How about you?!

I really hope you enjoyed my post! I can’t wait to share some more posts with you in November!! Xoxo, Amanda

Hedgehog Hollow

Non-traditionally Colored Holiday Cards

Are you ready for the holiday season? I am most certainly not! That’s why I am not quite ready for the traditional reds and greens of holiday cards! The October Subscription box has the cutest Holiday stamp set, though, and I NEEDED to use it NOW! So, I used purples instead of the traditional colors! Sneaky sneaky, I know! I tricked my brain!

For the first card, I am stamping my sentiments and wreath from the “Around Winter” stamp set that is included in the October subscription box. I am going to use my MISTI to stamp everything with VersaFine ink, emboss it with clear embossing powder, and then melt the embossing powder with a heat tool. I am stamping on watercolor cardstock, because I’m going to use watercolors in the next step.

Now, I’m grabbing this newly released “Easy Watercolor” stamp set. I am mixing Seedless Preserves and Wilted Violet Distress Inks on the stamp, spritzing with water, and then stamping the image.

While I wait for this to dry, I’m going start on my next card!

For this second card, I am starting with a piece of Snow Flurries Perfect Blend Cardstock. This cardstock is AMAZING for ink blending! It has a sort of glossy finish, but not as glossy as photo or Yupo paper. The ink stays wet just a bit longer than normal cardstock so you have time to blend. It dries pretty quickly though, so it doesn’t slow down your cardmaking!

I am using Dusty Concord and Shaded Lilac Distress Oxides with this gorgeous stencil that was also included in the October subscription box.

Using the Around Winter stamp set again, I am going to stamp a wreath with the “Happy Holidays” sentiment in the center.

Now I’m ready to assemble and embellish my cards! I am going to trim my watercolor card front to 3.75″x4″ and then mount it to a piece of black cardstock that I cut down to 4″x5.25″. Then place on my white A2 card base. To add a little more balance, I am going to adhere a few Angel Mix Sequins.

For my wreath card, I am going to cut my card front down to 4×5.25″ and then mount it to a black A2 card base.

Are you signed up for the Hedgehog Hollow Subscription Box already? If so, you should be getting your box soon! What will you make with all those goodies!?

If you missed the live stream revealing the October Box goodies, you can find it here.

I’m off to go make some more fun projects for my blog post on Tuesday! See you then! Xoxo, Amanda

cards · Hedgehog Hollow

Hedgehog Hollow – Shake, Rattle & Roll

Happy Saturday, you all! I hope you’re all having a great day today! Thank you for coming to my blog to check out my card! Do you have The Hedgehog Hollow’s September subscription box?? It is SO fun!

I just love this colorful card to celebrate the Day of the Dead!

Using the Dios De Los Muertos stamp set, I’m going to stamp my images and sentiment. I’m using my Copic markers to color my images. To finish the card off, I’m using glue, 3D foam squares, and some Multicolored Stars embellishments.

I think this card turned out so happy and bright! I hope you enjoyed this post and thanks again for coming to my blog!

I would love for you to follow me on Social Media!
My links:
Instagram | Website | YouTube

Don’t forget – this box is only available until September 14th! To see all the products you’ll get in the box, click here. To see the subscription options, click here.

‘Til next time!! Xoxo, Amanda

Butterfly Reflections Ink

Boo! – Sneak Peek!

Hellooo! I hope you’re all having a great week so far! Are you getting ready for Fall? I’m not quite ready yet… Still enjoying the warmth and sunshine!

But… I know it’s around the corner and it’s time to get ready with some Fall cards! Today, I’m sharing a sneak peek of my FIRST card as a Butterfly Reflections Ink Design Team member!

To see the finished card, process photos, and product links, visit the Butterfly Reflections Ink blog post!

Enjoy the rest of your week!

XOXO, Amanda

Kinda Cute by Patricia Alvarez

Stay Salty

Hello all of my crafty friends! I hope you are all doing well! I have been enjoying the warmer weather my kiddos and husband! We’ve been spending lots of time at the pool! I hope you are having nice weather as well!

Today, I have my very first card I’ve made for the Kinda Cute by Patricia Alvarez design team! It’s this adorable Mermaid in Shell digi stamp!

I printed the digital stamp on 80 lb. Neenah Solar White Card Stock. Then, using Copic markers, I colored in my mermaid. (Click on a photo below to view it larger.)

Next, I used the Ocean Scene Builder Stencil from Honey Bee to create my background. I used Tumbled Glass Distress Oxide and Copic markers (BG0000, BG000, BG11, and BG70). I also used Frayed Burlap for my plants.

I added just a few water droplets and a “Stay Salty” sentiment to complete the scene!

Thanks so much for stopping by my blog! I hope you enjoyed this post! Til next time! Xoxo, Amanda

cards

Retail Therapy – City Streets

Hello crafty friends! I hope everyone is staying happy and healthy!

I made this card before this terrible Coronavirus epidemic. Now, I’m posting it because we all need a little reminder of what’s to come after this is all over! (Or, if you’re like me, you are already treating yourself to a little online retail therapy!!)

To make this card, I started with creating my own street using a ruler and my Copic markers. I used T7, T6, T5, and T4 to create the street.

I used Antique Linen distress ink and this cloud stencil to create a neutral sky.

I stamped my images from the Sunny Studio City Streets stamp set and colored them in with my Copic markers. To keep a certain color palette, I used the same markers throughout all the stamped images.

I stamped my sentiment with Versamark Watermark ink and used white detail embossing powder. I used my heat tool to emboss the sentiment.

I cut the images out with the coordinating dies and adhered them to my card front with 3D foam adhesive.

Here are a few close-up photos!

Thanks so much for stopping by! Stay healthy!! Xoxo, Amanda

cards · heffy doodle

Happy Purrthday!

Hello crafty friends! I hope everyone is staying healthy!

I wanted to share this cute card I made using Heffy Doodle’s Hello Squeakheart and Purrfect Day stamp sets.

I’m using Tuxedo Black Memento ink to stamp all of my images.

I’m coloring in my images with Copic markers.

For my background, I’m using this brick background stamp and Hickory Smoke distress oxide. I’m also cutting a stitched border with a die and black cardstock.

I’m using 3D foam squares, strips, and glue to adhere everything to my card.

Here are a few close-ups of the finished card!

Thanks so much for stopping by! Xoxo, Amanda