Posted on 7 Comments

Pear Blossom Press and Heffy Doodle Collaboration Blog Hop

Hey friends!  Today, we’re kicking off a CRAFTY Collaboration Blog Hop with Pear Blossom Press and Heffy Doodle !  Come hop along with us and see some awesome light-up cards!  Plus, each company will be giving away £20/$25 PRIZES!  All you have to do to be entered to win is to leave a comment at each stop along our Hop Lineup before May 29th at 11:59 PM EDT.  Winners will be announced on the Pear Blossom Press & Heffy Doodle Blogs on 5.31.24! Scroll down for the Blog Hop Lineup!

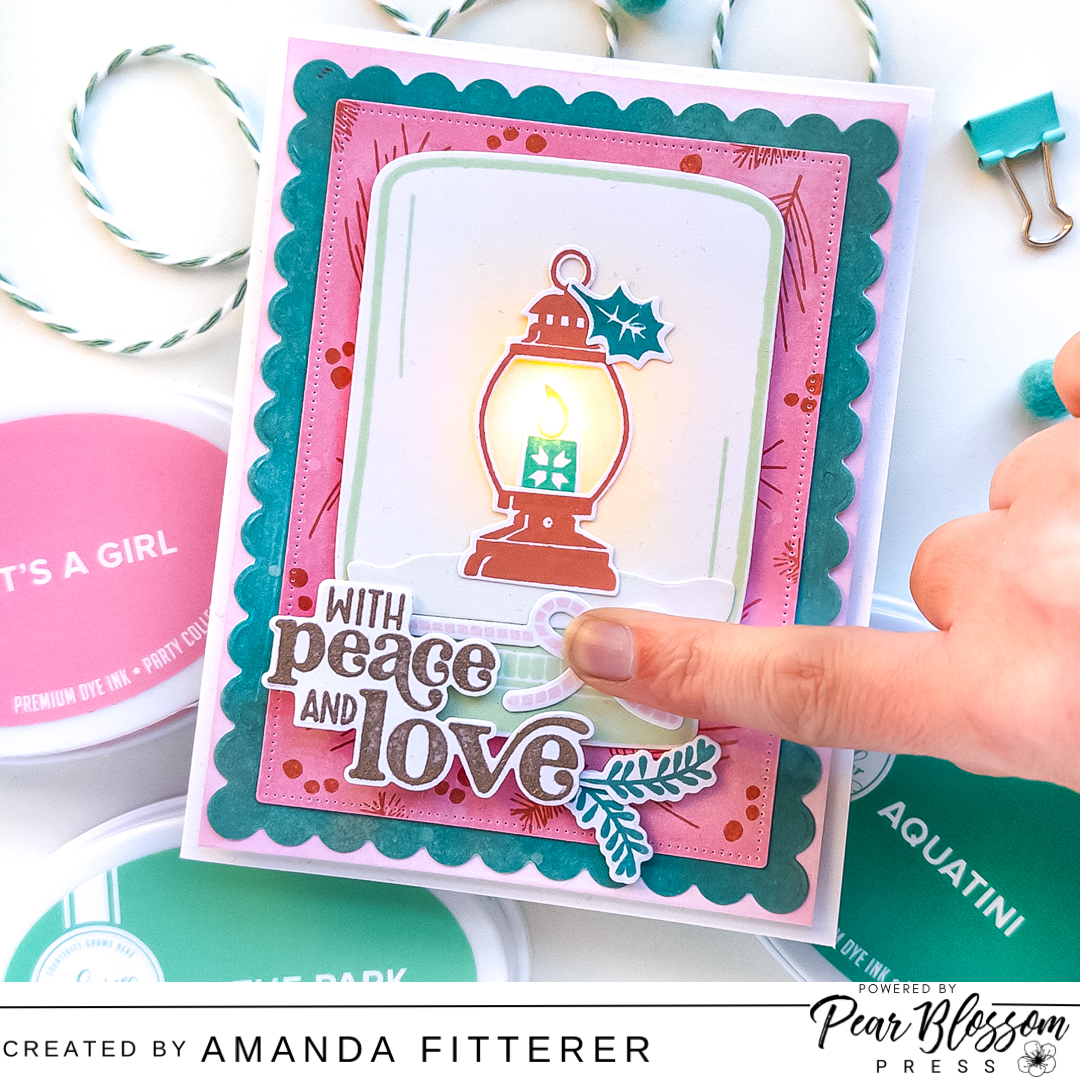
To create this card, I used the Man Cave Paper Pad with the Imperial Storyboard Backdrop Die.

On a plain piece of white cardstock, I used some Heffy Memo Tape to mask off the top half of the card. I ink blended Catherine Pooler’s Wintergreen ink. Then, I removed the Heffy Memo Tape and ink blended the bottom half of the card. I stamped my sentiments – one from the Koality Hugs stamp set and one from the PRESS Stamp and Die Bundle.

I also grabbed my “Hey” Heffy Cuts die and my Catherine Pooler Coral Cabana and Do-Si-Do inks. I cut one of each color.

Next, I stamped all of my images from the Koality Hugs stamp set and colored them with Copic markers. Then, I die cut them out using the coordinating dies.

Now, I can make the card light up! I poked a hole through my koala where I wanted him to light up. Then, I placed him on the card where he’ll chill permanently. I, then, made a mark where the light should go.

Then, I used double sided tape to adhere my Pear Blossom Press One Light where my pencil mark was. Then, I used the World’s Best Foam Tape all over the card base. This tape is the same depth as the EZ-Lights battery component. (This will keep the light from sticking out.)

Then, I assembled the rest of the card using liquid glue and 3D foam squares.

Blog Hop Lineup:

Pear Blossom Press 

April Leithner

Amanda Fitterer

Kavya N

Natasha Davies

Sylvie

Cassie Trask

Heffy Doodle

My favorite craft essentials:
Heffy Doodle Mini Die Cutting Machine
* MISTI
Smart Craft Glue
*  Petal Pink Gemini Jr. Die Cutting Machine
* 3D Foam Squares
* 3D Foam Tape
*Pre-scored Card Base
* Catherine Pooler Inks
* Catherine Pooler Blending Brushes

* White Glass Magnetic Craft Mat (Use code AMANDA20 for 20% off your order!)

Don’t forget: If you’re a Catherine Pooler StampNation member, you get EARLY ACCESS to every new release (plus SOOO many other benefits)! Sign up now! It’s worth it!

👇🏻👇🏻 Subscribe 👇🏻👇🏻 to be alerted of new posts by yours truly!

Xx, Amanda

Shop Scrapbook.com dickblick.com
Posted on 13 Comments

Pear Blossom Press & Picket Fence Studios Collab Blog Hop!

Hey guys! Want a chance to win prizes from both Pear Blossom Press and Picket Fence Studios?! In March, we’ll have THREE different Hops for you to enter to win!!

Today we’re kicking off the BLOG HOP!

Come hop along with us and see some awesome light-up cards!  Plus, each company will be giving away $25 PRIZES!  All you have to do to be entered to win is to leave a comment at each stop along our Hop Lineup before March 29th at 11:59 PM EDT.  Winners will be announced on the Pear Blossom Press & Picket Fence Studios Blogs on 3.31.24!

I have created this fun light-up card using products from both companies! Read on to see how I created this card! You’ll be amazed at how EASY it is!!

First, I created my background using the Picket Fence Studios What’s Your Sign Stencil and Pint Sized Paper Pouncers. I blended Catherine Pooler’s All That Jazz and Cummerbund inks.

Next, I stamped my images from the Sugar and Calorie Free Stamp Set. I colored them in with Copic markers. I stamped my sentiment on Perfect Sentiment Cardstock – Black with Embossing ink and then sprinkled white embossing powder on it. I melted the powder with my heat tool and then die cut the sentiment out with the coordinating die. I also used the coordinating dies to cut out my cakes. I used the same dies to cut out 2 plain black pieces of cardstock. I glued the cakes and their black counterparts together on a slight angle, to give the effect of a shadow!

On my card base, I made 3 little pencil dots where I wanted the candles’ flames to be. I also made a little pencil dot where I wanted the ON button to be. For this card, I’m using the Pear Blossom Press EZ-Lights. I used double sided tape to adhere my battery and button where I wanted it. Then I used masking tape to hold my wires and lights in place.

Once I had everything in place, I placed Pear Blossom Press’s World’s Best Foam Tape everywhere except over the lights and battery/button case.

On my card front, I poked 3 holes where my lights are. I placed my Pear Blossom Press Yellow Candle Flame Gems over the lights using liquid glue. Then, I placed my Clay Candles under the flames and adhered them with liquid glue.

I used 3D Foam Squares to prop up my cakes and sentiment. I added a few Catherine Pooler Crater Lake Sequins to finish it off.

That’s how easy it is to create a fun light-up card! I hope you enjoyed my stop on the Blog Hop!

Blog Hop Lineup:

Pear Blossom Press 

Natasha Davies

Andrea Shell

April Leithner

Brenda Noelke

Jenn Paar Gross

Colleen Balija

Amanda Fitterer

Justin Adkins <<- Go here next!

Picket Fence Studios

Happy Hopping!!

My favorite craft essentials:
Heffy Doodle Mini Die Cutting Machine
* MISTI
Smart Craft Glue
*  Petal Pink Gemini Jr. Die Cutting Machine
* 3D Foam Squares
* 3D Foam Tape
*Pre-scored Card Base
* Catherine Pooler Inks
* Catherine Pooler Blending Brushes

* White Glass Magnetic Craft Mat (Use code AMANDA20 for 20% off your order!)

Thanks for using my affiliate links! You all are the BEST! Using an affiliate link in this post above or down below costs you nothing, but it gives me a teeny percentage of your sale to buy more crafty goodies to continue to share card tutorials with YOU! So, thank YOU! Xx, Amanda

Scrapbook.com Affiliate Link | Catherine Pooler Affiliate Link | Become a Catherine Pooler StampNation member

👇🏻👇🏻 Subscribe 👇🏻👇🏻 to be alerted of new posts by yours truly!

Posted on Leave a comment

How to Make a Holiday Light-Up Card

Hello friends!! Today, I am sharing a Light-up card I made using a Pear Blossom Press One Light and some Catherine Pooler products!

To make this card, I first chose my ink color combo. If you need help picking the perfect color combo, you can download a FREE Catherine Pooler Color Wheel!
For my combo, I’m using Whipped Honey, In the Park, Aquatini, It’s a Girl, Polished, Cotton Candy, and Minted.\

I used the Dots & Scallops Dies to create my layers. Then, I used the Mason Jar Snow Globe Stamp Set to create my jar. The lantern and sentiment comes from the Warm and Bright Stamp Set . I stamped my sentiment with the new gorgeous Champagne Metallic Ink!

Once I got all of that stamped, die cut, and assembled, I created a flame for my candle using the PB Press Stamp and Die Combo.

Next, I popped a One Light out of the Halo Light Combo. I inserted a battery (that comes with the combo!) and tested my light to ensure my battery was placed properly.
Then, on my A2 card base, I placed my assembled front panel on top and made a pencil mark inside the flame so I know where my light needs to be.

I placed my One Light where I wanted it to be and secured it using double sided tape. Next, I placed some World’s Best Foam Tape around the entire card base (leaving a border). Then, I attached my front panel to the card!

Here’s a photo of the card with the light off.

And, with a simple push of a button… Voila! Light!

This is definitely a super special card for someone to receive this Christmas!

Thank you SOOO much for stopping by my blog today!! I hope you enjoyed this post and will subscribe below to see more posts from me! Xx, Amanda

My favorite craft essentials:
Heffy Doodle Mini Die Cutting Machine
* MISTI
Smart Craft Glue
*  Petal Pink Gemini Jr. Die Cutting Machine
* 3D Foam Squares
* 3D Foam Tape
*Pre-scored Card Base
* Catherine Pooler Inks
* Catherine Pooler Blending Brushes

* White Glass Magnetic Craft Mat (Use code AMANDA20 for 20% off your order!)

Thanks for using my affiliate links! You all are the BEST! Using an affiliate link in this post above or down below costs you nothing, but it gives me a teeny percentage of your sale to buy more crafty goodies to continue to share card tutorials with YOU! So, thank YOU! Xx, Amanda

Scrapbook.com Affiliate Link | Catherine Pooler Affiliate Link | Become a Catherine Pooler StampNation member

👇🏻👇🏻 Subscribe 👇🏻👇🏻 to be alerted of new posts by yours truly!

Xx, Amanda

Shop Scrapbook.com dickblick.com
Posted on Leave a comment

Magical Dragons Light-up Card with Video Tutorial

Hello my friends!! I’m here today to share a light-up card I made using the incredibly easy-to-use EZ- Lights!  I also have a video to share with you on how I added the EZ-Lights to my card!

Here’s the video tutorial:

I created this card using My Favorite Things’ Magical Dragons and Up in the Air stamp sets.  For my card front, I used Heffy Doodle’s Slimline Pull Tab Dies.  For my sky background, I blended Faded Jeans, Salty Ocean, and Tumbled Glass Distress Oxides and then spritzed it with water.

On my card base, I made marks where I wanted my lights to shine through and where I wanted the button to be.  Then, I adhered my button using double sided tape.  I held my lights down using tape as well, with the bulbs facing upwards.  I used Heffy Doodle Deep Foam Tape to prop my card front up so that there wasn’t a bulge where the button was.

I adhered my card front to my card base and tested to make sure the lights worked.  Then, I adhered all of the stamped images onto my card front.  Here’s another photo of the finished card!

Thank you so much for stopping by my blog today!  I hope you enjoyed my card and video!
Xoxo, Amanda

This blog uses affiliate links to help me fund my crafting! If you click through and make a purchase using one of the links above, I am able to receive a small commission from the sale! It won’t cost you any extra, but you will help be helping me out and I really appreciate that!

Posted on Leave a comment

EZ-Lights Peek-a-Boo Pals Light Up Card

Hello there, crafty friends!  I am so happy to be guest designing for Pear Blossom Press using the oh-so-amazing EZ- Lights!

To make this light-up card, I started by stamping some images from the Avery Elle Peek-a-Boo Pets, Peek-a-Boo Pals, and Peek-a-Boo Car stamp sets.  I colored all of the images with Copic markers and then cut them out with their coordinating dies.

Now onto creating my background scene!  On a piece of white cardstock cut to 5.25″ x 4.5″, I blended Tumbled Glass, Salty Ocean, and Faded Jeans Distress Oxides.  I also created a foreground frame using Heffy Doodle’s Stitched Rectangle Dies and My Favorite Things Inside and Out Stitched Rounded Squares Dies.  For my street, I grabbed a piece of gray cardstock and used the Heffy Doodle Stitched Slopey Joe Border Dies.  I darkened the edges using Black Soot Distress ink to give it some dimension.  I also stamped my sentiment on the “street” using Versamark Watermark Ink and used white embossing powder on it.

Using the Heffy Doodle Cityscape Stencil, I created a city in the background with Black Soot Distress Ink.  I added some stars with Antique Linen Distress Oxide and the Starfall Stencil.

Now, I’m finally ready to get my EZ-lights installed!  I set my colored images up where I wanted them and then used a pencil to make marks on the background where I wanted my lights to shine through.  I poked holes through those spots and then used my pencil to create dots on my card base.  I put dots where I wanted each of the 3 lights to go, as well as where my push button will be.

Then, on my card base, I lined up the lights and push button on top of my pencil marks.  I used some tape to hold the pieces down and used 3mm Deep Foam Tape to prop my card front up.  This thick foam tape keeps me from having to double up on regular foam tape!

Now, all I needed to do was adhere all my images to the front of the card using liquid glue and 3D foam squares!  And voila!  It’s magic!  Man, I love these EZ-lights!!

Thank you so much for stopping by my blog!  I hope you have a fantastic day!  Xoxo, Amanda