Posted on 10 Comments

Alex Syberia Designs October Release Blog Hop & Giveaway

Hey guys! Welcome to this super sweet Blog Hop celebrating Alex Syberia Designs’ “Grateful for You” October Release!

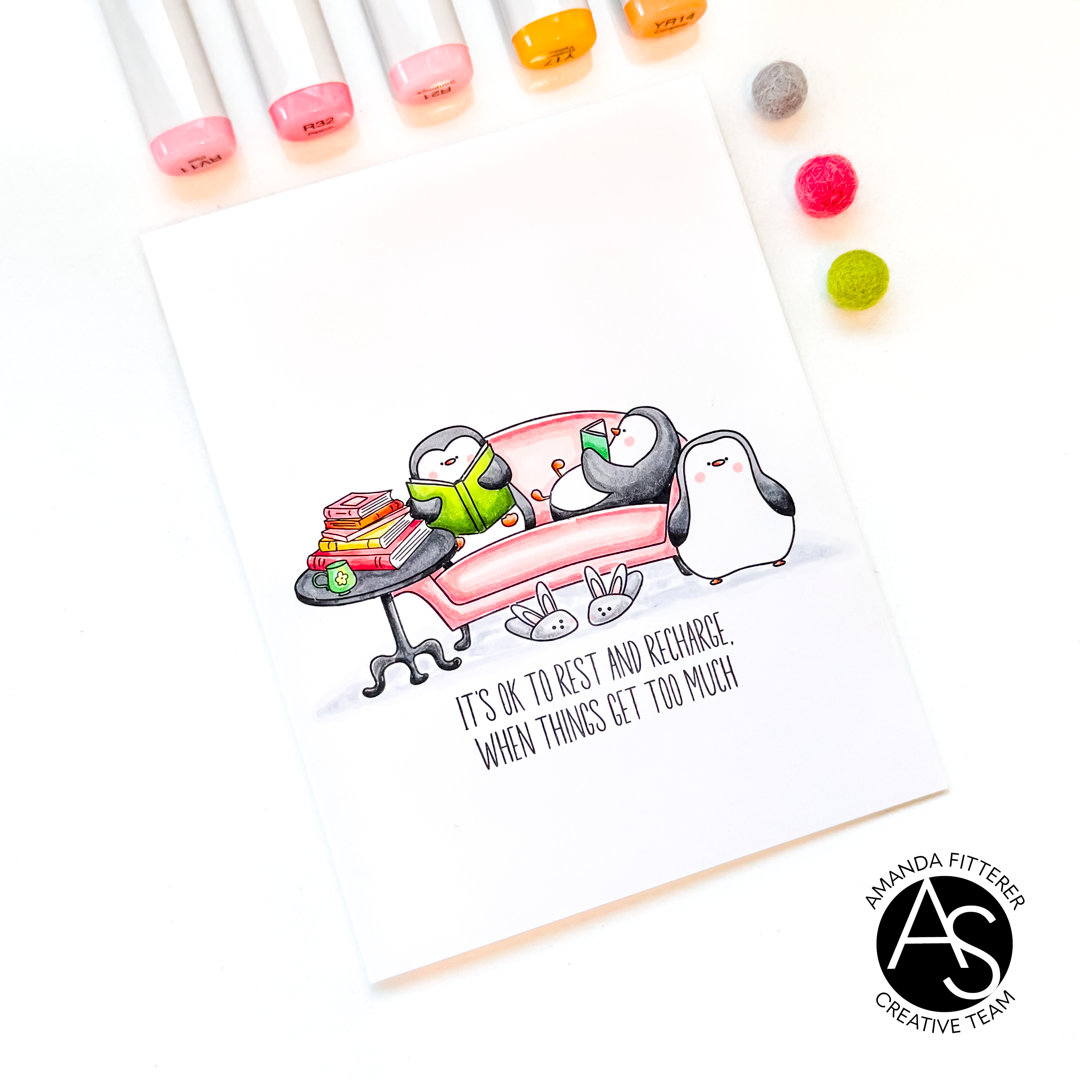
What do you think about these adorable penguins!? They are included in the “Smile More” stamp set! This stamp set also has some super cute fox critters!

I created this card using a masking technique. First, I stamped the end table, slippers, and the standing penguin. Then, I used some Heffy Doodle Memo Tape to mask off those images. To do this, I stamped the images on the Memo Tape and then cut on the lines. I placed the masks on the stamped images and then stamped my couch & penguins image. Then, I removed the masks and was left with this sweet little scene!

I colored the images with Copic markers and then stamped my sentiment underneath!

You can also start at the Alex Syberia Designs Release Blog Hop Post.

Alex Syberia Designs is giving away a $50 gift certificate to 1 winner and a $15 gift card to 3 lucky winners.

Open internationally. All 4 winners will be drawn from the entrants that have played along with this Blog hop by midnight BST October 31st, 2024. Winners will be announced on the Alex Syberia Designs blog ‘Giveaway Winners’ page on November 1st, 2024.

Blog Hop Order:

Alex Syberia Designs
Samantha
Rachel
Hannelie
Emelie
Hanh
Allison
Erin
Colleen
Sylvie
Carly
Bonnie
Amanda
Bobbi <<– Go here next!
Brenda
Nicky
Lien
Sandi
Nicoletta

Thank you for stopping by my Blog for this exciting New Release! Enjoy the rest of the Hop and have fun shopping! Shop the New Release NOW!

If you kindly use the affiliate links in this blog post to shop the New Release, I’ll get a tiny percentage of your entire order! When you do this, I get to buy more crafty goodies to keep making posts for YOU! I love what I do and I hope you do, too! Xx, Amanda

Posted on Leave a comment

Twiddler’s Nook Spooktacular Instagram Hop

Hey guys! I wanted to share how I put together this shaker card for the Twiddler’s Nook Spooktacular Instagram Hop! To win, you’ll have to head to the Hop on Instagram, but definitely scroll down to see how to make this card and all the awesome supplies I used!!

I used the Heffy Doodle Stitched Birthday Trio Dies with a piece of white cardstock. I then created 3 “scenes” with the 3 cut out pieces. On the top one, I blended Catherine Pooler’s Flirty Fuchsia and Glam inks. I also added some stars using a gold gel pen and the Starfall Stencil. I used Bellini and Mandarin Spice for the middle one. I added a background using the Sleepy Hollow Stencil. The bottom one is blended with Melon Ice and Garden Party and the Sleepy Hollow Stencil.

Next, I stamped my images from the Let’s Hang Out Stamp Set. I colored them with Copic markers and then cut them out with the coordinating dies.

I used the magnets from my White Glass Magnetic Craft Mat to hold my card base in place while I glued the 3 “scenes” down.

Now, I’m ready to create the shaker portion of the card. I used double sided tape on the back of the frame. Then, I cut down a piece of acetate to fit behind the frame and adhered it.

Then, I added 3D Foam Tape all around the frame.

Now for the super fun part!! Adding shaker mixes! I kept each section separate with the foam tape, so I wanted to use different mixes for each section. On the top, we have the Twiddler’s Nook Burning Embers Embellishment Mix. The middle one contains a mix of the Happy Jacks and the Mulan Princess Rings. The bottom is the Tiana Princess Rings.

Once I added my frame to the top, I added all my cute stamped images to the front of the card.

Just take a look at these embellishments up close!

My favorite craft essentials:
Heffy Doodle Mini Die Cutting Machine
* MISTI
Smart Craft Glue
*  Petal Pink Gemini Jr. Die Cutting Machine
* 3D Foam Squares
* 3D Foam Tape
*Pre-scored Card Base
* Catherine Pooler Inks
* Catherine Pooler Blending Brushes

* White Glass Magnetic Craft Mat (Use code AMANDA20 for 20% off your order!)

Don’t forget: If you’re a Catherine Pooler StampNation member, you get EARLY ACCESS to every new release (plus SOOO many other benefits)! Sign up now! It’s worth it!

👇🏻👇🏻 Subscribe 👇🏻👇🏻 to be alerted of new posts by yours truly!

Xx, Amanda

Shop Scrapbook.com dickblick.com
Posted on 13 Comments

Pear Blossom Press & Picket Fence Studios Collab Blog Hop!

Hey guys! Want a chance to win prizes from both Pear Blossom Press and Picket Fence Studios?! In March, we’ll have THREE different Hops for you to enter to win!!

Today we’re kicking off the BLOG HOP!

Come hop along with us and see some awesome light-up cards!  Plus, each company will be giving away $25 PRIZES!  All you have to do to be entered to win is to leave a comment at each stop along our Hop Lineup before March 29th at 11:59 PM EDT.  Winners will be announced on the Pear Blossom Press & Picket Fence Studios Blogs on 3.31.24!

I have created this fun light-up card using products from both companies! Read on to see how I created this card! You’ll be amazed at how EASY it is!!

First, I created my background using the Picket Fence Studios What’s Your Sign Stencil and Pint Sized Paper Pouncers. I blended Catherine Pooler’s All That Jazz and Cummerbund inks.

Next, I stamped my images from the Sugar and Calorie Free Stamp Set. I colored them in with Copic markers. I stamped my sentiment on Perfect Sentiment Cardstock – Black with Embossing ink and then sprinkled white embossing powder on it. I melted the powder with my heat tool and then die cut the sentiment out with the coordinating die. I also used the coordinating dies to cut out my cakes. I used the same dies to cut out 2 plain black pieces of cardstock. I glued the cakes and their black counterparts together on a slight angle, to give the effect of a shadow!

On my card base, I made 3 little pencil dots where I wanted the candles’ flames to be. I also made a little pencil dot where I wanted the ON button to be. For this card, I’m using the Pear Blossom Press EZ-Lights. I used double sided tape to adhere my battery and button where I wanted it. Then I used masking tape to hold my wires and lights in place.

Once I had everything in place, I placed Pear Blossom Press’s World’s Best Foam Tape everywhere except over the lights and battery/button case.

On my card front, I poked 3 holes where my lights are. I placed my Pear Blossom Press Yellow Candle Flame Gems over the lights using liquid glue. Then, I placed my Clay Candles under the flames and adhered them with liquid glue.

I used 3D Foam Squares to prop up my cakes and sentiment. I added a few Catherine Pooler Crater Lake Sequins to finish it off.

That’s how easy it is to create a fun light-up card! I hope you enjoyed my stop on the Blog Hop!

Blog Hop Lineup:

Pear Blossom Press 

Natasha Davies

Andrea Shell

April Leithner

Brenda Noelke

Jenn Paar Gross

Colleen Balija

Amanda Fitterer

Justin Adkins <<- Go here next!

Picket Fence Studios

Happy Hopping!!

My favorite craft essentials:
Heffy Doodle Mini Die Cutting Machine
* MISTI
Smart Craft Glue
*  Petal Pink Gemini Jr. Die Cutting Machine
* 3D Foam Squares
* 3D Foam Tape
*Pre-scored Card Base
* Catherine Pooler Inks
* Catherine Pooler Blending Brushes

* White Glass Magnetic Craft Mat (Use code AMANDA20 for 20% off your order!)

Thanks for using my affiliate links! You all are the BEST! Using an affiliate link in this post above or down below costs you nothing, but it gives me a teeny percentage of your sale to buy more crafty goodies to continue to share card tutorials with YOU! So, thank YOU! Xx, Amanda

Scrapbook.com Affiliate Link | Catherine Pooler Affiliate Link | Become a Catherine Pooler StampNation member

👇🏻👇🏻 Subscribe 👇🏻👇🏻 to be alerted of new posts by yours truly!

Posted on 14 Comments

Heffy Doodle and WOW! Embossing Powder Collaboration Blog Hop

Welcome to the Heffy Doodle and WOW! Embossing Powders Collaboration Blog Hop!
Design Team members from both companies are sharing inspiration using products from both companies!

I’m super excited to be taking part in the collaboration because I get to use products from two of my FAVORITE companies! I’m going to walk you through how I made this fun GLOW IN THE DARK Halloween card!

  1. Cut out a circle using either a punch or circle die. Any size will work!
  2. Press the circle directly onto the WOW! Embossing Pad and then apply the WOW! Glow in the Dark Embossing Powder. Melt with a heat gun.
  3. Create a night sky background blending Catherine Pooler’s Black Jack for teh sky and Midnight for the Sleepy Hollow Stencil.
  4. Glue the circle moon onto your background with Glubert Glue.
  5. Using a blending brush and White Pigment Ink, create a halo around the moon.

6. Cut some grass using the Tree-mendous Peekaboo Tree Dies.

7. Ink up your grass with Melon Ice.

8. Round the edges of your card front with my favorite Corner Punch.

9. Stamp your cuties from the Costume Critters and Ghoulfriends stamp sets.

10. Color your images with any medium (I prefer OLO or Copic markers!)

11. Die cut your images with the coordinating die sets.

12. Use 3D foam squares to adhere your images and sentiment to your card!

13. Turn off the lights and see how amazing the WOW! Glow in the Dark Embossing Powder looks!

To be entered to win the giveaway, all you need to do is comment at each stop along the Blog Hop!
WOW! Embossing Powders will be giving away $25/£25 and Heffy Doodle will be giving away £25 to their respective stores!  Be sure to comment before 11:59 PM EST on Oct 25th to be entered to win!

Each company will post their random winner on October 27th at 10AM EST!  Make sure to check the Heffy Doodle Blog and WOW! Embossing Powders Blog to see if you’re a winner!


Blog Hop Lineup:

Heffy Doodle Blog

Bibi Cameron [COMING SOON]

Cassie Trask

Michelle Lupton

Natasha Davies 

Amanda Fitterer

Zsofia Molnar <– GO HERE NEXT

Dunja Trautmann

Ali Farmer

Claudia Mauri

Jo Laverty

WOW! Embossing Powders Blog

Posted on Leave a comment

Maker Forte and Picket Fence Studios IG Hop

Hello friends! I am SO excited to be part of this amazing IG Hop with Maker Forte and Picket Fence Studios! Come join in the fun HERE. You could win prizes from both companies!

Maker Forte’s Color Hive Inks are ABSOLUTELY FANTASTIC! They are juicy and smooshy and vibrant! And I LOVE how they react with water! Picket Fence Studios Blending Brushes make blending these inks a breeze!! They are the perfect match for beautiful backgrounds, such as the ones I made for the Hop!

–> I have 2 RAINBOW BLENDS TO SHARE with you!

Blend 1:
For my first card, I’m blending:
* Pitstop Pink
* Lemon
* Blue Raspberry

Blend 2:
For my second card, I’m blending:
* Flamingo
* Yellowstone
* Vegas Strip

For both of my cards, I’m using the CUTEST Maker Forte stamp set called Grovehill Farm. You can see the rest of the products used below!

Thank you so much for stopping by my blog today! To shop any of these products, you can use the affiliate links in my post! It doesn’t cost anything to you, but it does give me a teeny percentage which helps to fund my crafty tutorials for YOU! So THANK YOU for coming to my blog and using my links! I appreciate you!

See you in the IG Hop!!

Xx, Amanda

Product Links:

Maker Forte – Embossing Powder – Rainbow Sparkler
Picket Fence Studios – Tools – Life Changing Blender Brush Set
Maker Forte Affiliate Link
Maker Forte – Clear Photopolymer Stamps – Grovehill FarmMaker Forte – Simple Sayings – Simple CelebrationsScrapbook.com Affiliate Link

Posted on 20 Comments

Heffy Doodle and Time for Tea Collaboration Blog Hop

Welcome to the Heffy Doodle and Time for Tea Collaboration Blog Hop!
Design Team members from both companies are sharing inspiration using products from both companies!

I’m so excited to share this card I made with you! I absolutely adore both of these companies’ products! They work SO WELL together! Can you guess which products are from which company? Read on to see!

To create my super vibrant background, I am blending Sixteen Candles, Pixie Dust and Grape Crush through the Time for Tea Tiled Wall Stencil. Once that’s done, I am going to very gently go over the entire background with a blending brush that has leftover Sixteen Candles ink on it.

To create the forefront of my scene, I am using the leaves from the Heffy Doodle Tree-mendous Peekaboo Tree Die and blending Melon Ice and Lime Rickey onto my cutout. For the dirt hill, I am using the Heffy Doodle Slimline Scenery Dies and blending Sand Castle and Over Coffee ink onto it. I am then splattering some white acrylic paint mixed with water using a small paintbrush. I’ve also used the Silver Linings Border Dies to create some clouds for the top portion of my scene and have left them white.

Now I’m ready to stamp my little cuties! I am grabbing the Heffy Doodle Hello Squeakheart Stamp Set and the Time for Tea Cafe Critters Stamp Set. I’m coloring them with my Copic markers using purples, greens, and yellows.

I’ve cut out the word “ENJOY” using the Heffy Doodle Stitched Alphabetters Dies and used Melon Ice and Lime Rickey to color them. Once I’ve cut my stamped images out using the coordinating dies, I’m ready to start assembling my card! I’m using Heffy Doodle’s Deep Foam Tape and Glubert Glue. I’m also creating one last sentiment by stamping the word “SQUEAKHEART” from the Hello Squeakheart stamp set on black cardstock with Versamark watermark ink. Then, I’m applying white embossing powder to it and cutting the sentiment into a ribbon using my scissors.

And, voila! Don’t those little cuties look so cute?! 🙂

That’s it for me on this Hop! I hope you enjoyed my card and all the love I put into it!

GIVEAWAY INFO: To be entered to win the giveaway, all you need to do is comment at each stop along the Blog Hop!
Time for Tea will be giving away £25 and Heffy Doodle will be giving away £25 to their respective stores!  Be sure to comment before 11:59 PM EST on Mar 2nd to be entered to win!

Each company will post their random winner on Mar 3rd at 10AM EST!  Make sure to check the Heffy Doodle Blog and Time for Tea Blog to see if you’re a winner!

Blog Hop Lineup:

Heffy Doodle Blog

Claudia Cubas 

Carrie Rhoades

Lyndsey Turner

Amanda Stevens

Jayne Vaughan

Tallie Clewley

Silvia Galloni

Amanda Fitterer (You are here)

Time for Tea Blog (GO HERE NEXT)

Posted on Leave a comment

Catherine Pooler New Global Adventure Pt. Deux InstaHop and Giveaway

INSTAHOP + GIVEAWAY
Today, the NEW 🌏 Global Adventure Collection Pt. Deux hits the CPD shop along with the three NEW 🌈 Refresh Inks !!! This is cause for a celebratory Insta Hop! Someone is going to WIN a $50 Gift Card to the CPD Shop 🎁!

Head to my Instagram account to see all the details and enter to win!

–> If you want to use my affiliate link to shop the New Release, click here. Thank you for all your support!! It is SO appreciated! <–

I’ve created this fun shaker card using the New Release items and the newly refreshed inks. My card features the Springtime in Paris Collection.

If you want to use my affiliate link to shop the New Release, click here. Thank you for all your support!! It is SO appreciated!

Posted on 39 Comments

Heffy Doodle and Sunny Studio Stamps Collaboration Blog Hop

Welcome to the Heffy Doodle and Sunny Studio Stamps Collaboration Blog Hop!
Design Team members from both companies are sharing inspiration using products from both companies!

I couldn’t choose just 1 card, so I decided to make 2!

Whenever I’m starting a card, I like to lay my stamps out on my card base to get an idea of what the card will look like. After doing that, I got blended my background using Fossilized Amber, Worn Lipstick, and Dusty Concord Distress Oxides.

The next step is stamping and coloring! I stamped images from the Heffy Doodle Chimply the Best, Wingman, Hootiful, and Beary Big Heart stamp sets. From Sunny Studio Stamps, I stamped images from the Silly Sloths stamp set.

For my sentiments, I used the word bubbles from the Whatcha Sayin’ stamp set. I also used a sentiment from the Silly Sloth stamp set.

Once I had all of my elements ready, I used 3D foam squares and strips to adhere everything to my background.

For my other card, I used Chimply the Best and Silly Sloths again. I stamped the images and colored them with Copic markers.

For my background and border, I used the UnbeLEAFable Stencil and the Stitched Rectangle Dies. I wanted my border to stick out farther than regular 3D foam adhesive, so I used the Deep Foam Tape.

I created leaves with the Amazonian Leaves Dies and Lucky Clover Distress Oxide. Finally, I started adhering everything to my card front with glue and 3D foam squares and strips.

To be entered to win the giveaway, all you need to do is comment at each stop along the Blog Hop!
Sunny Studio Stamps will be giving away $35 and Heffy Doodle will be giving away £25 to their respective stores!  Be sure to comment before 11:59 PM on March 3rd to be entered to win!

Each company will post their random winner on March 4th at 10AM EST!  Make sure to check the Heffy Doodle Blog and Sunny Studio Stamps Blog to see if you’re a winner!

Blog Hop Lineup:

Heffy Doodle Blog
Tallie Clewley
Mayra Duran-Hernandez
Mona Toth
Candice Fisher
Davina Cantrell
Julia Englich
Amanda Fitterer
Handmade by Kavya
Sunny Studio Blog