Posted on Leave a comment

Happy Fall!

Hello everyone! I hope you’re all having a great week so far!

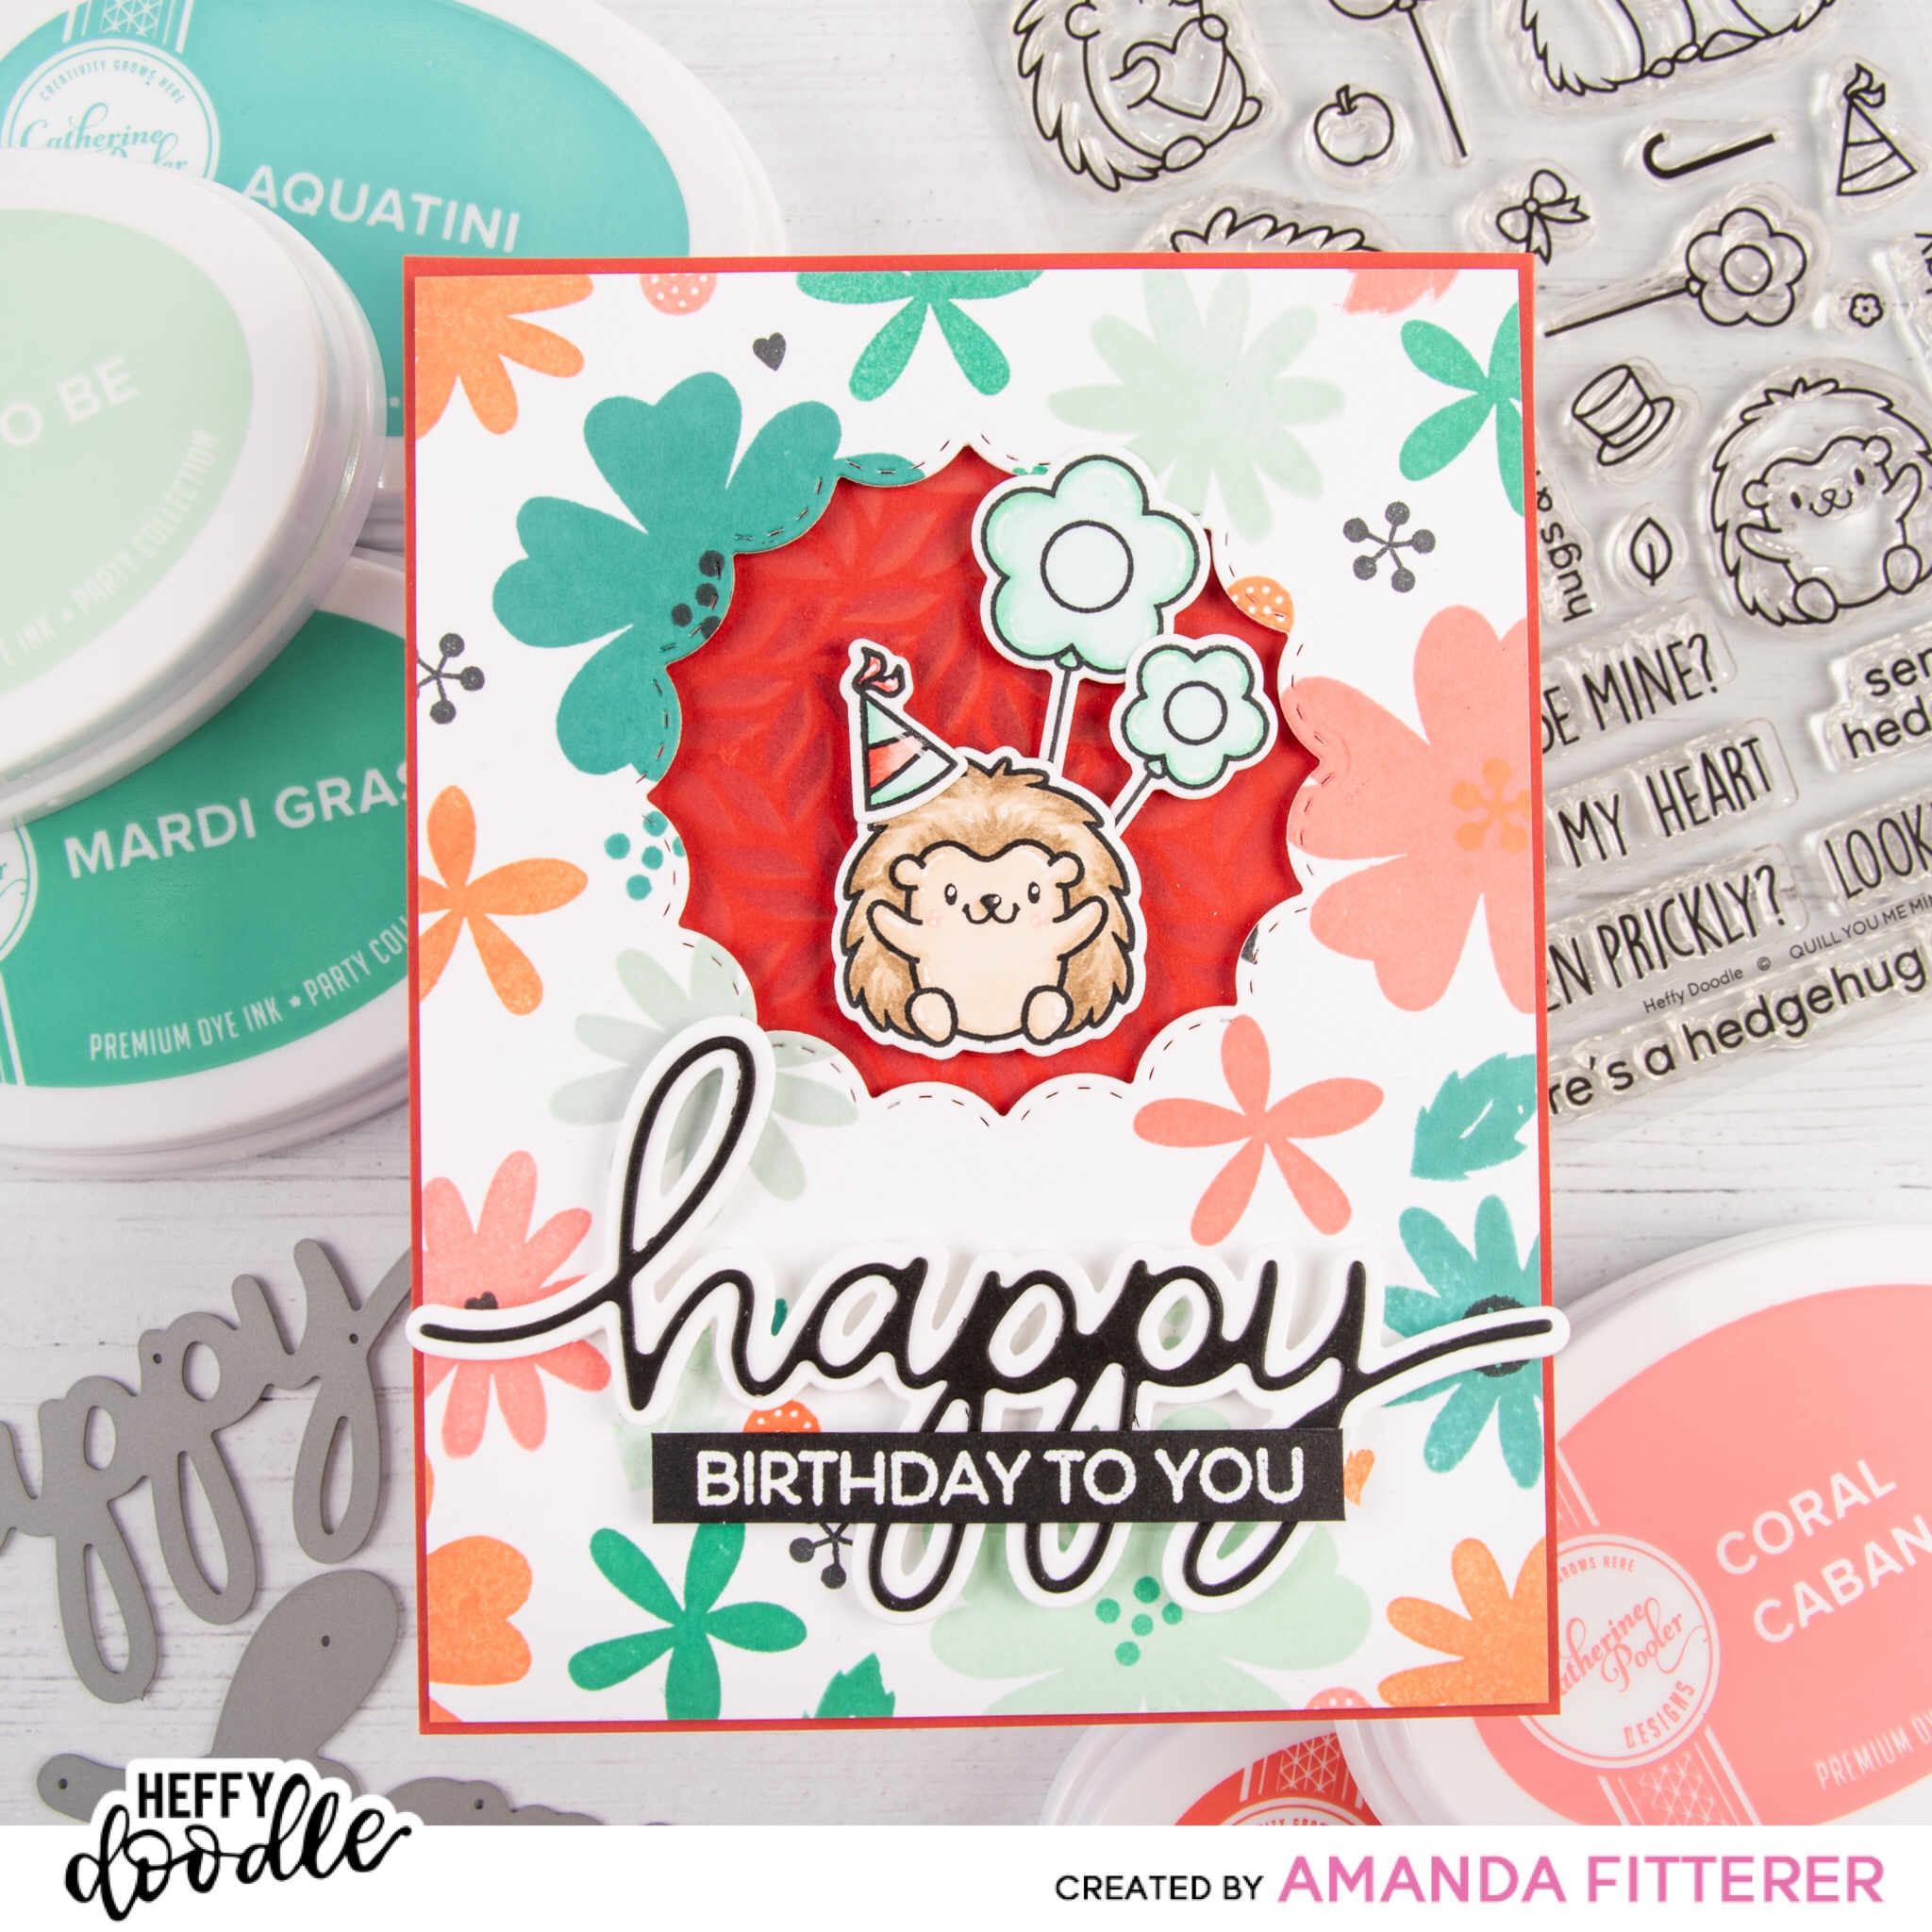
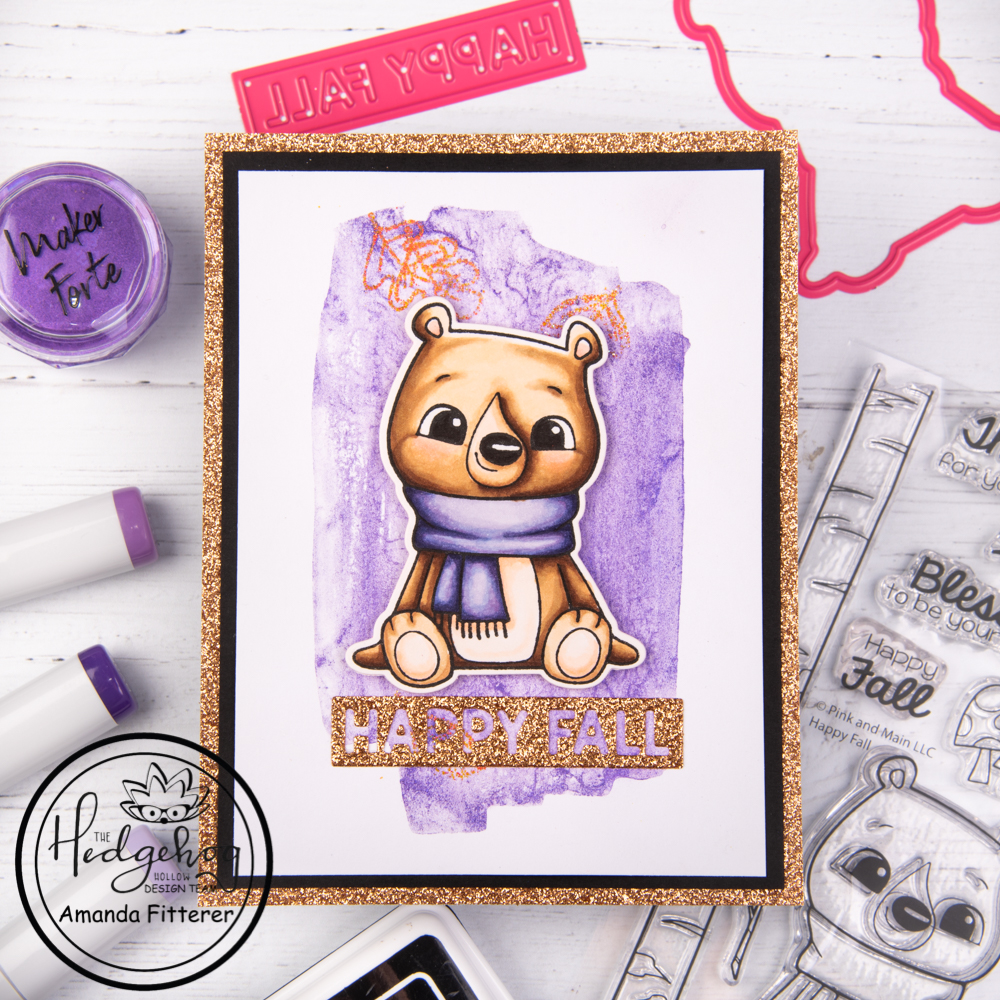
I am loving this card I made using Pink and Main’s Happy Fall stamp and die set! It is so simple, but yet so elegant! I love the idea of taking a non-traditional Fall color and using it to make a card that really stands out!

Plus, I used a few of Maker Forte’s newest gems: Kaleidoscope Powder – Interference – Nebula and Easy Watercolors by Hedgehog Hollow.

To make this card, I’m starting with the Kaleidoscope Powder – Interference – Nebula and a water brush. Putting a small puddle of water on my workspace, I am mixing in a bit of the powder. Using my water brush, I can mix it into a watercolor medium.

On a piece of watercolor cardstock, I am taking the largest of the Easy Watercolors by Hedgehog Hollow stamps and am brushing on my watercolor mixture straight onto my clear stamp. Once it’s completely covered, I can stamp the image. I am going to repeat this process twice to get a better coverage.

After waiting for that to dry, I am placing some leaf stamps from the Pink and Main’s Happy Fall stamp set on top of my watercolor. I am using the Color Hive Clear Embossing Glue Ink Pad to create a sticky image of the leaves. Then, I can apply my gold embossing powder to my images and melt it with my heat tool.

I’m ready to go ahead and stamp my adorable bear from the Pink and Main’s Happy Fall stamp set! (This bear is definitely the cutest bear EVER!) I am going to stamp him with Hero Arts Intensified Black ink and color him with Copic markers.

I cut my watercolor cardstock down to 3.75″ x 5″. Behind that, I’m layering a piece of black cardstock and a piece of gold cardstock.

The last thing I need to do is create my sentiment! I am using the same gold cardstock as I used for my base and cutting out the “Happy Fall” banner from the Pink and Main Blessings Slimline Die. I saved the little insides of the A’s and P’s to glue in after I get my sentiment down!

Next, I am ready to glue everything down and use 3D foam squares to adhere my bear!

I’d love it if you left a comment below or on my Instagram page to let me know if you enjoyed this post!

Don’t forget that you have until October 14th to get the October Subscription Box! It’s filled with some really fun stuff! If you didn’t get a chance to see the goodies, you can watch the video here! Or, if you’re already signed up for the subscription, you should be getting your box soon! Yipee!!

I hope you all enjoy the rest of your week! I’ll be back next Monday with another fun project!! I can’t wait! Xoxo, Amanda

Posted on Leave a comment

Non-traditionally Colored Holiday Cards

Are you ready for the holiday season? I am most certainly not! That’s why I am not quite ready for the traditional reds and greens of holiday cards! The October Subscription box has the cutest Holiday stamp set, though, and I NEEDED to use it NOW! So, I used purples instead of the traditional colors! Sneaky sneaky, I know! I tricked my brain!

For the first card, I am stamping my sentiments and wreath from the “Around Winter” stamp set that is included in the October subscription box. I am going to use my MISTI to stamp everything with VersaFine ink, emboss it with clear embossing powder, and then melt the embossing powder with a heat tool. I am stamping on watercolor cardstock, because I’m going to use watercolors in the next step.

Now, I’m grabbing this newly released “Easy Watercolor” stamp set. I am mixing Seedless Preserves and Wilted Violet Distress Inks on the stamp, spritzing with water, and then stamping the image.

While I wait for this to dry, I’m going start on my next card!

For this second card, I am starting with a piece of Snow Flurries Perfect Blend Cardstock. This cardstock is AMAZING for ink blending! It has a sort of glossy finish, but not as glossy as photo or Yupo paper. The ink stays wet just a bit longer than normal cardstock so you have time to blend. It dries pretty quickly though, so it doesn’t slow down your cardmaking!

I am using Dusty Concord and Shaded Lilac Distress Oxides with this gorgeous stencil that was also included in the October subscription box.

Using the Around Winter stamp set again, I am going to stamp a wreath with the “Happy Holidays” sentiment in the center.

Now I’m ready to assemble and embellish my cards! I am going to trim my watercolor card front to 3.75″x4″ and then mount it to a piece of black cardstock that I cut down to 4″x5.25″. Then place on my white A2 card base. To add a little more balance, I am going to adhere a few Angel Mix Sequins.

For my wreath card, I am going to cut my card front down to 4×5.25″ and then mount it to a black A2 card base.

Are you signed up for the Hedgehog Hollow Subscription Box already? If so, you should be getting your box soon! What will you make with all those goodies!?

If you missed the live stream revealing the October Box goodies, you can find it here.

I’m off to go make some more fun projects for my blog post on Tuesday! See you then! Xoxo, Amanda

Posted on Leave a comment

Monster Lemonade Stand

Hello lovely friends! Thanks for stopping by my blog to to see this adorable monster selling lemonade! This cute digital stamp can be printed as one scene or as separate pieces and arranged in your own scene! You can find this stamp on Kinda Cute’s website!

I’m going to start by printing the digital stamp on 80lb. Neenah Solar White cardstock. I’m printing the images separately so that I can arrange my own scene. I’m also going to print a few extra lemonade pitchers!

I’m ready to color my images now! For the lemonade, I’m using Y00, Y04, and Y08. For the lemonade stand, I’m using E30, E31, E33, E35, and E37.

Now, I’m going to use YG00, YG01, and YG03 for the awning. I’m also using BG000, BG10 and BG11.

For my cute little monster, I’m using YG17, YG03, YG01, YG00. For his outfit and eye, I’m using BG0000, BG000, BG01, BG02, and 100 (to make stripes). I’m using T5, T6, T8, and T10 for his hairs.

Now, I’m going to cut all of my images out with some precision scissors. After I’m finished with that, I’m ready to arrange my scene. I am using some stencils and dies and distress oxides to create my background. The stencils are from Simon Says Stamp and the die is from Heffy Doodle.


I am going to heat emboss some sentiments with white embossing powder on black cardstock and then adhere everything to my card using 3D foam squares and strips.

Thank you so much for stopping by my site! Xoxo, Amanda

Posted on 1 Comment

Happy Purrthday!

Hello crafty friends! I hope everyone is staying healthy!

I wanted to share this cute card I made using Heffy Doodle’s Hello Squeakheart and Purrfect Day stamp sets.

I’m using Tuxedo Black Memento ink to stamp all of my images.

I’m coloring in my images with Copic markers.

For my background, I’m using this brick background stamp and Hickory Smoke distress oxide. I’m also cutting a stitched border with a die and black cardstock.

I’m using 3D foam squares, strips, and glue to adhere everything to my card.

Here are a few close-ups of the finished card!

Thanks so much for stopping by! Xoxo, Amanda

Posted on 95 Comments

Heffy Doodle Catherine Pooler Collaboration Blog Hop

Hi everyone! Welcome to the Heffy Doodle and Catherine Pooler Designs Collaboration Blog Hop! Our design teams have come together to share some inspiration with the new Heffy Doodle and Catherine Pooler releases, and there is a prize up for grabs, too!

I had such a fun time playing with the new releases! The Catherine Pooler inks are so juicy and amazing! I had to make more than just one card!

Card 1

For the first card, I’m starting with these beautiful colors of Catherine Pooler inks: Mardi Gras, Aquatini, Mint To Be, Tutti Frutti, and Coral Cabana. The flowers are from the So Happy stamp set.

I am using one of the dies from the Fancy Nancy Frames set to create a cutout in the center of the top of my card front.

I’m using the Happy X Three dies to cut out a black inline and a white outline for my sentiment.

On a piece of Heffy Doodle Cherry on Top cardstock that I cut down to A2 size, I am placing my Fancy Foliage stencil and blending the pattern using Candied Apple and Fired Brick distress ink/oxide.

Now, I’m ready to stamp my Quill You Be Mine images with Memento Tuxedo Black ink. This ink works well with Copic markers, which I will use to color in my stamped images.
Body: E41, E42, E43, R21, white Gelly Roll pen
Quills: E44, E43, and E42
Balloons (on 2nd attempt!): G0000, G00, and G02

After using the coordinating dies to cut my images out, I’m ready to start putting my card together. I’m using foam tape and squares to create a 3D layers.

I’m stamping my sentiment on black cardstock using Versamark Watermark ink. I’m adding white detail embossing powder and using my heat gun to emboss it. I am cutting down small strips of 1/8” foam tape and putting it on the back of my “happy” piece.

Now I’m ready to add my sentiments and it’s all done!

Card 2

For the next card, I’m going to make a slimline card, using the same Catherine Pooler inks and So Happy stamp set. I’m starting by laying out where I want things to be. I’m going to use some masking tape to cover the sentiment “HAPPY” because I’m going to stamp that in a different color. After stamping my sentiments, I’m using one of the Fancy Nancy frames to create some peek-a-boo cutouts. I’m using the Mint to Be ink pad to blend a background that will be peeking through my cutouts.

I’m stamping my bugs from the Big Bug Hugs and coloring them with Copic markers.

Now, I’m ready to adhere everything to the card using 3D foam adhesive!

Catherine Pooler and Heffy Doodle will be respectively giving away a $25 and a 25£ gift certificate to their stores! Make sure to comment on each post in the hop for your chance to win!
Winner will be chosen randomly and announced on Tuesday, February 25th on the Heffy Doodle and Catherine Pooler blogs.

You’re next stop is Jen Carter!

BLOG HOP LINEUP:
Catherine Pooler Blog
Heffy Doodle Blog
Karen Baker
Davina Cantrell
Nanette Tracy
Amanda Fitterer (you are here!)
Jen Carter
Laura Volpes
Erica Andersson
Cassie Trask
Erin Thompson
Jenn Bena