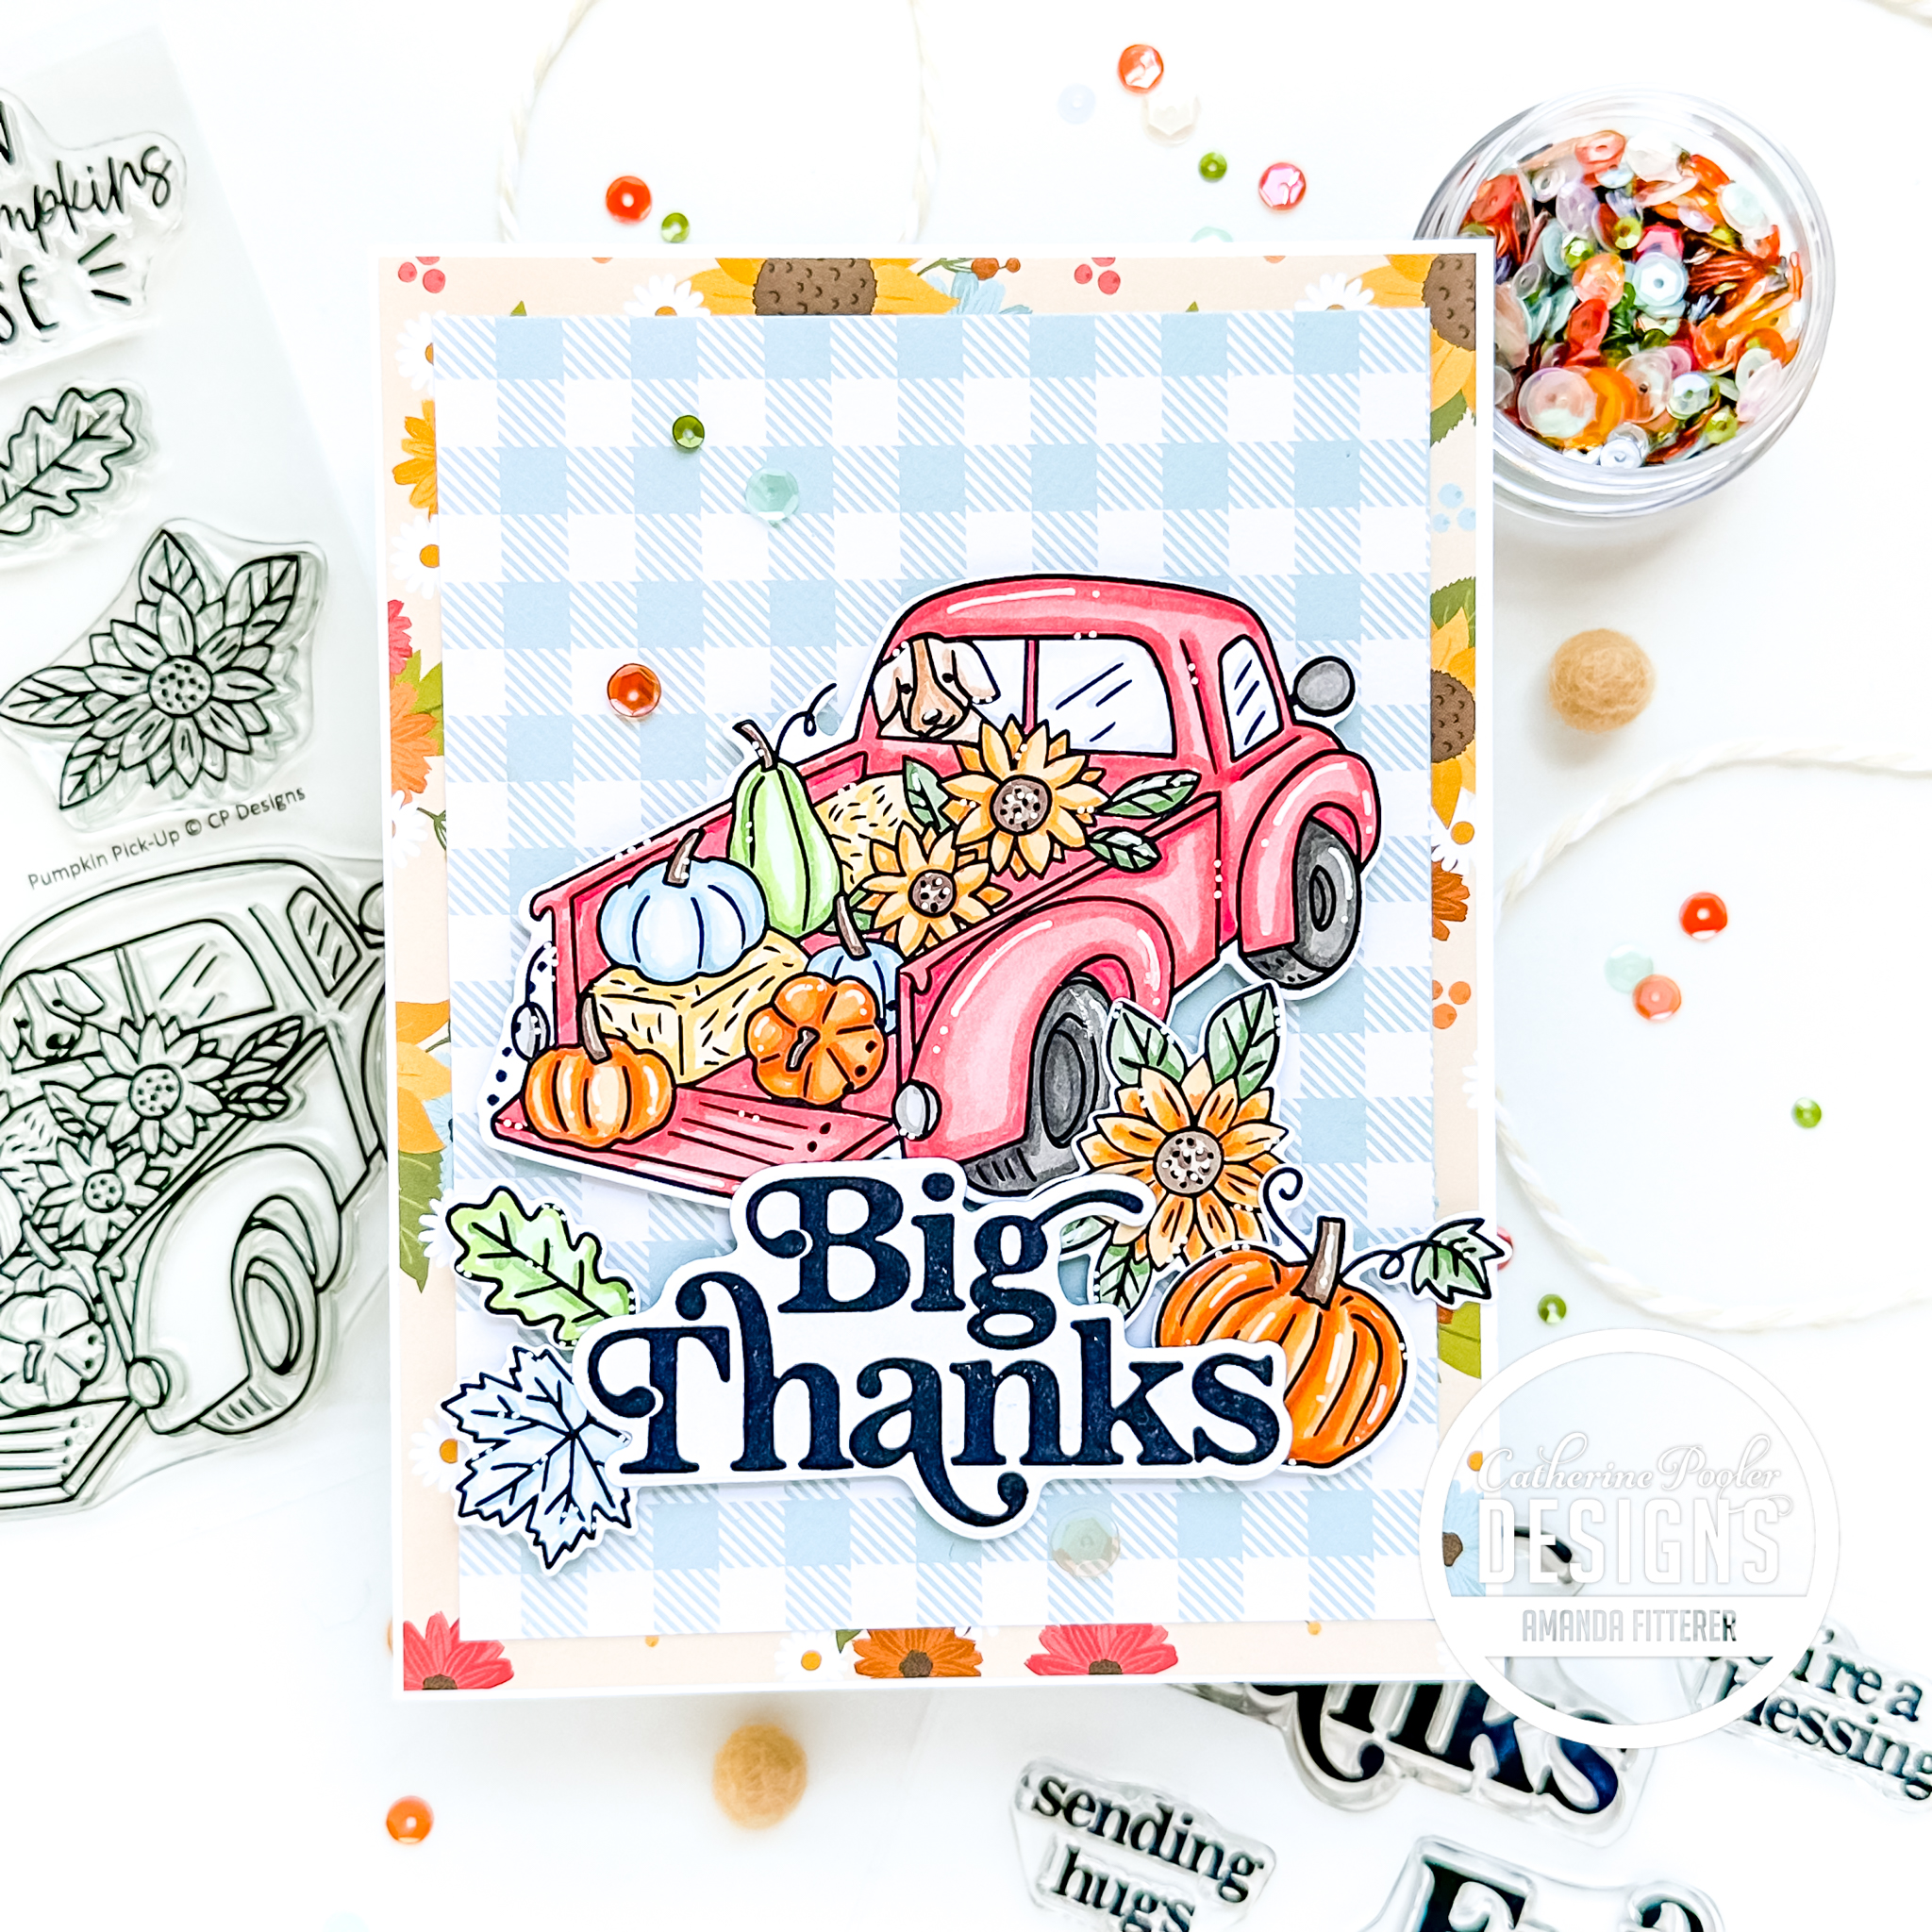
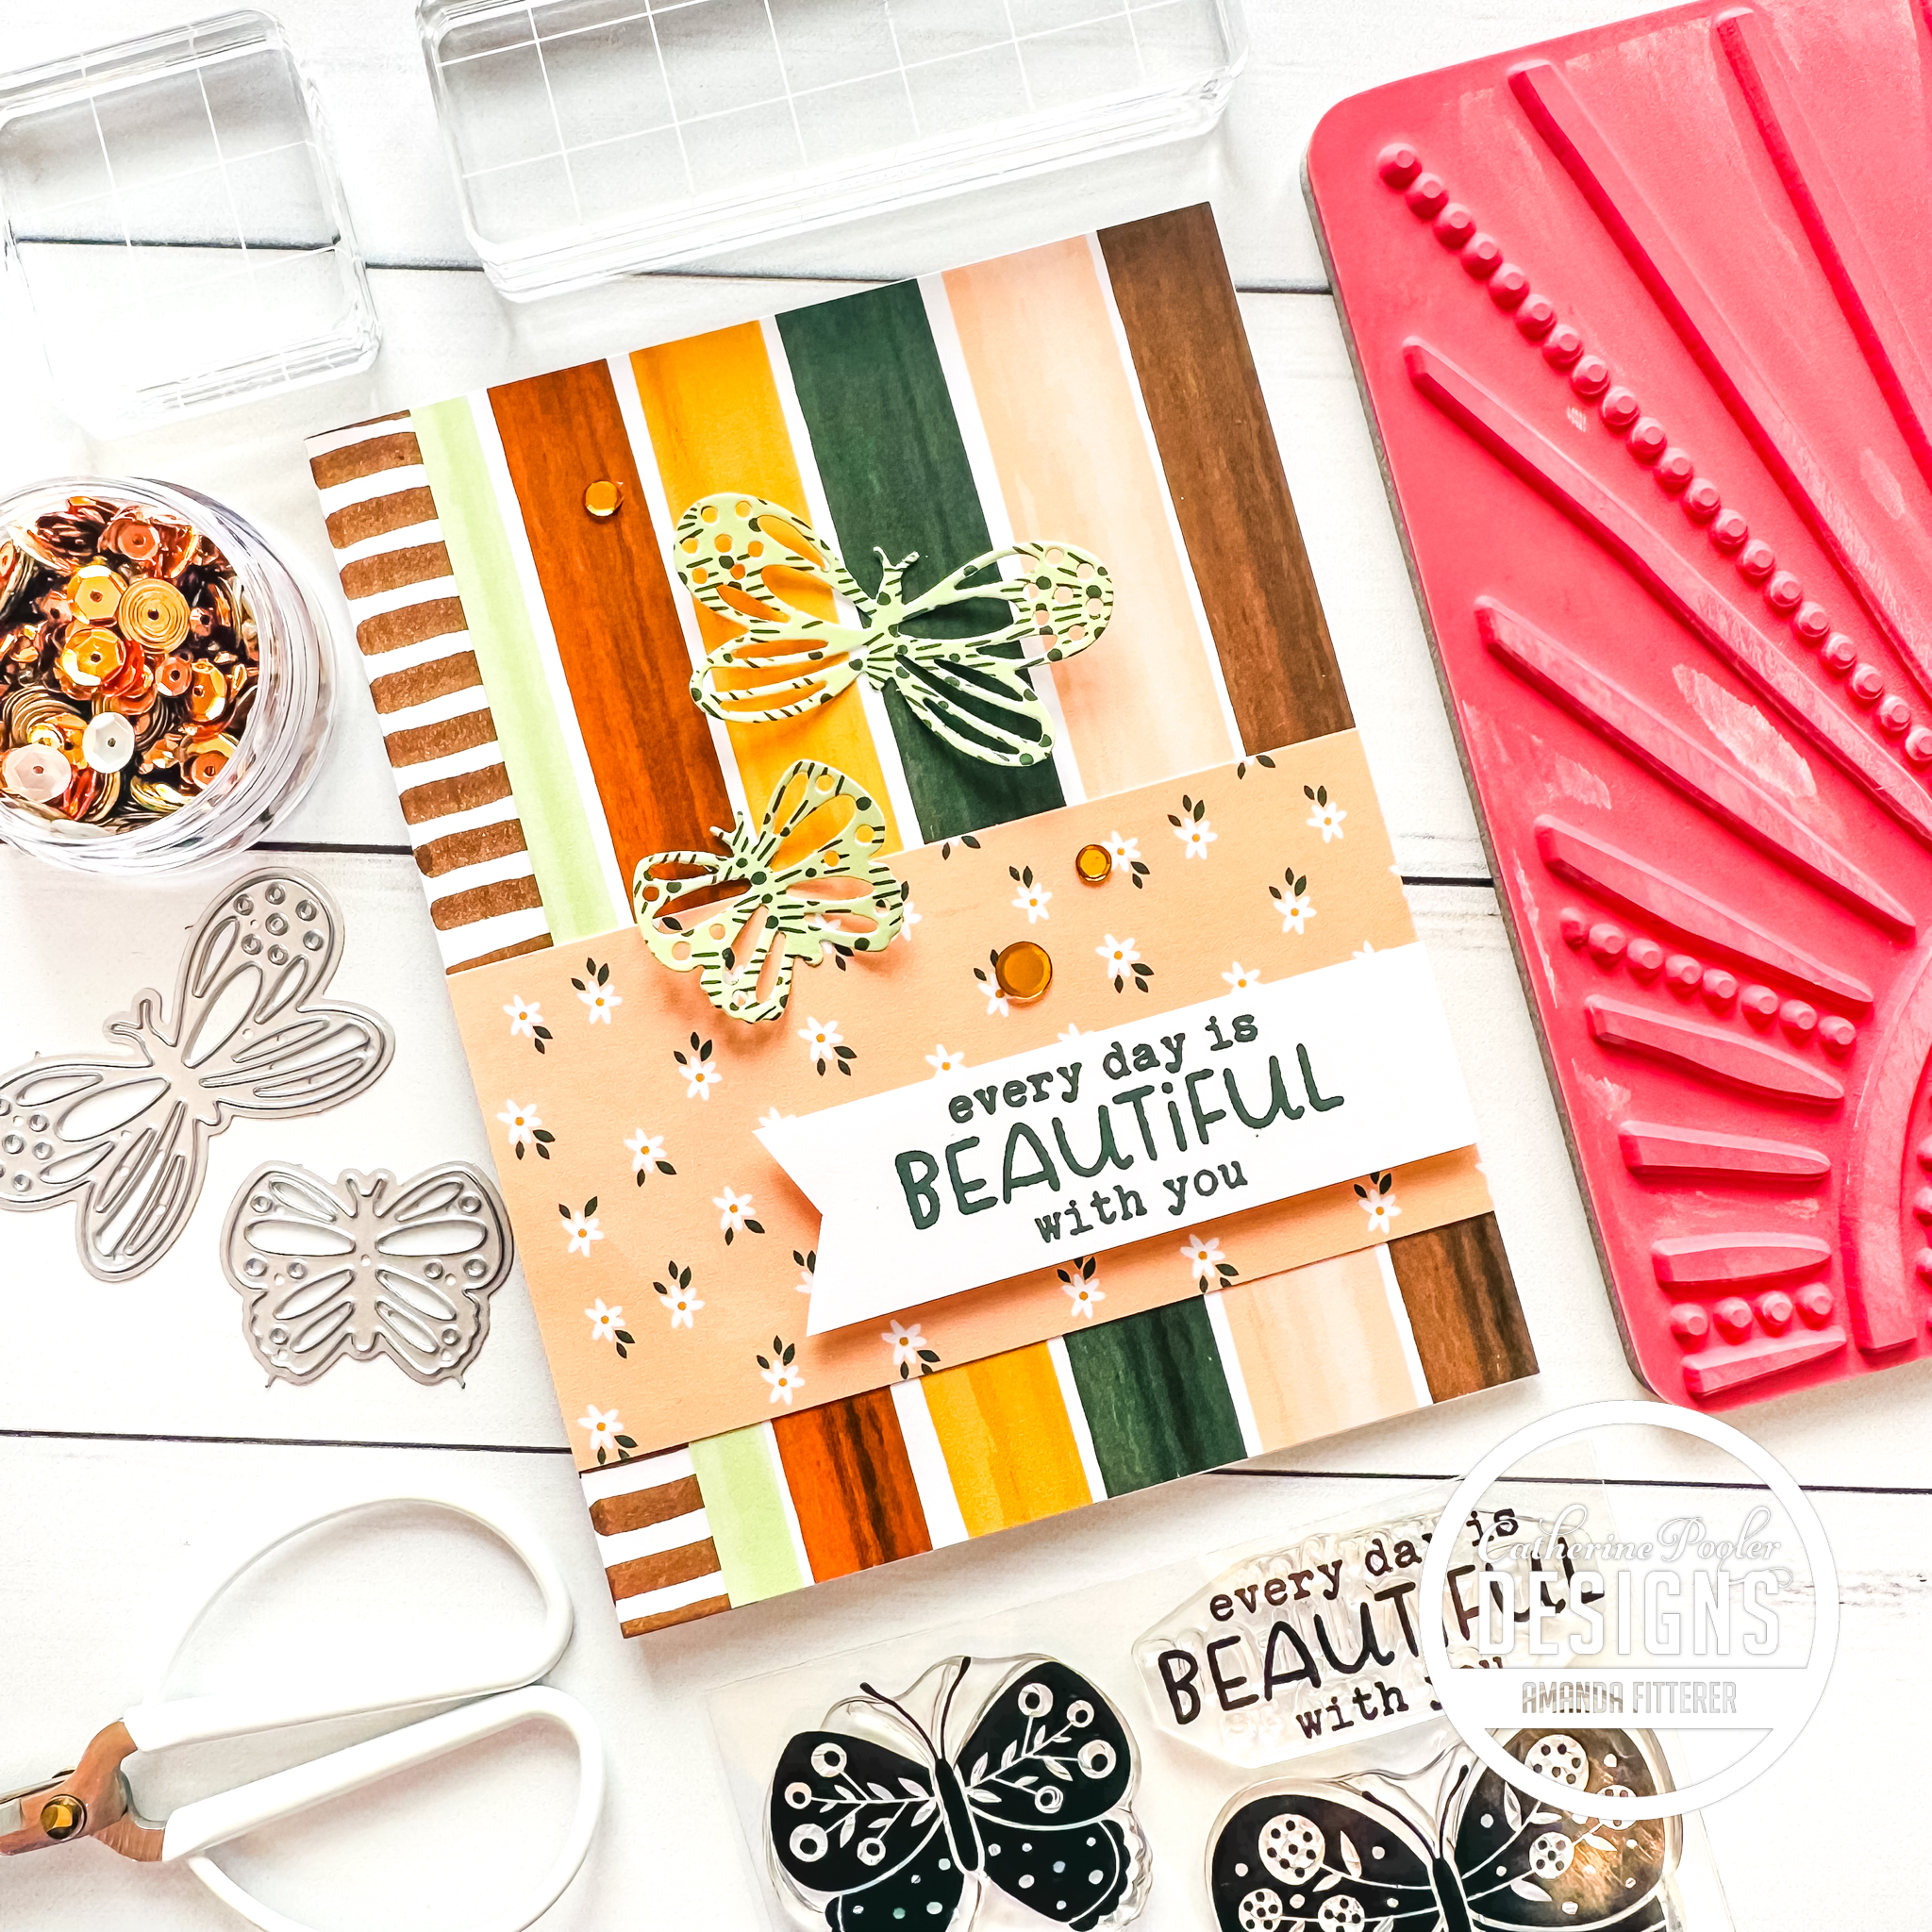
Hey crafty friends! The Catherine Pooler BRAND NEW RELEASE is available now!
👉🏻👉🏻 GET EARLY ACCESS to this (and EVERY) New Release! Sign up to be a Catherine Pooler StampNation member and get tons of perks, including early ordering for every monthly release!
This Holiday De-Lights collection is bursting with some amazing new patterned paper packs, new Olive and On the Lake ink pads, stamps, dies and more! Come check out the entire new release here.
I had so much fun creating some fun holiday tags using the No Shaking Bundle with the NEW Olive and On the Lake Inks! You get 5 different tag dies which you can mix and match! I even added a tags to my cards! Keep scrolling to see more projects!
Don’t forget: If you’re a Catherine Pooler StampNation member, you get EARLY ACCESS to every new release (plus SOOO many other benefits)! Sign up now! It’s worth it!
Thanks for using my affiliate links! You all are the BEST! Using an affiliate link in this post above or down below costs you nothing, but it gives me a teeny percentage of your sale to buy more crafty goodies to continue to share card tutorials with YOU! So, thank YOU! Xx, Amanda
Welcome to the Alex Syberia Designs September Anniversary Release Blog Hop! To celebrate their birthday, Alex Syberia Designs has collaborated with a ton of wonderful sponsors to give away a grand total of £800 ($1000) in prizes! See ALL THE PRIZES down below! 👇👇
My cards feature a lot of the new products! Shop all the NEW PRODUCTS HERE.
If you ever have an issue getting a really good ink blended background, it’s possible you’re not using the right paper or cardstock. The ink should be smooth and easy to blend. Consider using Catherine Pooler’s Premium White Cardstock. It makes the process so much easier!
Be sure to leave comments by midnight BST (London, UK time) on September 17th, 2023, for a chance to win!
👉🏼👉🏼 Start your comment by telling us where you’re from (USA, Canada, Europe, or Australia) and what your favorite product is from this September Anniversary release.
All the winners will be chosen at random from the comments left on any of the posts in the blog hop, upcoming YouTube hop, and the three upcoming Instagram hops. Winners will be announced on the Alex Syberia Designs GIVEAWAY WINNERS PAGE on September 18th, 2023.
Make sure to come back and check if you are a winner! Prizes not claimed within two weeks will be forfeited.
To increase your chances of winning, be sure to comment on this blog hop, the upcoming Anniversary Video Hop that starts on the 9th of Sep on Alex Syberia Designs YT Channel, and the three consecutive Instagram Hops on Alex Syberia Designs Instagram starting on the 11th of September.
Thanks for using my affiliate links! You all are the BEST! Using an affiliate link in this post above costs you nothing, but it gives me a teeny percentage of your sale to buy more crafty goodies to continue to share card tutorials with YOU! So, thank YOU! Xx, Amanda
👇🏻👇🏻 Subscribe 👇🏻👇🏻 to be alerted of new posts by yours truly!
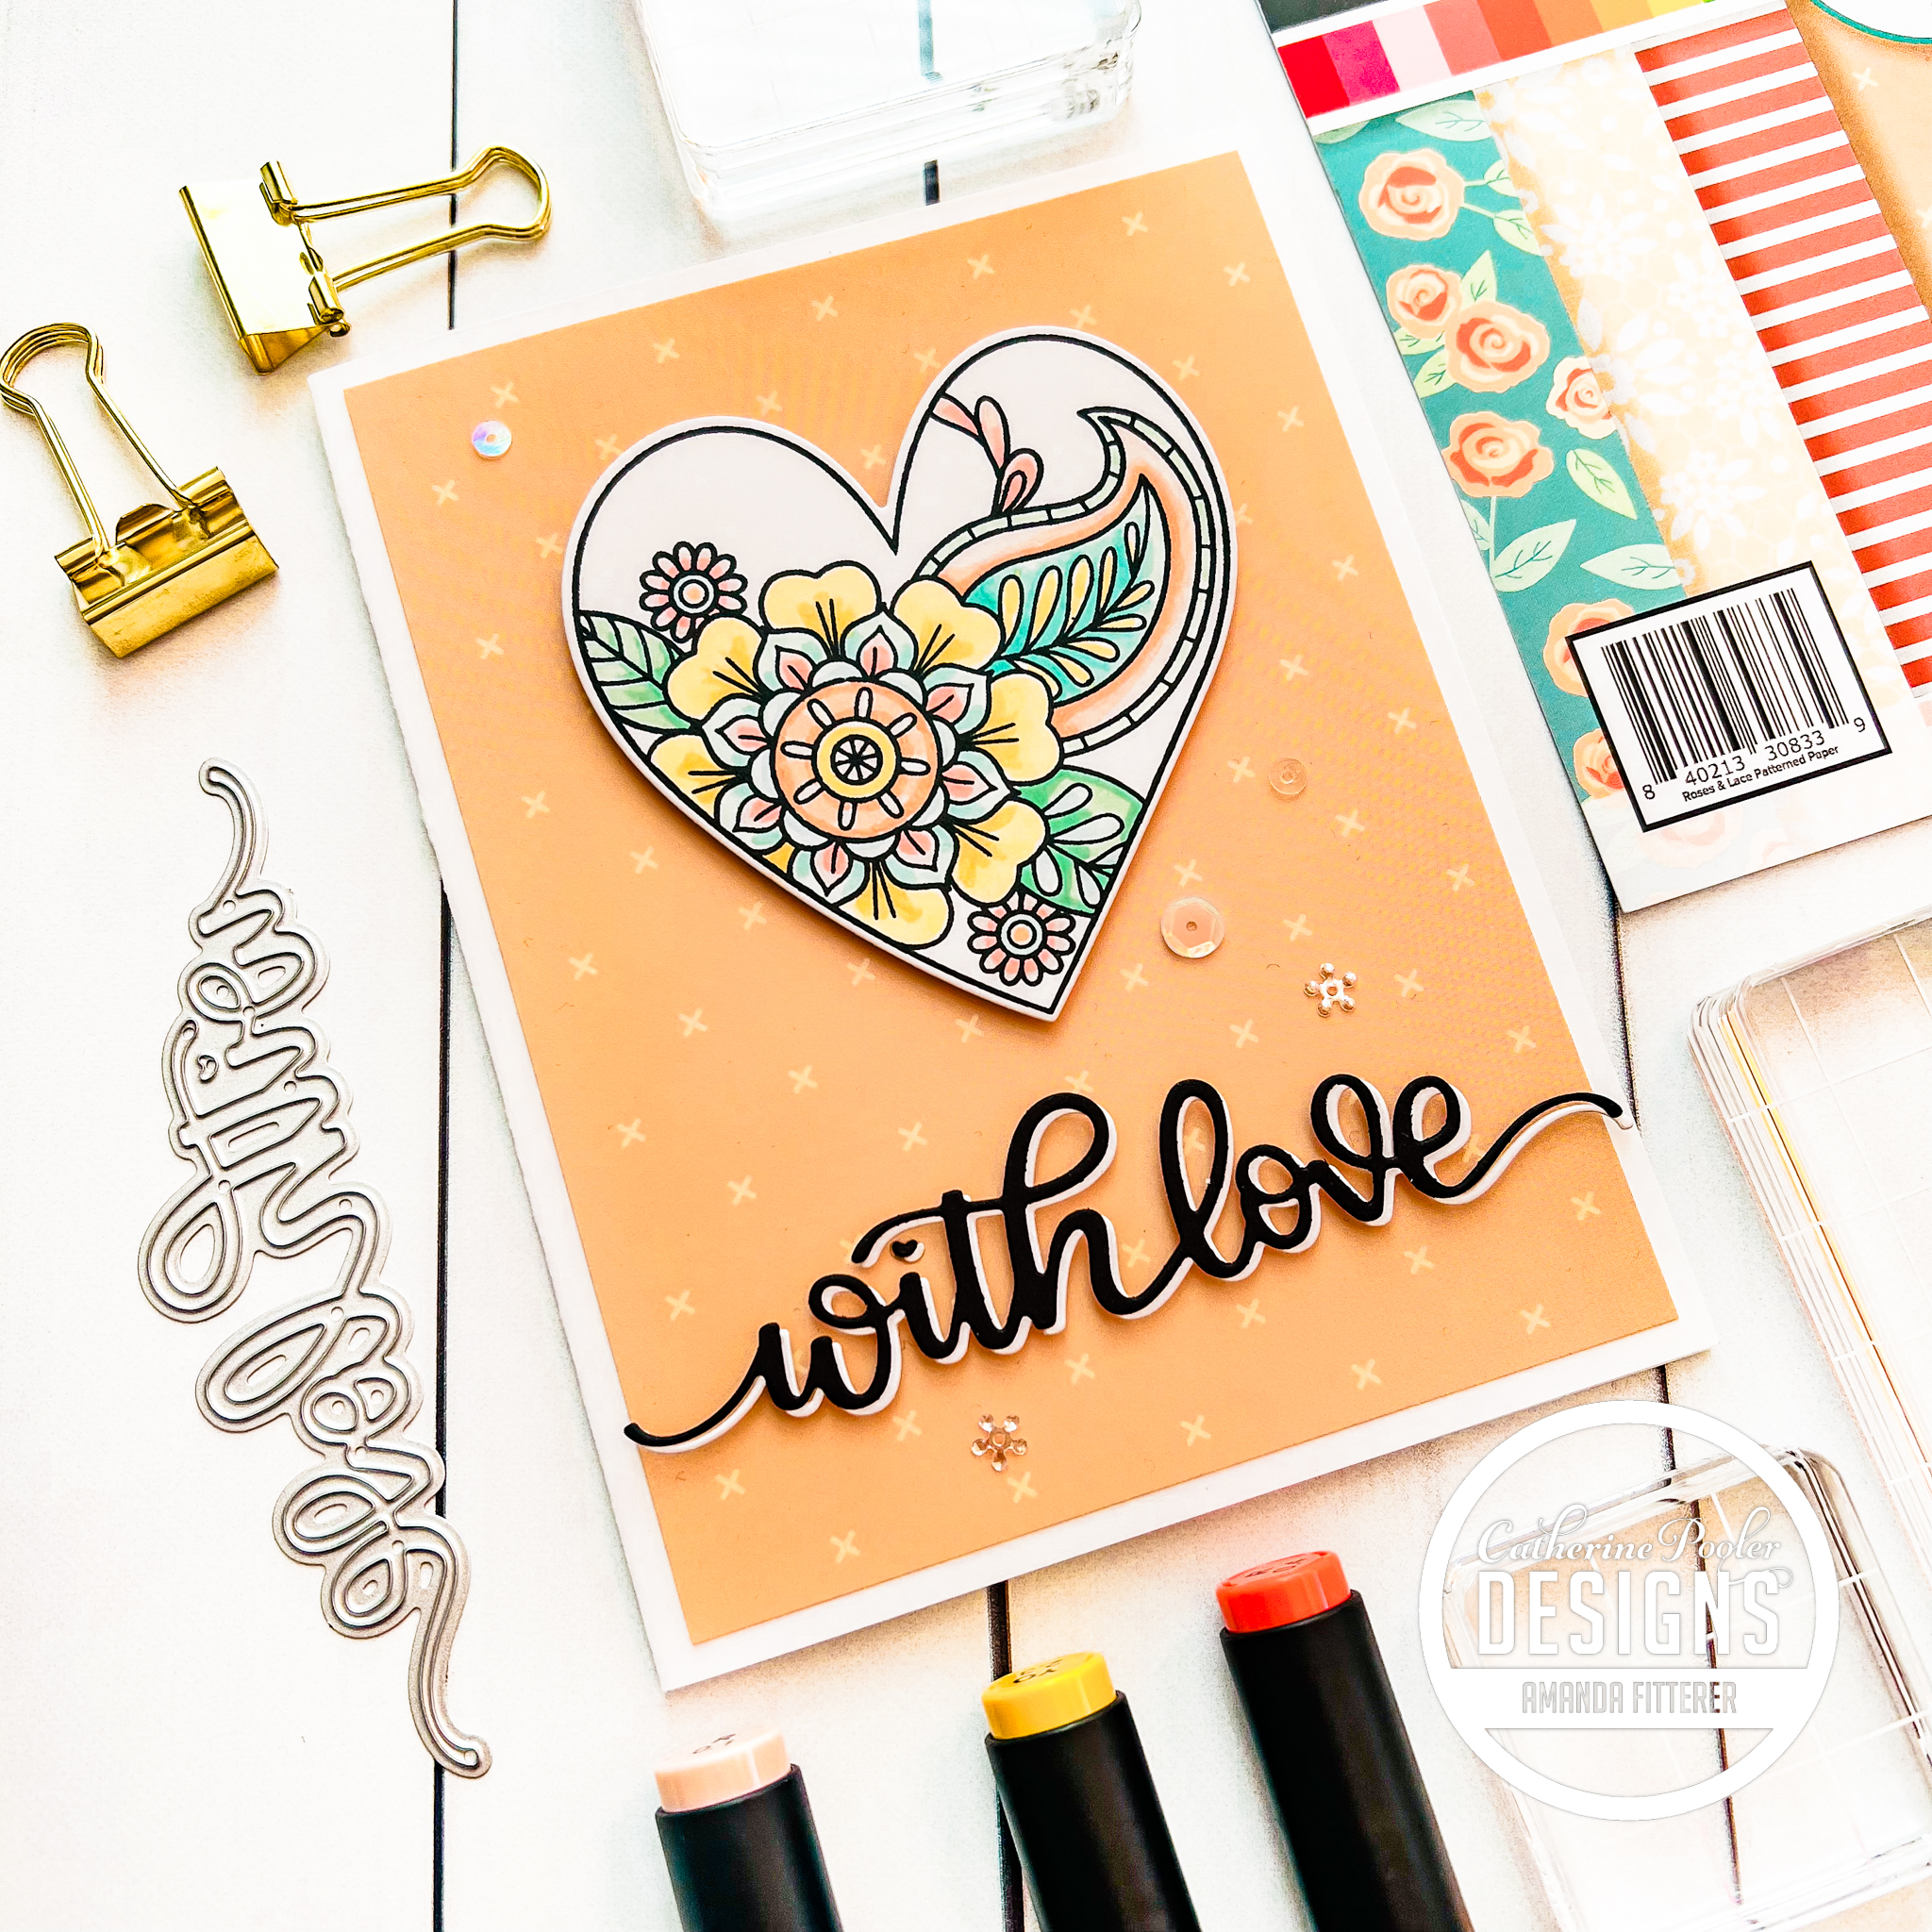
Hello friends! Today I’m sharing a soft and pretty “LOVE YOU” card featuring the Paradise Birds Stamp Set. Let’s make this card together! Grab your supplies!
For the White/Green Panel, we’re going to blend Catherine Pooler’s Melon Ice just around the edges. For the White/Pink panel, we’re going to blend (just lightly in the center) Cotton Candy.
Next up, we’re going to stamp our leaves from the Paradise Birds Stamp Set directly onto our card base using Melon Ice ink. To make this process a little quicker, I like to use a combination of my acrylic blocks and my MISTI. I do this because I want to use the foam from the MISTI to get a better stamped image, but the acrylic blocks make it much faster, as I don’t have to constantly move my stamps around!
We’re ready to stamp our sweet birds now! After stamping with alcohol marker-friendly Memento Tuxedo Black Ink, I’m coloring my images with Copic markers. Once finished with that, I’ll die cut them with the coordinating die set.
Well, friends! That’s it for me today!! I hope you have enjoyed this post and find some time to get crafty today!!
Thanks for using my affiliate links! You all are the BEST! Using an affiliate link in this post above costs you nothing, but it gives me a teeny percentage of your sale to buy more crafty goodies to continue to share card tutorials with YOU! So, thank YOU! Xx, Amanda
Hey crafty friends! The Catherine Pooler BRAND NEW RELEASE is available now!!
👉🏻👉🏻 GET EARLY ACCESS to this(and EVERY) New Release! Sign up to be a Catherine Pooler StampNation member and get tons of perks, including early ordering for every monthly release!
Don’t forget: If you’re a Catherine Pooler StampNation member, you get EARLY ACCESS to every new release (plus SOOO many other benefits)! Sign up now! It’s worth it!
Thanks for using my affiliate links! You all are the BEST! Using an affiliate link in this post above or down below costs you nothing, but it gives me a teeny percentage of your sale to buy more crafty goodies to continue to share card tutorials with YOU! So, thank YOU! Xx, Amanda
For my background, I started by blending with Catherine Pooler’s Shea Butter Ink. For my dirt, I used Sand Castle ink. I spritzed the whole background with water.
Thanks so much for stopping by my blog today! I hope you enjoyed this post and have some time to get crafty today! Xx, Amanda
Thanks for using my affiliate links! You all are the BEST! Using an affiliate link in this post above or down below costs you nothing, but it gives me a teeny percentage of your sale to buy more crafty goodies to continue to share card tutorials with YOU! So, thank YOU! Xx, Amanda
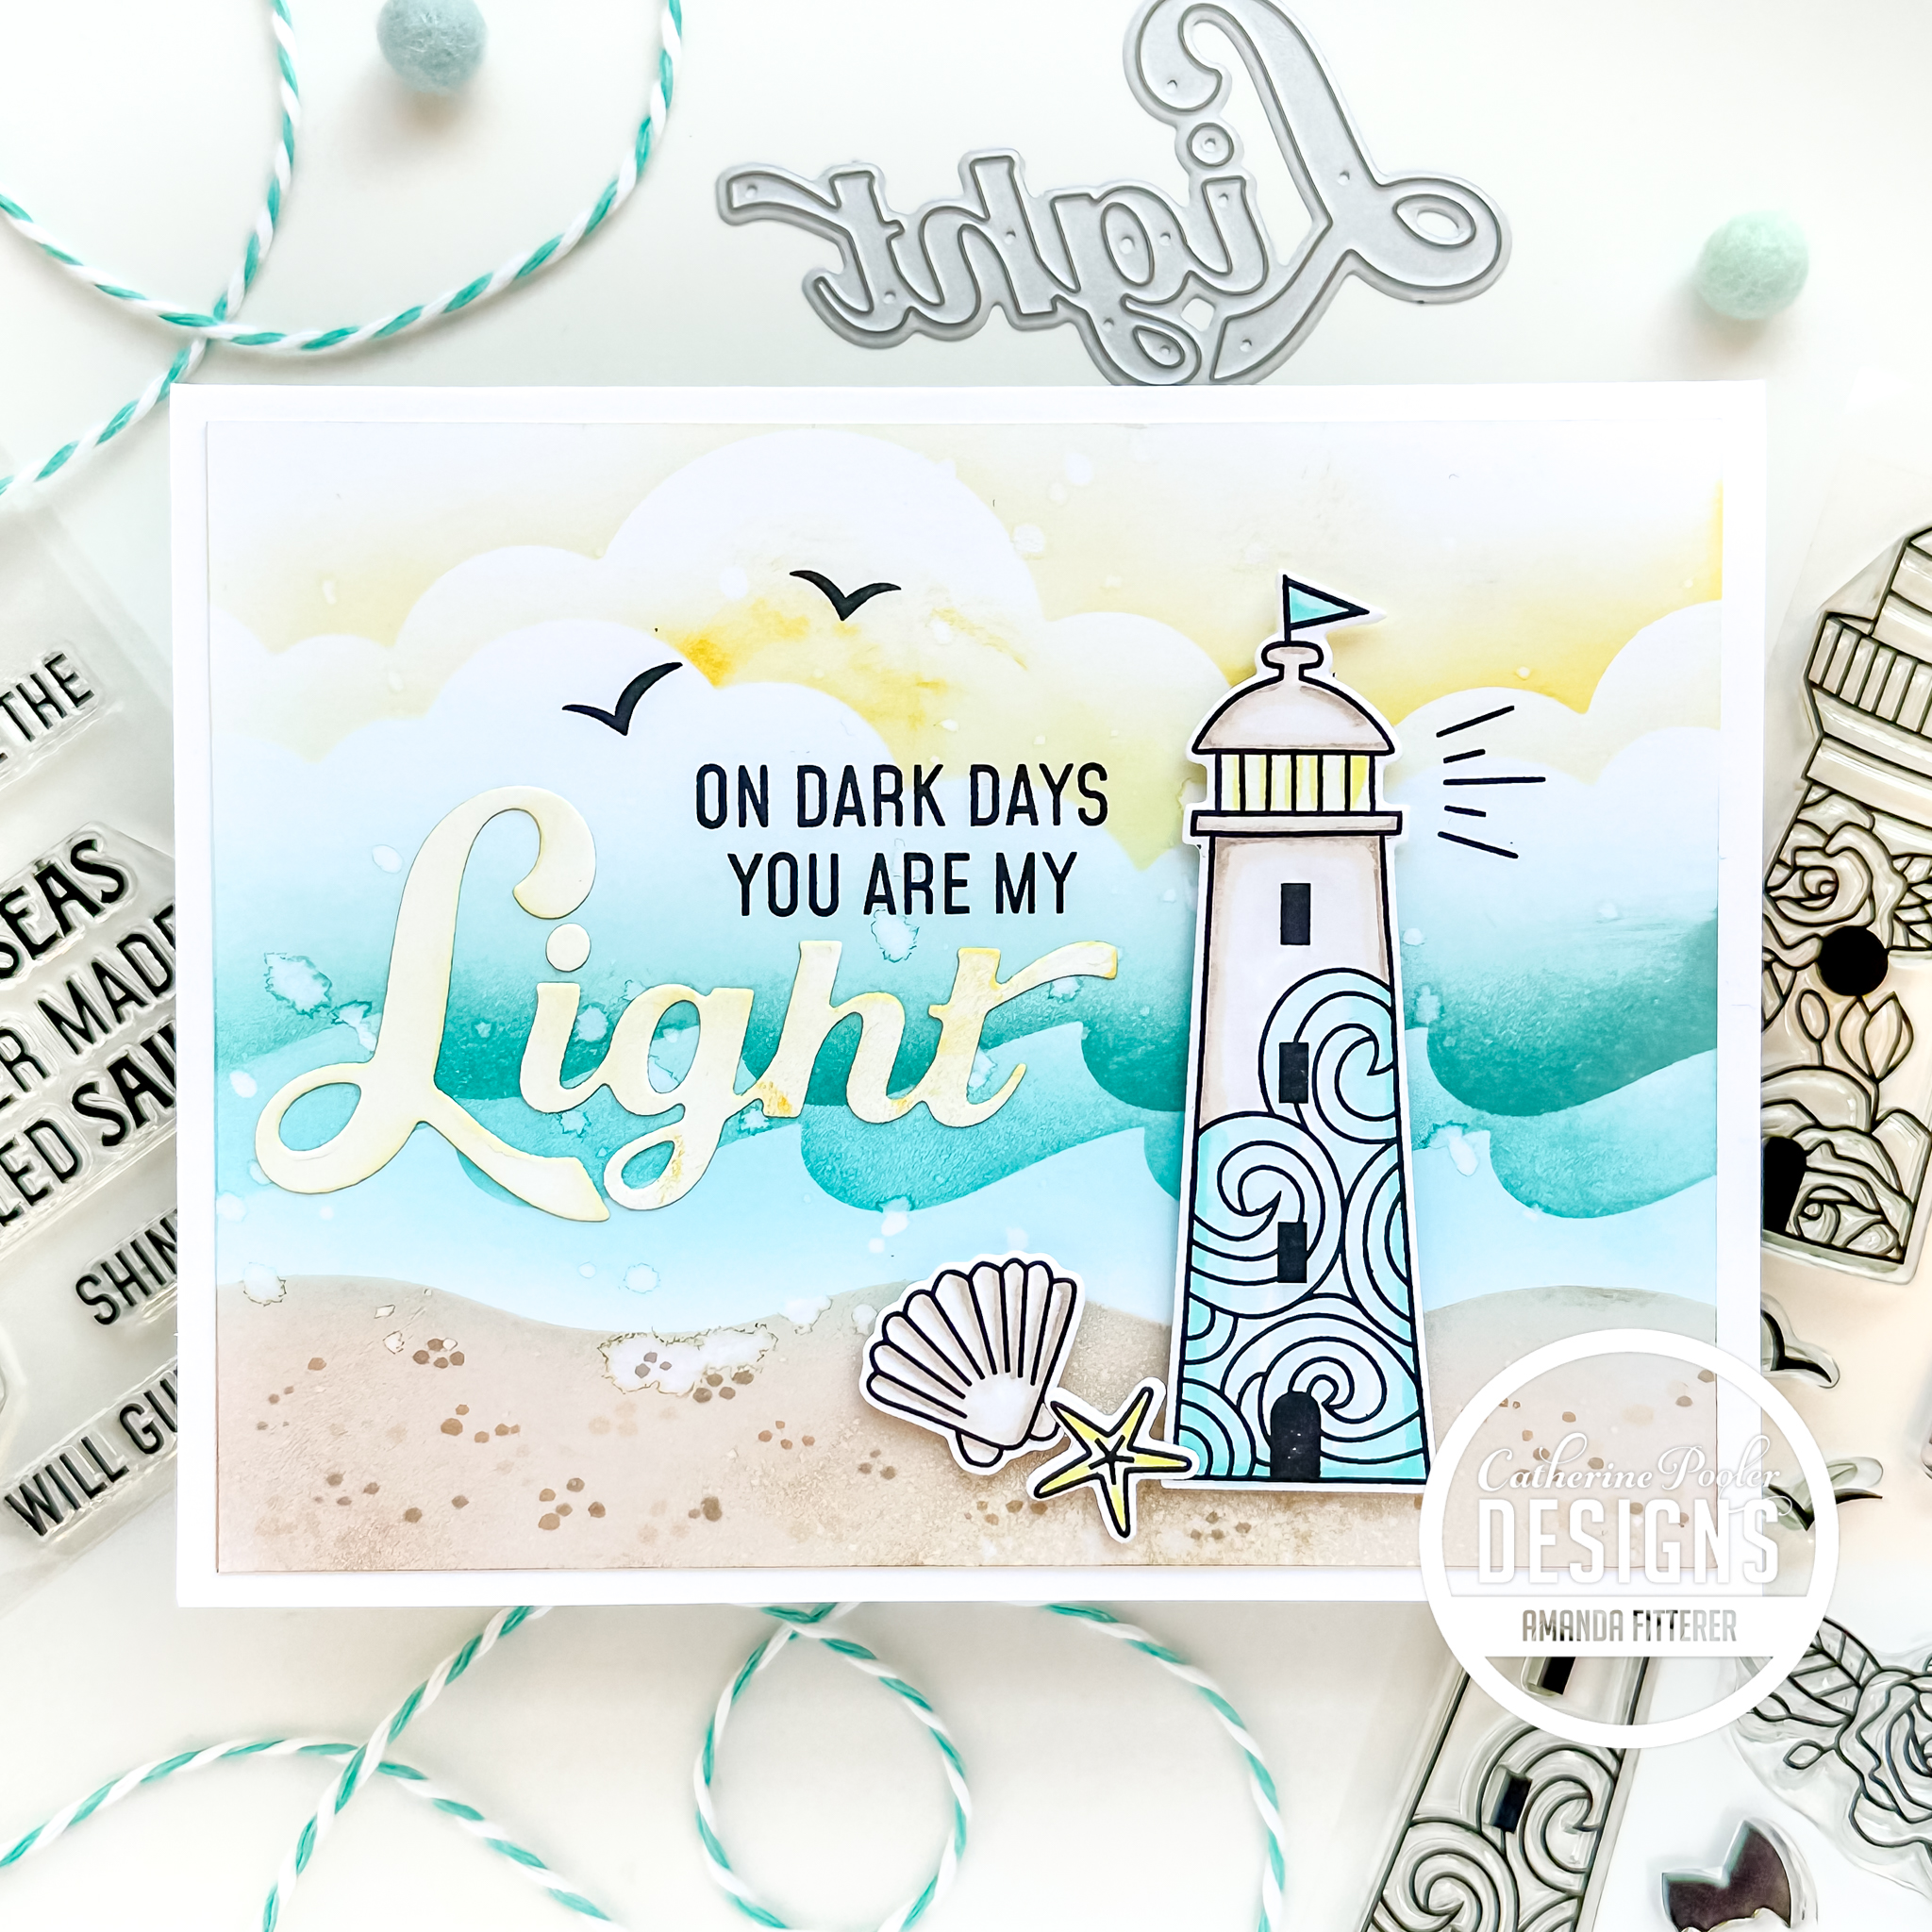
Hey crafty friends! The BRAND NEW RELEASE from Catherine Pooler is Available Now!
👉🏻👉🏻 GET EARLY ACCESS to this(and EVERY) New Release! Sign up to be a Catherine Pooler StampNation member and get tons of perks, including early ordering for every monthly release!
For my background, I used some cloud and waves stencils with Shea Butter and Skylight Inks. For my sand, I used Sand Castle ink.
I stamped my Scenic Lighthouses Stamps with black ink and then colored them in with Copic markers. I cut them out using the coordinating dies. I cut my Light Word Die out of white cardstock and used Shea Butter to tint it yellow.
Don’t forget: If you’re a Catherine Pooler StampNation member, you get EARLY ACCESS to every new release (plus SOOO many other benefits)! Sign up now! It’s worth it!
Thanks for using my affiliate links! You all are the BEST! Using an affiliate link in this post above or down below costs you nothing, but it gives me a teeny percentage of your sale to buy more crafty goodies to continue to share card tutorials with YOU! So, thank YOU! Xx, Amanda
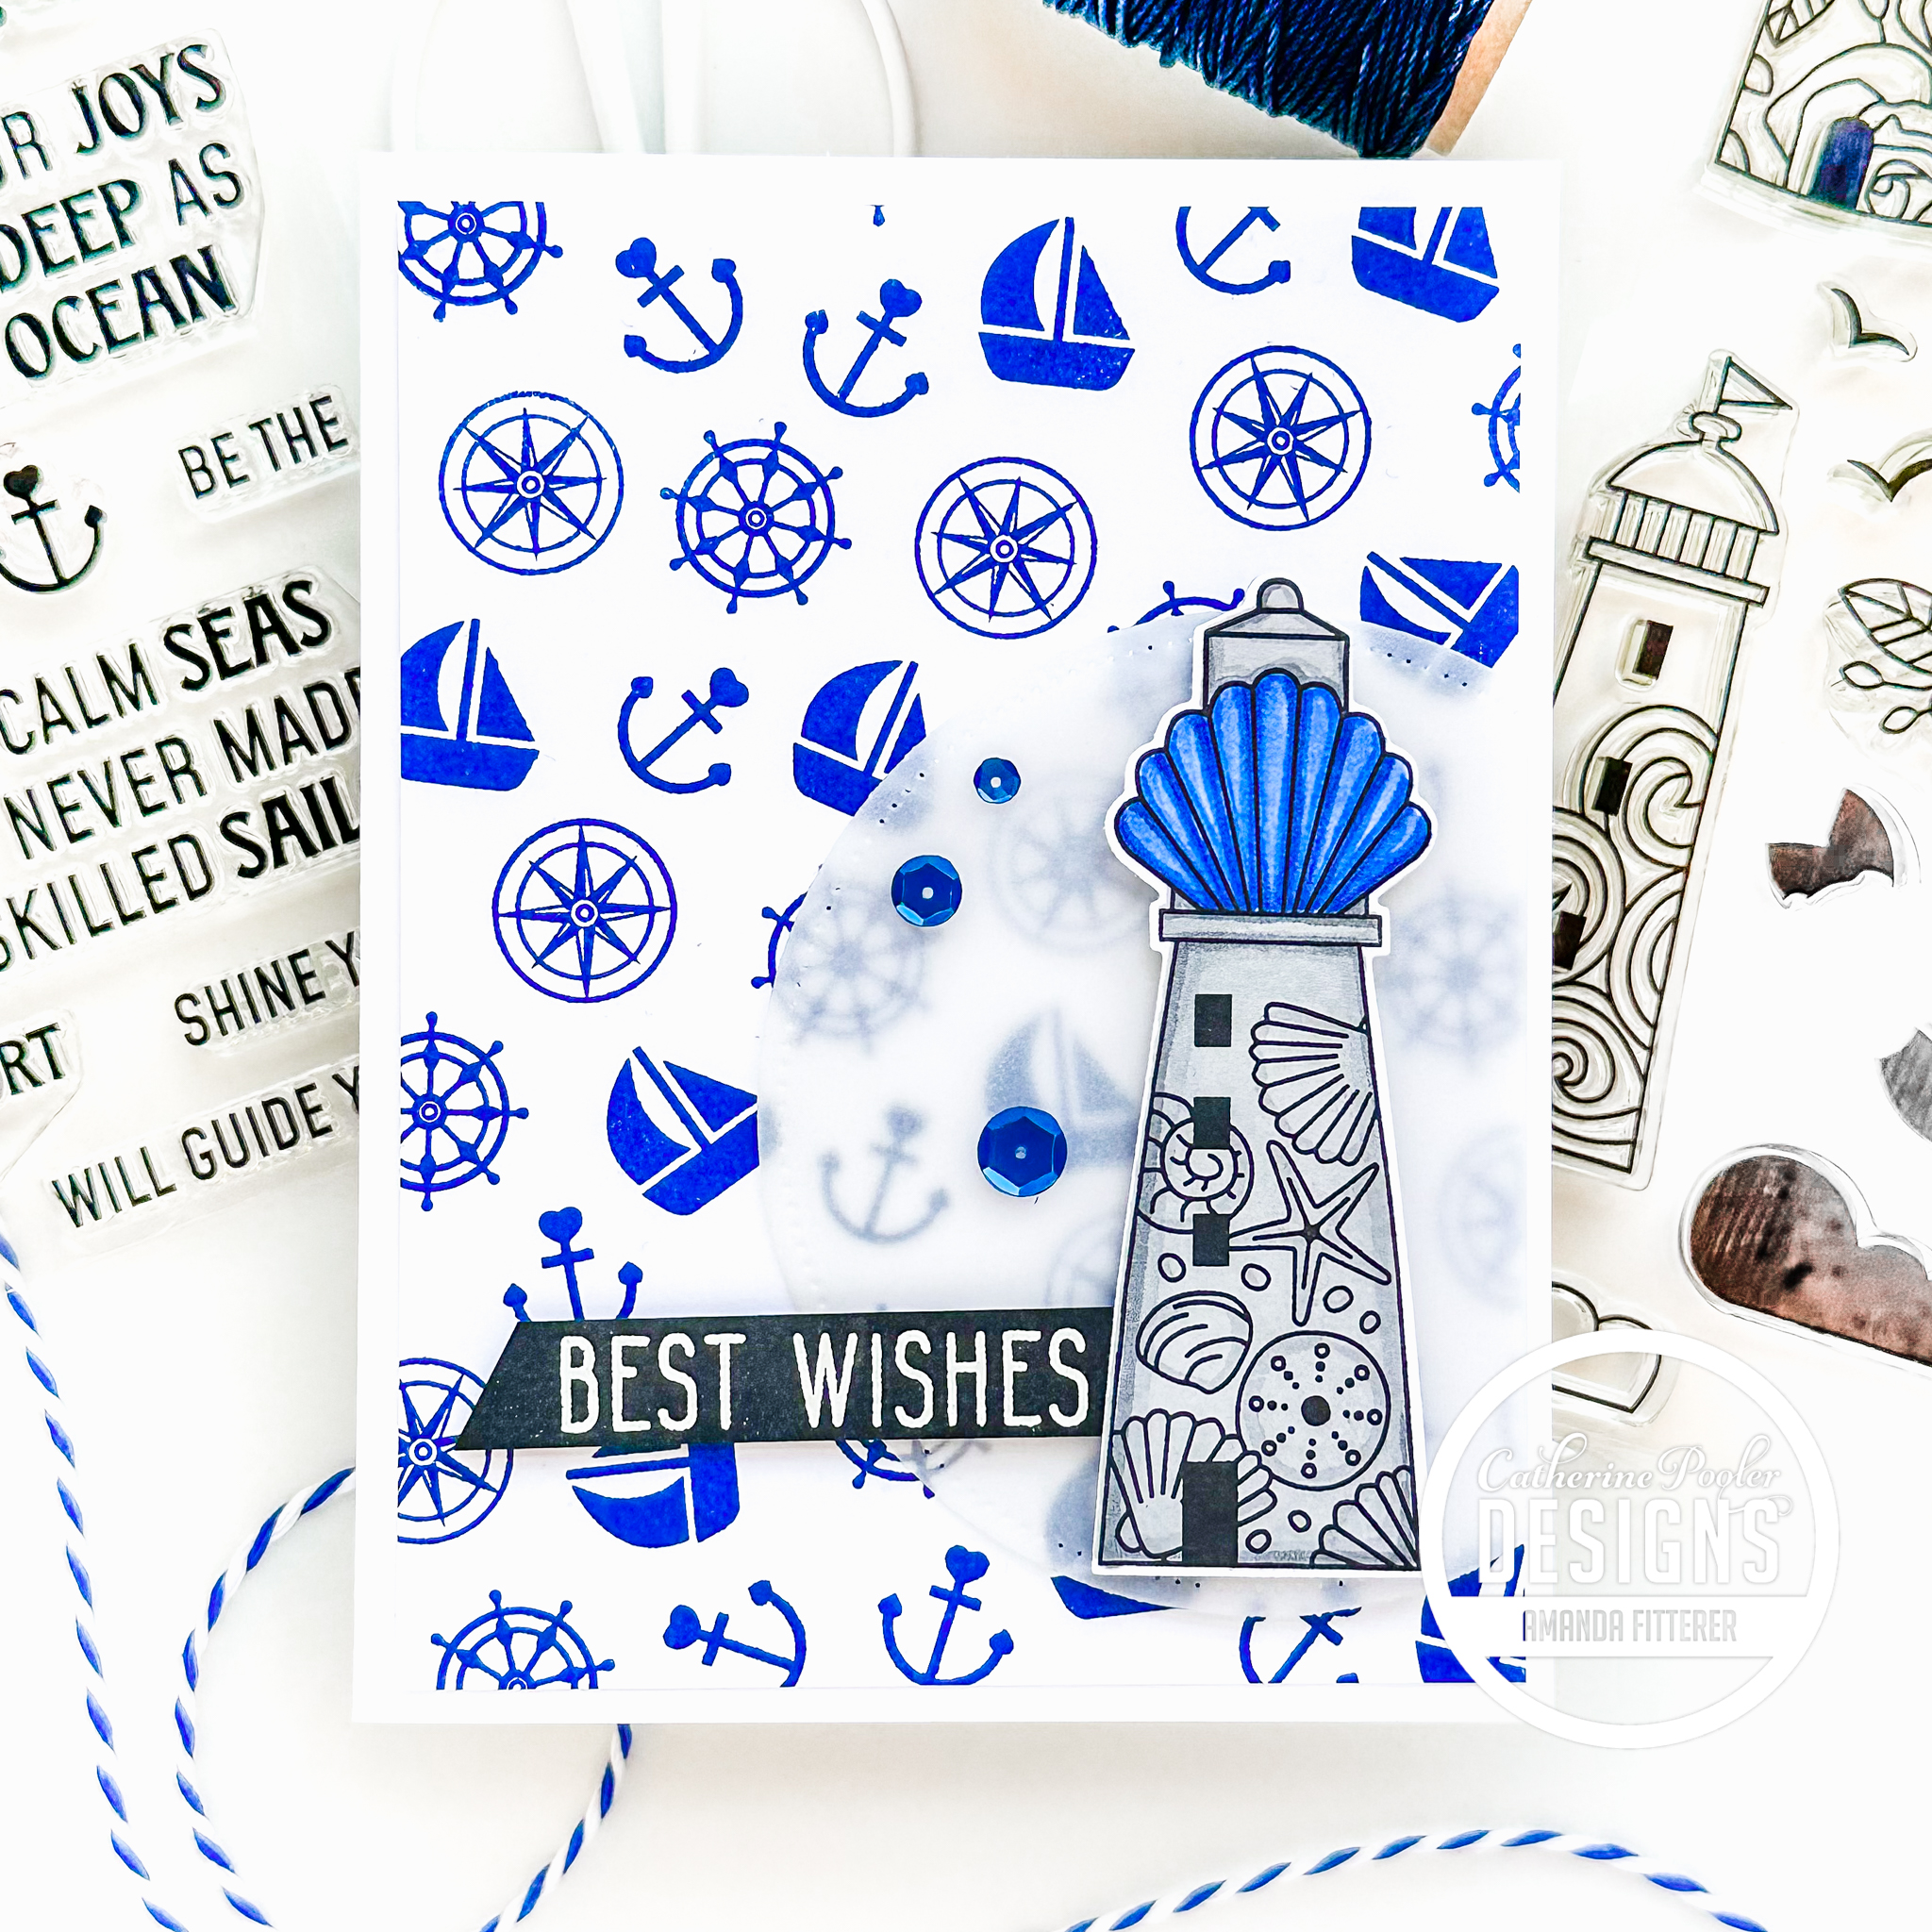
Hey crafty friends! Are you as pumped as I am for the BRAND NEW RELEASE from Catherine Pooler?! Catherine Pooler StampNation members have early access to purchase this collection TOMORROW! General ordering opens June 21st! This release is just so much fun, you’re going to WANT IT ALL!!
👉🏻👉🏻 GET EARLY ACCESS to this(and EVERY) New Release! Sign up to be a Catherine Pooler StampNation member and get tons of perks, including early ordering for every monthly release!
I used the Double Duty Circle DIes to cut out a piece of vellum. I stamped my Scenic Lighthouses Stamp with black ink and then colored it in with Copic markers. I cut it out using the coordinating dies. I added a few sequins to finish the card off!
Don’t forget: If you’re a Catherine Pooler StampNation member, you get EARLY ACCESS to every new release (plus SOOO many other benefits)! Sign up now! It’s worth it!
Thanks for using my affiliate links! You all are the BEST! Using an affiliate link in this post above or down below costs you nothing, but it gives me a teeny percentage of your sale to buy more crafty goodies to continue to share card tutorials with YOU! So, thank YOU! Xx, Amanda
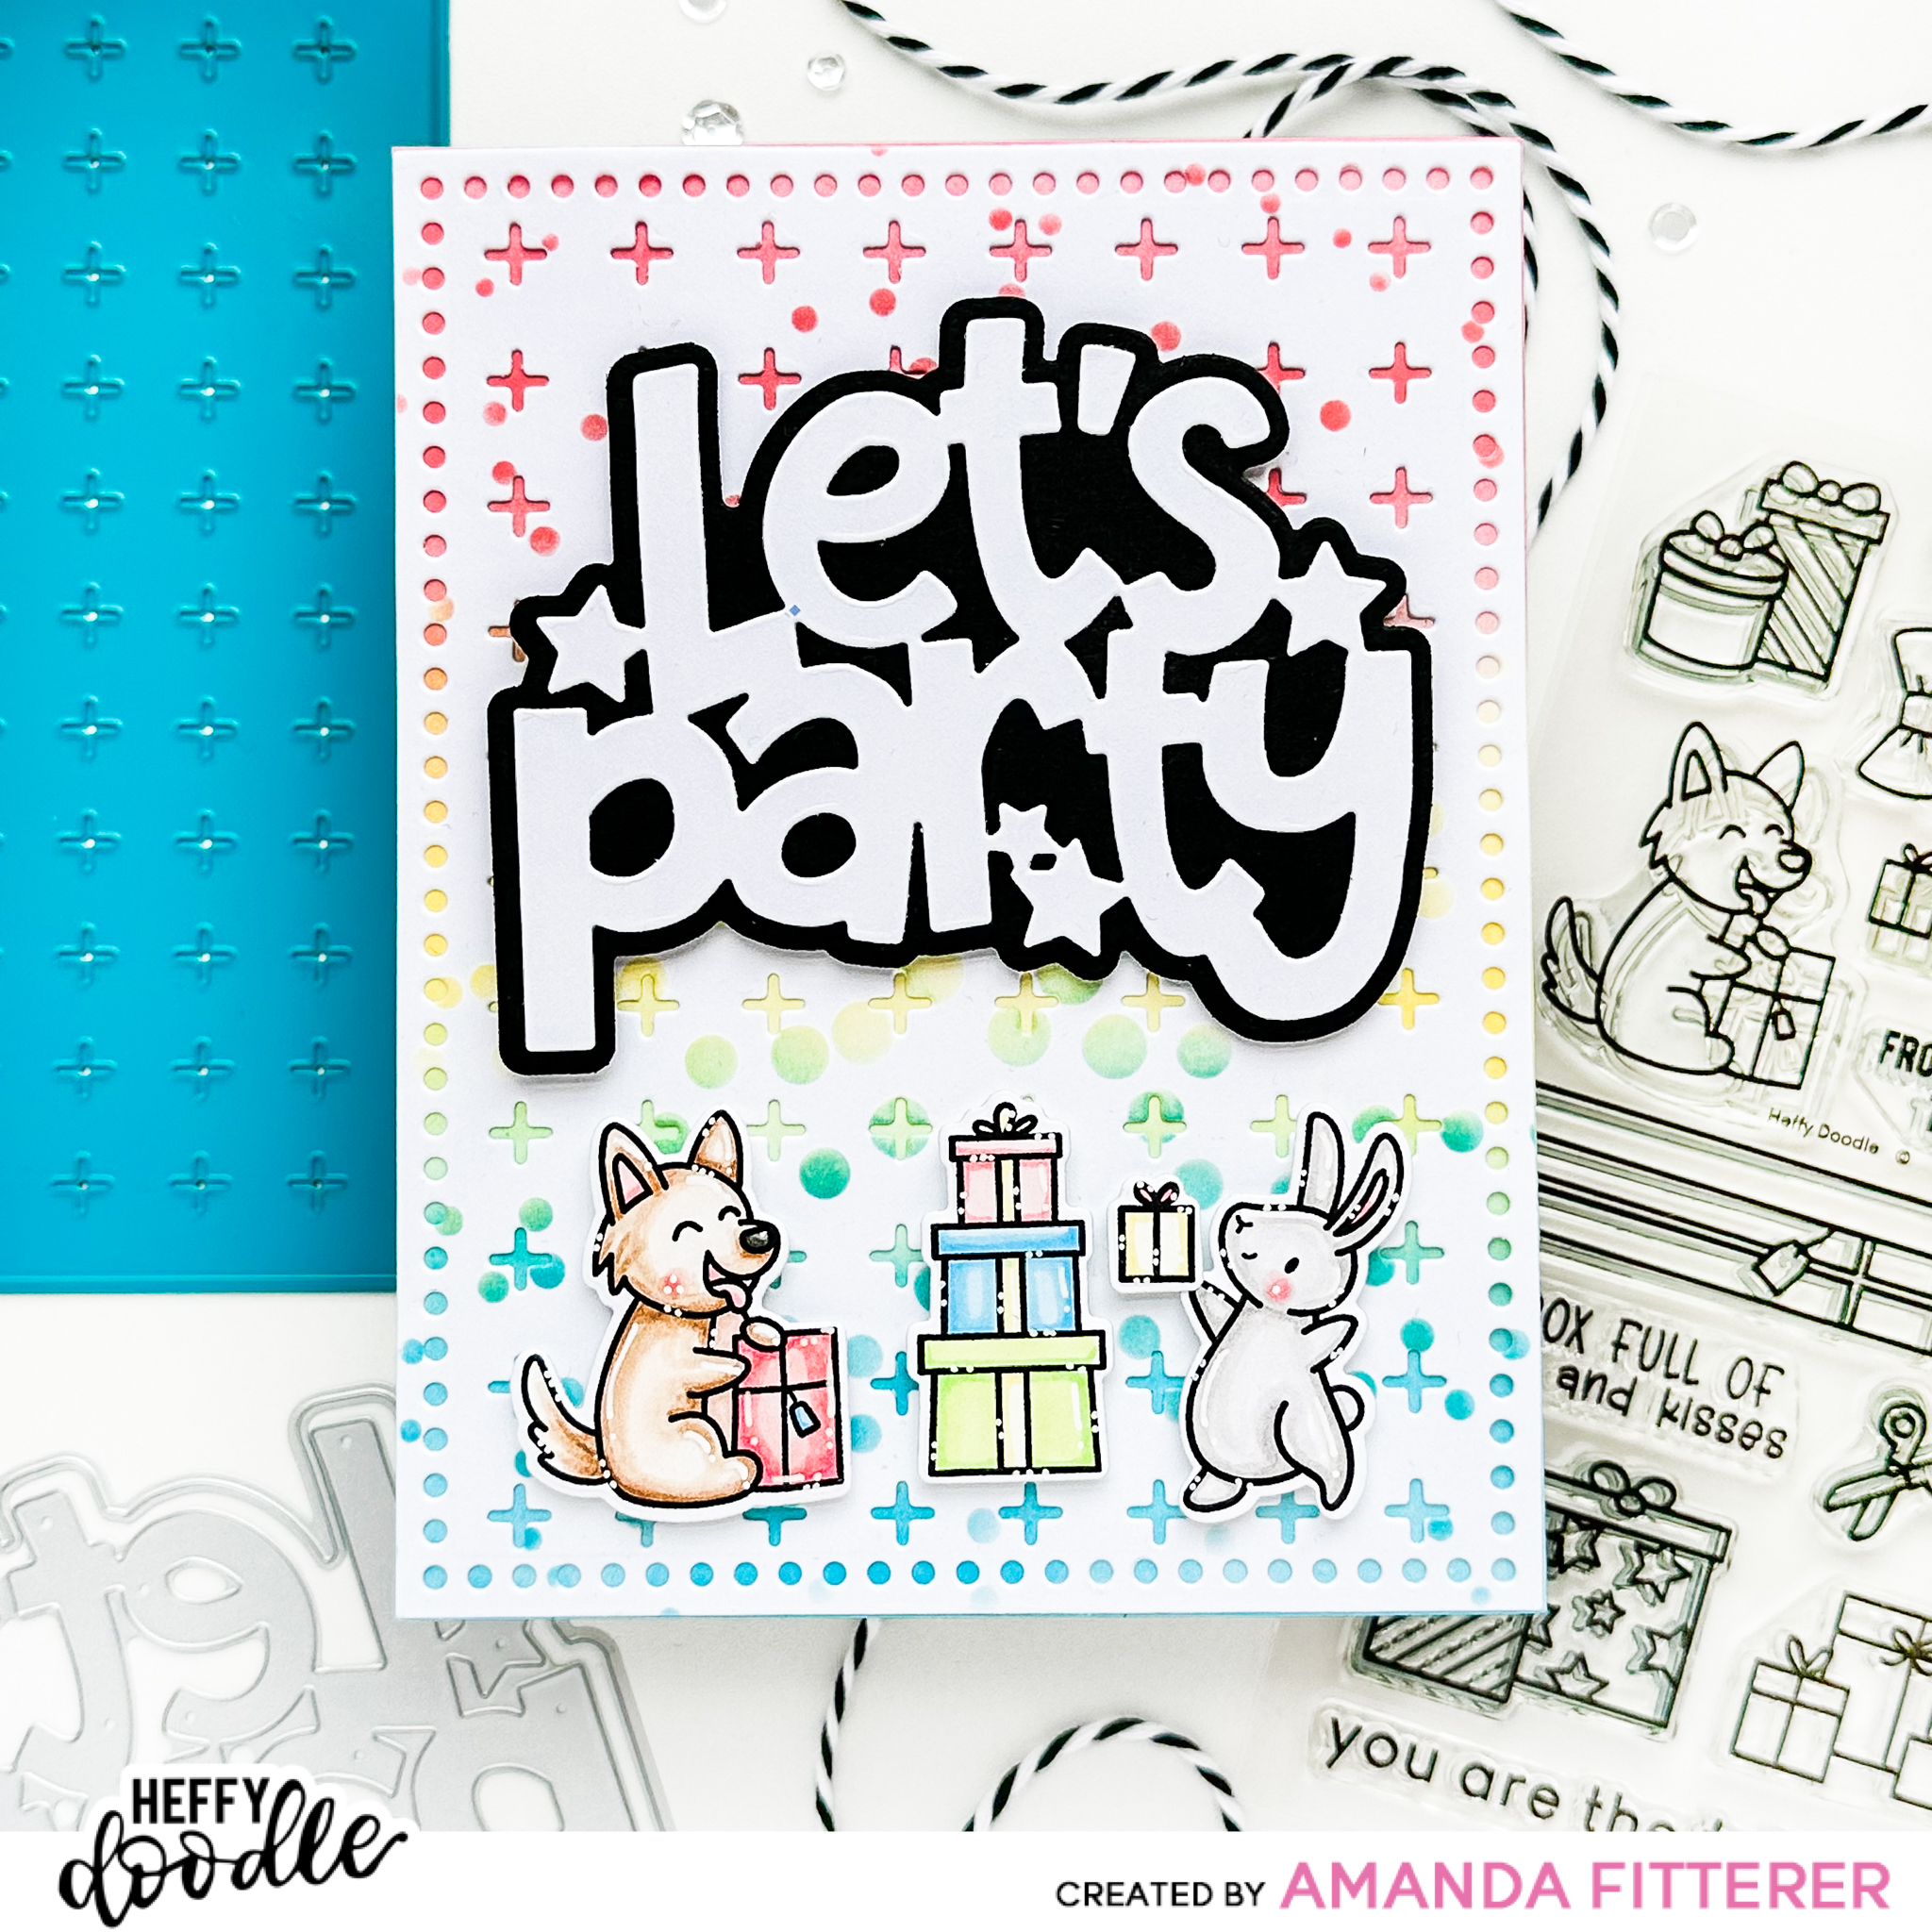
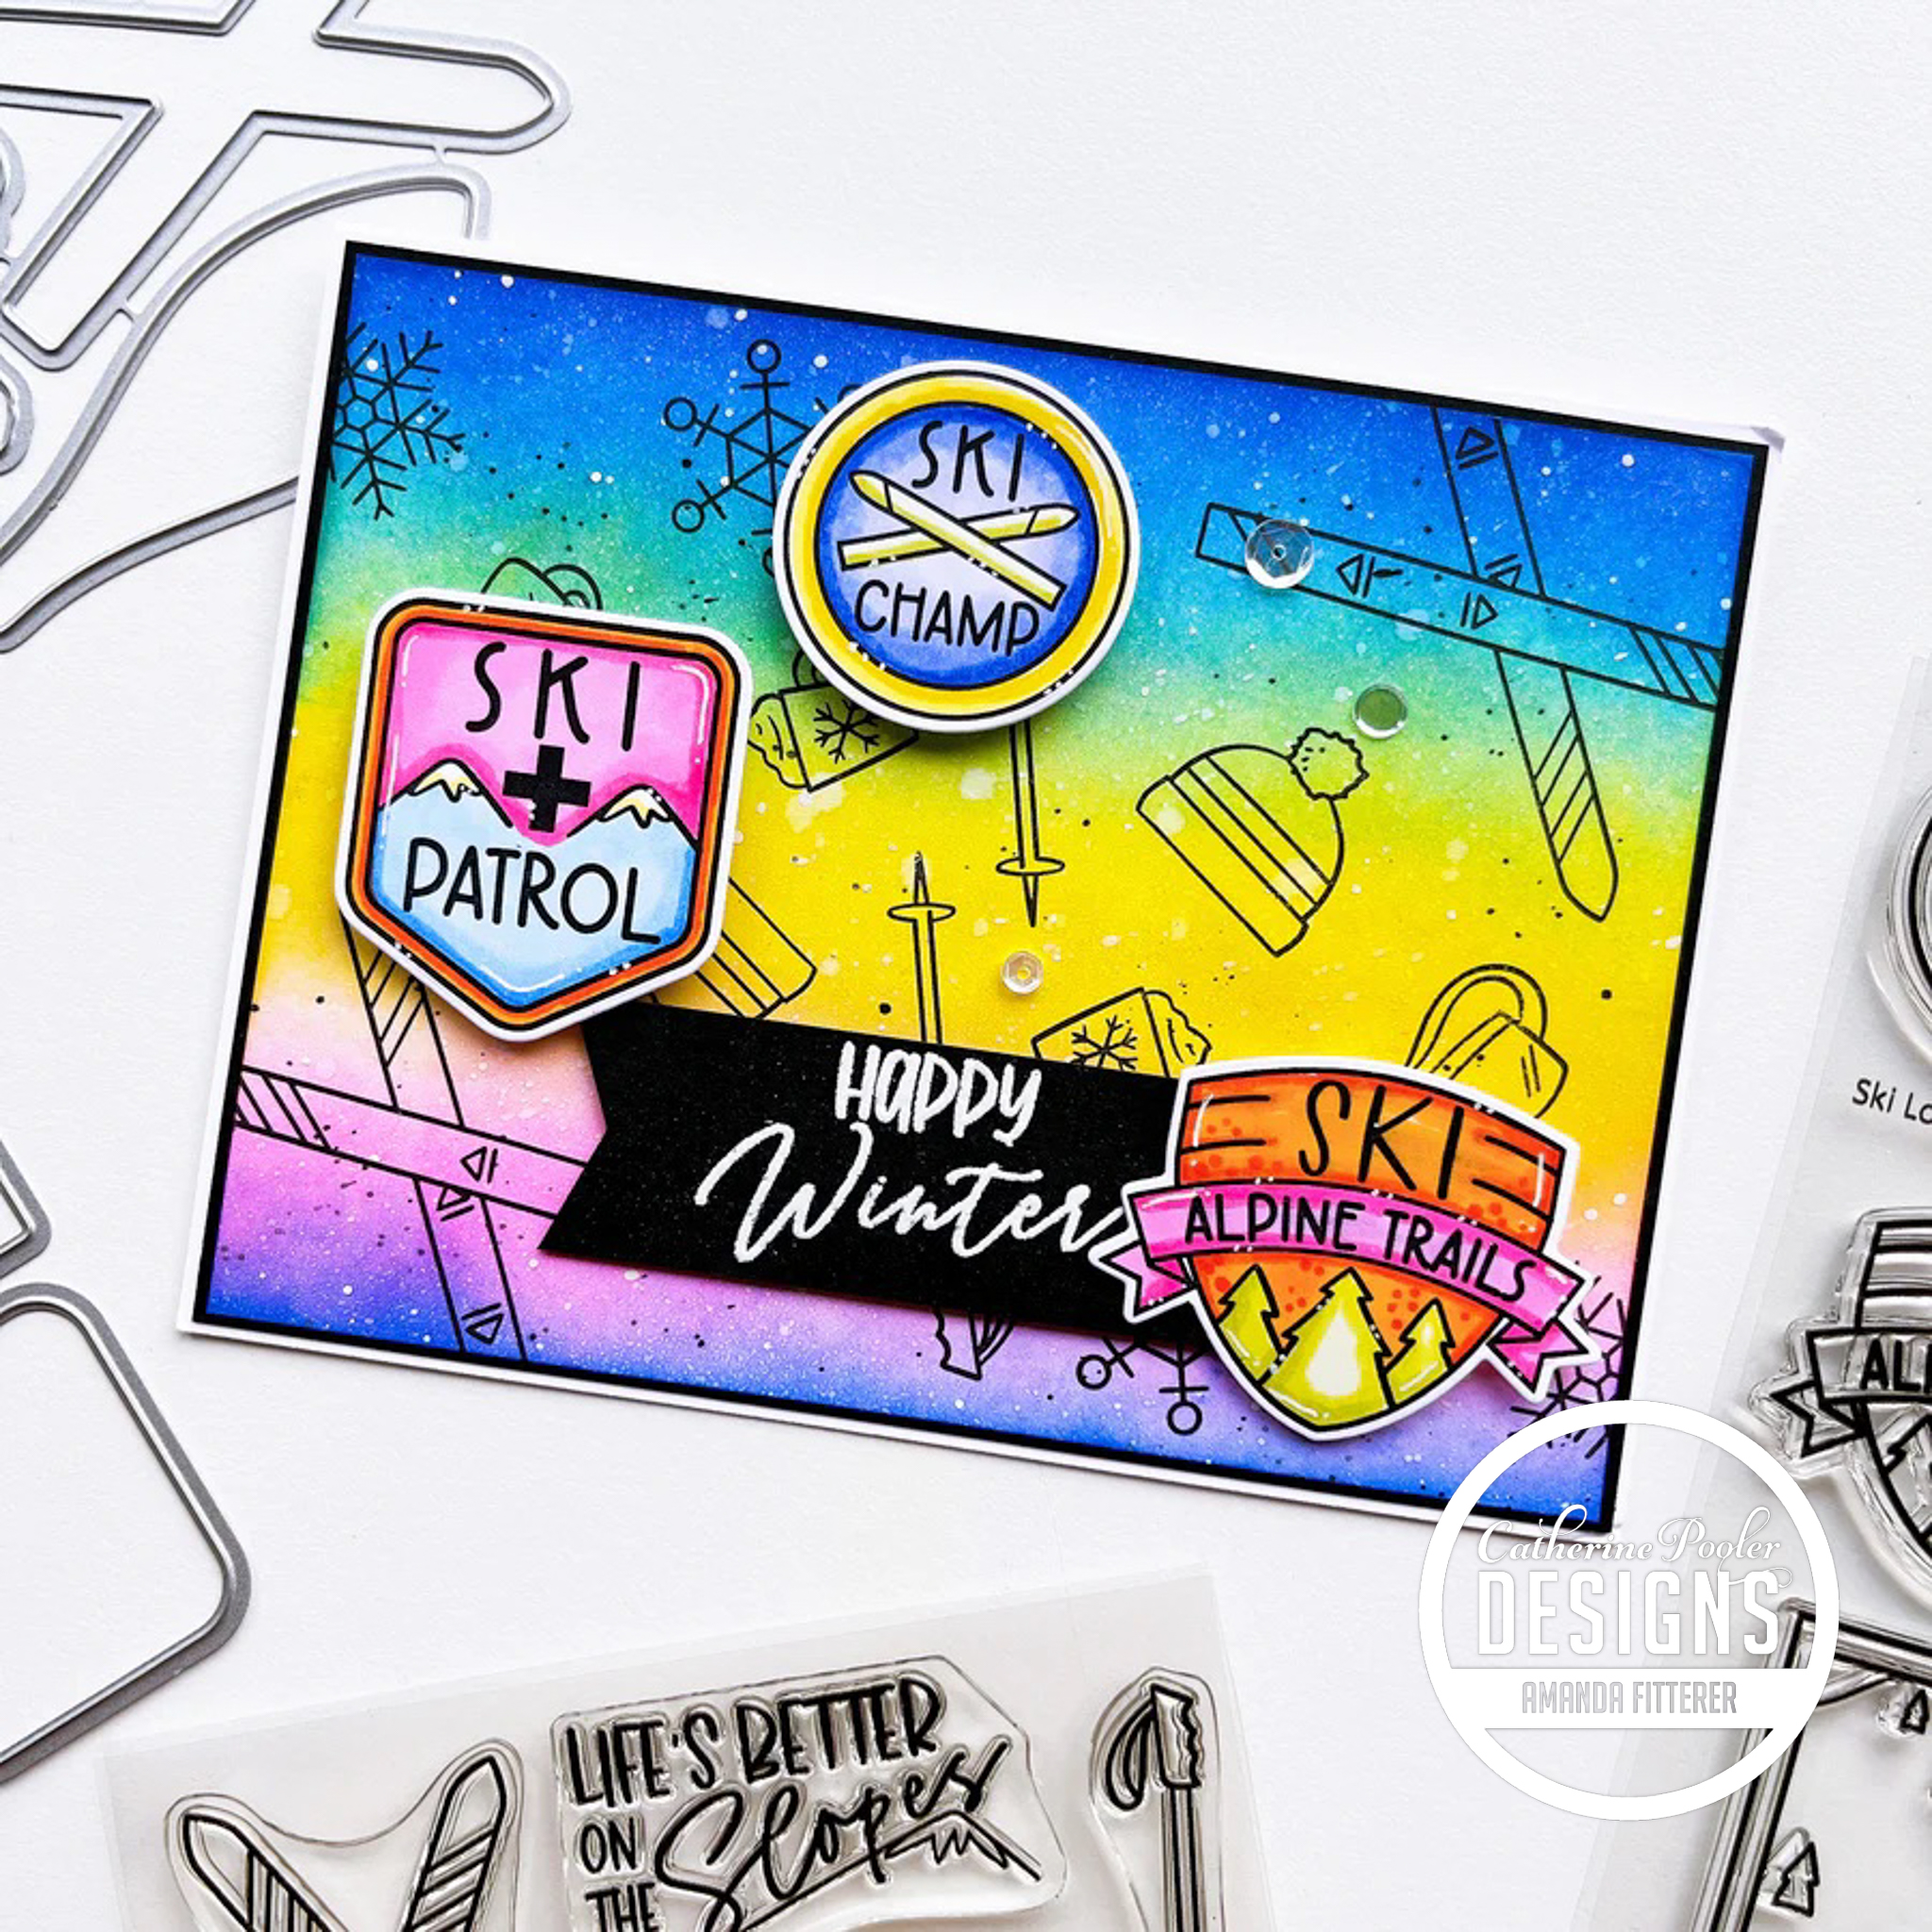
Welcome to the Heffy Doodle and Alex Syberia Designs Collaboration Blog Hop! Design Team members from both companies are sharing inspiration using products from both companies!
I’m going to stamp my sentiment on black cardstock with Wow! Embossing Glue and then apply white embossing powder. I’ll heat the powder with my heat tool to melt the powder.
To be entered to win the giveaway, all you need to do is comment at each stop along the Blog Hop! Alex Syberia Designs and Heffy Doodle will be giving away £20 to their stores! Be sure to comment before 11:59 PM EST on June 6th to be entered to win!Each company will post their random winner on June 8th at 10AM EST! Make sure to check the Heffy Doodle Blog and Alex Syberia Designs Blog to see if you’re a winner!
Thanks for using my affiliate links! You all are the BEST! Using an affiliate link in this post above or down below costs you nothing, but it gives me a teeny percentage of your sale to buy more crafty goodies to continue to share card tutorials with YOU! So, thank YOU! Xx, Amanda
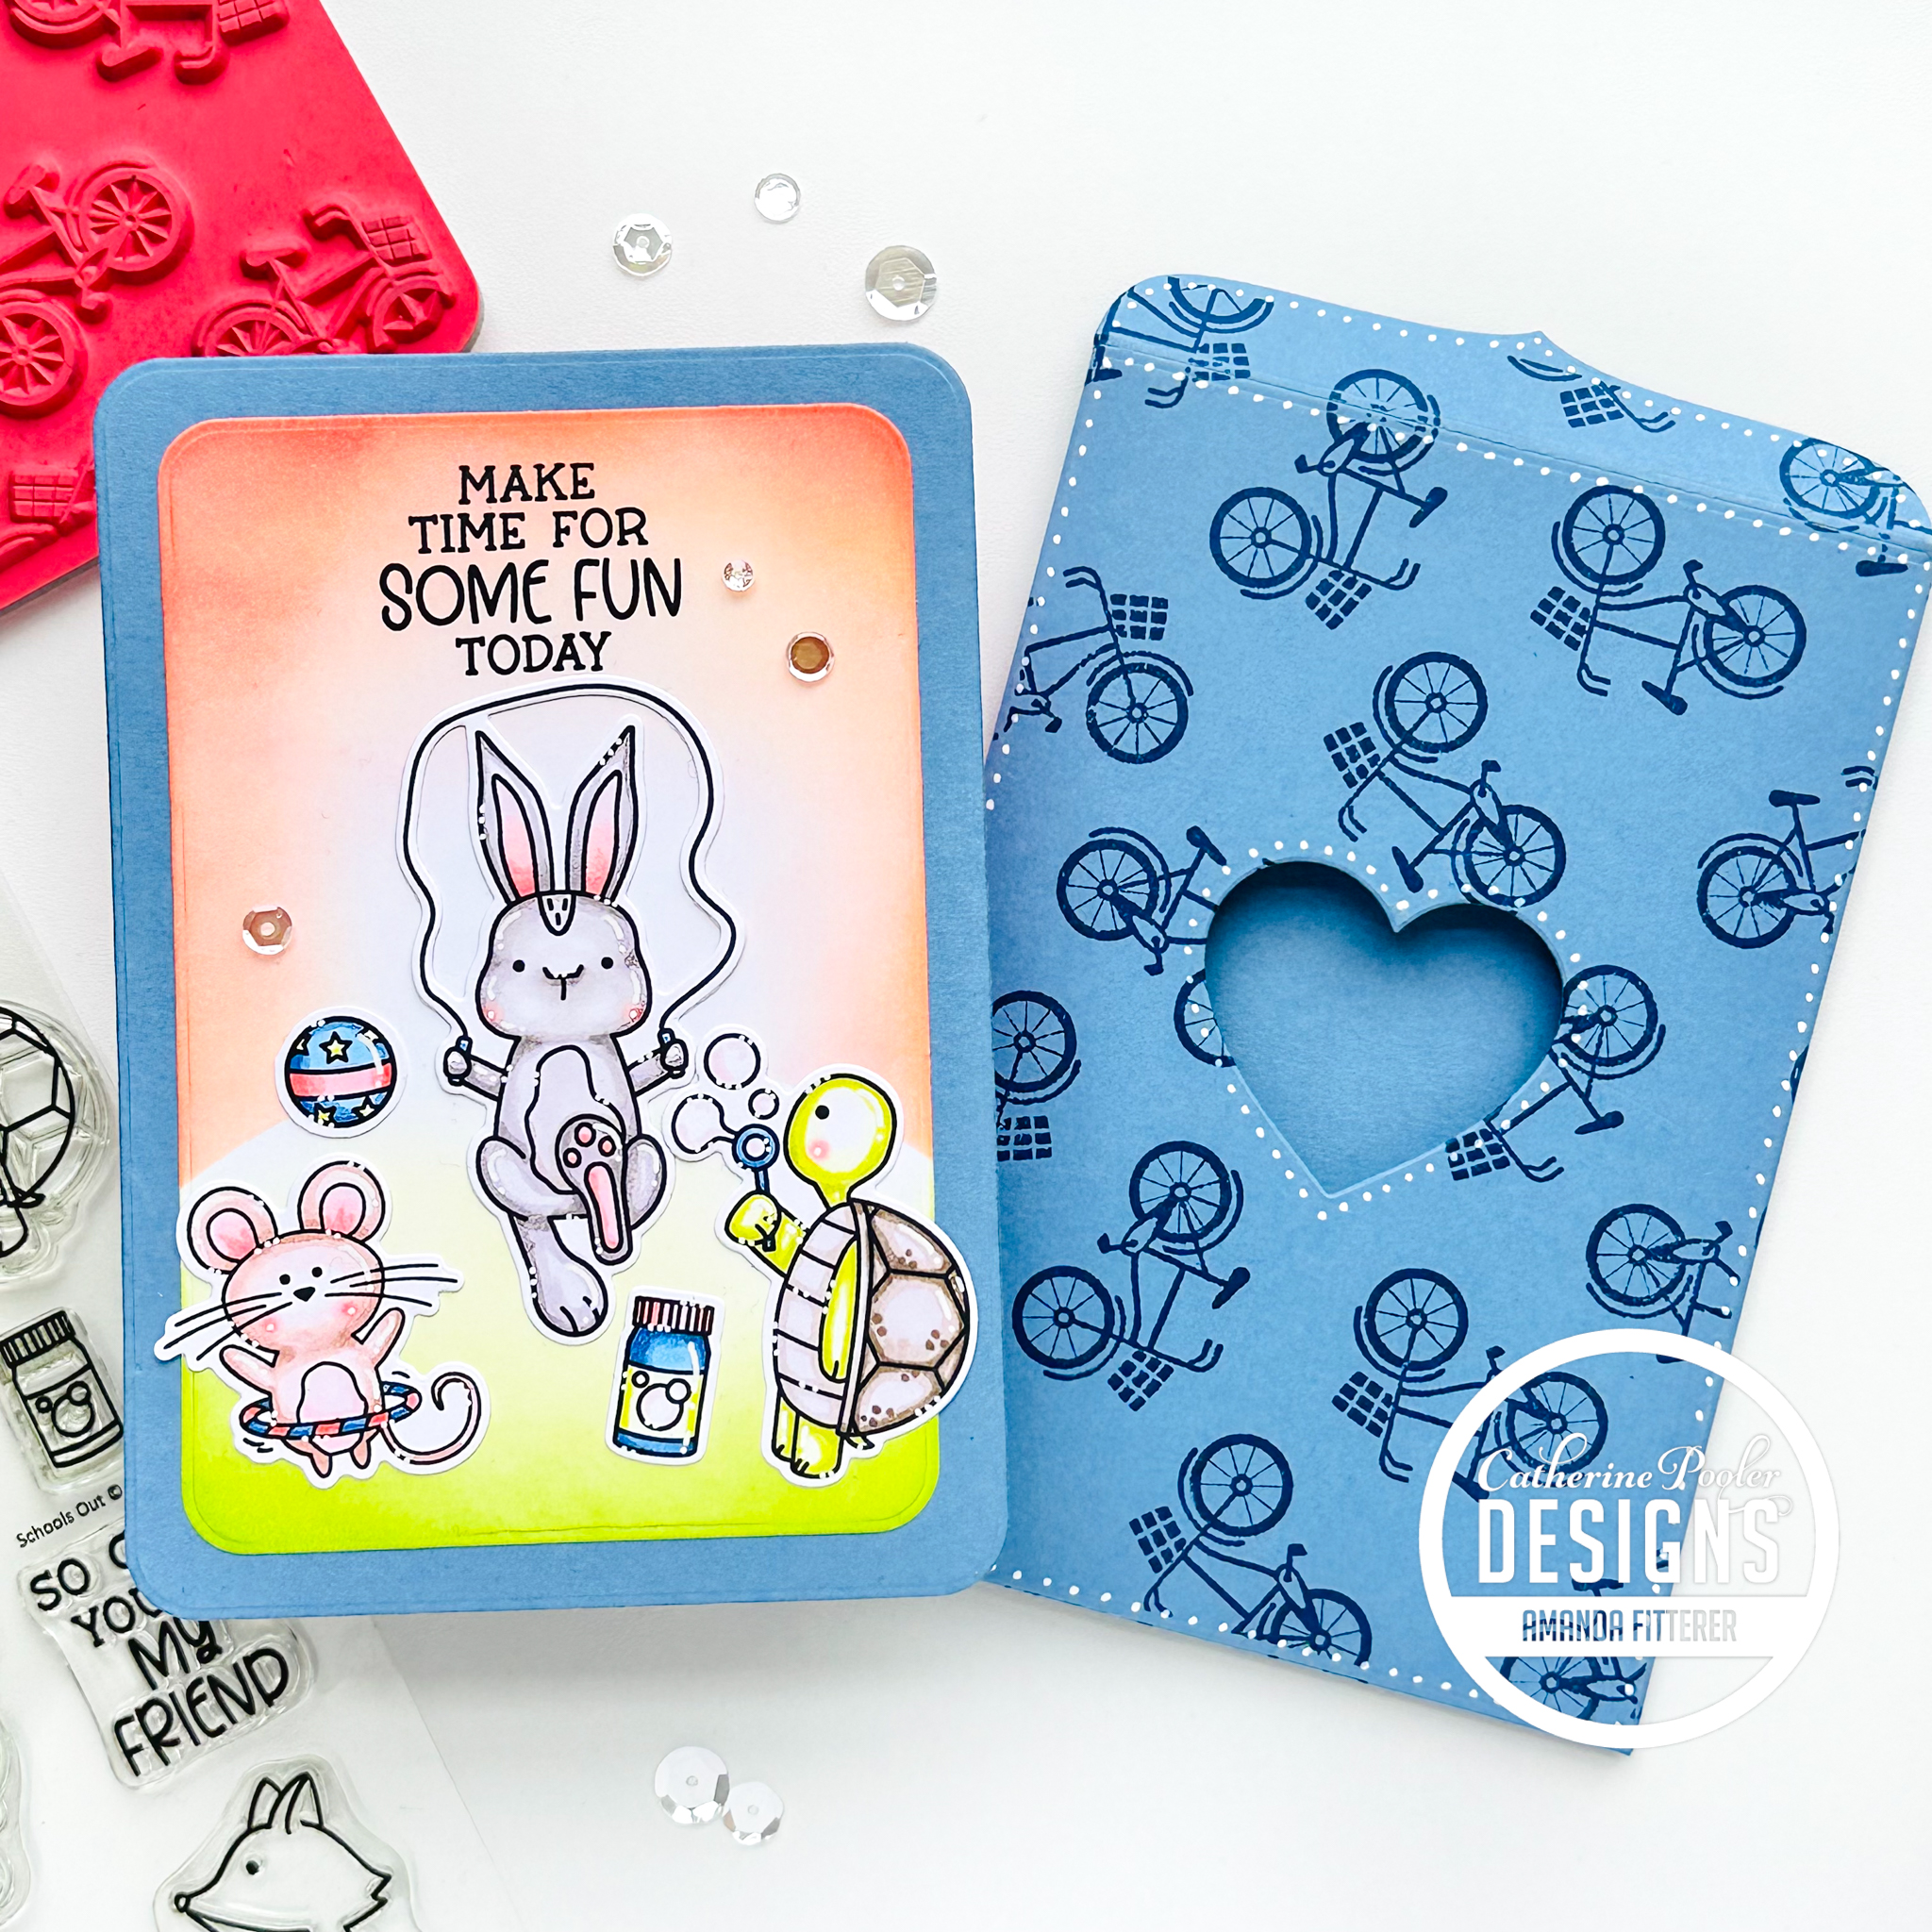
Hey crafty friends! The Catherine Pooler BRAND NEW RELEASE is available now!!
👉🏻👉🏻 GET EARLY ACCESS to this(and EVERY) New Release! Sign up to be a Catherine Pooler StampNation member and get tons of perks, including early ordering for every monthly release!
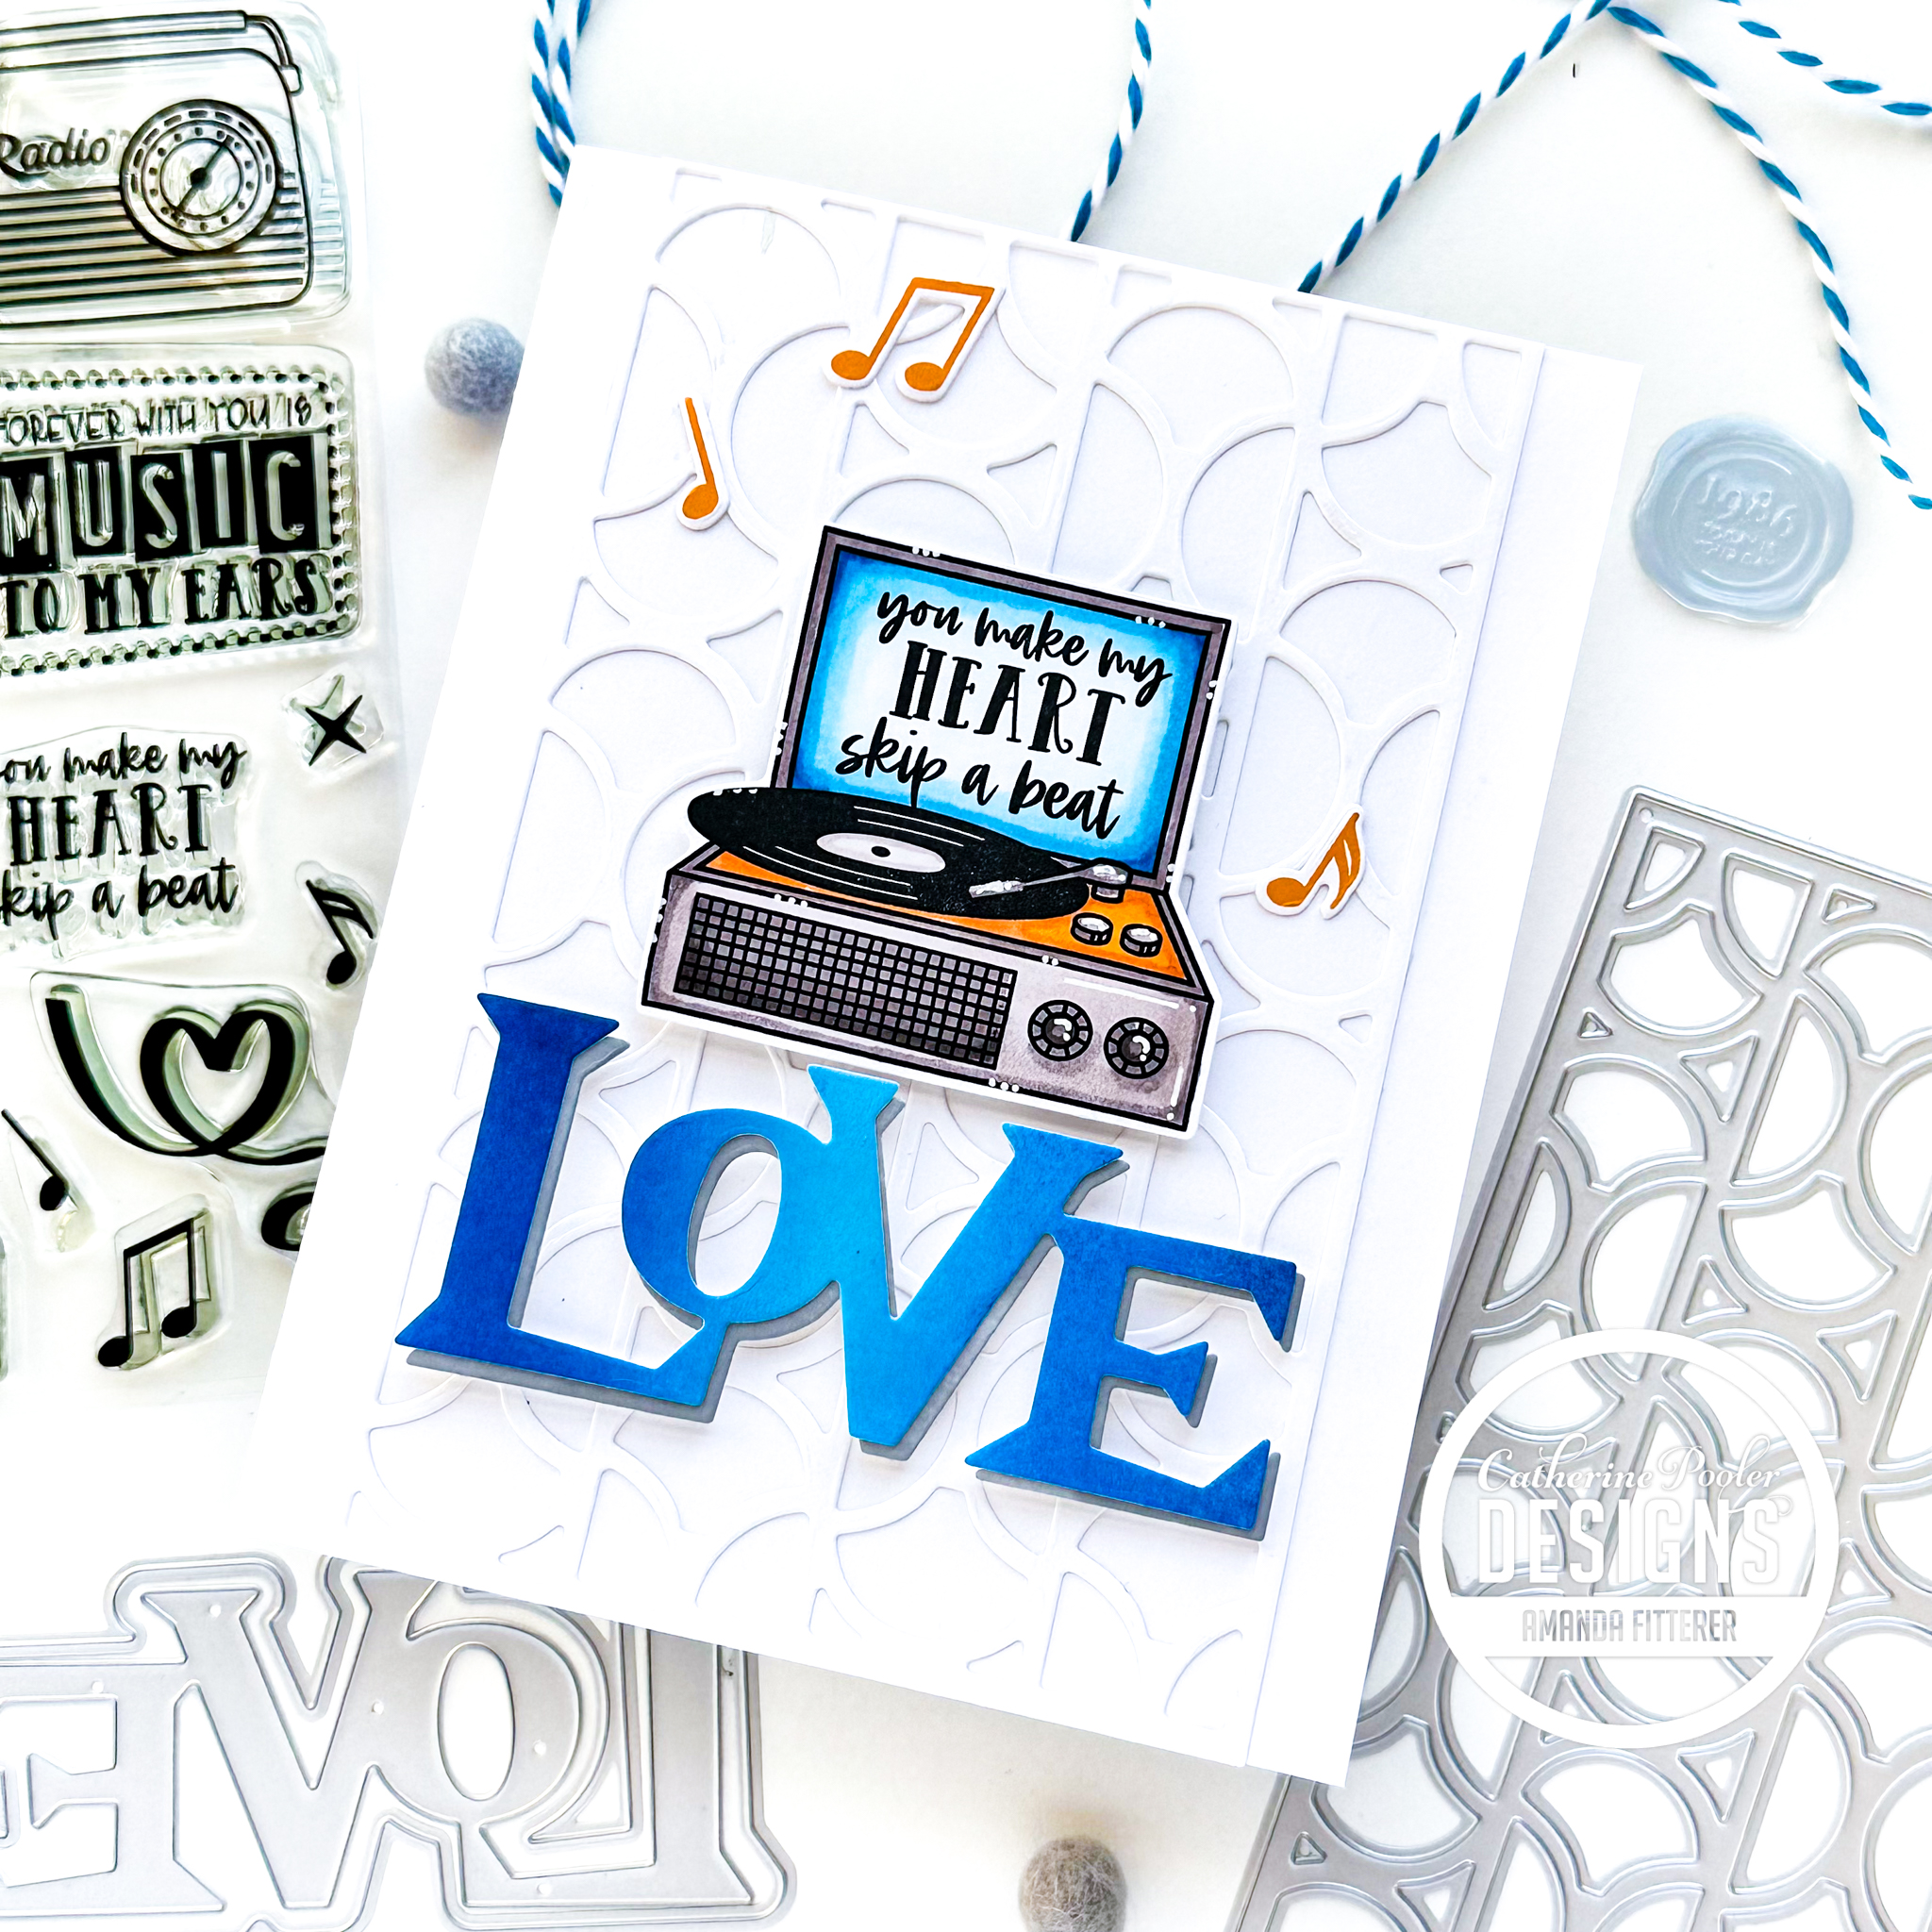
First, I’m creating my envelope using the Notecard Envelope Dies and blue cardstock. Then, I am stamping the NEW Poppin’ Wheelies Background Stamp with Dress Blues ink.
Don’t forget: If you’re a Catherine Pooler StampNation member, you get EARLY ACCESS to every new release (plus SOOO many other benefits)! Sign up now! It’s worth it!
Thanks for using my affiliate links! You all are the BEST! Using an affiliate link in this post above or down below costs you nothing, but it gives me a teeny percentage of your sale to buy more crafty goodies to continue to share card tutorials with YOU! So, thank YOU! Xx, Amanda
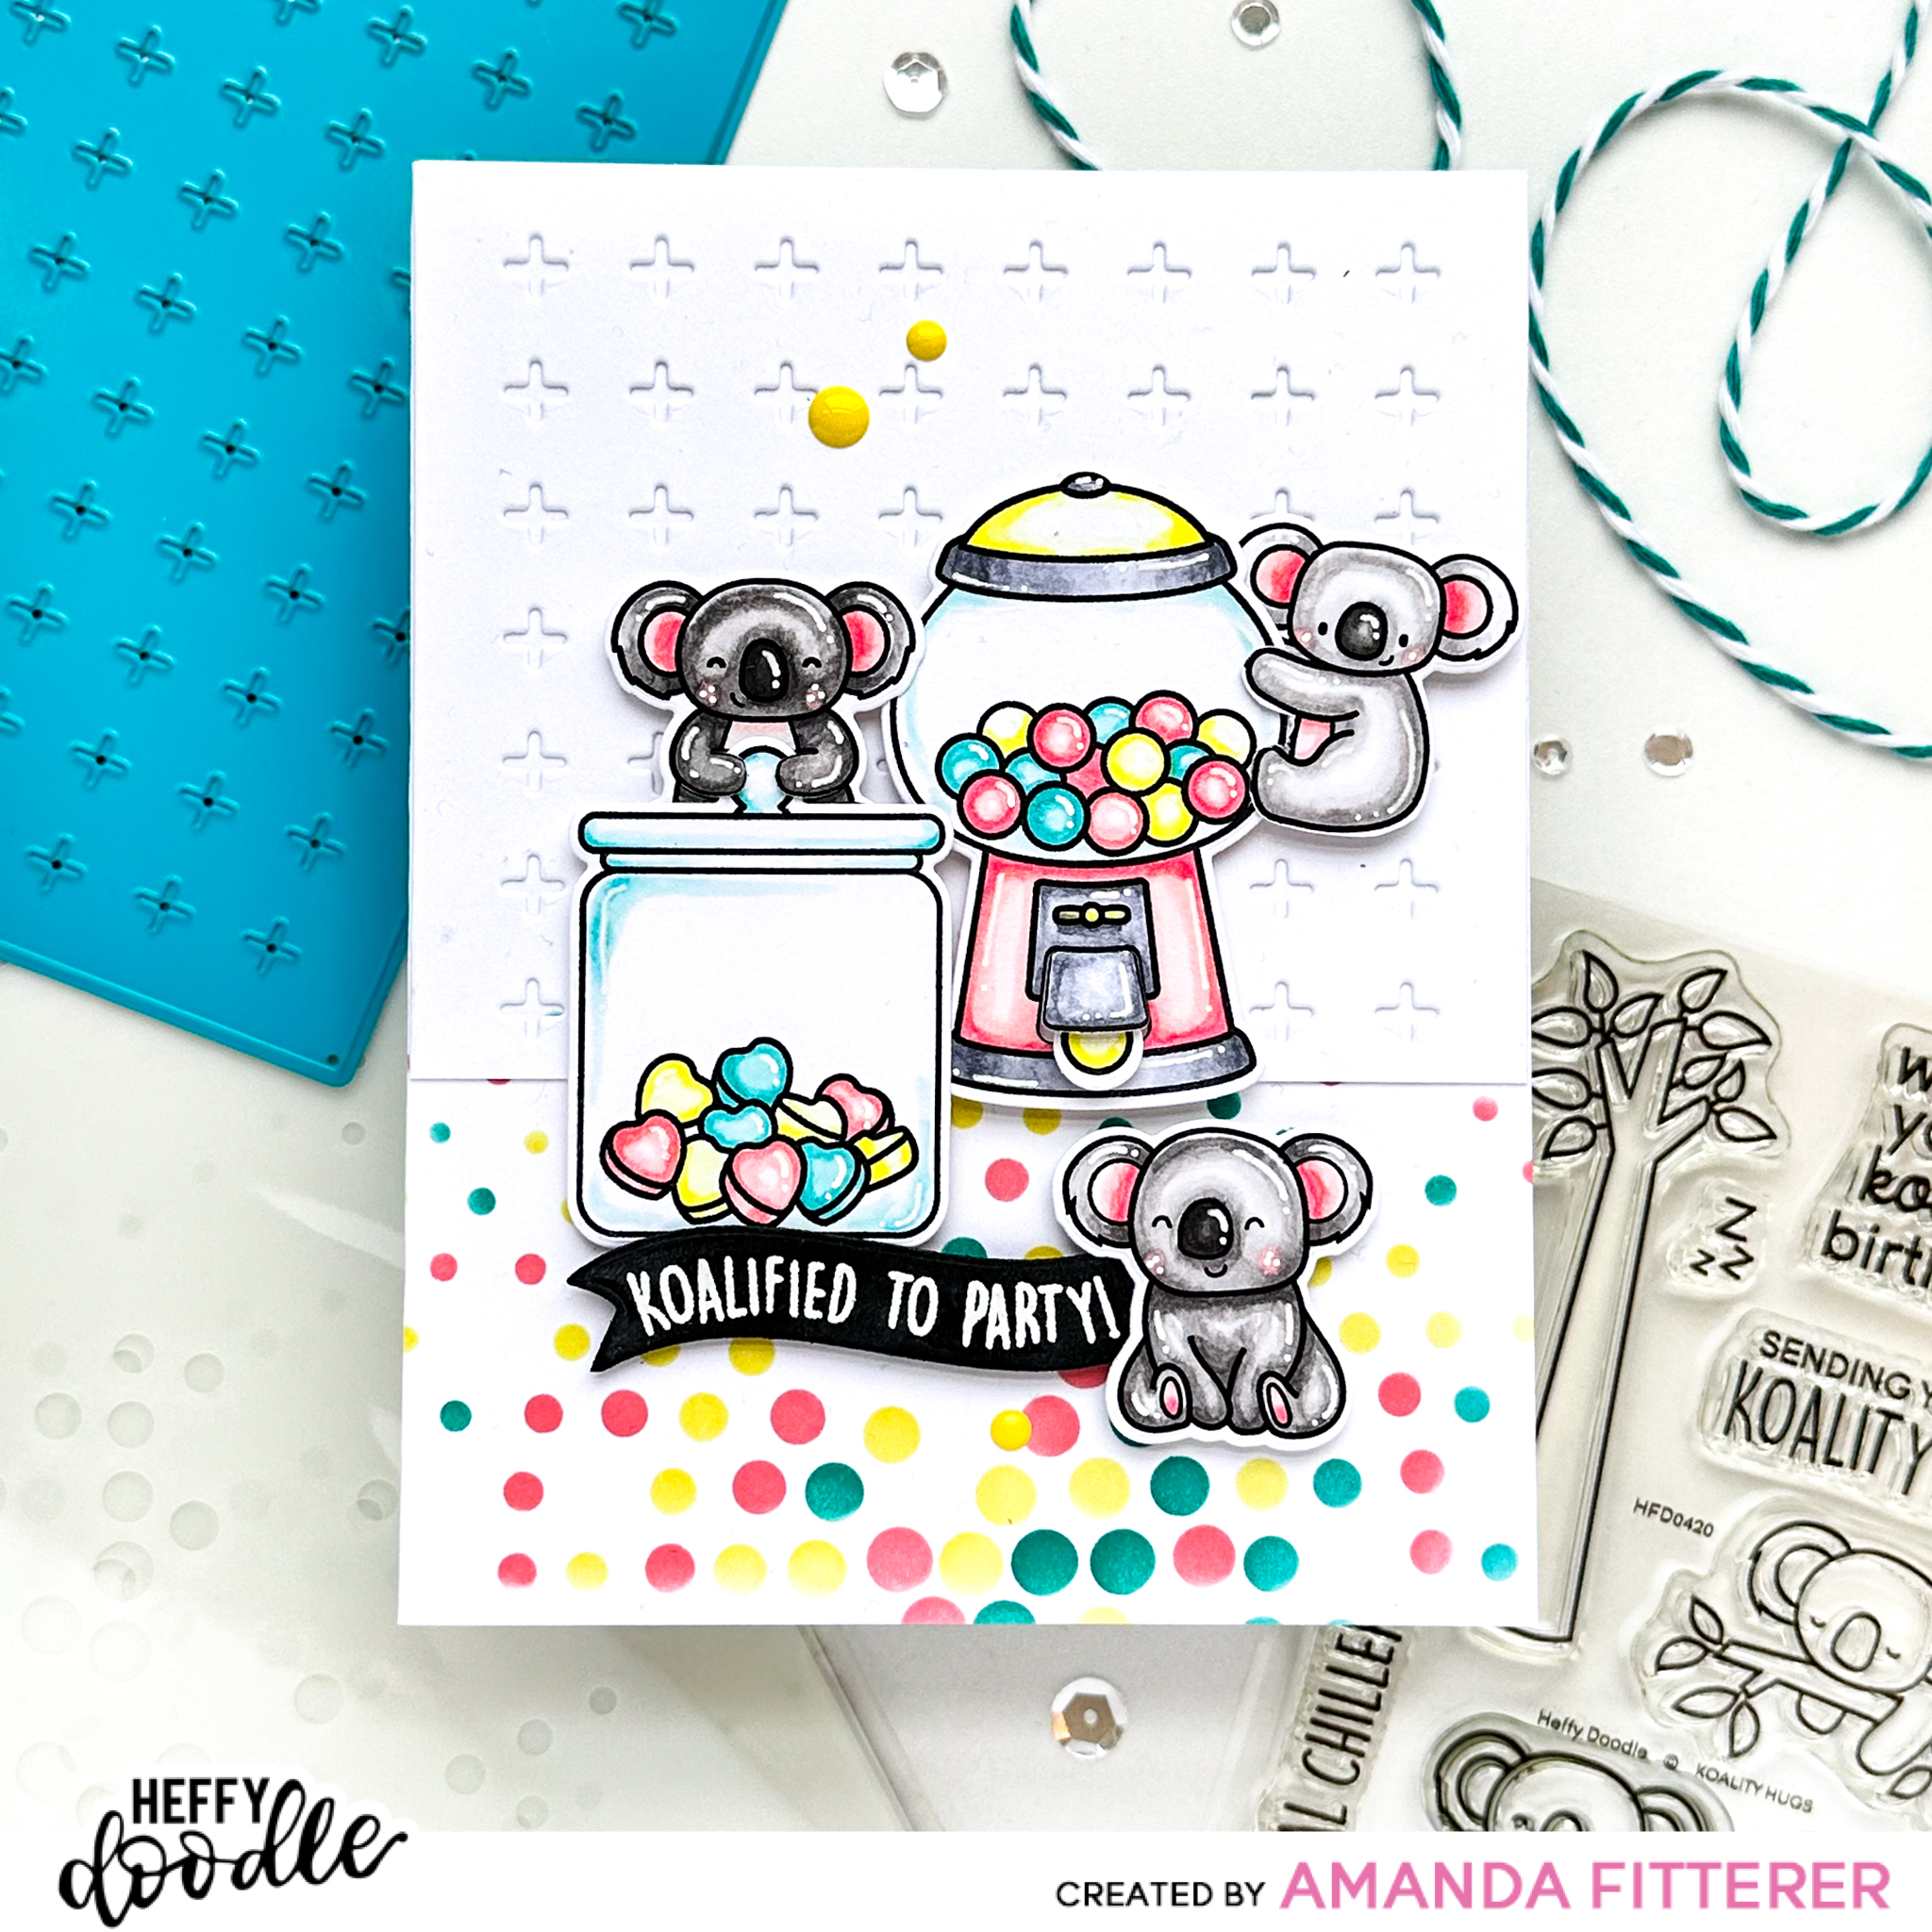
Hey crafty friends! Are you as pumped as I am for the BRAND NEW RELEASE from Catherine Pooler?! Catherine Pooler StampNation members have early access to purchase this collection NOW! General ordering opens May 17th! This release is just so much fun, you’re going to WANT IT ALL!!
👉🏻👉🏻 GET EARLY ACCESS to this(and EVERY) New Release! Sign up to be a Catherine Pooler StampNation member and get tons of perks, including early ordering for every monthly release!
For my stamped images, I’m combining elements from the NEW School’s Out Stamp Set and NEW Recess Stamp Sets. I’m coloring them in with Copic markers and then diecutting them with the coordinating dies.
I love how simple and easy this card is to put together and it’s still OH SO CUTE!
Don’t forget: If you’re a Catherine Pooler StampNation member, you get EARLY ACCESS to every new release (plus SOOO many other benefits)! Sign up now! It’s worth it!
Thanks for using my affiliate links! You all are the BEST! Using an affiliate link in this post above or down below costs you nothing, but it gives me a teeny percentage of your sale to buy more crafty goodies to continue to share card tutorials with YOU! So, thank YOU! Xx, Amanda
Welcome to the Heffy Doodle and Alex Syberia Designs Collaboration Instagram Hop! Design Team members from both companies are sharing inspiration using products from both companies on Instagram!
Thanks for using my affiliate links! You all are the BEST! Using an affiliate link in this post above or down below costs you nothing, but it gives me a teeny percentage of your sale to buy more crafty goodies to continue to share card tutorials with YOU! So, thank YOU! Xx, Amanda
Hey crafty friends! Are you as pumped as I am for the BRAND NEW RELEASE from Catherine Pooler?! Catherine Pooler StampNation members have early access to purchase this collection TOMORROW! General ordering opens May 17th! This release is just so much fun, you’re going to WANT IT ALL!!
👉🏻👉🏻 GET EARLY ACCESS to this(and EVERY) New Release! Sign up to be a Catherine Pooler StampNation member and get tons of perks, including early ordering for every monthly release!
Don’t forget: If you’re a Catherine Pooler StampNation member, you get EARLY ACCESS to every new release (plus SOOO many other benefits)! Sign up now! It’s worth it!
Thanks for using my affiliate links! You all are the BEST! Using an affiliate link in this post above or down below costs you nothing, but it gives me a teeny percentage of your sale to buy more crafty goodies to continue to share card tutorials with YOU! So, thank YOU! Xx, Amanda
Hey friends! If you’re not signed up for the Club Sursee subscription through Catherine Pooler, YOU SHOULD BE! I love these kits!! So many fun things to be surprised by every month!! This cards’ products came from the January 2023 Club Sursee box!
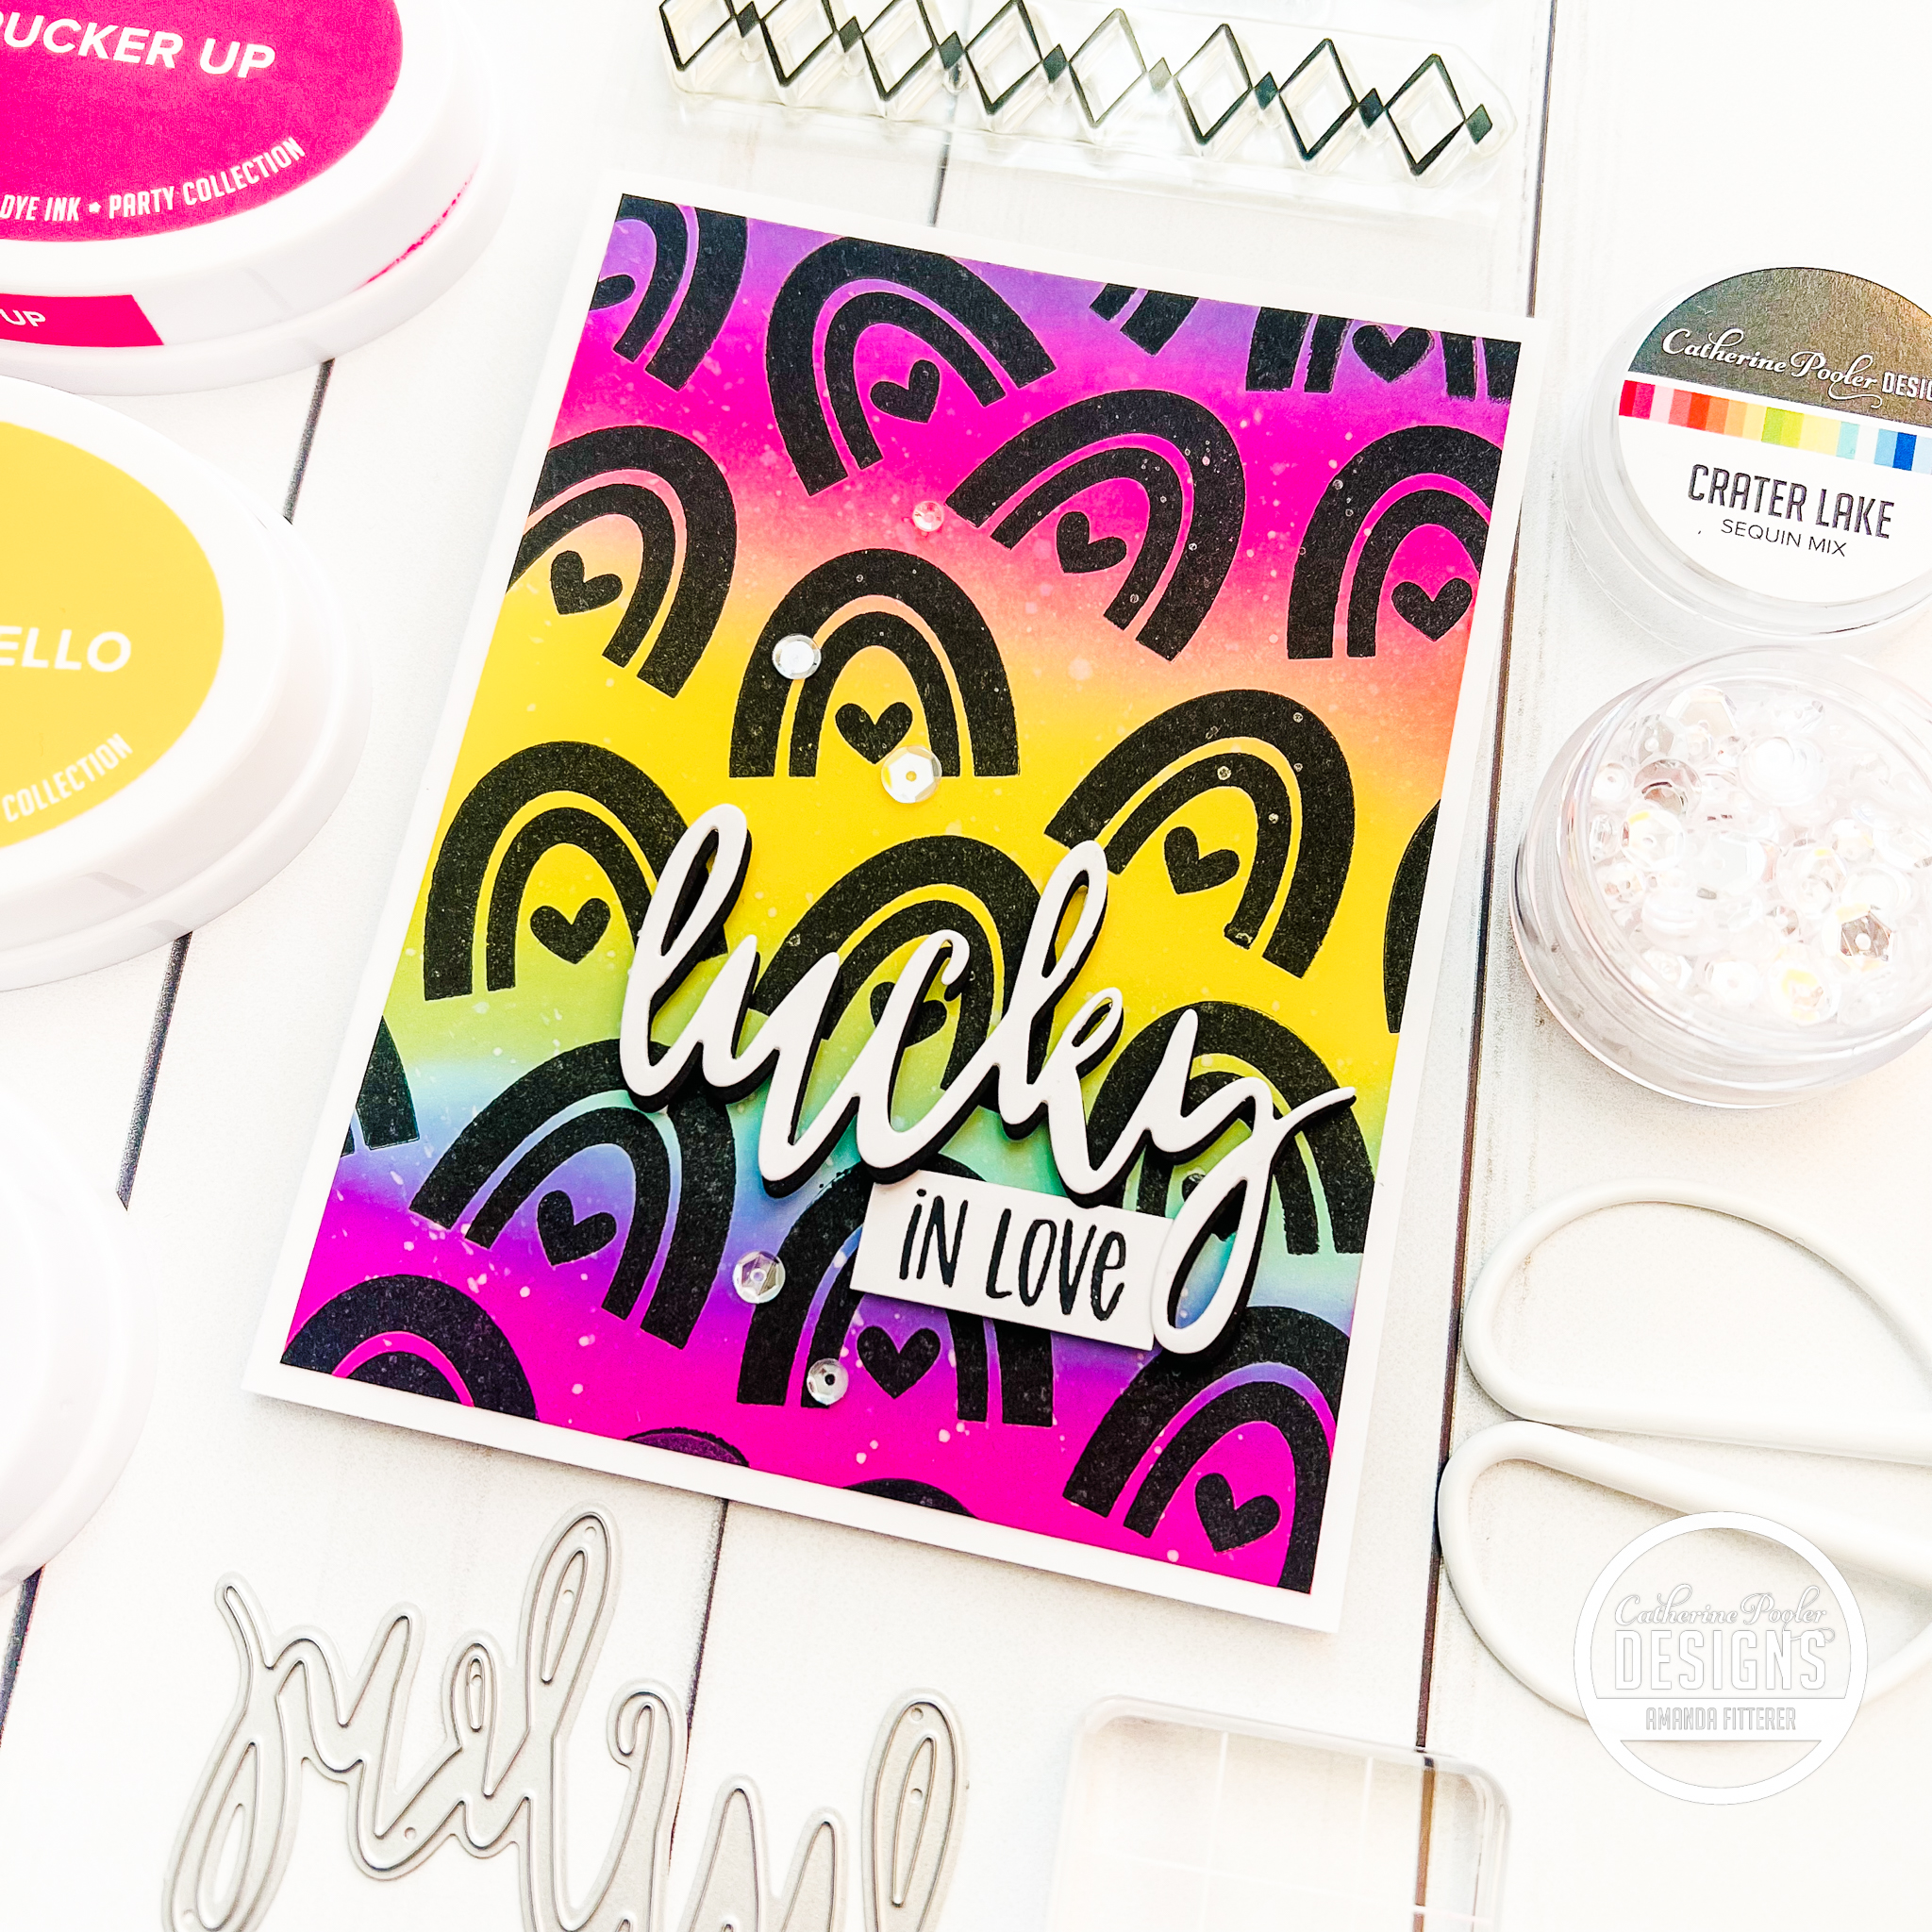
When creating a rainbow background, I always start with the yellow first in the center of the card (in this case, Limoncello). Next, I’ll blend Oh Boy! along the entire bottom and blend it a little with the Limoncello. Then, I’ll blend Pucker Up on the entire top of the panel. Then, I’ll blend the very bottom of the panel with Pucker Up to create a violet color. I’ll then grab Oh Boy! again and blend the top of the panel to create a fuchsia color. Next, I’ll grab Limoncello again and blend it out into the pink and blue once more.
To create a “shadow” on the Lucky Word Die, I cut the word twice; once with white cardstock and one with black cardstock. Then, I just offset the black and glued them together! It’s an easy way to help your word dies POP!
Thanks for using my affiliate links! You all are the BEST! Using an affiliate link in this post above or down below costs you nothing, but it gives me a teeny percentage of your sale to buy more crafty goodies to continue to share card tutorials with YOU! So, thank YOU! Xx, Amanda
Hey crafty friends! Today, I’m sharing a card I made using the Clovers and Blooms Stamp Set from the January 2023 Club Sursee! This stamp set is available for purchase outside of the subscription now, so you can get yours today!!
Using floral stamps that are completely solid is personally outside of my comfort zone! If you know me, I love to color in outlined images much more than using solid stamps! So, this set was a fun challenge for me! I wanted to share how I created this card with you!
First, I picked my color palette. This is (in my opinion) the make or break moment when it comes to using solid stamps. I used the Free Download Color Wheel from Catherine Pooler to help me make this decision! If you haven’t downloaded it yet, you need to! It’s a life saver!!
So, I’ve chosen Limoncello, Tiara, Pucker Up, Melon Ice, and Minted. Then, I just go crazy with stamping them! I make sure for each color, I have a large and a small option. Having too many flowers and leaves is NOT a problem. It’s better to have a full bouquet than one that looks bare!
Next, I die cut the images with the coordinating dies and then start laying them out on my card panel. This is super time consuming for me, but it’s probably not for everyone! I just move them around until I feel like it’s looking good! With this card, I’m also planning around my sentiment. When that is the case, I lay my stamp down where I think I’m going to want it so that I can visual it.
Once I get my flowers arranged how I like them, I TAKE A PHOTO with my phone! That way, I can use that as a guide for positioning them once I’ve got glue and 3D foam squares on them!
Once I take my photo, I leave my sentiment stamp where it is and place my card panel in my MISTI. I stamp my sentiment with Midnight Ink. Then, I start assembling my bouquet again, with glue and 3D foam squares! Phew! Good thing I have that photo to look back to! The last step is to add some black dots with any black marker!
Well, that wasn’t too hard! I hope you enjoyed this little tutorial!! Xx, Amanda
Thanks for using my affiliate links! You all are the BEST! Using an affiliate link in this post above or down below costs you nothing, but it gives me a teeny percentage of your sale to buy more crafty goodies to continue to share card tutorials with YOU! So, thank YOU! Xx, Amanda
👉🏻👉🏻 GET EARLY ACCESS to this(and EVERY) New Release! Sign up to be a Catherine Pooler StampNation member and get tons of perks, including early ordering for every monthly release!
To create this vintage card, I cut down a panel of white cardstock to 4″x5.25″ and ink blended it using Spiced and Macchiato inks. Then, I used a distress tool to distress my edges. I spritzed water and ink over the entire panel. I also cut a heart out using the Nested Stitched Heart Dies. I ink blended it with the NEW grays! I used Pebble and Hoodie.
Don’t forget: If you’re a Catherine Pooler StampNation member, you get EARLY ACCESS to every new release (plus SOOO many other benefits)! Sign up now! It’s worth it!
Thanks for using my affiliate links! You all are the BEST! Using an affiliate link in this post above or down below costs you nothing, but it gives me a teeny percentage of your sale to buy more crafty goodies to continue to share card tutorials with YOU! So, thank YOU! Xx, Amanda
👉🏻👉🏻 GET EARLY ACCESS to this(and EVERY) New Release! Sign up to be a Catherine Pooler StampNation member and get tons of perks, including early ordering for every monthly release!
Plus, get a FREE die set for a limited time only!!
Don’t forget: If you’re a Catherine Pooler StampNation member, you get EARLY ACCESS to every new release (plus SOOO many other benefits)! Sign up now! It’s worth it!
Thanks for using my affiliate links! You all are the BEST! Using an affiliate link in this post above or down below costs you nothing, but it gives me a teeny percentage of your sale to buy more crafty goodies to continue to share card tutorials with YOU! So, thank YOU! Xx, Amanda
👉🏻👉🏻 GET EARLY ACCESS to this(and EVERY) New Release! Sign up to be a Catherine Pooler StampNation member and get tons of perks, including early ordering for every monthly release!
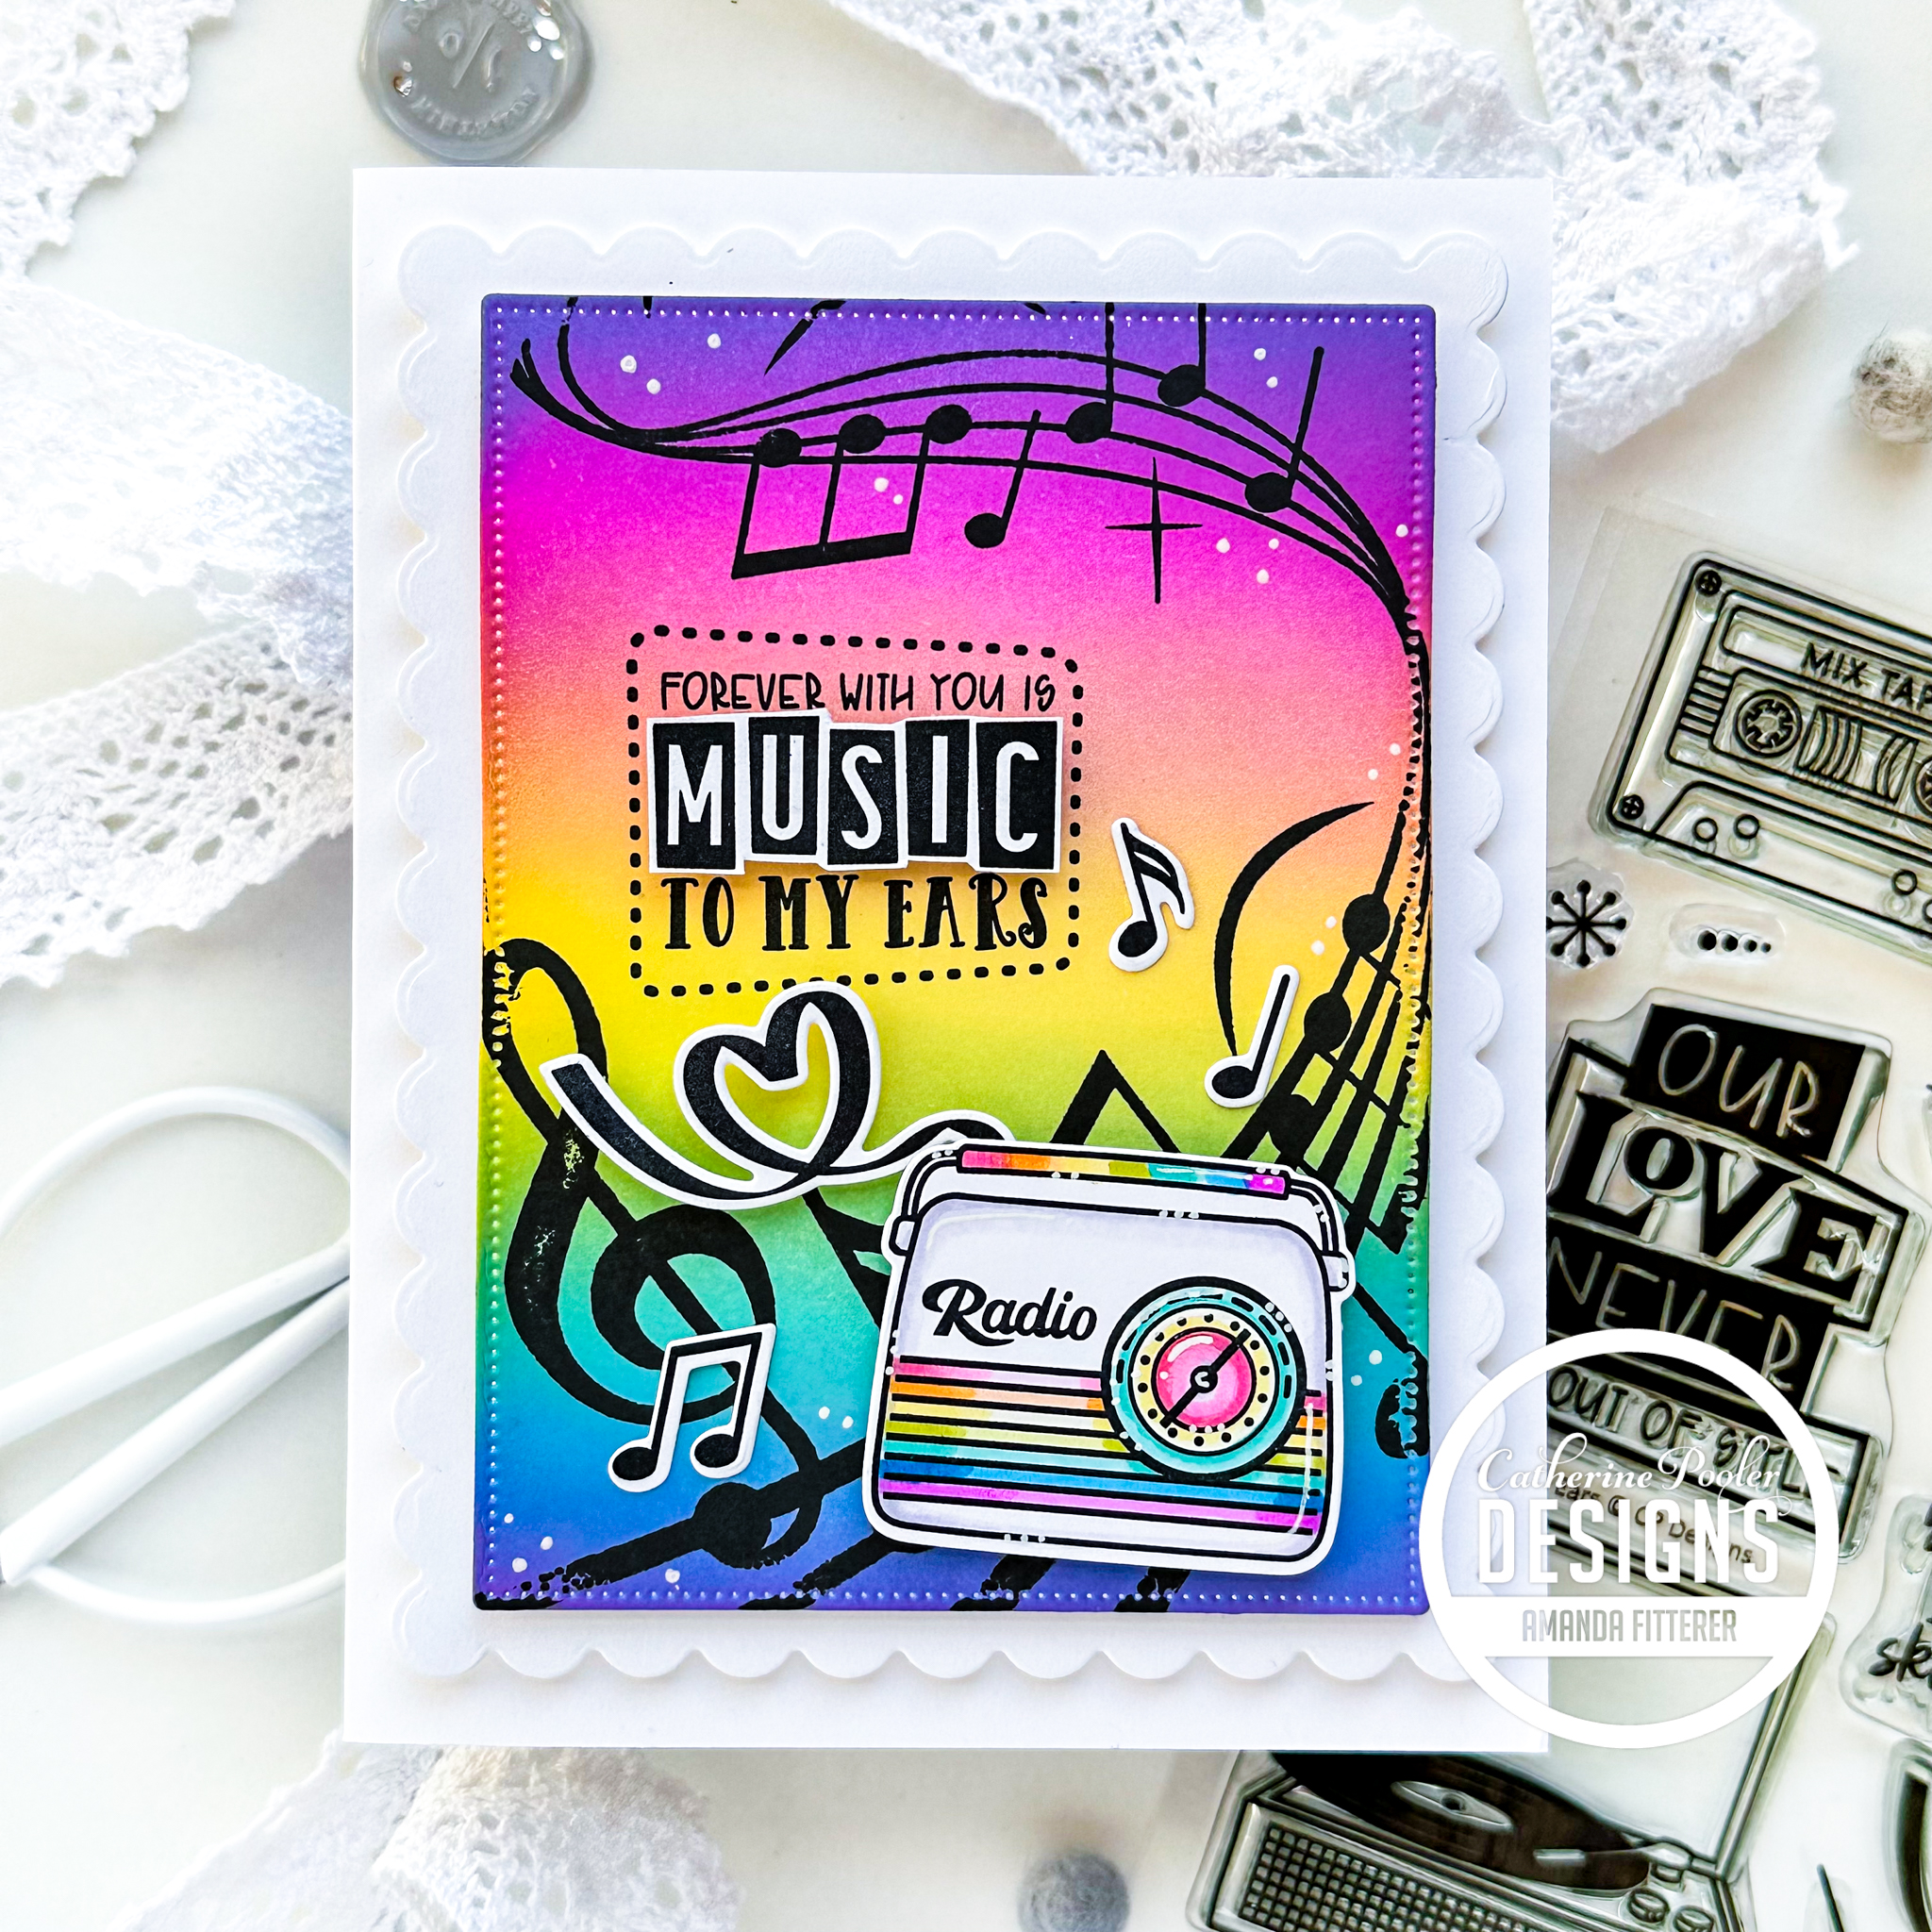
When creating a rainbow background, I always start with the yellow first in the center of the card (in this case, Limoncello). Next, I’ll blend Oh Boy! along the entire bottom and blend it a little with the Limoncello. Then, I’ll blend Pucker Up on the entire top of the panel. Then, I’ll blend the very bottom of the panel with Pucker Up to create a violet color. I’ll then grab Oh Boy! again and blend the top of the panel to create a fuchsia color. Next, I’ll grab Limoncello again and blend it out into the pink and blue once more.
Once I’ve got my panel ready, I can die cut with the Scallops and Dots Dies. I’m also using the dies to cut a white scalloped panel.
I stamped my sentiment again on white and then used scissors to cut out the word “MUSIC”. I propped my die and sentiments up using my favorite 3D foam squares. I used Bearly Arts Precision Glue to adhere the panels it to my pre-scored card base,
Don’t forget: If you’re a Catherine Pooler StampNation member, you get EARLY ACCESS to every new release (plus SOOO many other benefits)! Sign up now! It’s worth it!
Thanks for using my affiliate links! You all are the BEST! Using an affiliate link in this post above or down below costs you nothing, but it gives me a teeny percentage of your sale to buy more crafty goodies to continue to share card tutorials with YOU! So, thank YOU! Xx, Amanda
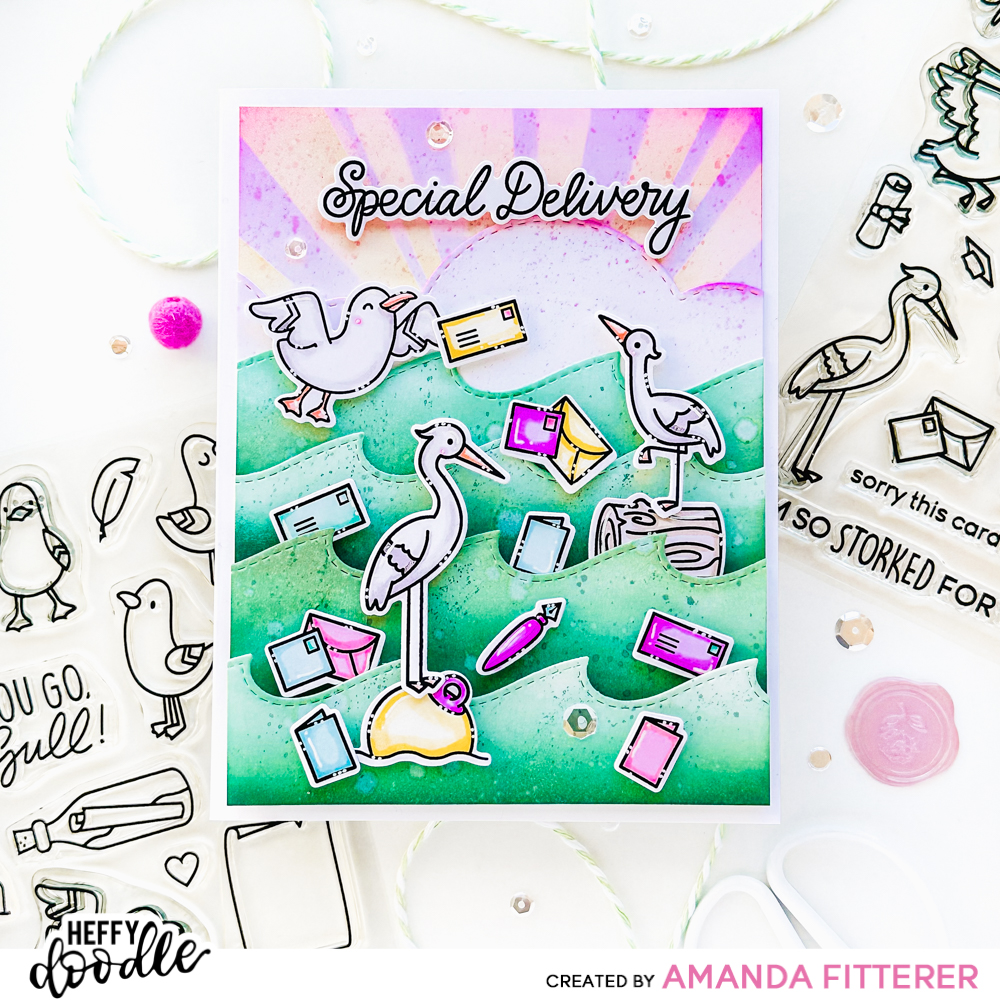
Hello and Happy Tuesday, crafty friends!! I hope your week is off to a great start so far! Let’s make this Heffy Doodle Mix and Match card together!
Let’s start with the background! First, we’re going to blend a piece of white cardstock trimmed down to 4″x5.25″. Blend the top of the panel (that will be visible) with Catherine Pooler’s Pucker Up ink. Then, blend Catching Rays ink through the Rays the Roof Stencil. The Simple Sunburst Stencil would also work great here. Next, die cut one of the Silver Linings Cloud Border Dies and add a bit of the Pucker Up ink to the top of it. Now, die cut 4 of the Breaking Waves Border Dies. Ink blend the waves with Minted, Seafoam, and Skylight inks. Spritz all the ink blended areas with water. For the waves, take a bit of the Skylight and flick it with a water brush onto the waves. Do the same with the sky and clouds using Pucker Up.
Now that we have our background done and drying, we can start working on stamping and coloring! Stamp the images from the You Go, Gull and Special Delivery stamp sets. Color them with whatever medium you like! I’m using the OLO alcohol markers. Once they’re all colored, they’re ready to be die cut with the coordinating dies.
The final step is to adhere everything down to an A2 sized white card base! I’ve used my favorite Bearly Arts Precision Craft Glue to attach my clouds and top 2 waves. I’ve used 3D foam tape to attach the bottom 2 waves. Then, I’ve used 3D foam squares for the stamped images and sentiment!
For the finishing touch, I added a few sequins! Did you see the Heffy Doodlers Challenge this month on Facebook? If you like adding sequins to your projects, you might want to enter and maybe win a prize!! You can JOIN HERE!
Well, friends, I hope you’re feeling inspired from this post! Tag me on Instagram if you make a project using this as inspiration!! I’d love to see how you made it your own!! Xx, Amanda
Thanks for using my affiliate links! You all are the BEST! Using an affiliate link in this post above or down below costs you nothing, but it gives me a teeny percentage of your sale to buy more crafty goodies to continue to share card tutorials with YOU! So, thank YOU! Xx, Amanda
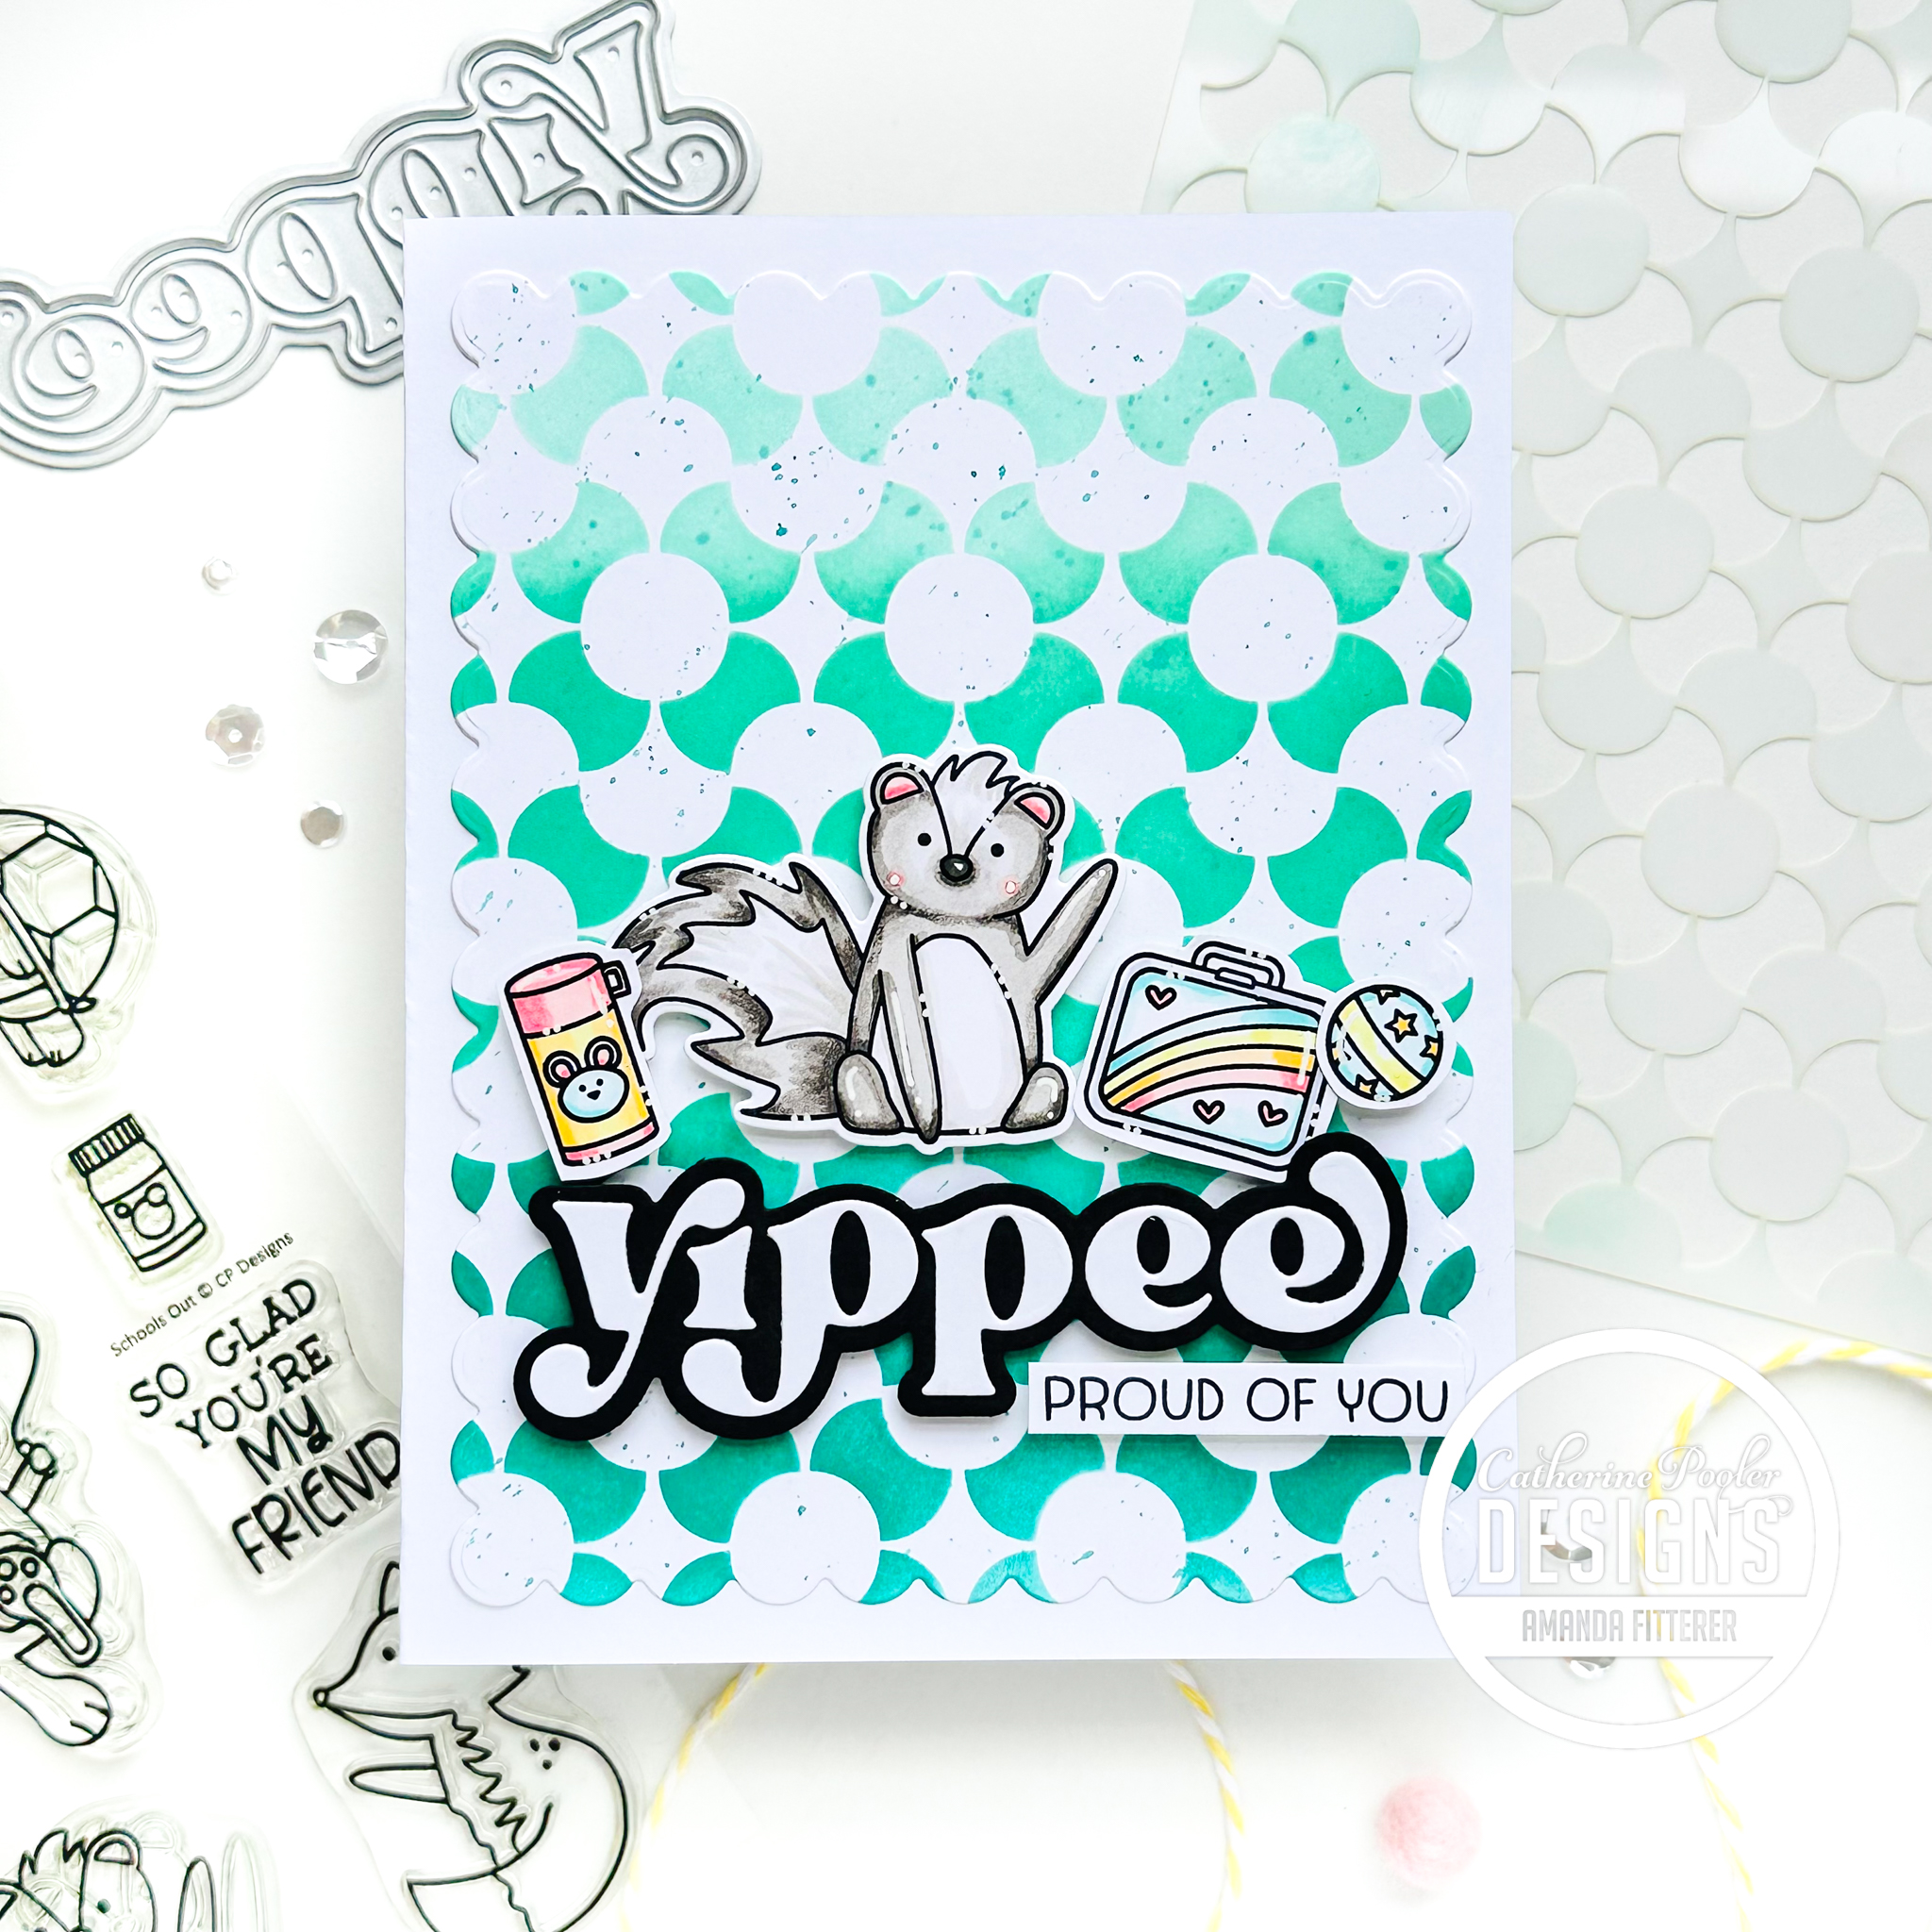
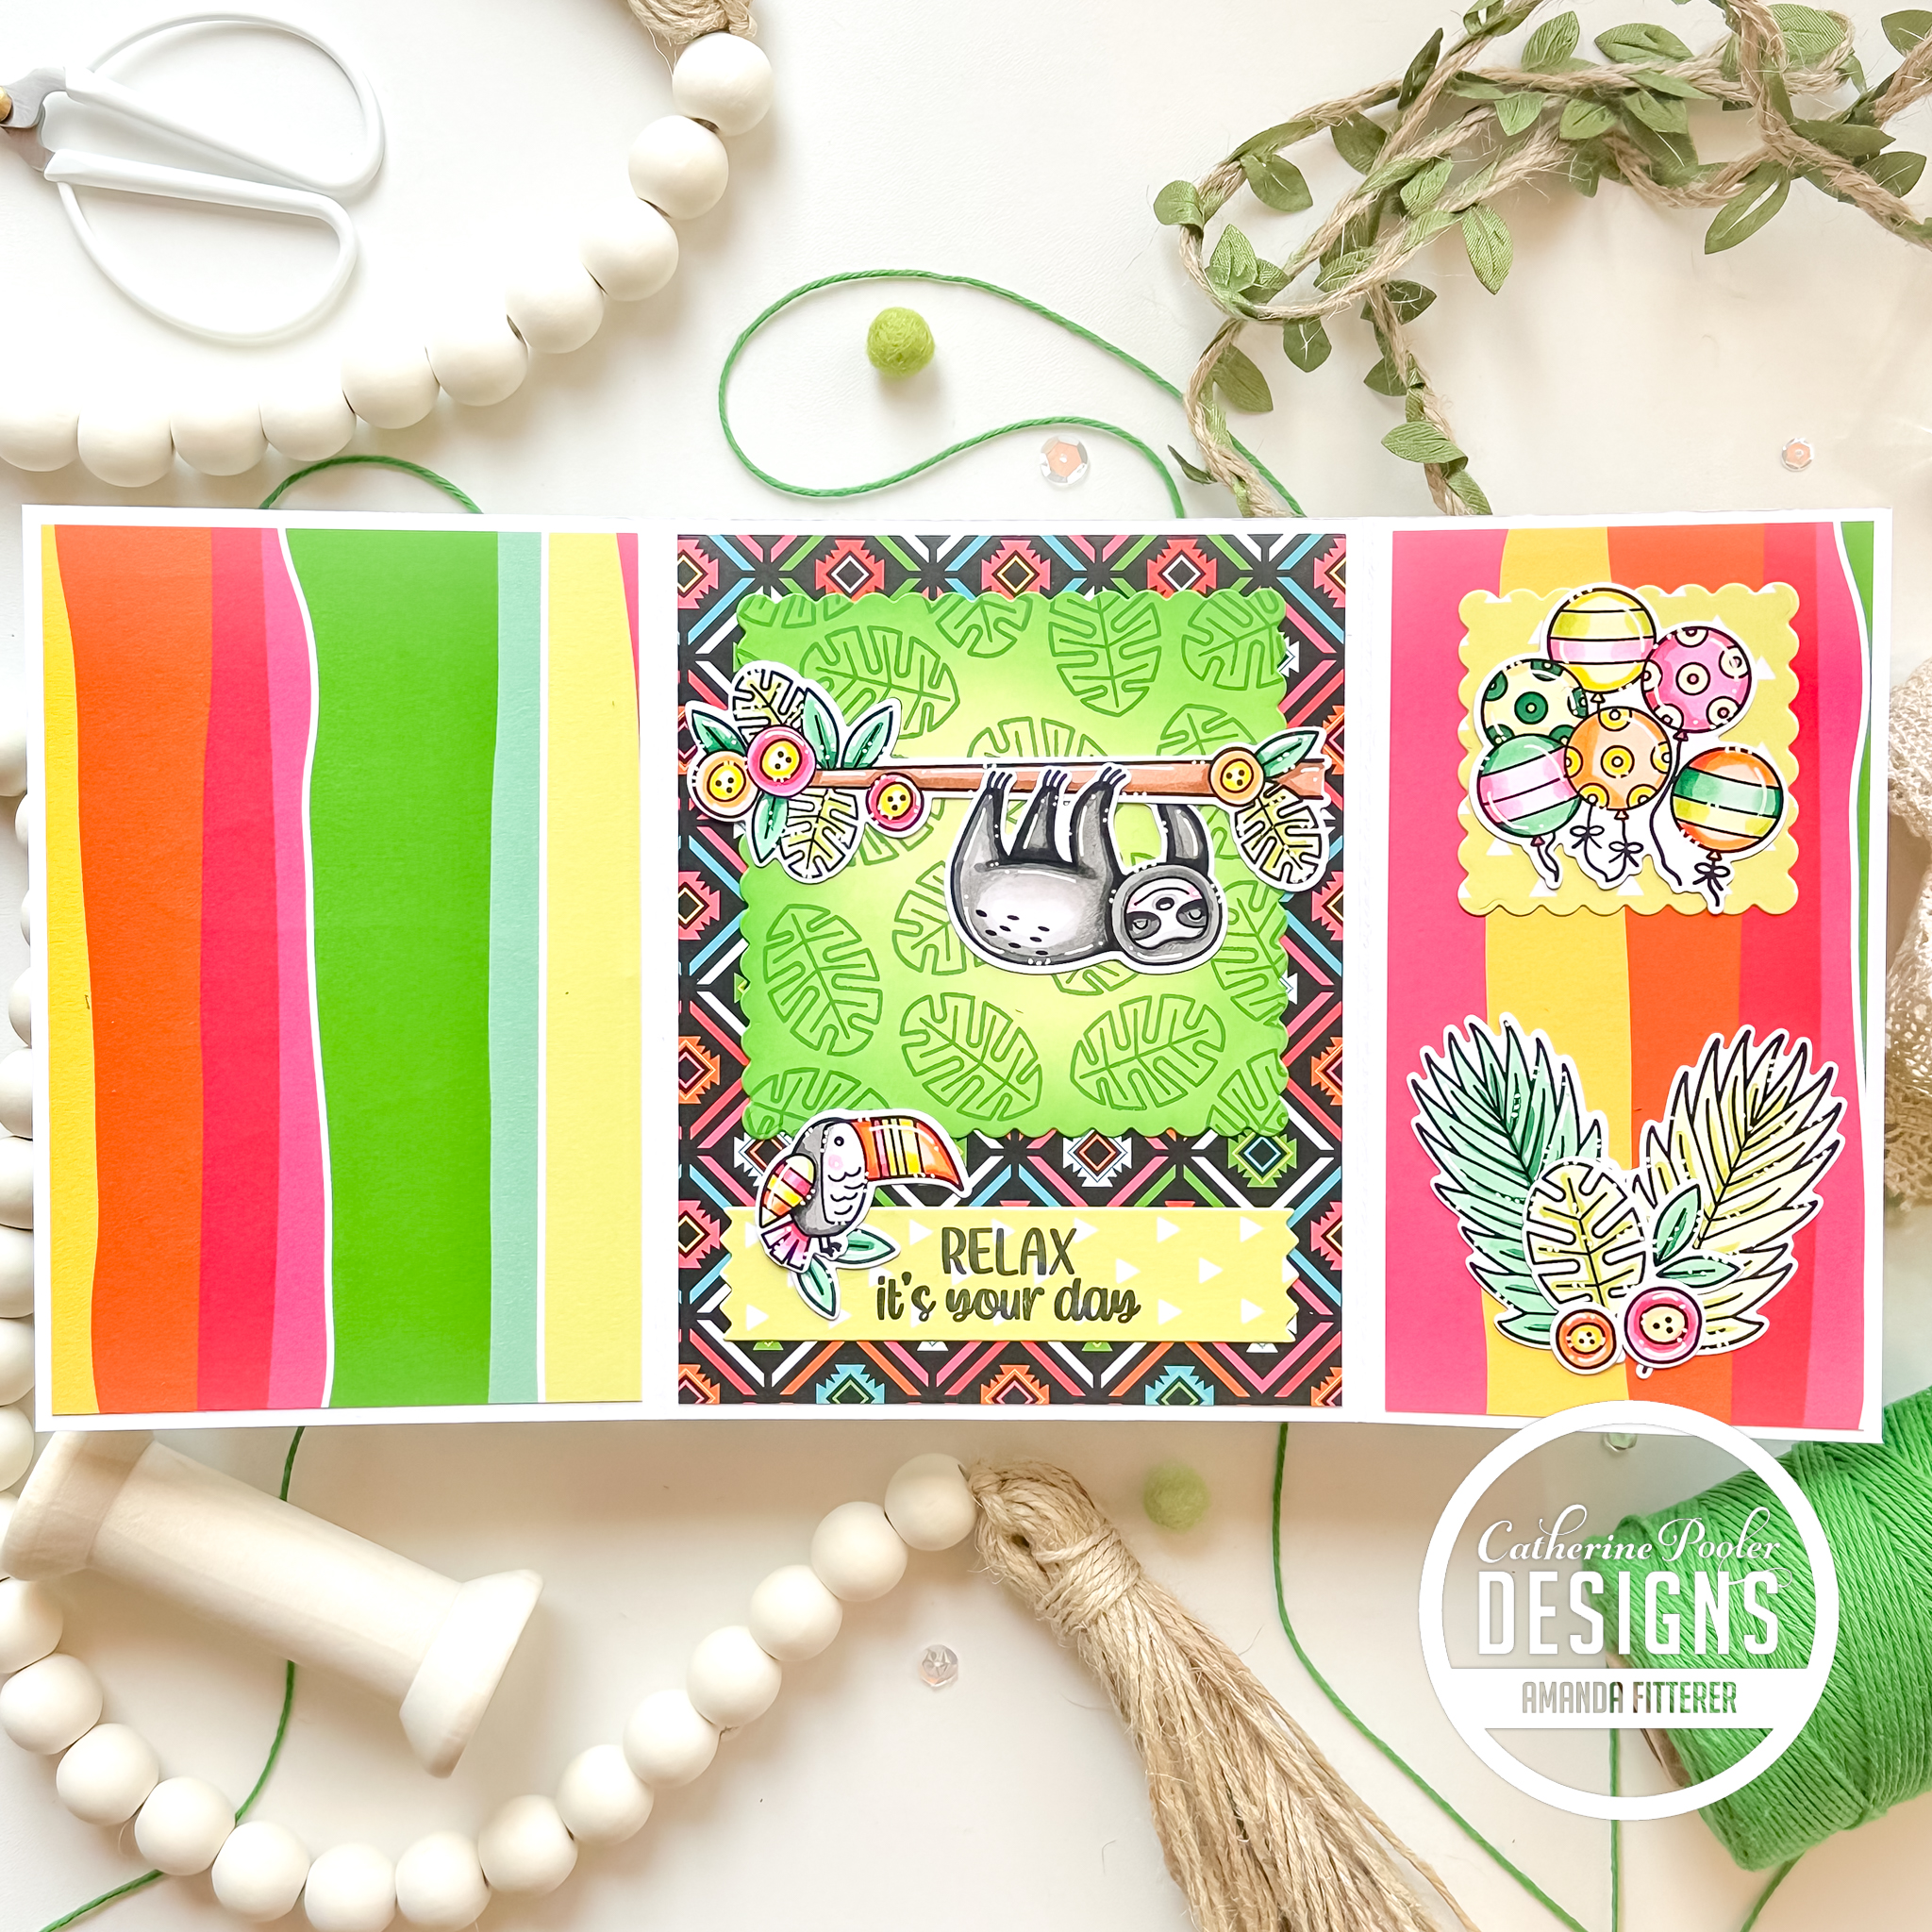
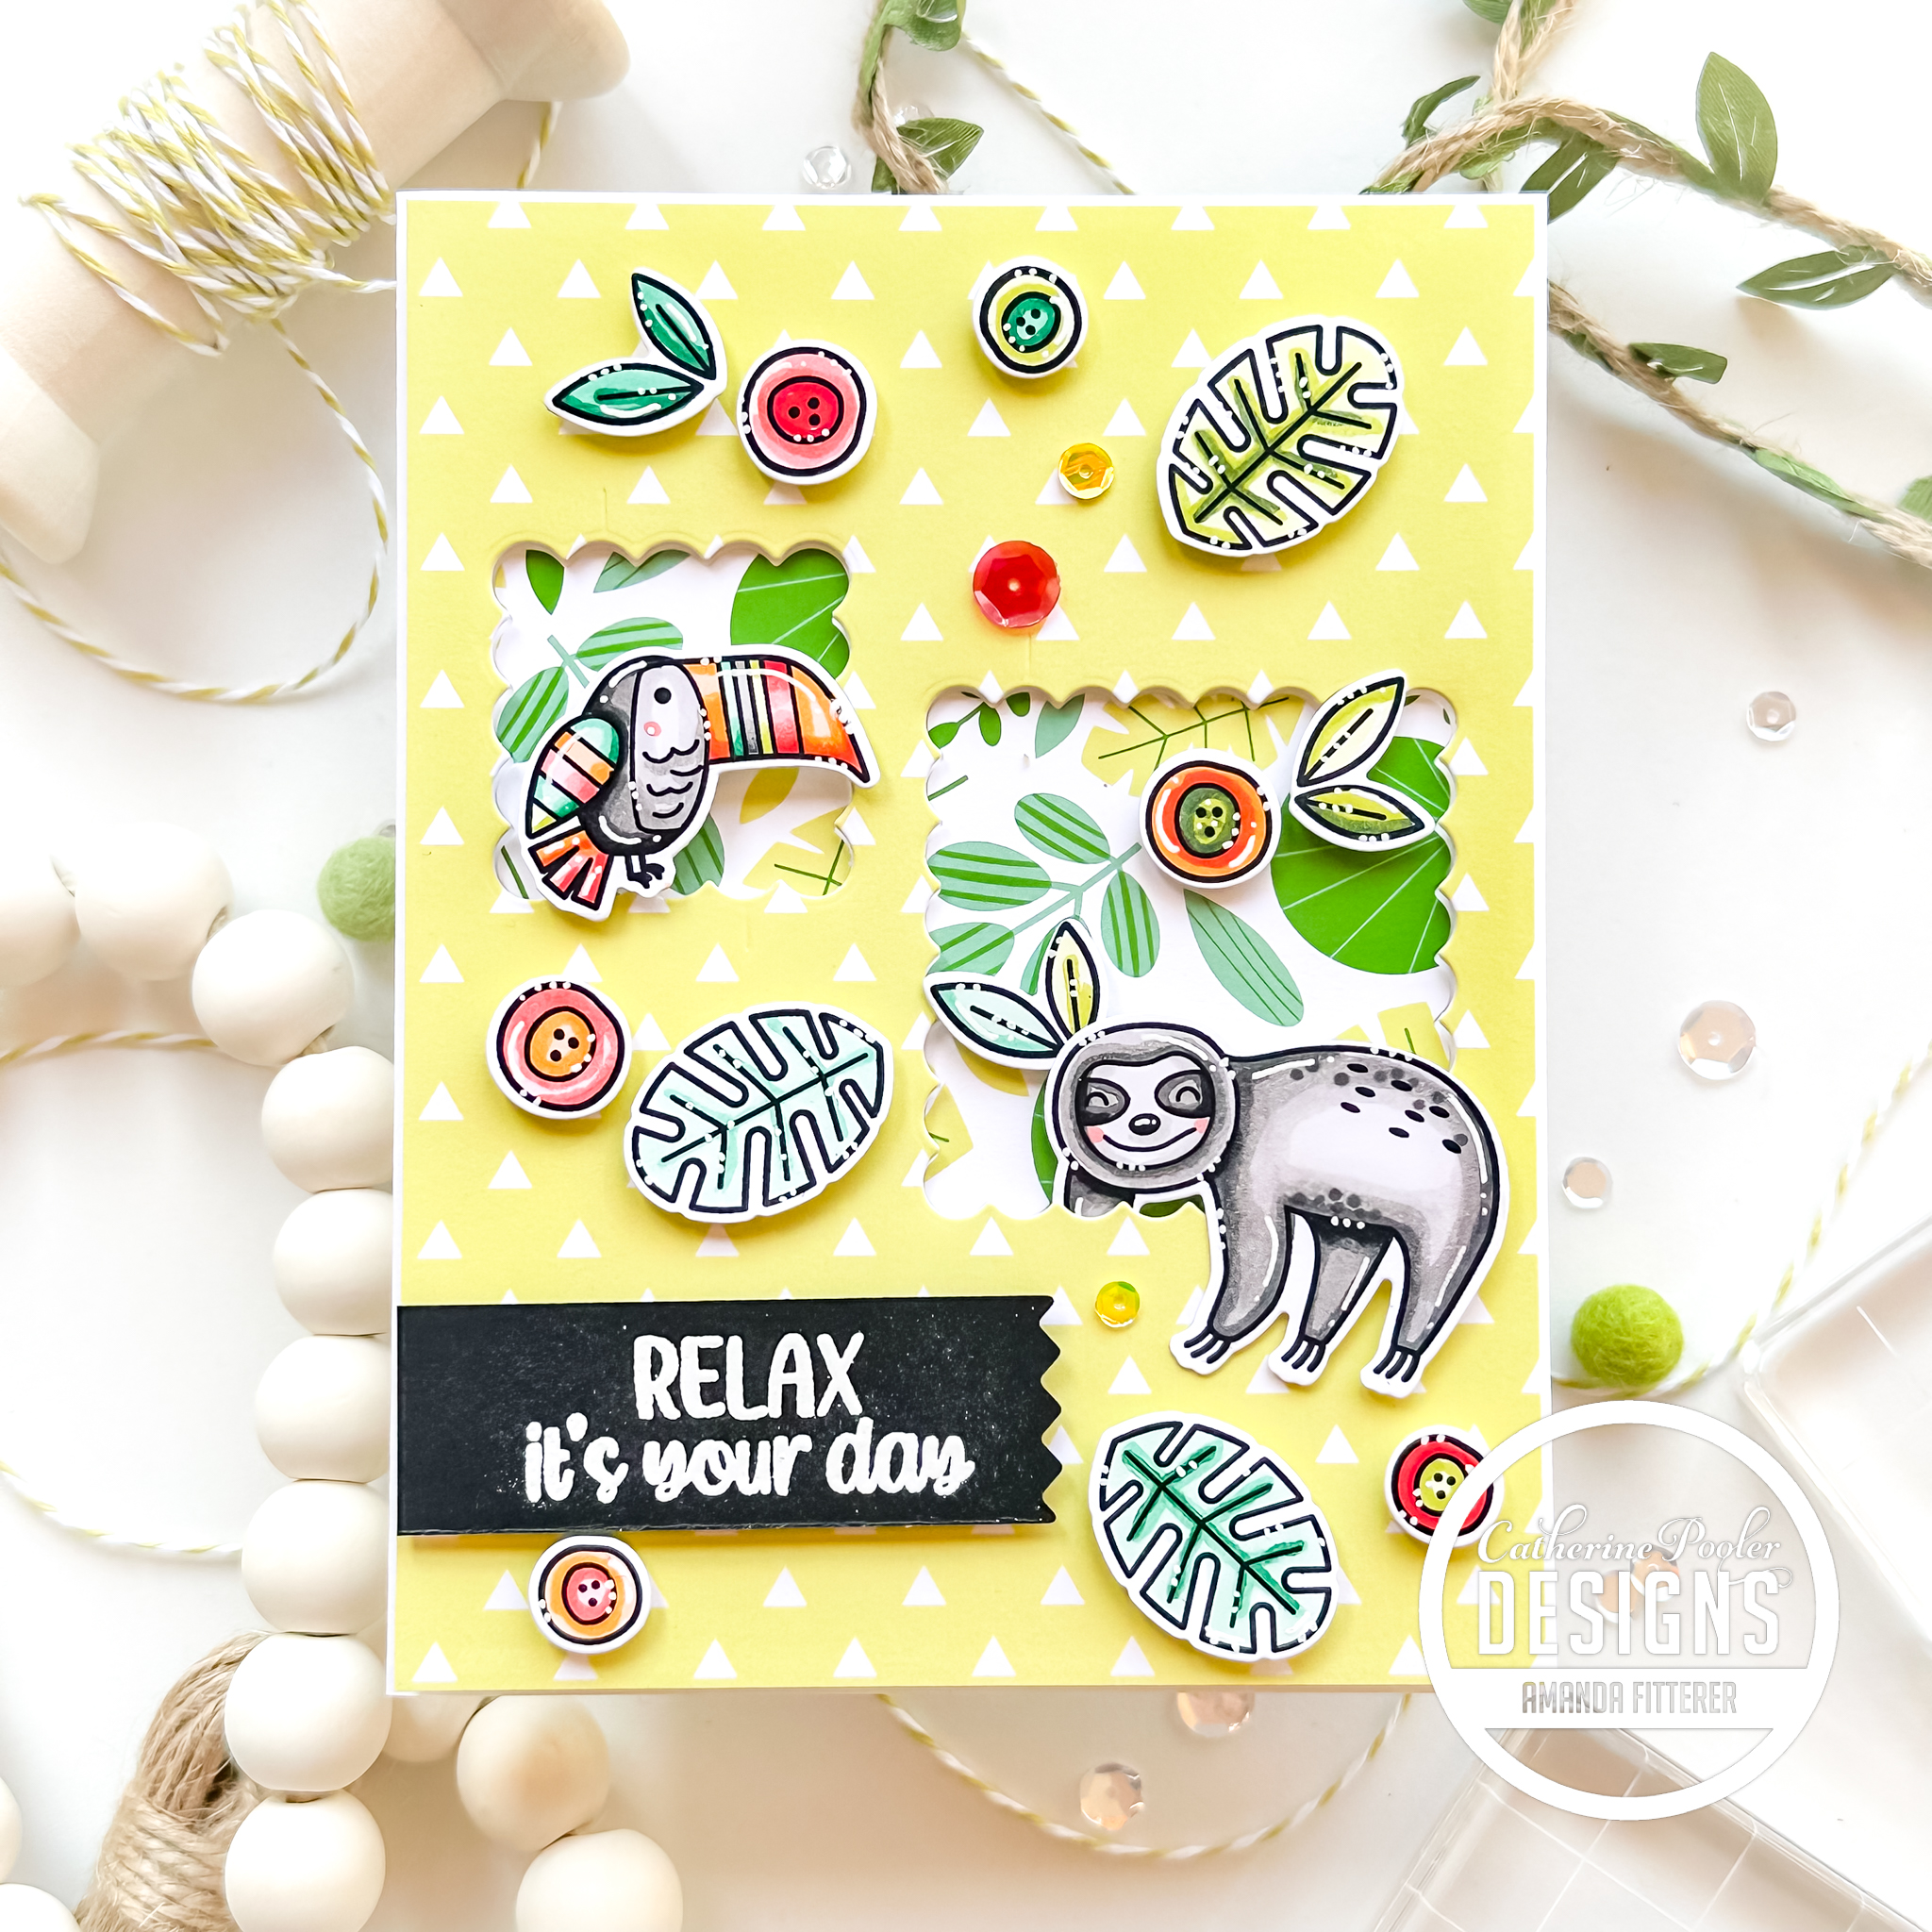
Hey friends! You can shop the BRAND NEW RELEASE from Catherine Pooler NOW! Keep scrolling to see how I made this card featuring the In the Amazon Bundle.
For my sentiments, I used the. new Just Right Duos Sentiments Stamp Set. I stamped the sentiments and then used a trimmer to trim them down. I used my scissors to cut the strips at an angle. Lastly, I added some Lima Sequin Mix sequins to the background.
Don’t forget: If you’re a Catherine Pooler StampNation member, you get EARLY ACCESS to every new release (plus SOOO many other benefits)! Sign up now! It’s worth it!
Thanks for using my affiliate links! You all are the BEST! Using an affiliate link in this post above or down below costs you nothing, but it gives me a teeny percentage of your sale to buy more crafty goodies to continue to share card tutorials with YOU! So, thank YOU! Xx, Amanda
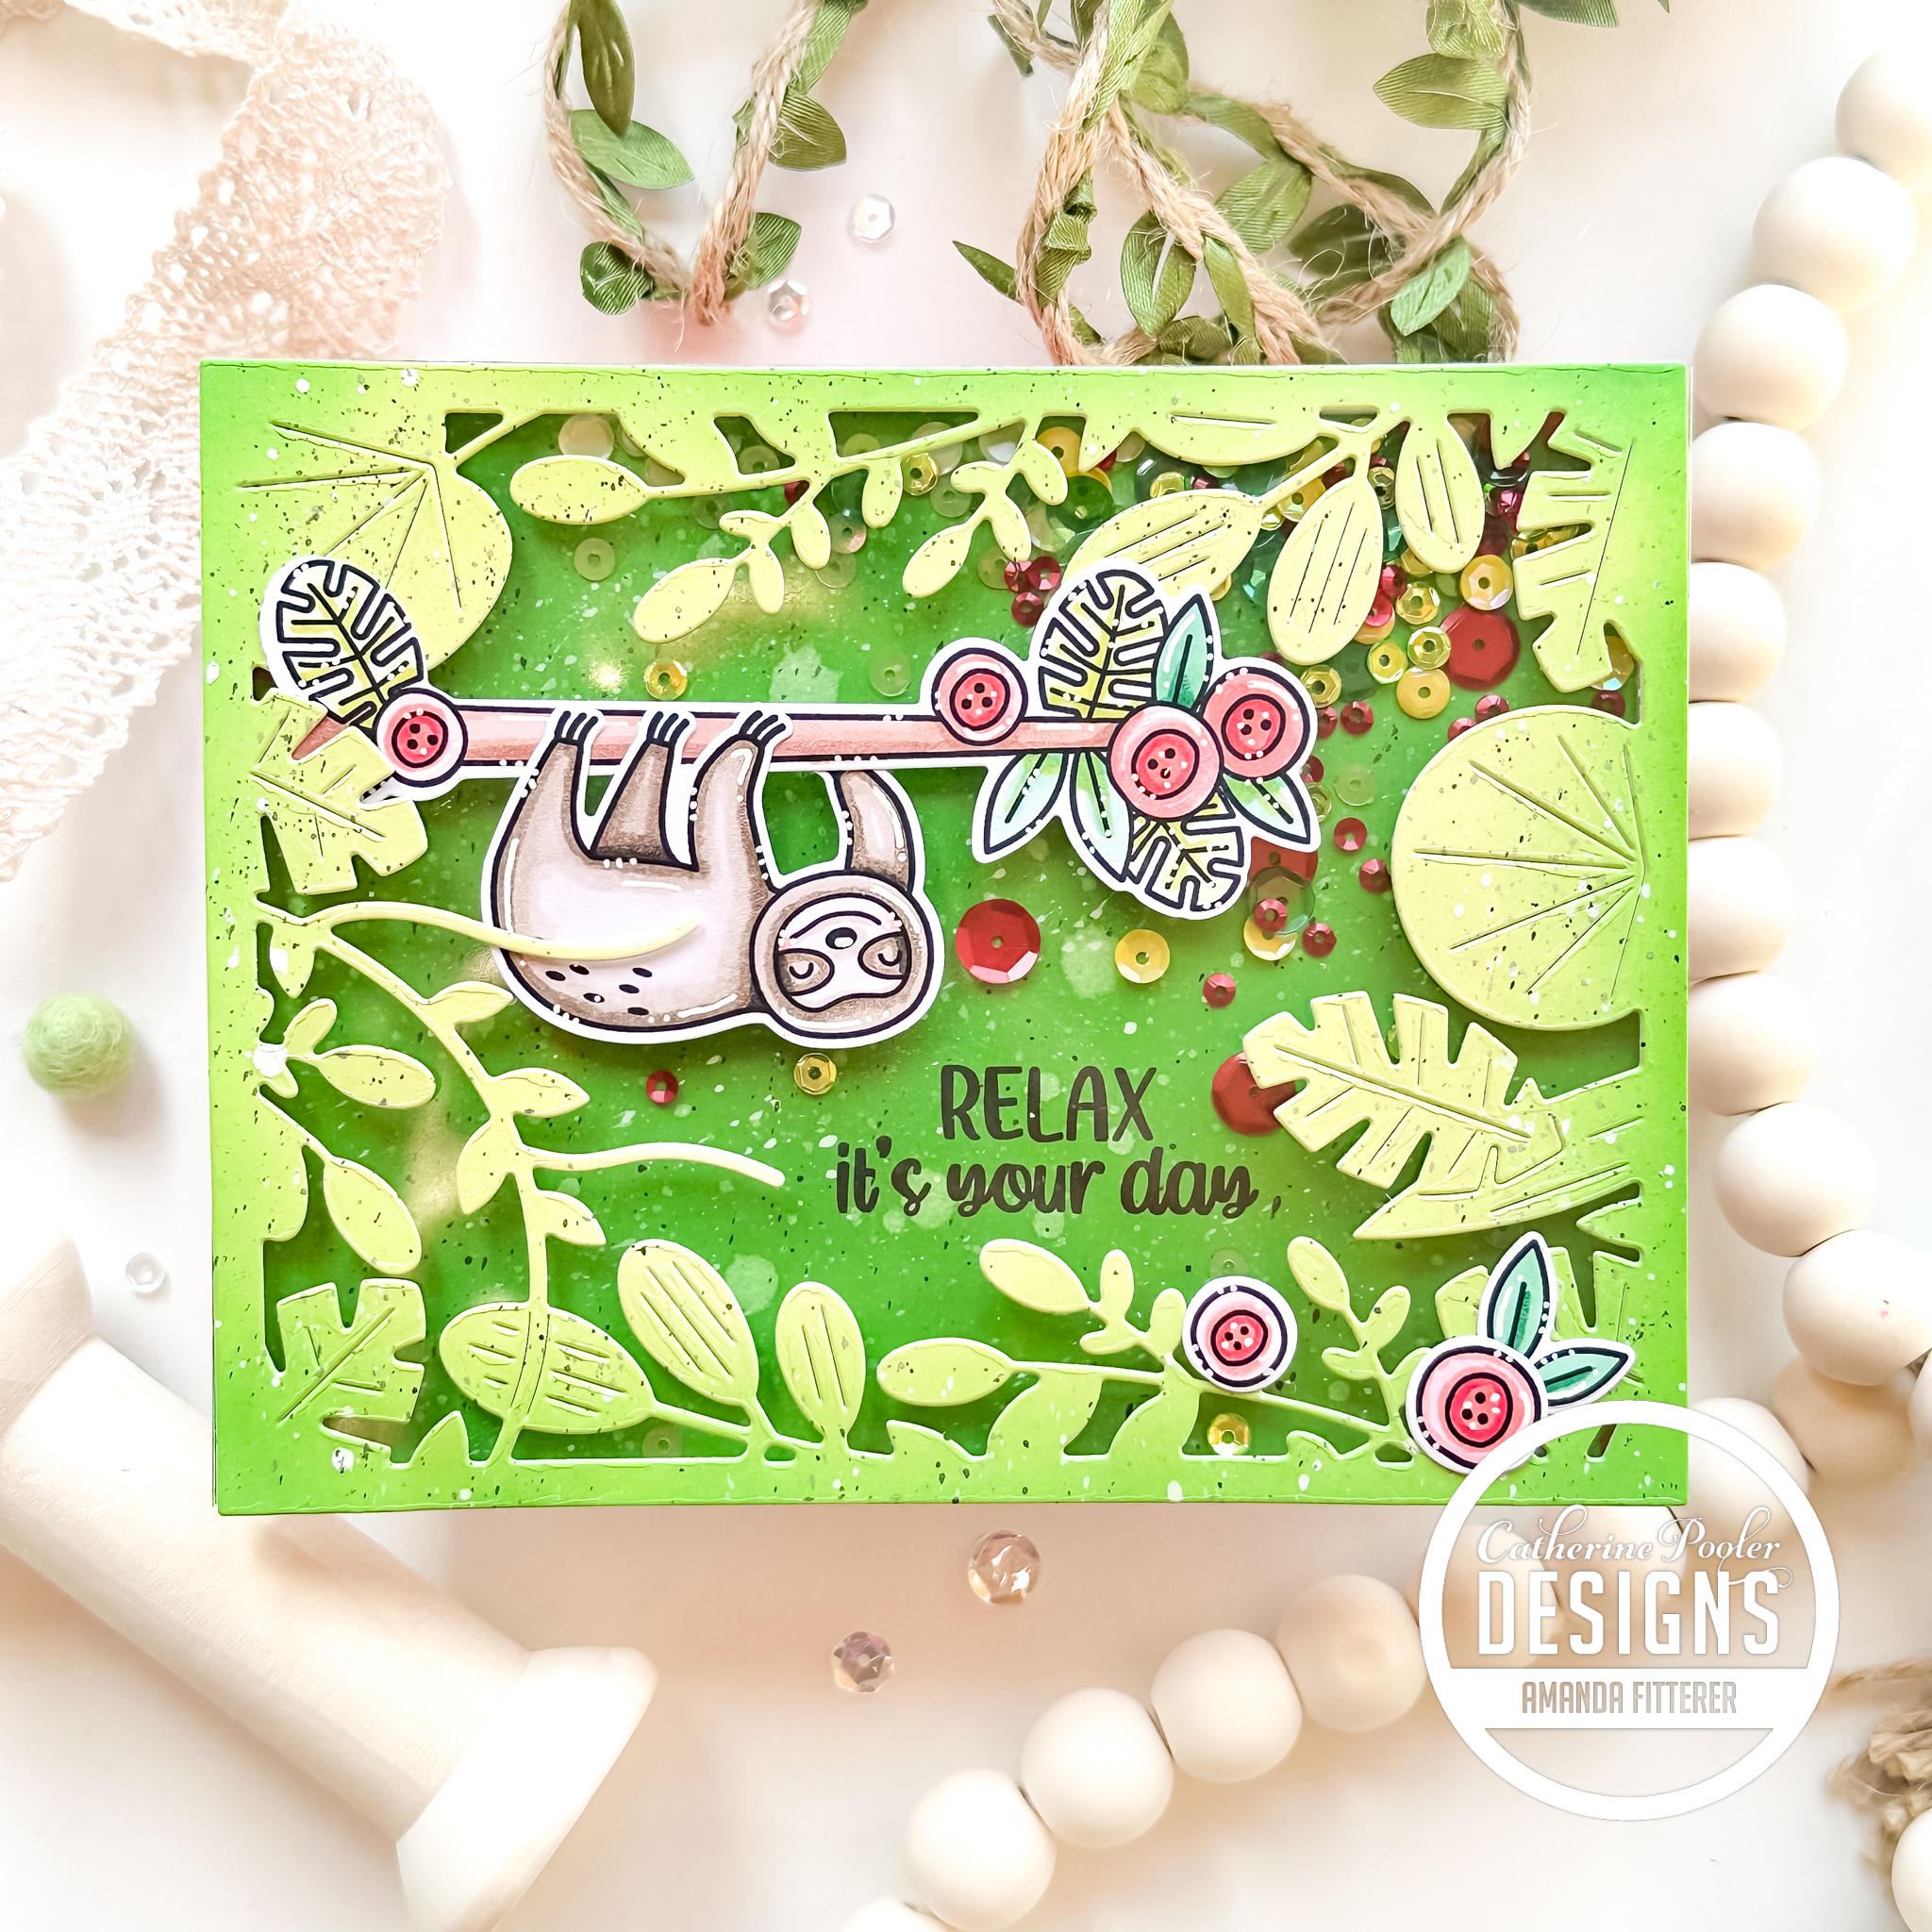
Hey friends! You can shop the BRAND NEW RELEASE from Catherine Pooler NOW! Keep scrolling to see how I made this card featuring the In the Amazon Bundle.
Don’t forget: If you’re a Catherine Pooler StampNation member, you get EARLY ACCESS to every new release (plus SOOO many other benefits)! Sign up now! It’s worth it!
Thanks for using my affiliate links! You all are the BEST! Using an affiliate link in this post above or down below costs you nothing, but it gives me a teeny percentage of your sale to buy more crafty goodies to continue to share card tutorials with YOU! So, thank YOU! Xx, Amanda
Hey friends! You can shop the BRAND NEW RELEASE from Catherine Pooler NOW! Keep scrolling to see how I made this card featuring the In the Amazon Bundle.
To create the shaker portion of the card, I trimmed an acetate sheet to a teeny bit smaller than my die cut frame. I adhered the sheet to my frame using redline tape. Then, I applied 3D foam tape to create depth between the layers and hold my Big Apple Sequin Mix shakers inside.
Don’t forget: If you’re a Catherine Pooler StampNation member, you get EARLY ACCESS to every new release (plus SOOO many other benefits)! Sign up now! It’s worth it!
Thanks for using my affiliate links! You all are the BEST! Using an affiliate link in this post above or down below costs you nothing, but it gives me a teeny percentage of your sale to buy more crafty goodies to continue to share card tutorials with YOU! So, thank YOU! Xx, Amanda
Hey friends! Have you heard the good news?! There’s a new release coming.. and boy, is this a FUN one!! StampNation Members can shop the new collection EARLY on Tues, March 21st! General ordering opens on Weds, March 22nd!
I propped my patterned paper up using 3D foam tape to create depth between the layers. Then, I attached my card panel to a pre-scored card base. I propped all of my cute critters and flowers up using my favorite 3D foam squares.
Don’t forget: If you’re a Catherine Pooler StampNation member, you get EARLY ACCESS to every new release (plus SOOO many other benefits)! Sign up now! It’s worth it!
Thanks for using my affiliate links! You all are the BEST! Using an affiliate link in this post above or down below costs you nothing, but it gives me a teeny percentage of your sale to buy more crafty goodies to continue to share card tutorials with YOU! So, thank YOU! Xx, Amanda
Thanks for using my affiliate links! You all are the BEST! Using an affiliate link in this post above or down below costs you nothing, but it gives me a teeny percentage of your sale to buy more crafty goodies to continue to share card tutorials with YOU! So, thank YOU! Xx, Amanda
Thanks for using my affiliate links! You all are the BEST! Using an affiliate link in this post above or down below costs you nothing, but it gives me a teeny percentage of your sale to buy more crafty goodies to continue to share card tutorials with YOU! So, thank YOU! Xx, Amanda
Hey friends! Have you heard the good news?! There’s a new release coming.. and boy, is this a gorgeous one!! StampNation Members can shop the new collection EARLY on Tues, Feb 21st! General ordering opens on Weds, Feb 22nd!
Thanks for using my affiliate links! You all are the BEST! Using an affiliate link in this post above or down below costs you nothing, but it gives me a teeny percentage of your sale to buy more crafty goodies to continue to share card tutorials with YOU! So, thank YOU! Xx, Amanda
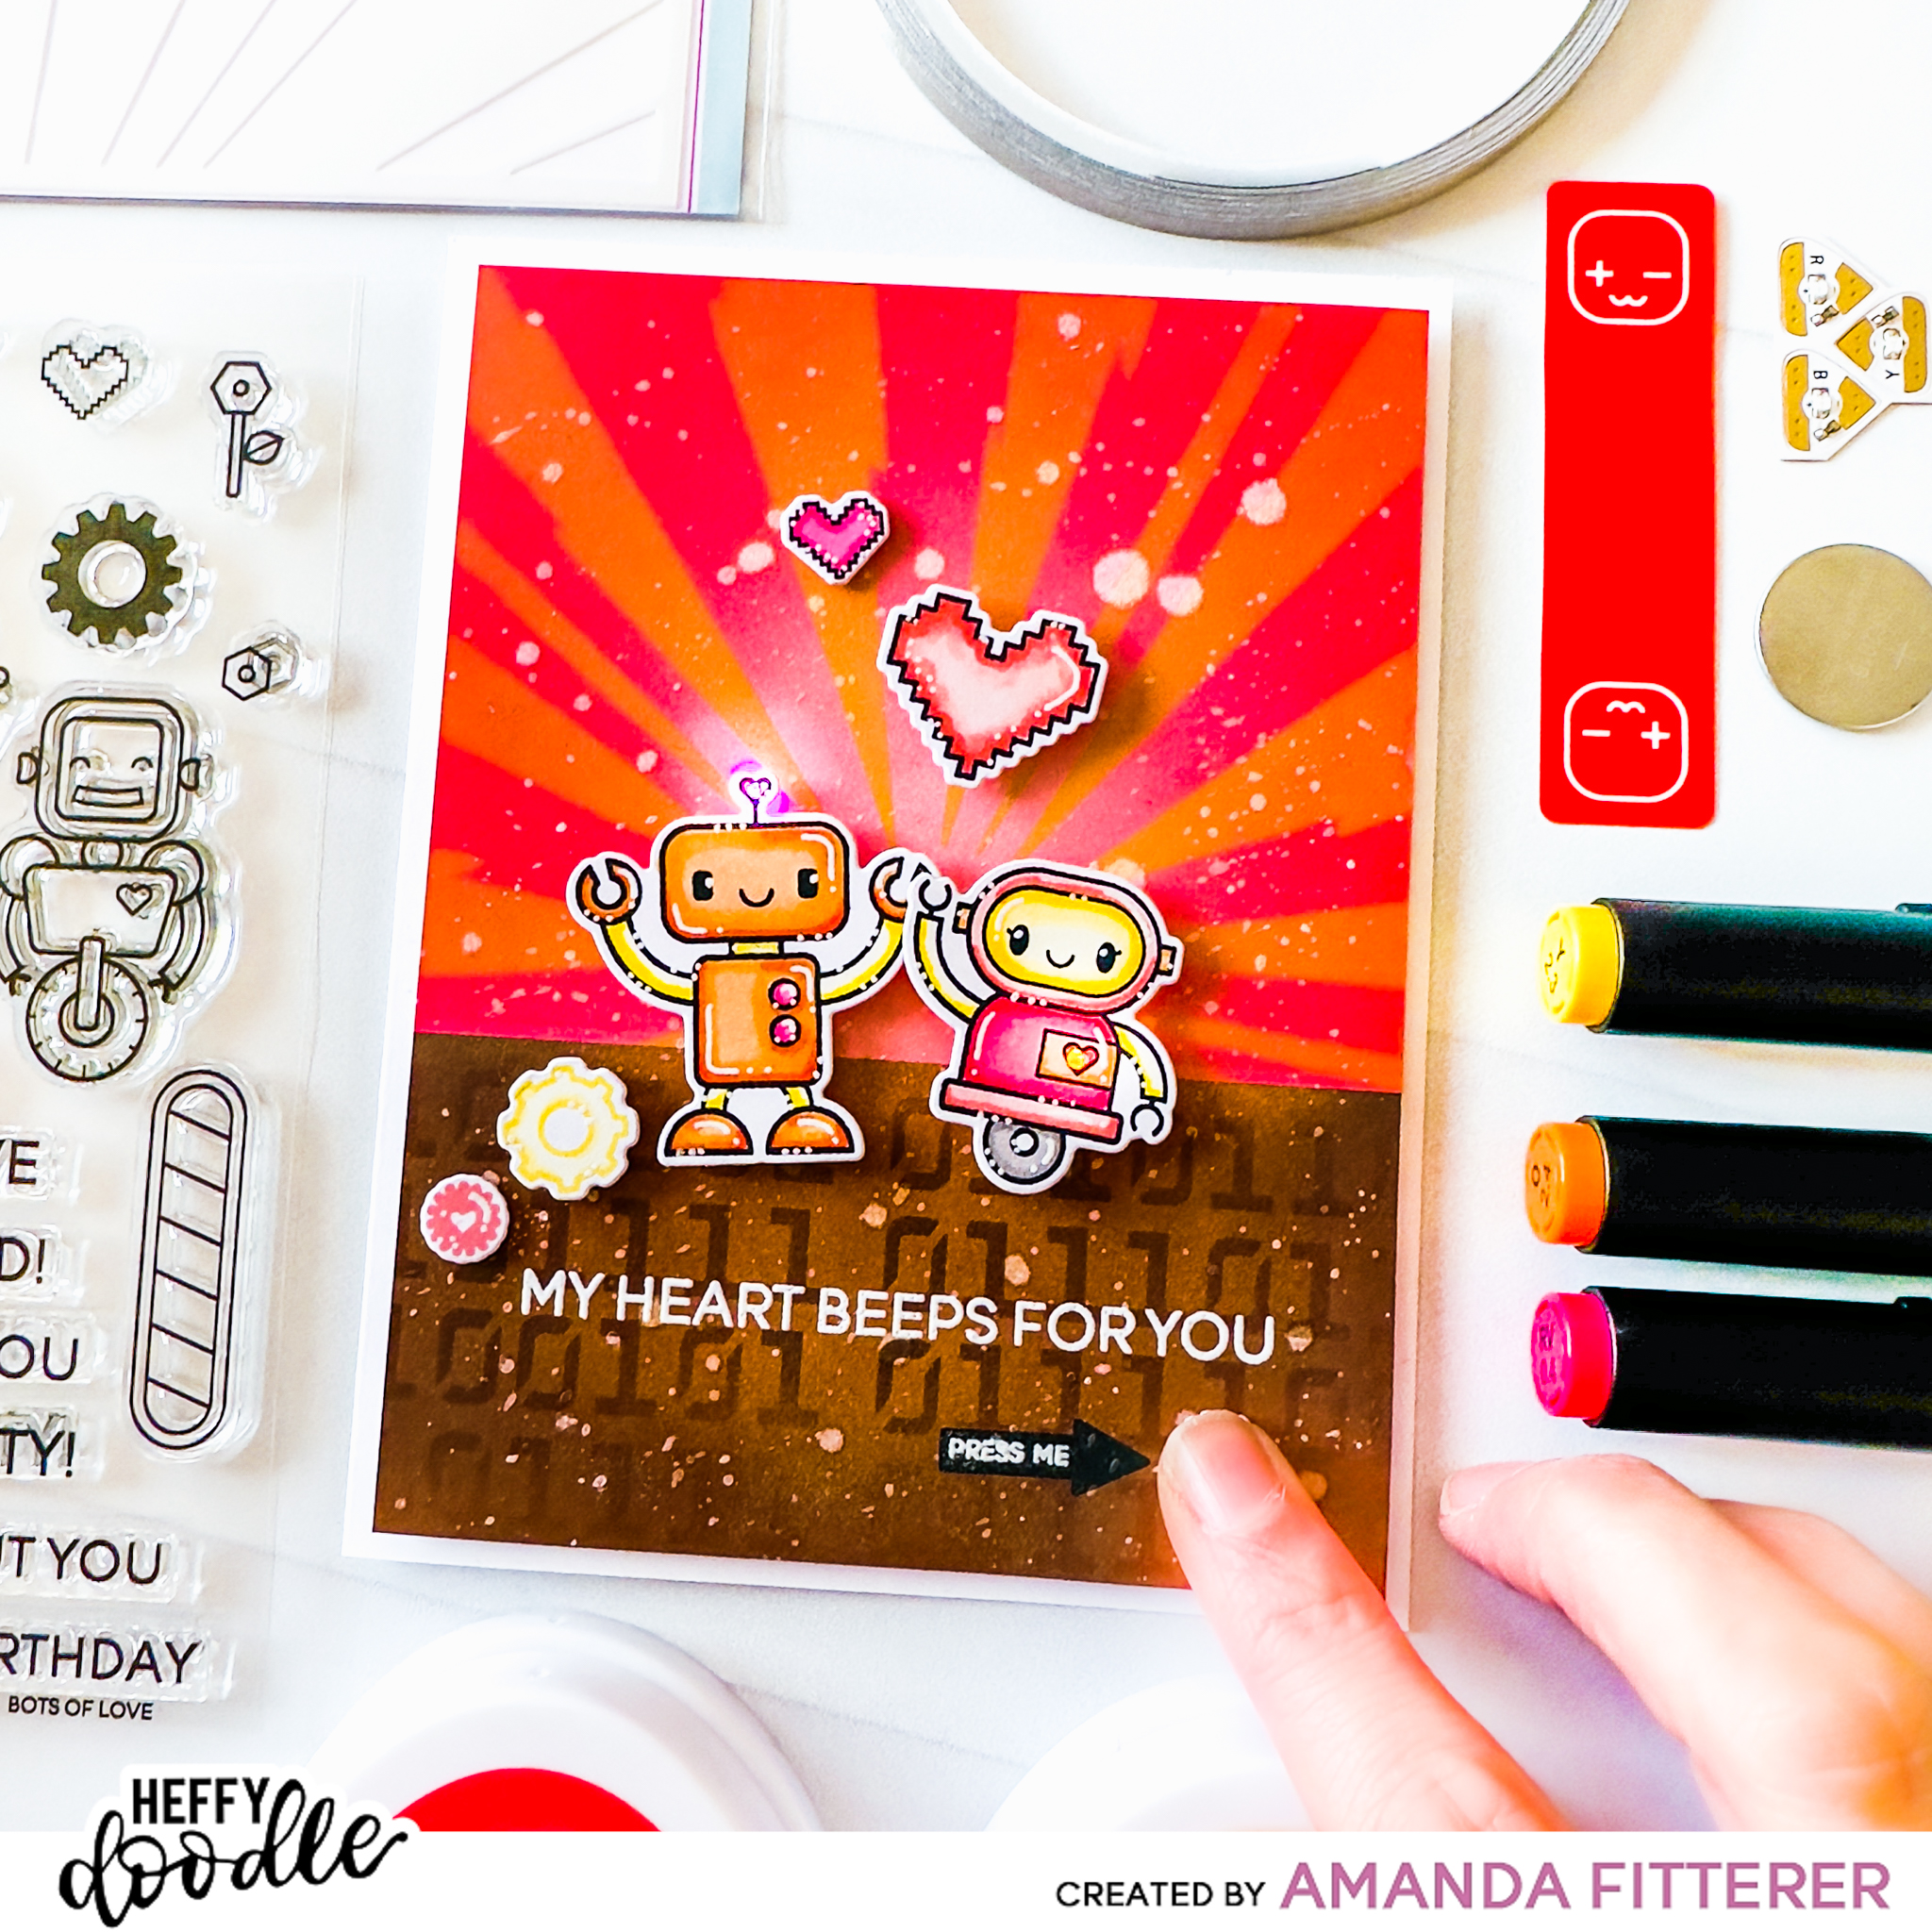
I created this fun light-up card using the Craft with Light Kit – White by Chibitronics. I used lots of Heffy Doodle products! Keep reading on for those links!
First, I created my bright background! I blended some Catherine Pooler inks through my Zapp Attack and Cogs & Code Stencil. I used Heffy Memo Tapeto mask off the top and bottom of my card.
Once I decided where I wanted my lights, I started to prepare for the wiring.
I poked holes through the robots’ hearts where I want the bulbs to show.
Then, I placed the robots on the background where they were going to be glued down once the card is assembled. I made a mark with a pencil through the robots’ heart holes onto the background.
Then, I poked holes through the pencil marks on the background panel.
Lastly, I used a pencil to make marks on my card base where the lights need to be placed.
On my card base, using the pencil marks I made in the last step as a guide, I’ve made marks where the + and – wires need to line up. I did this by taking the lights and placing them down onto my card base so the light was right over top of the pencil mark. Then, I looked at where the copper + and – are on the light unit and drew lines where I need the wires to be lined up to touch the copper part.
I’ve also created a “housing unit” for my battery with a plus and minus sign on it, so I know which way to insert the battery once it’s time. I also marked where I want the battery to be on the card base.
Next, I started by taking my tape and cutting it in half down the center to create smaller/narrower pieces. This isn’t necessary, but was helpful with navigating the tape.
I adhered my battery housing unit to my card base and started placing my + tape. This tape is the top wire which goes to the base of the battery housing unit.
Then, I placed my – tape which starts on the flap of the battery housing unit.
Next, I used 3D foam tape around the whole base of the card to “lift” my card front up so the battery doesn’t stick out farther than the rest of front panel. I attached the stamped images with 3D foam squares, making sure to line the robots up to the lights properly.
Come join in the IG HOP to enter to win the prizes from Heffy Doodle and Chibitronics!
Thank you so much for stopping by my blog today! Enjoy the Hop!
Thanks for using my affiliate links! You all are the BEST! Using an affiliate link in this post above or down below costs you nothing, but it gives me a teeny percentage of your sale to buy more crafty goodies to continue to share card tutorials with YOU! So, thank YOU! Xx, Amanda
Hey friends! If you’re not signed up for the Club Sursee subscription through Catherine Pooler, YOU SHOULD BE! I love these kits!! So many fun things to be surprised by every month!!
Thanks for using my affiliate links! You all are the BEST! Using an affiliate link in this post above or down below costs you nothing, but it gives me a teeny percentage of your sale to buy more crafty goodies to continue to share card tutorials with YOU! So, thank YOU! Xx, Amanda
Thanks for using my affiliate links! You all are the BEST! Using an affiliate link in this post above or down below costs you nothing, but it gives me a teeny percentage of your sale to buy more crafty goodies to continue to share card tutorials with YOU! So, thank YOU! Xx, Amanda
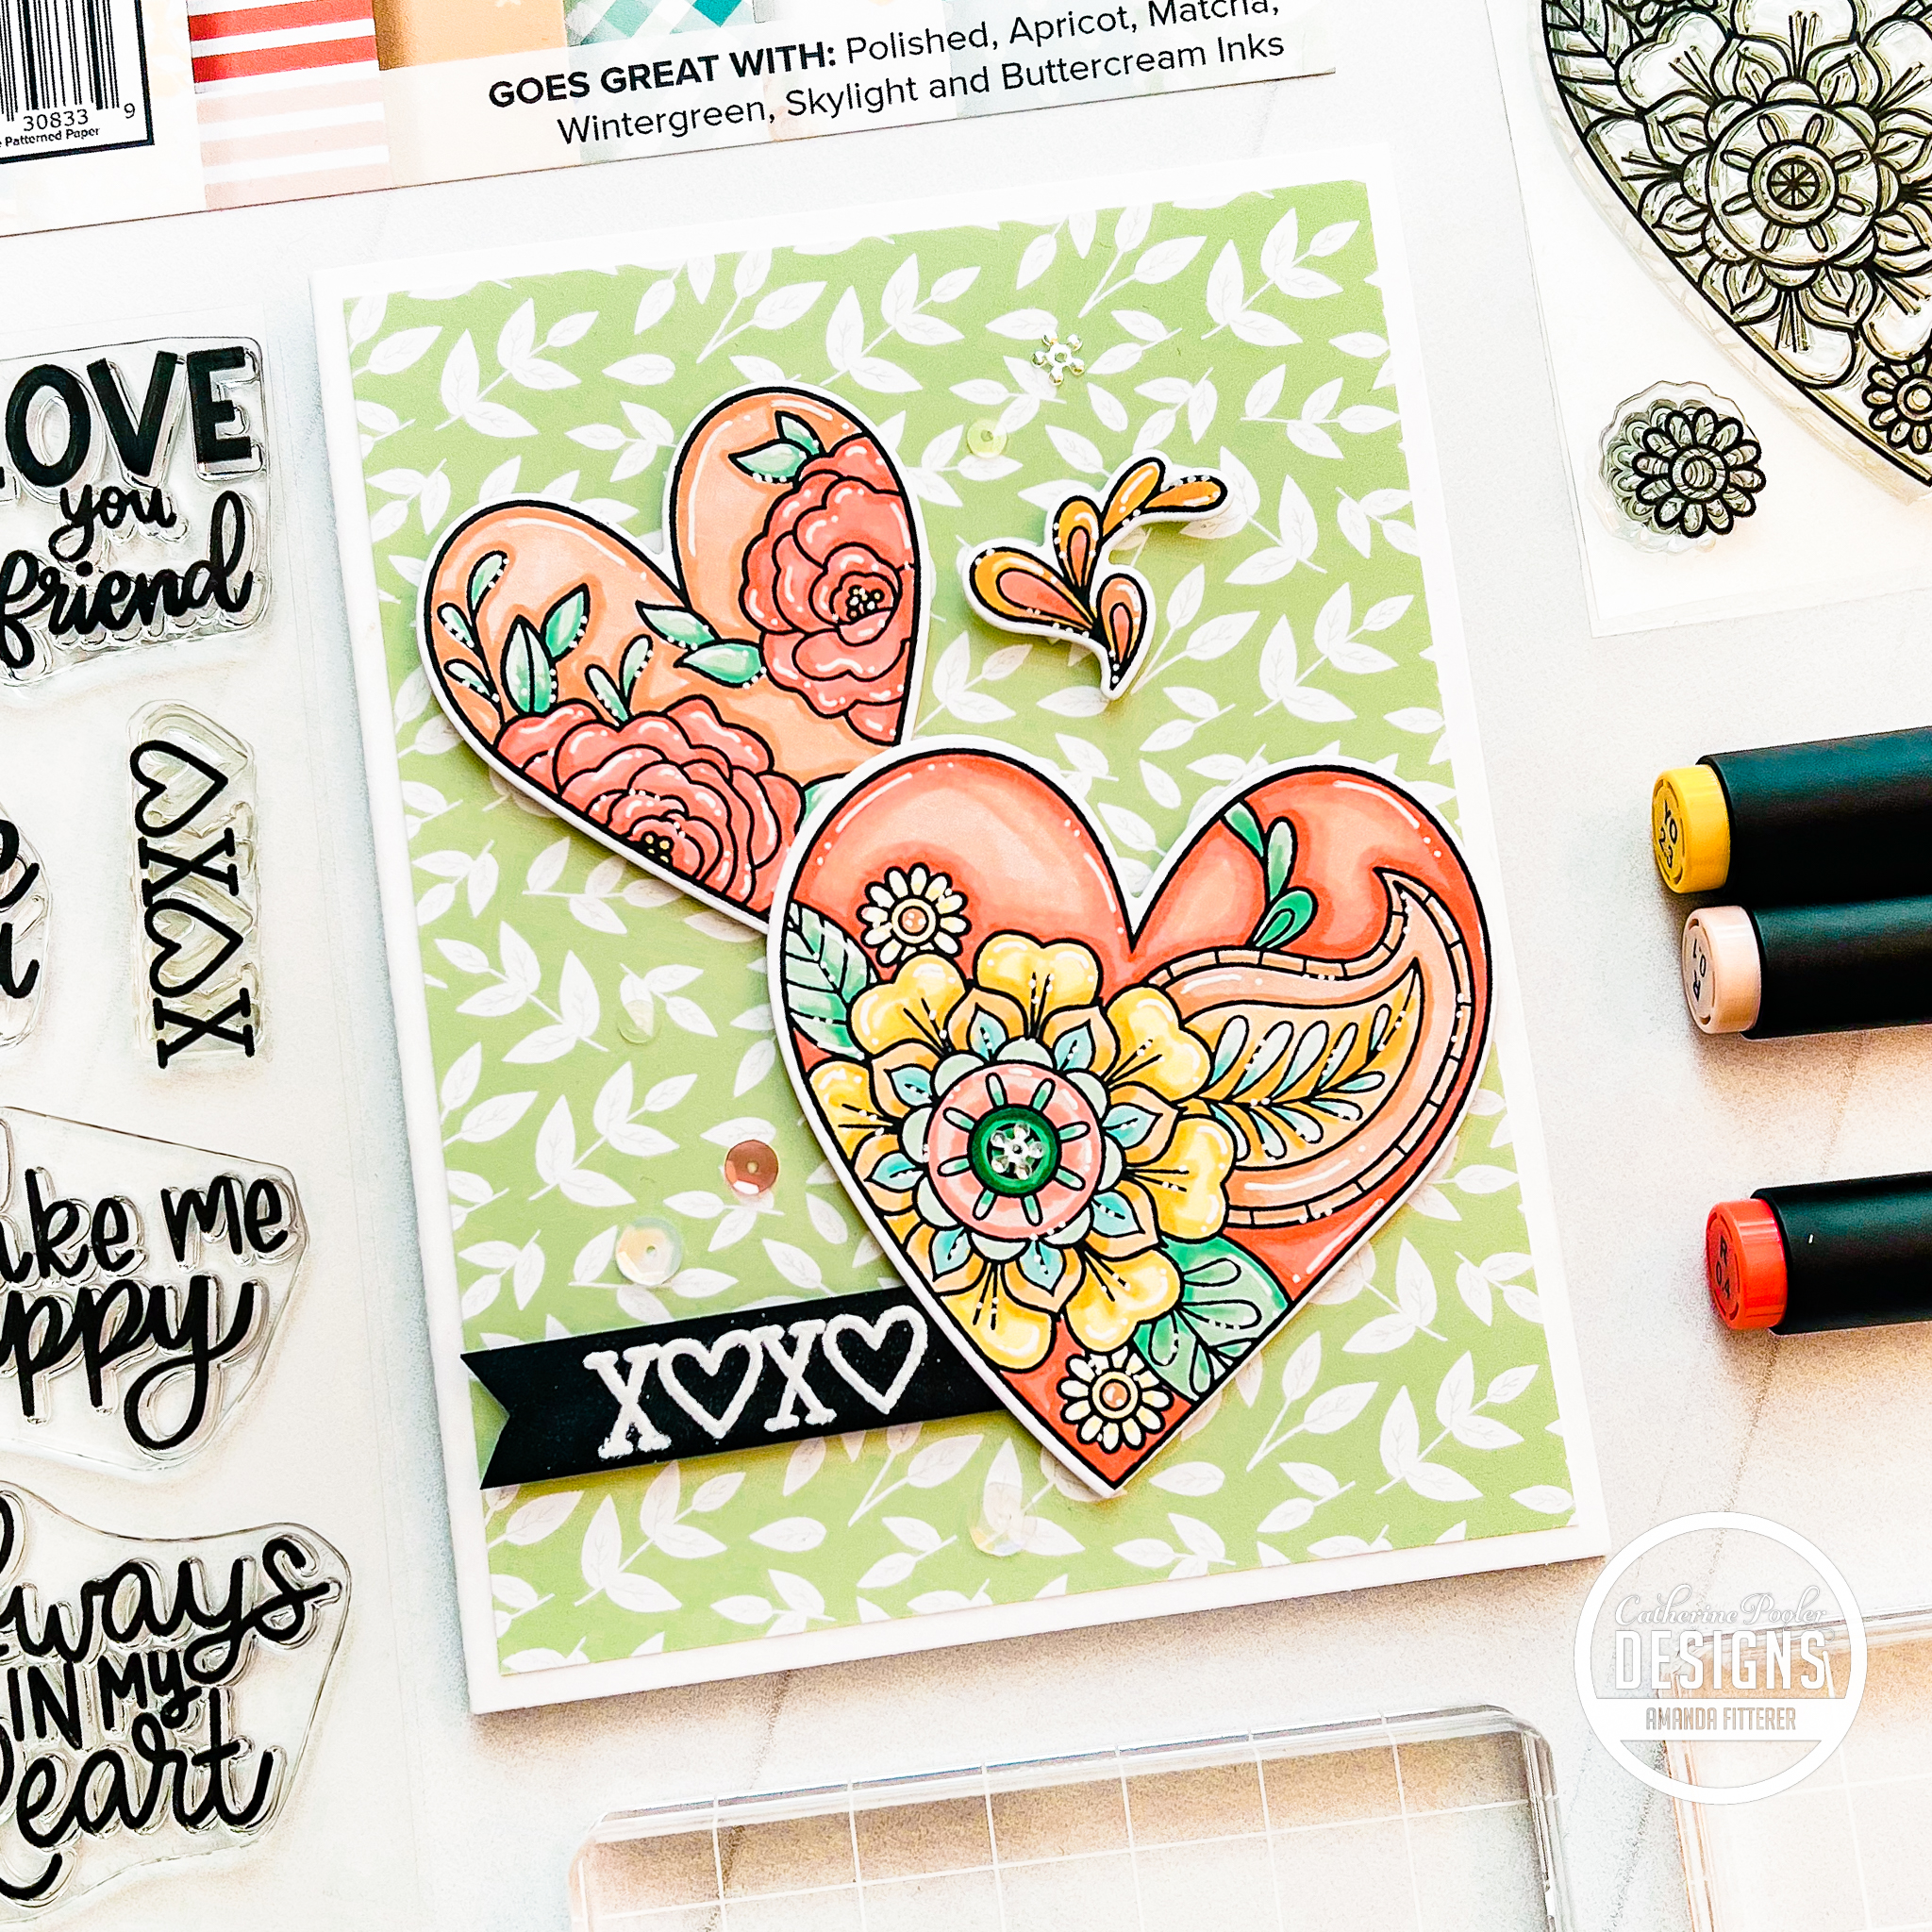
Hey friends! How do we feel about the color purple?? I tend to lean towards the pinks and yellows for my cards, for whatever reason. However, I am loving this color combo of Sixteen Candles, Pixie Dust, and Drive-In! What do you think??
Today, I am sharing a new card using the NEWLY RELEASED Love and Lace Collection from Catherine Pooler!
Thanks for using my affiliate links! You all are the BEST! Using an affiliate link in this post above or down below costs you nothing, but it gives me a teeny percentage of your sale to buy more crafty goodies to continue to share card tutorials with YOU! So, thank YOU! Xx, Amanda
Thanks for using my affiliate links! You all are the BEST! Using an affiliate link in this post above or down below costs you nothing, but it gives me a teeny percentage of your sale to buy more crafty goodies to continue to share card tutorials with YOU! So, thank YOU! Xx, Amanda
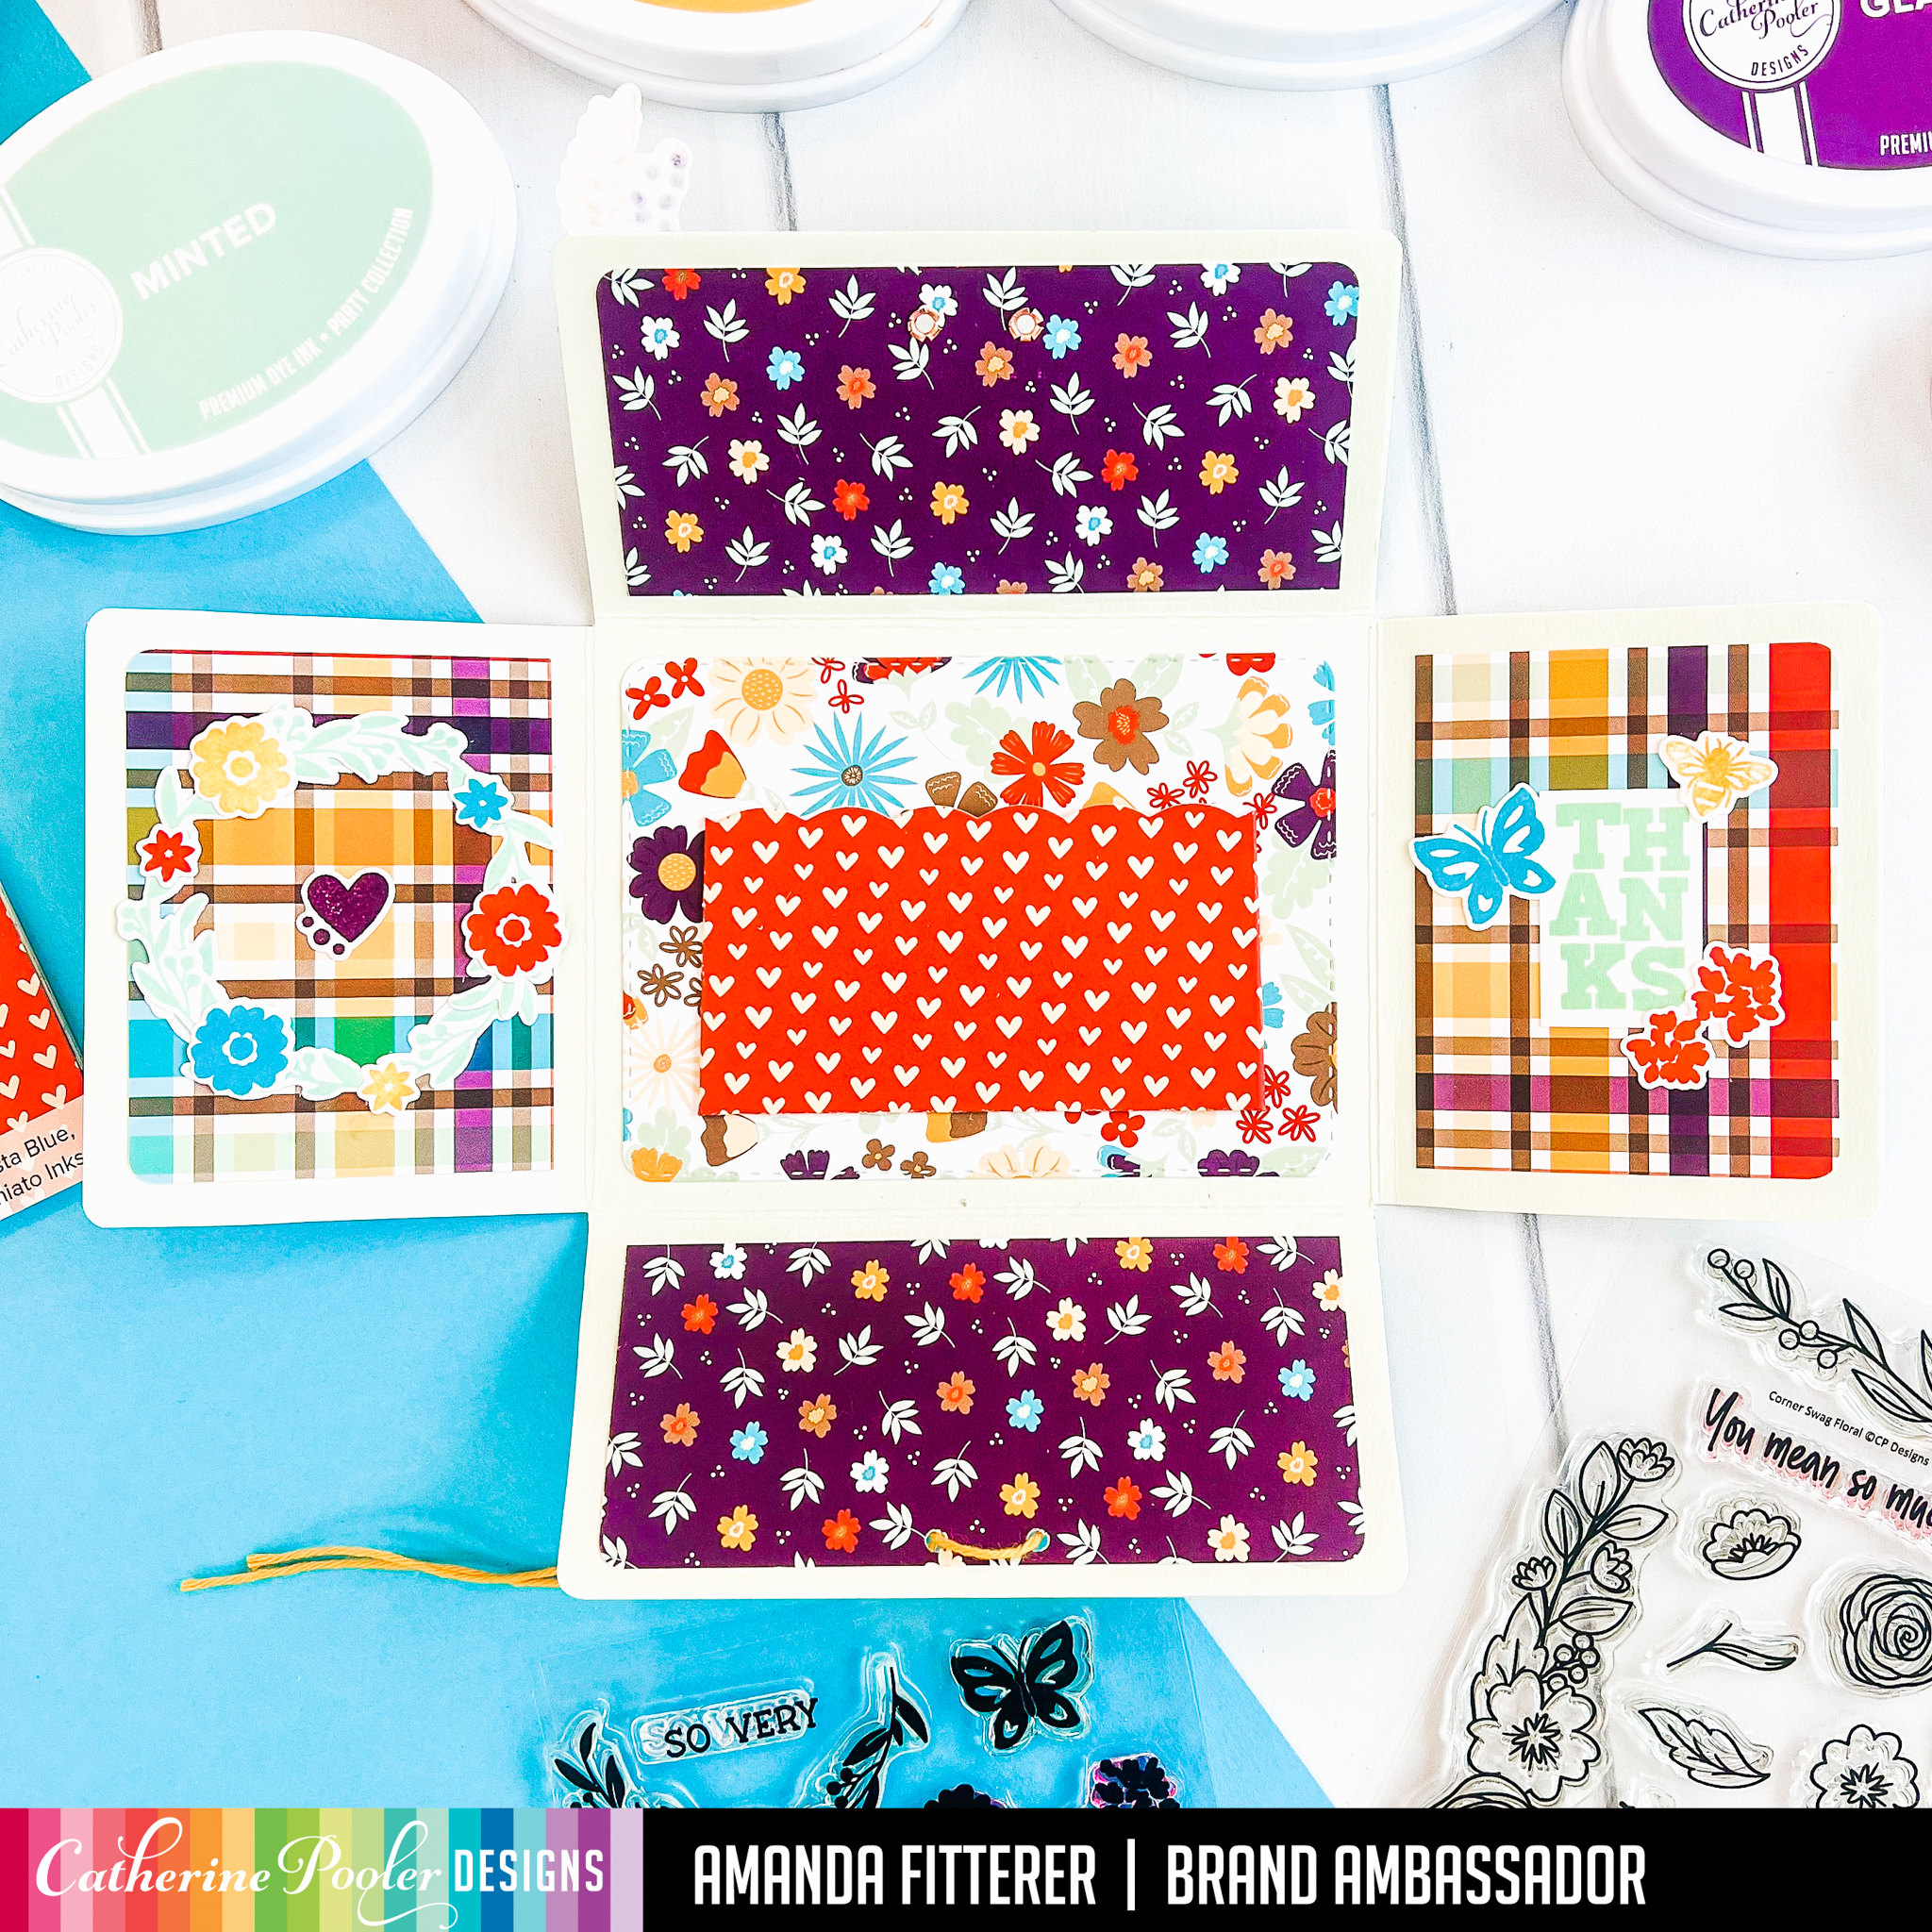
Hey friends! Did you come to learn how to make this gift card holder? It’s SO easy to make! Craft along with me! Grab your scoring board and bone folder, a piece of 8.5″x11″ cardstock, some patterned paper, some stamp sets and some dies!
Start by creating your pocketfold out of 8.5″x11″ cardstock and your scoring board. On the longer edge, score at 3″ and 8″. Turn the paper 90 degrees and score the shorter edge at 2 3/8″ and 6 1/8″. Using scissors, cut your corners off completely. Fold and score on the remaining score lines. Use a corner punch to round your corners.
Now, you can decorate your pocketfold! Use patterned paper, such as the Bee Thankful Paper Pad! I also used the Ruffles and Dashes Dies to add a stitched border to my inside paper.
Don’t forget to decorate both sides!
Now, let’s make the gift card holder pocket. Using the 2nd smallest scallop frame from the Ruffles and Dashes Dies, cut out a piece of patterned cardstock. You want the inside of your pocket to be 2″ x 3.5″. Make a score line on your sides at 3/4″. Trim off the bottom so you’re left with 2 3/4″. Score the bottom so you have a 3/4″ flap. Use scissors to angle cut the 2 bottom corners.
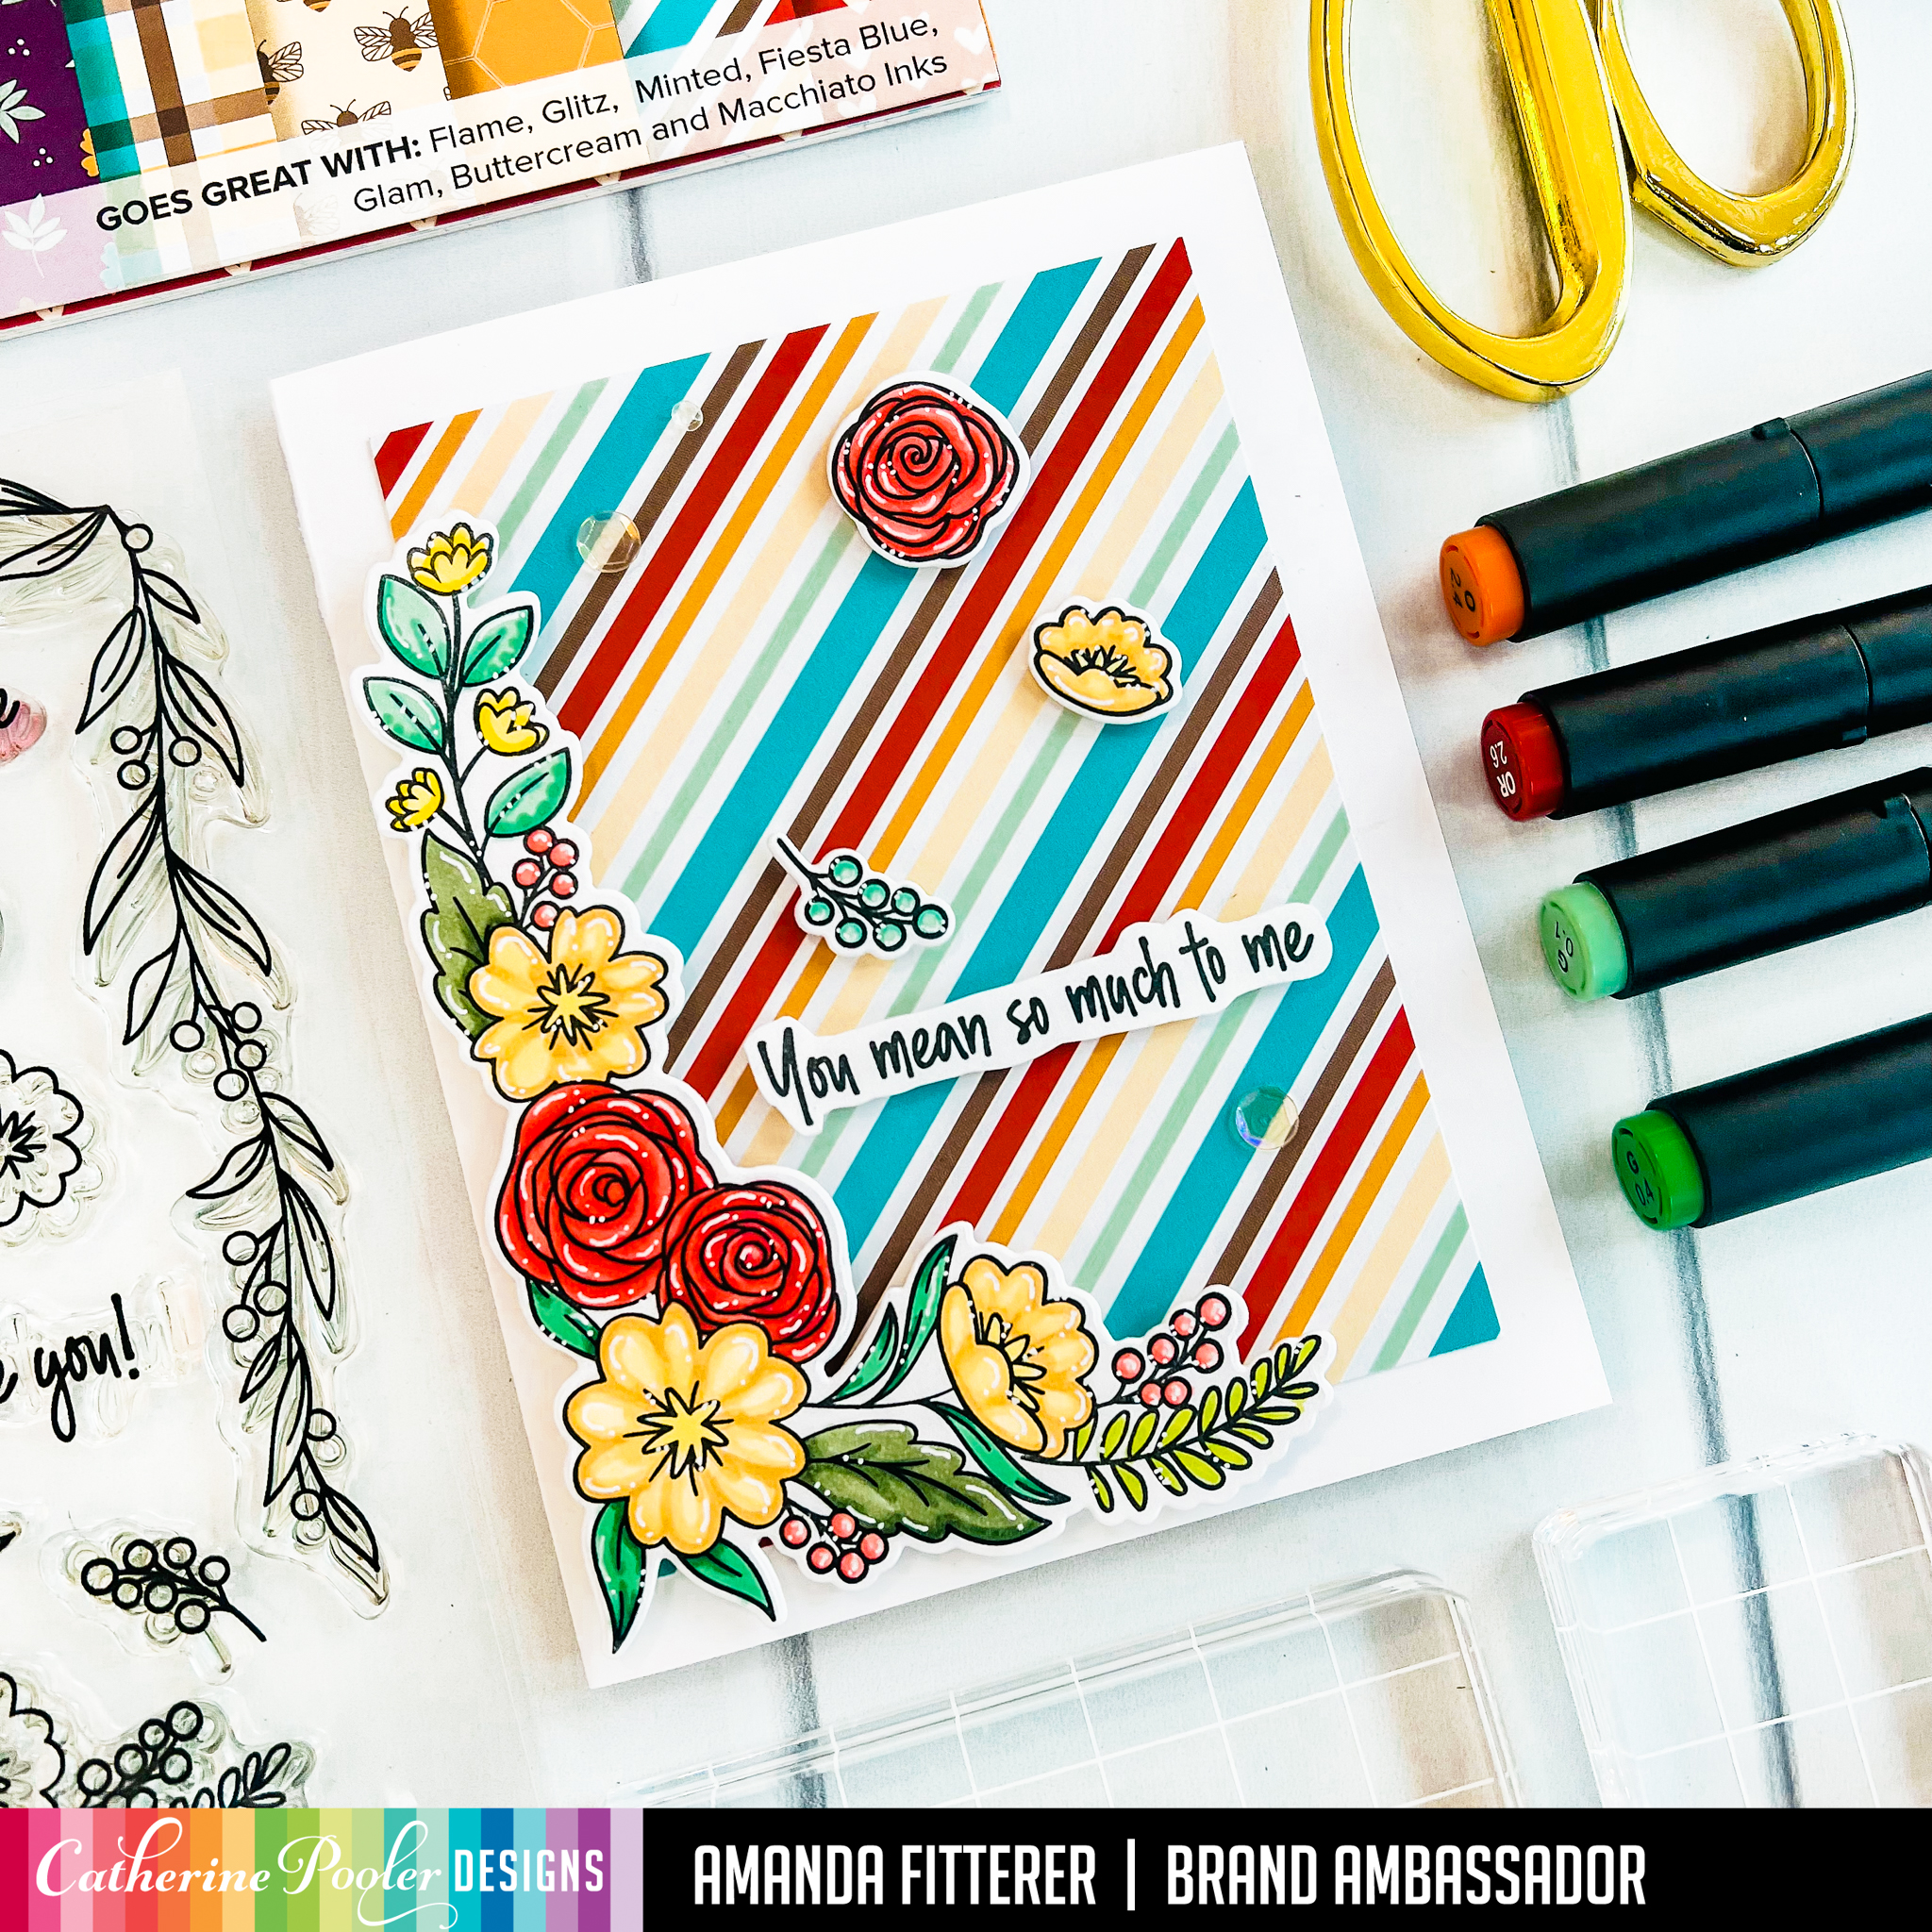
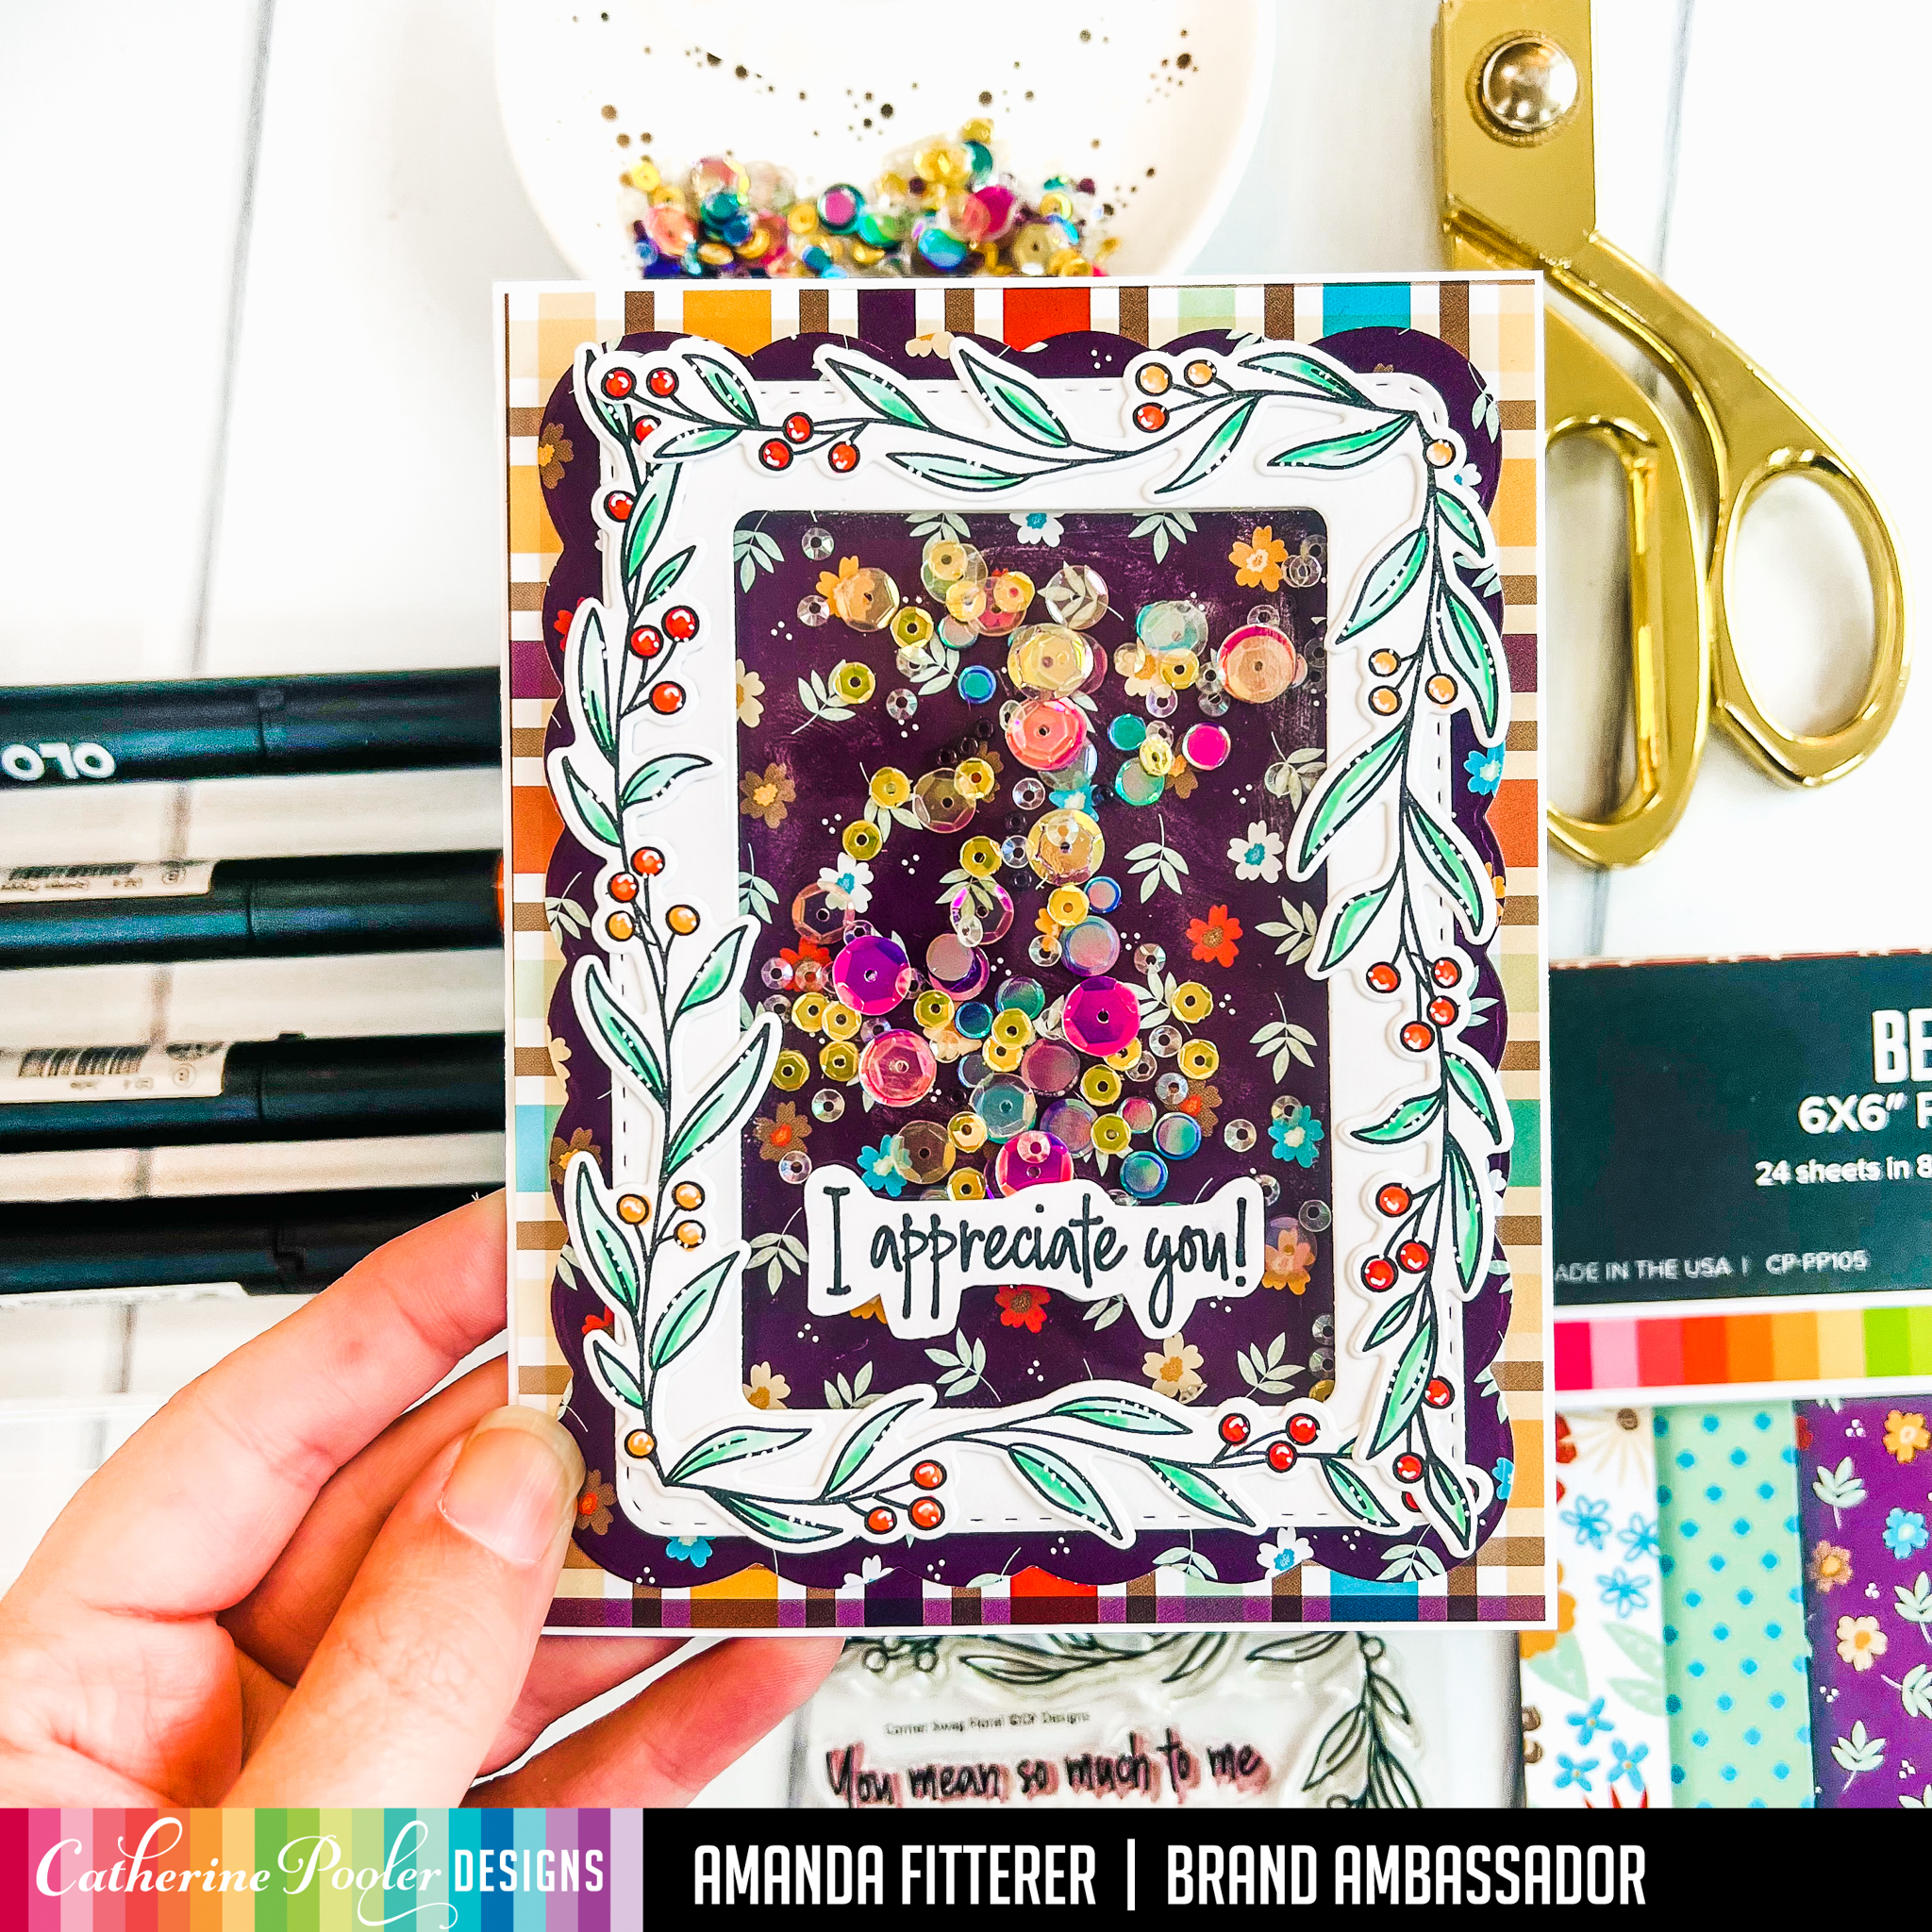
Now create some decorations! I used the Corner Swag Stamp Set and the Thank You Kindle Stamp Set. I used OLO markers to color in my stamped images and a Gelly Roll pen to create my highlights. I cut out the stamped images with the coordinating die sets.
To hold my pocketfold together, I punched 2 holes on the front flap and the bottom flap and threaded through some Torch Twine.
Stay tuned as I continue to share more projects made using this New Collection!
Thanks for using my affiliate links! You all are the BEST! Using an affiliate link in this post above or down below costs you nothing, but it gives me a teeny percentage of your sale to buy more crafty goodies to continue to share card tutorials with YOU! So, thank YOU! Xx, Amanda
Do you always find yourself wishing for some easy and versatile “Thank You” stamp sets? The new Catherine Pooler Thank You Kindly Bundle is an excellent bundle for creating appreciation cards!
Thanks for using my affiliate links! You all are the BEST! Using an affiliate link in this post above or down below costs you nothing, but it gives me a teeny percentage of your sale to buy more crafty goodies to continue to share card tutorials with YOU! So, thank YOU! Xx, Amanda
Hey friends!! Did you see that Catherine Pooler’s New Release is available for purchase now if you’re a StampNation Member? If you’re not a StampNation member, you can purchase the new release TOMORROW!
Thanks for using my affiliate links! You all are the BEST! Using an affiliate link in this post above or down below costs you nothing, but it gives me a teeny percentage of your sale to buy more crafty goodies to continue to share card tutorials with YOU! So, thank YOU! Xx, Amanda
Thanks for using my affiliate links! You all are the BEST! Using an affiliate link in this post above or down below costs you nothing, but it gives me a teeny percentage of your sale to buy more crafty goodies to continue to share card tutorials with YOU! So, thank YOU! Xx, Amanda
To create this fun card, I blended Twilight and Blackjack Inks and then spritzed the background with water. Next, I stamped my chalkboard menu from the Coffee Shop Stamp Set with WOW! Clear Glue ink. I applied white embossing powder and then melted it with a heat gun. I die cut it using the Coffee Shop Dies.
Stay tuned as I continue to share more projects made using this New Collection!
Thanks for using my affiliate links! You all are the BEST! Using an affiliate link in this post above or down below costs you nothing, but it gives me a teeny percentage of your sale to buy more crafty goodies to continue to share card tutorials with YOU! So, thank YOU! Xx, Amanda
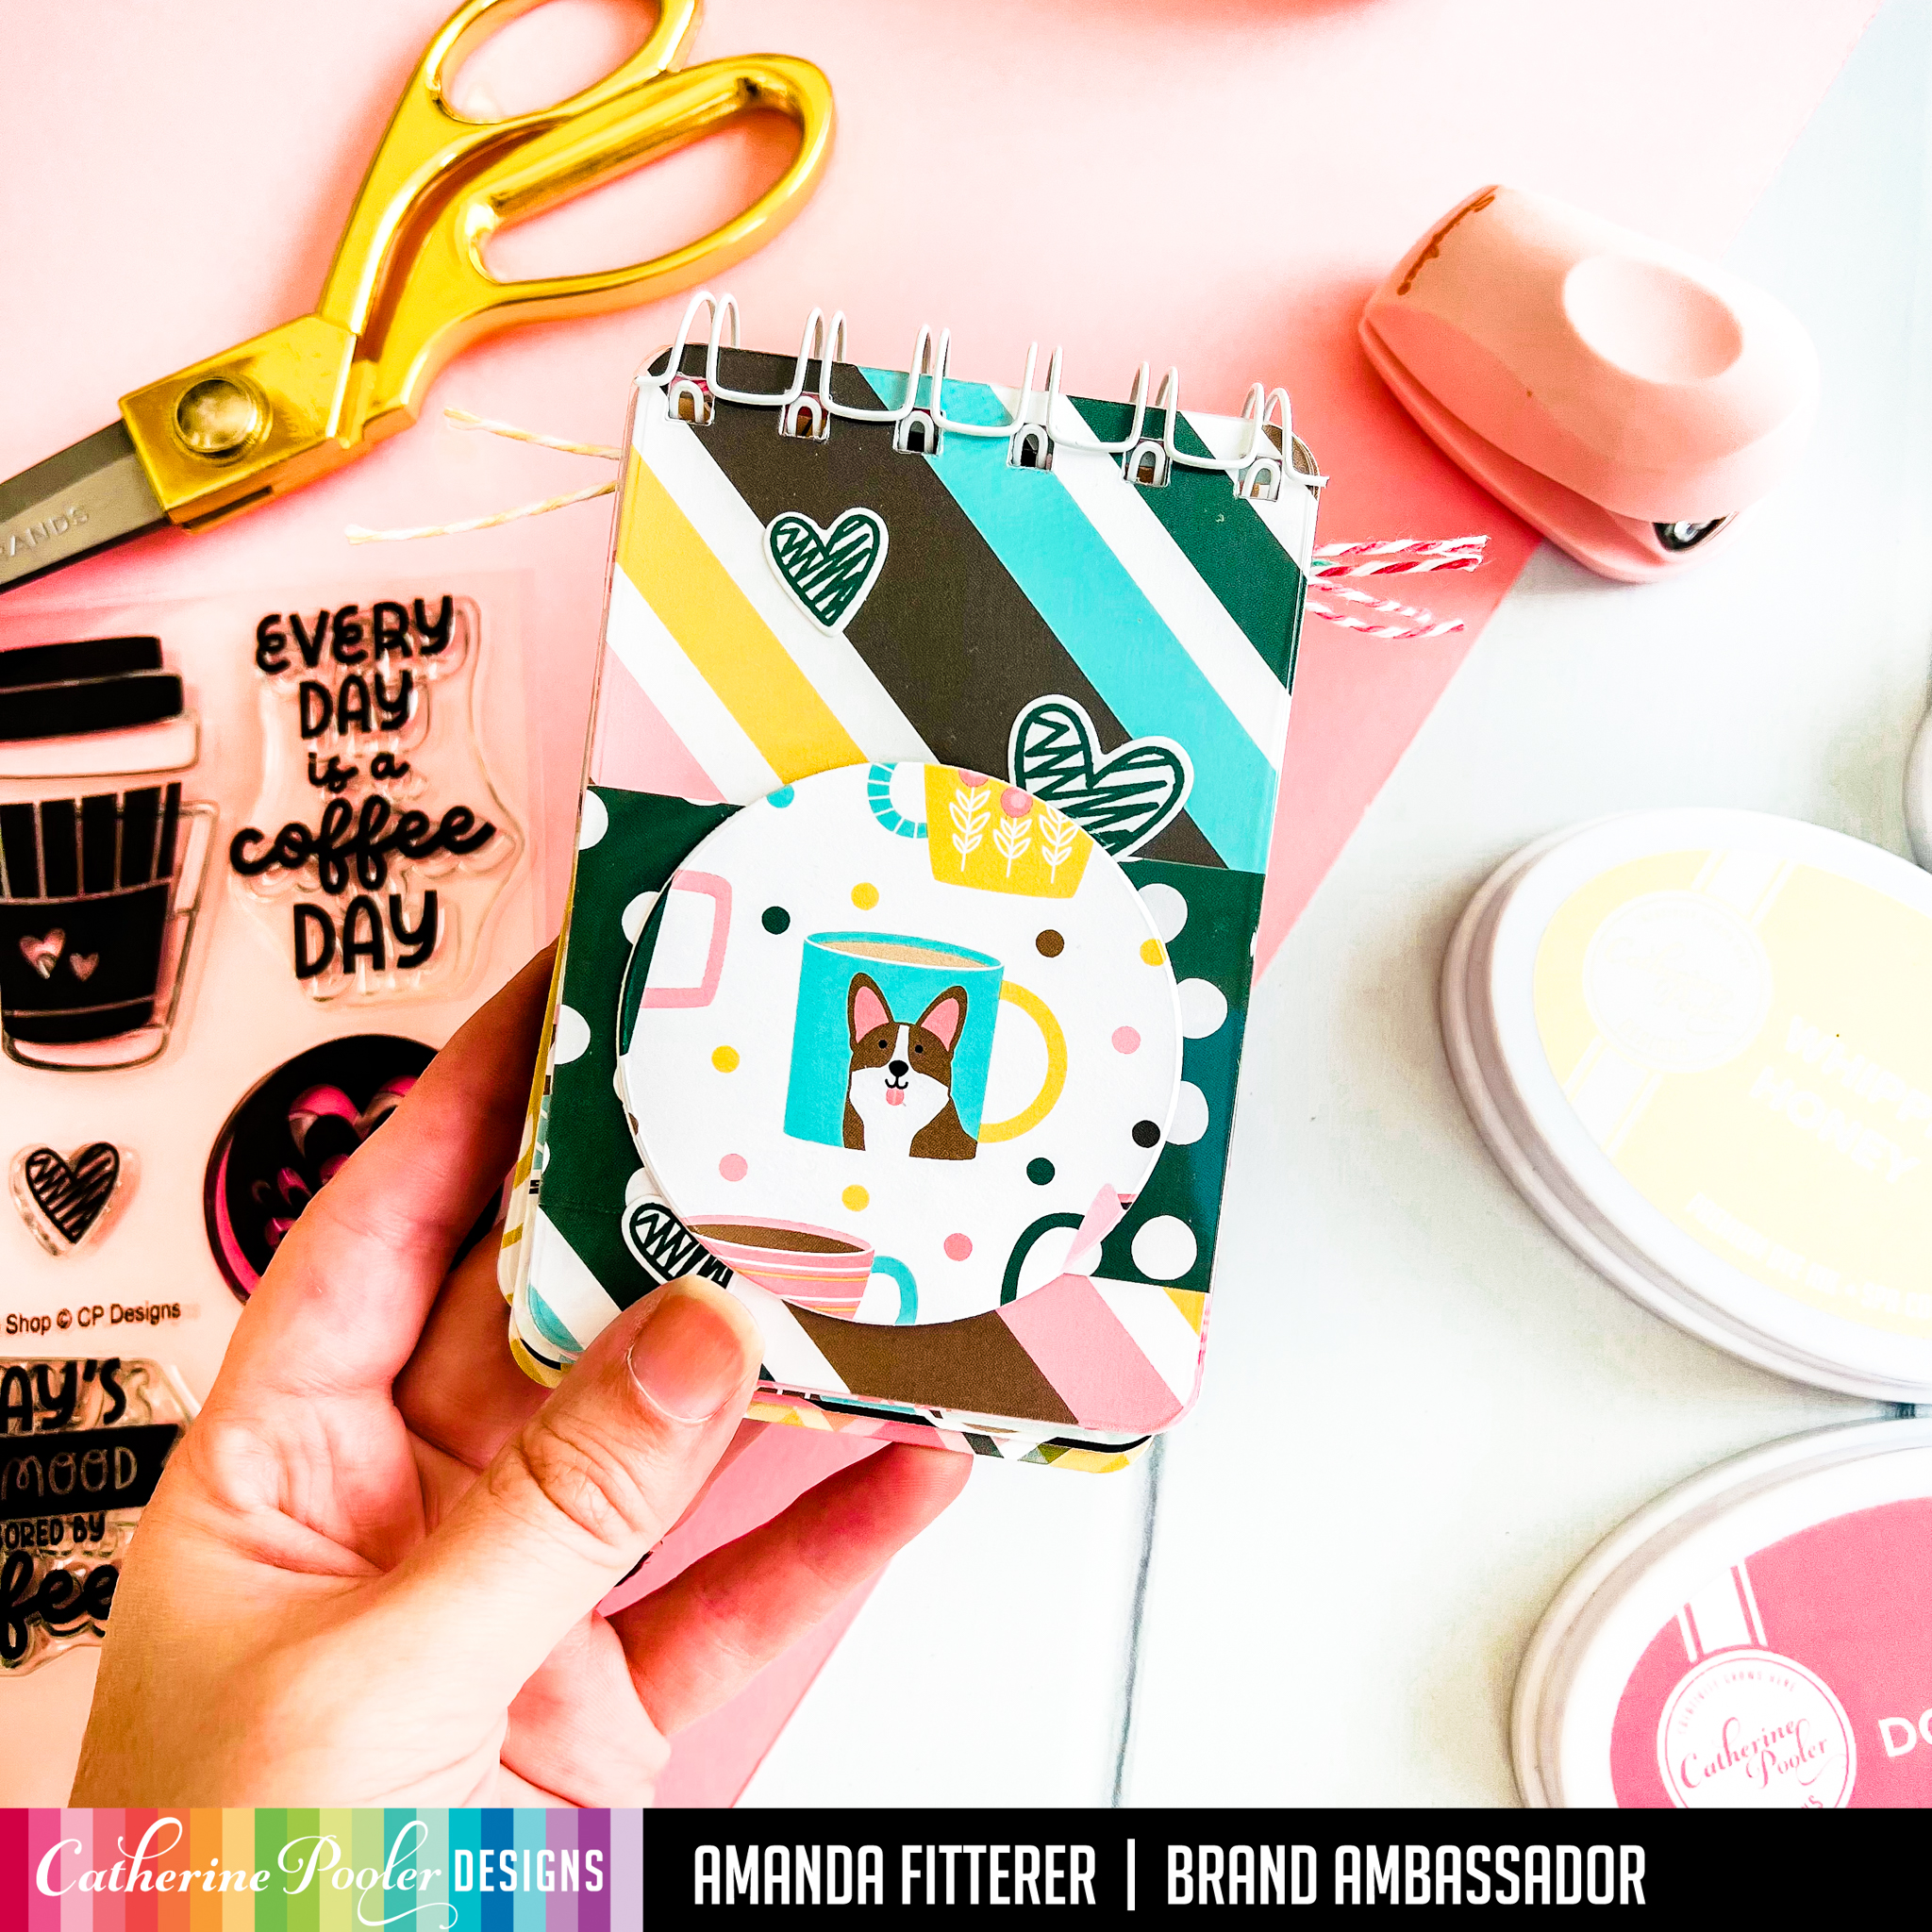
Do you love coordinating your envelopes with your cards? The new Java Fix 12×12 Paper Pad is the perfect size for creating envelopes using the Notecard Envelope Dies! This paper is part of the Coffee Shop New Release that is available now in the Catherine Pooler shop!!
Thanks for using my affiliate links! You all are the BEST! Using an affiliate link in this post above or down below costs you nothing, but it gives me a teeny percentage of your sale to buy more crafty goodies to continue to share card tutorials with YOU! So, thank YOU! Xx, Amanda
Do you love 12×12 paper?! You’re in luck! Catherine Pooler has just released this gorgeous Java Fix 12×12 Paper Pad! This paper is part of the Coffee Shop New Release that is available now in the Catherine Pooler shop!!
As always, thanks for using my affiliate links. It costs you nothing, but it gives me a teeny percentage of your sale to buy more crafty goodies to continue to share card tutorials with YOU! So, thank YOU! Xx, Amanda
Hey crafty friends! In case you missed it, the Coffee Shop New Release is available now in the Catherine Pooler shop!! Please feel free to shop with my affiliate link (you know it’s SOO appreciated).
As always, thanks for using my affiliate links. It costs you nothing, but it gives me a teeny percentage of your sale to buy more crafty goodies to continue to share card tutorials with YOU! So, thank YOU! Xx, Amanda
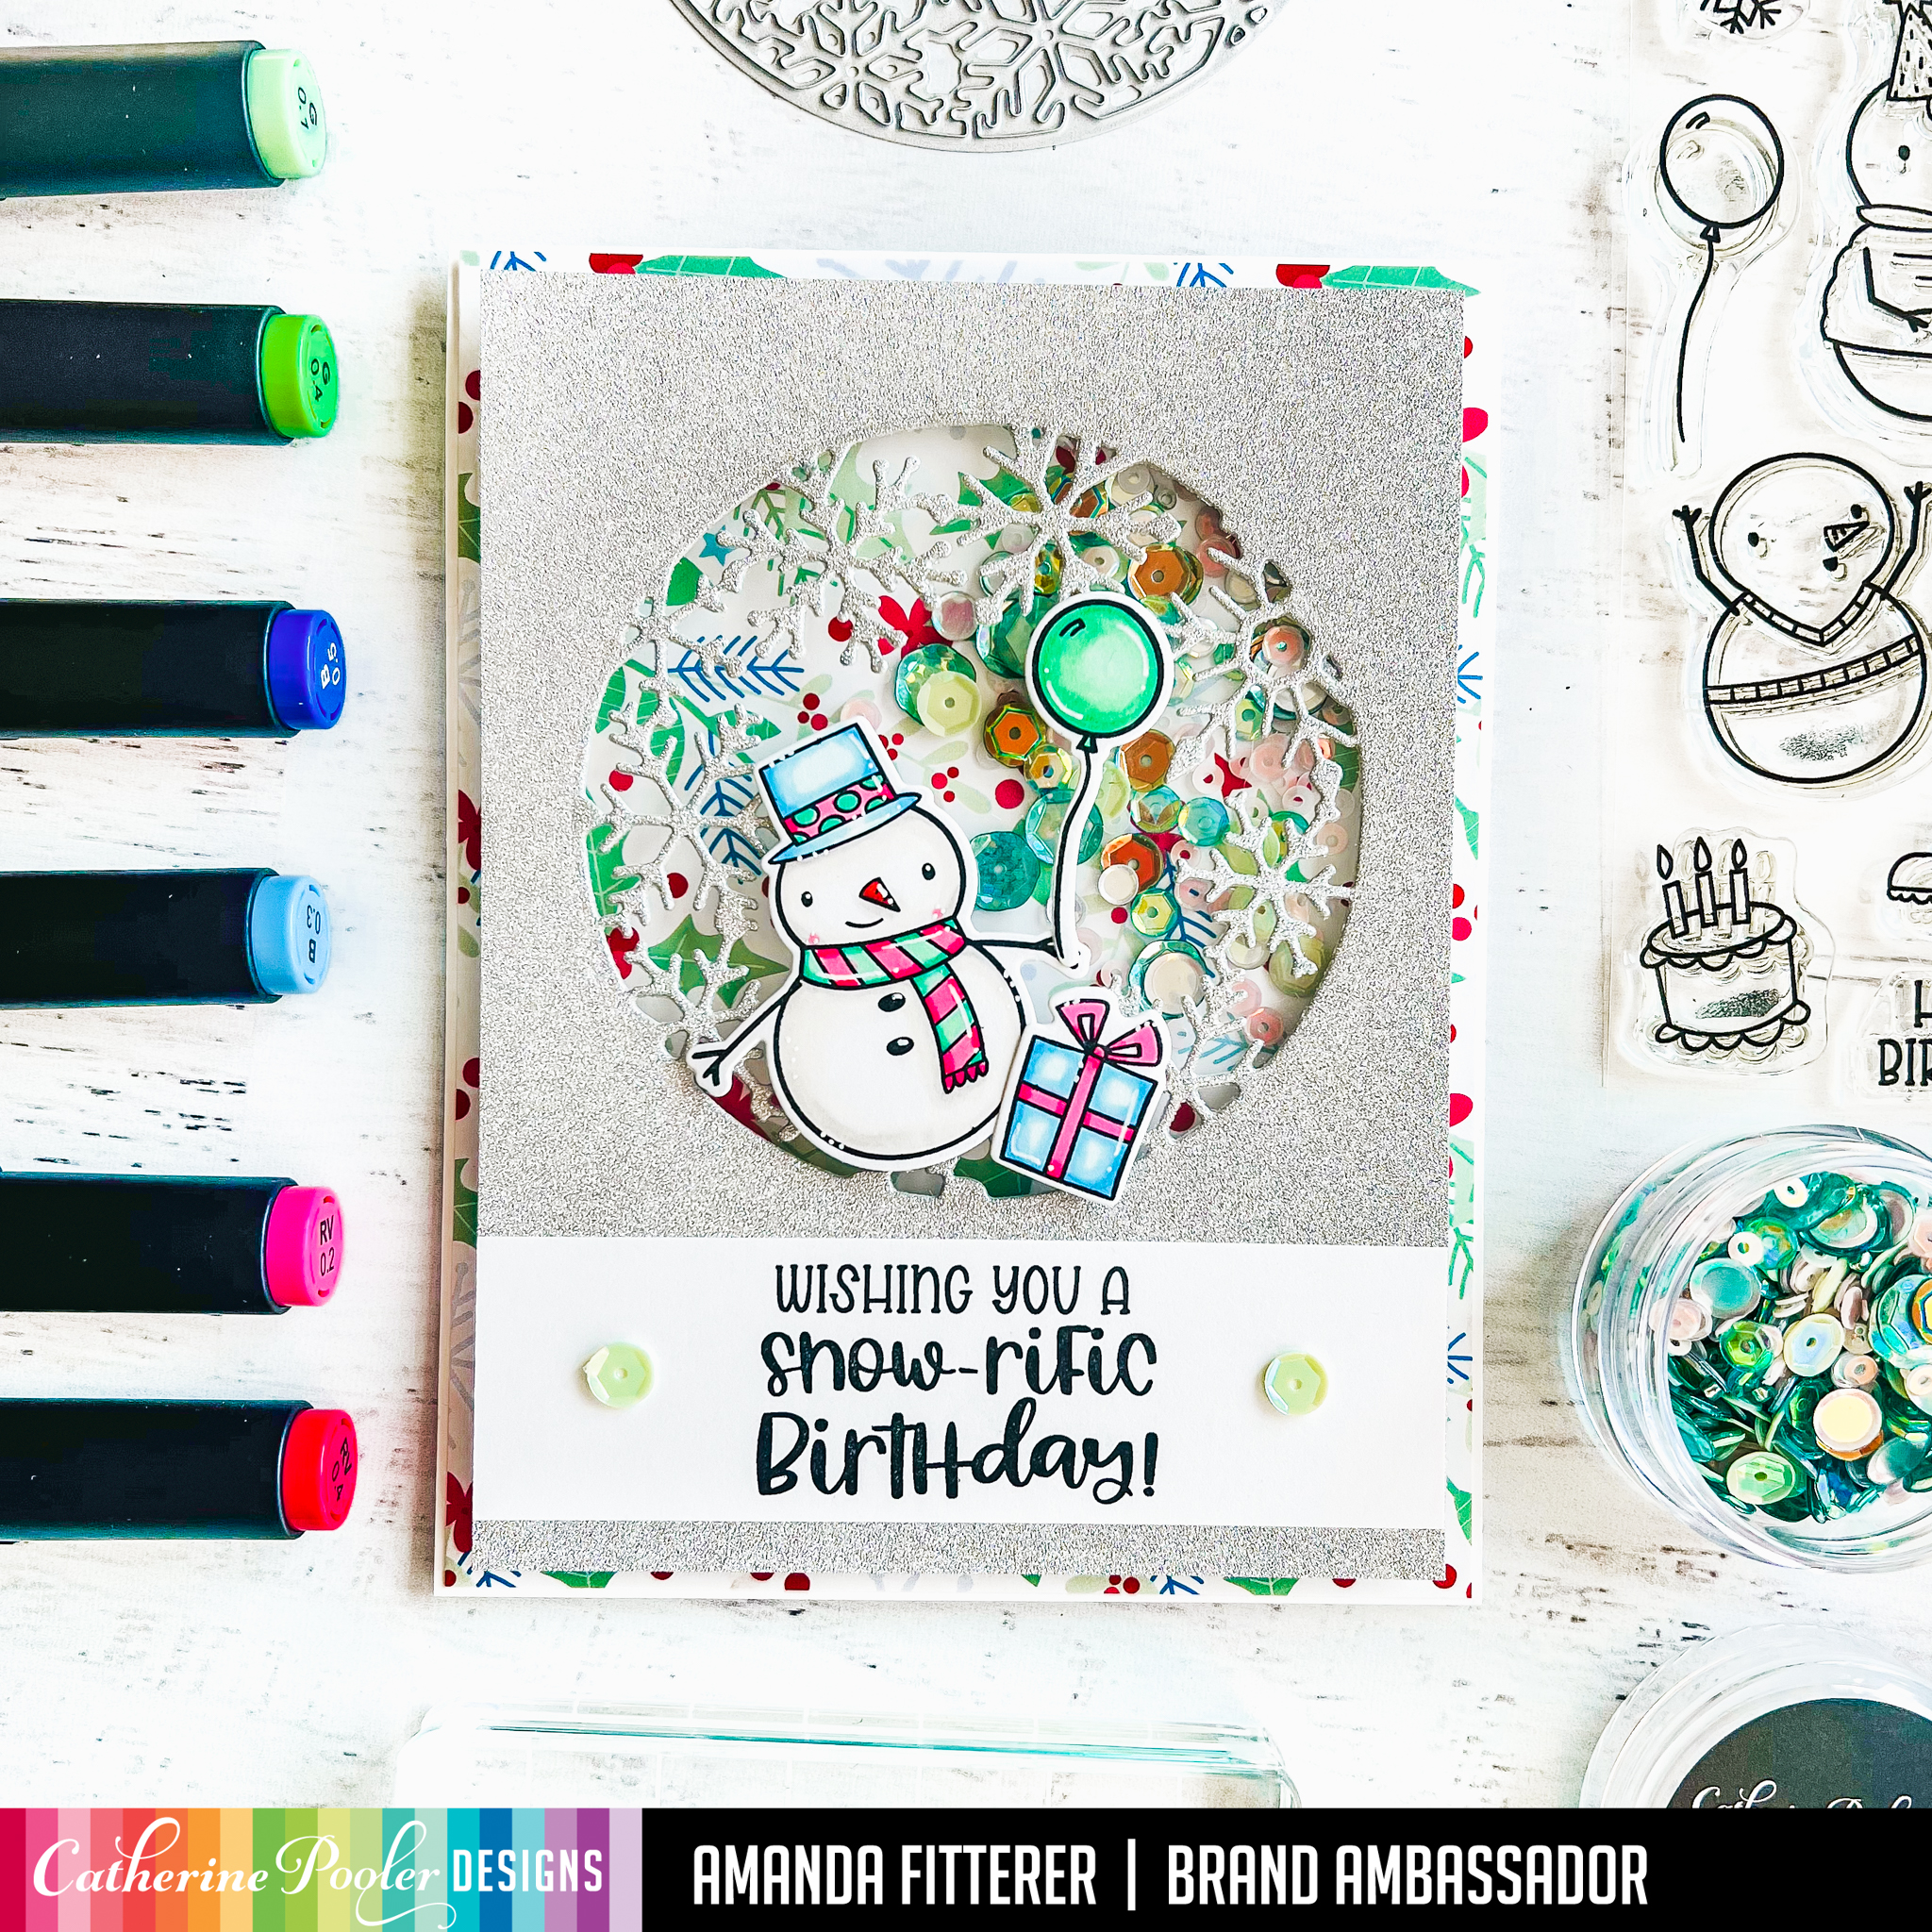
Hey crafty friends! The Snow-rific Birthday Collection is available now!! Please feel free to shop with my affiliate link (you know it’s SOO appreciated). If you want the ENTIRE Collection, click here.
For this card, I used a bunch of new products, including: Snow-rific Party Stamp Set, Snow Many Flakes Dies, the Snow Day Birthday Patterned Paper, and the Frosted Window Die!
Stay tuned as I continue to share more cards made using this New Collection!
As always, thanks for using my affiliate links. It costs you nothing, but it gives me a teeny percentage of your sale to buy more crafty goodies to continue to share card tutorials with YOU! So, thank YOU! Xx, Amanda