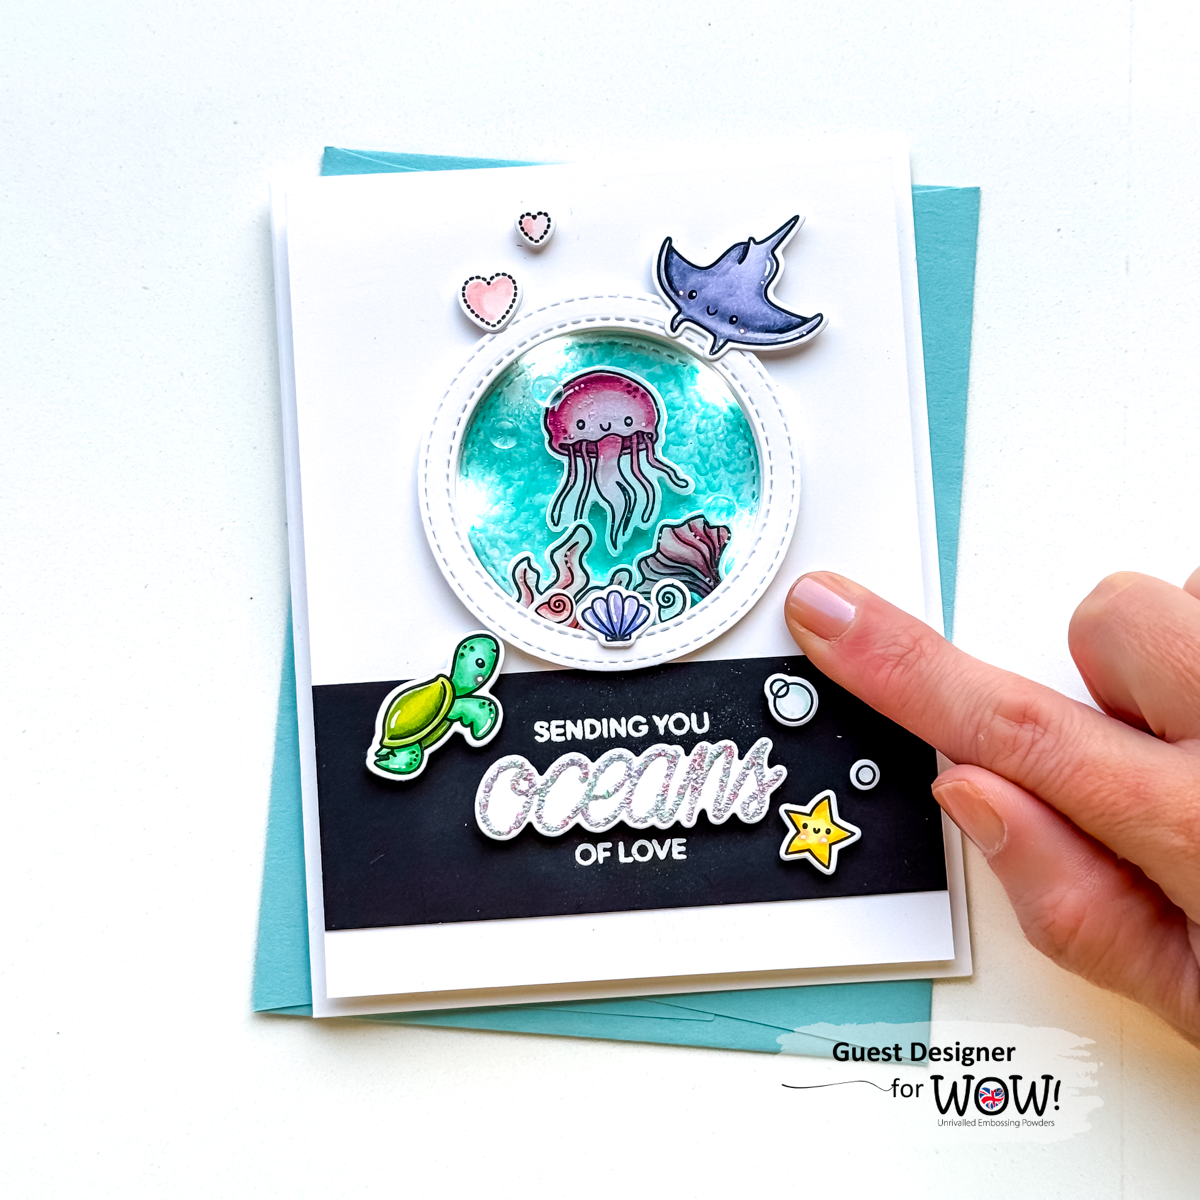
Oh my gosh, guys!! Did you see all the amazing new powders, sparkles, and foils WOW! just released?! Holy moly! You can see all the products here. Keep scrolling to see some fun cards I made!
Here are some of the cards I made using the NEW Hot Foils! The Black Glass is gorgeous and so fun to use! Also, do you see the new Silver Squares sparkles?! It comes in 2 sizes!
For these cards, I used the new Sahara sparkles! This color is BY FAR my favorite in this release!! For the top card, I applied the glitter on top of a mixed media paste. For the bottom card, I mixed it into the paste! I love the 2 different looks with the same products!
For this stunning shaker card, I used the Mixed Media Embossing Brush and a stiff paint brush. I brushed on some of the glue and then applied Ray of Sunshine embossing powder. I used my heat tool to melt the powder. Then I applied more of the glue, and applied Primary Indigo Ultra High, and melted that powder. I repeated the process with Violet Aurora and Bordeaux. I used the Ray of Sunshine for the sentiment as well! What a gorgeous mix of colors!!
I used a similar technique for this card! I applied the glue a little thicker (using the brush it comes with.). I applied Primary Indigo Ultra High and Pastel Pearl Mist Ultra High. As I was melting the powders with my heat gun, I used my fingers to sprinkle a little bit of the opposite powder.
I have a few more really cool cards I made on my Instagram feed, if you want to go check them out! Click on the photo to see the post!
I hope you got some crafty inspiration from this post!! You can shop all the WOW! New Release here.
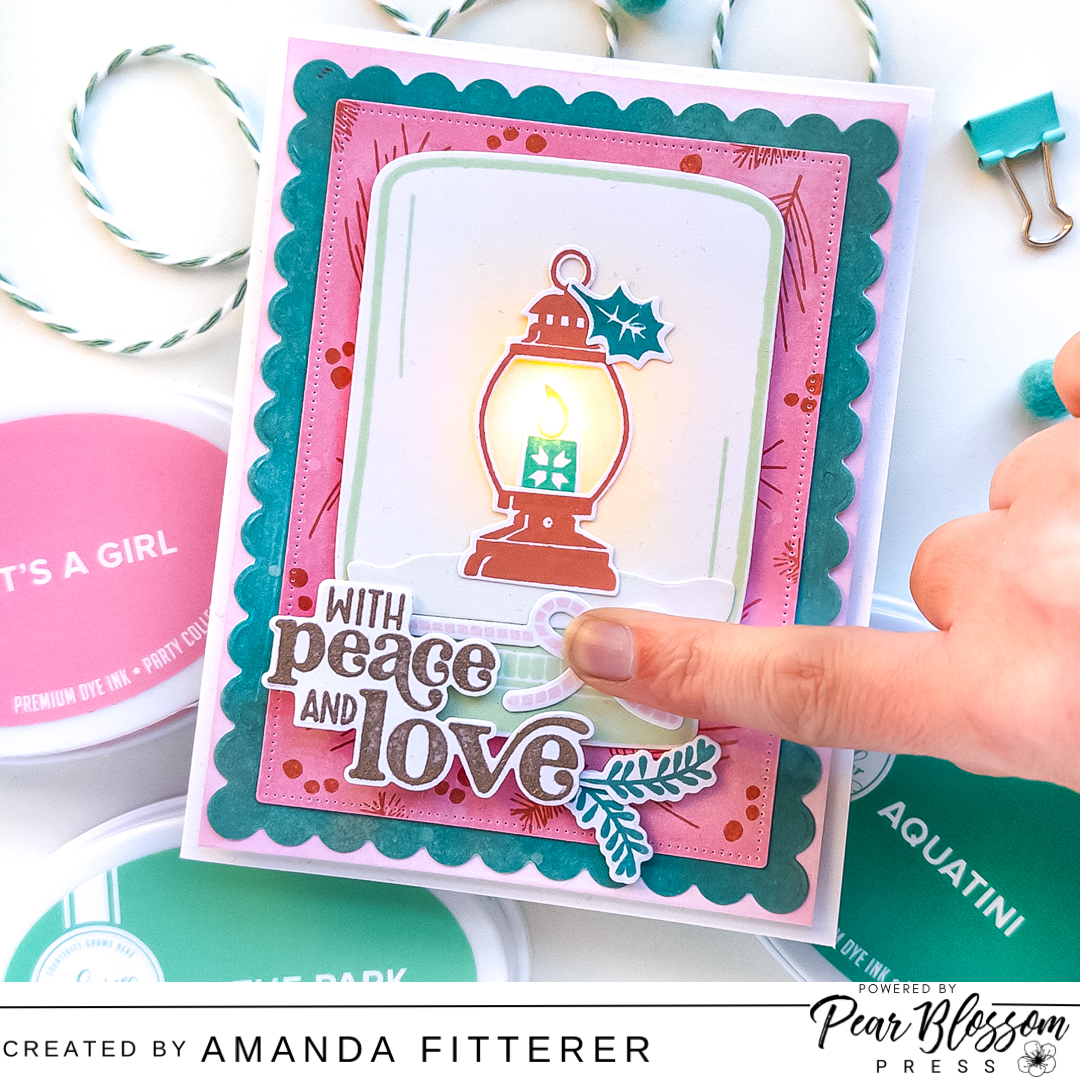
Hey friends! Today, we’re kicking off a CRAFTY Collaboration Blog Hop with Pear Blossom Press and Heffy Doodle ! Come hop along with us and see some awesome light-up cards! Plus, each company will be giving away £20/$25 PRIZES! All you have to do to be entered to win is to leave a comment at each stop along our Hop Lineup before May 29th at 11:59 PM EDT. Winners will be announced on the Pear Blossom Press & Heffy Doodle Blogs on 5.31.24! Scroll down for the Blog Hop Lineup!
On a plain piece of white cardstock, I used some Heffy Memo Tape to mask off the top half of the card. I ink blended Catherine Pooler’s Wintergreen ink. Then, I removed the Heffy Memo Tape and ink blended the bottom half of the card. I stamped my sentiments – one from the Koality Hugs stamp set and one from the PRESS Stamp and Die Bundle.
Next, I stamped all of my images from the Koality Hugs stamp set and colored them with Copic markers. Then, I die cut them out using the coordinating dies.
Now, I can make the card light up! I poked a hole through my koala where I wanted him to light up. Then, I placed him on the card where he’ll chill permanently. I, then, made a mark where the light should go.
Then, I used double sided tape to adhere my Pear Blossom Press One Light where my pencil mark was. Then, I used the World’s Best Foam Tape all over the card base. This tape is the same depth as the EZ-Lights battery component. (This will keep the light from sticking out.)
Then, I assembled the rest of the card using liquid glue and 3D foam squares.
Don’t forget: If you’re a Catherine Pooler StampNation member, you get EARLY ACCESS to every new release (plus SOOO many other benefits)! Sign up now! It’s worth it!
👇🏻👇🏻 Subscribe 👇🏻👇🏻 to be alerted of new posts by yours truly!
Once I got all of that stamped, die cut, and assembled, I created a flame for my candle using the PB Press Stamp and Die Combo.
Next, I popped a One Light out of the Halo Light Combo. I inserted a battery (that comes with the combo!) and tested my light to ensure my battery was placed properly. Then, on my A2 card base, I placed my assembled front panel on top and made a pencil mark inside the flame so I know where my light needs to be.
I placed my One Light where I wanted it to be and secured it using double sided tape. Next, I placed some World’s Best Foam Tape around the entire card base (leaving a border). Then, I attached my front panel to the card!
Here’s a photo of the card with the light off.
And, with a simple push of a button… Voila! Light!
This is definitely a super special card for someone to receive this Christmas!
Thank you SOOO much for stopping by my blog today!! I hope you enjoyed this post and will subscribe below to see more posts from me! Xx, Amanda
Thanks for using my affiliate links! You all are the BEST! Using an affiliate link in this post above or down below costs you nothing, but it gives me a teeny percentage of your sale to buy more crafty goodies to continue to share card tutorials with YOU! So, thank YOU! Xx, Amanda
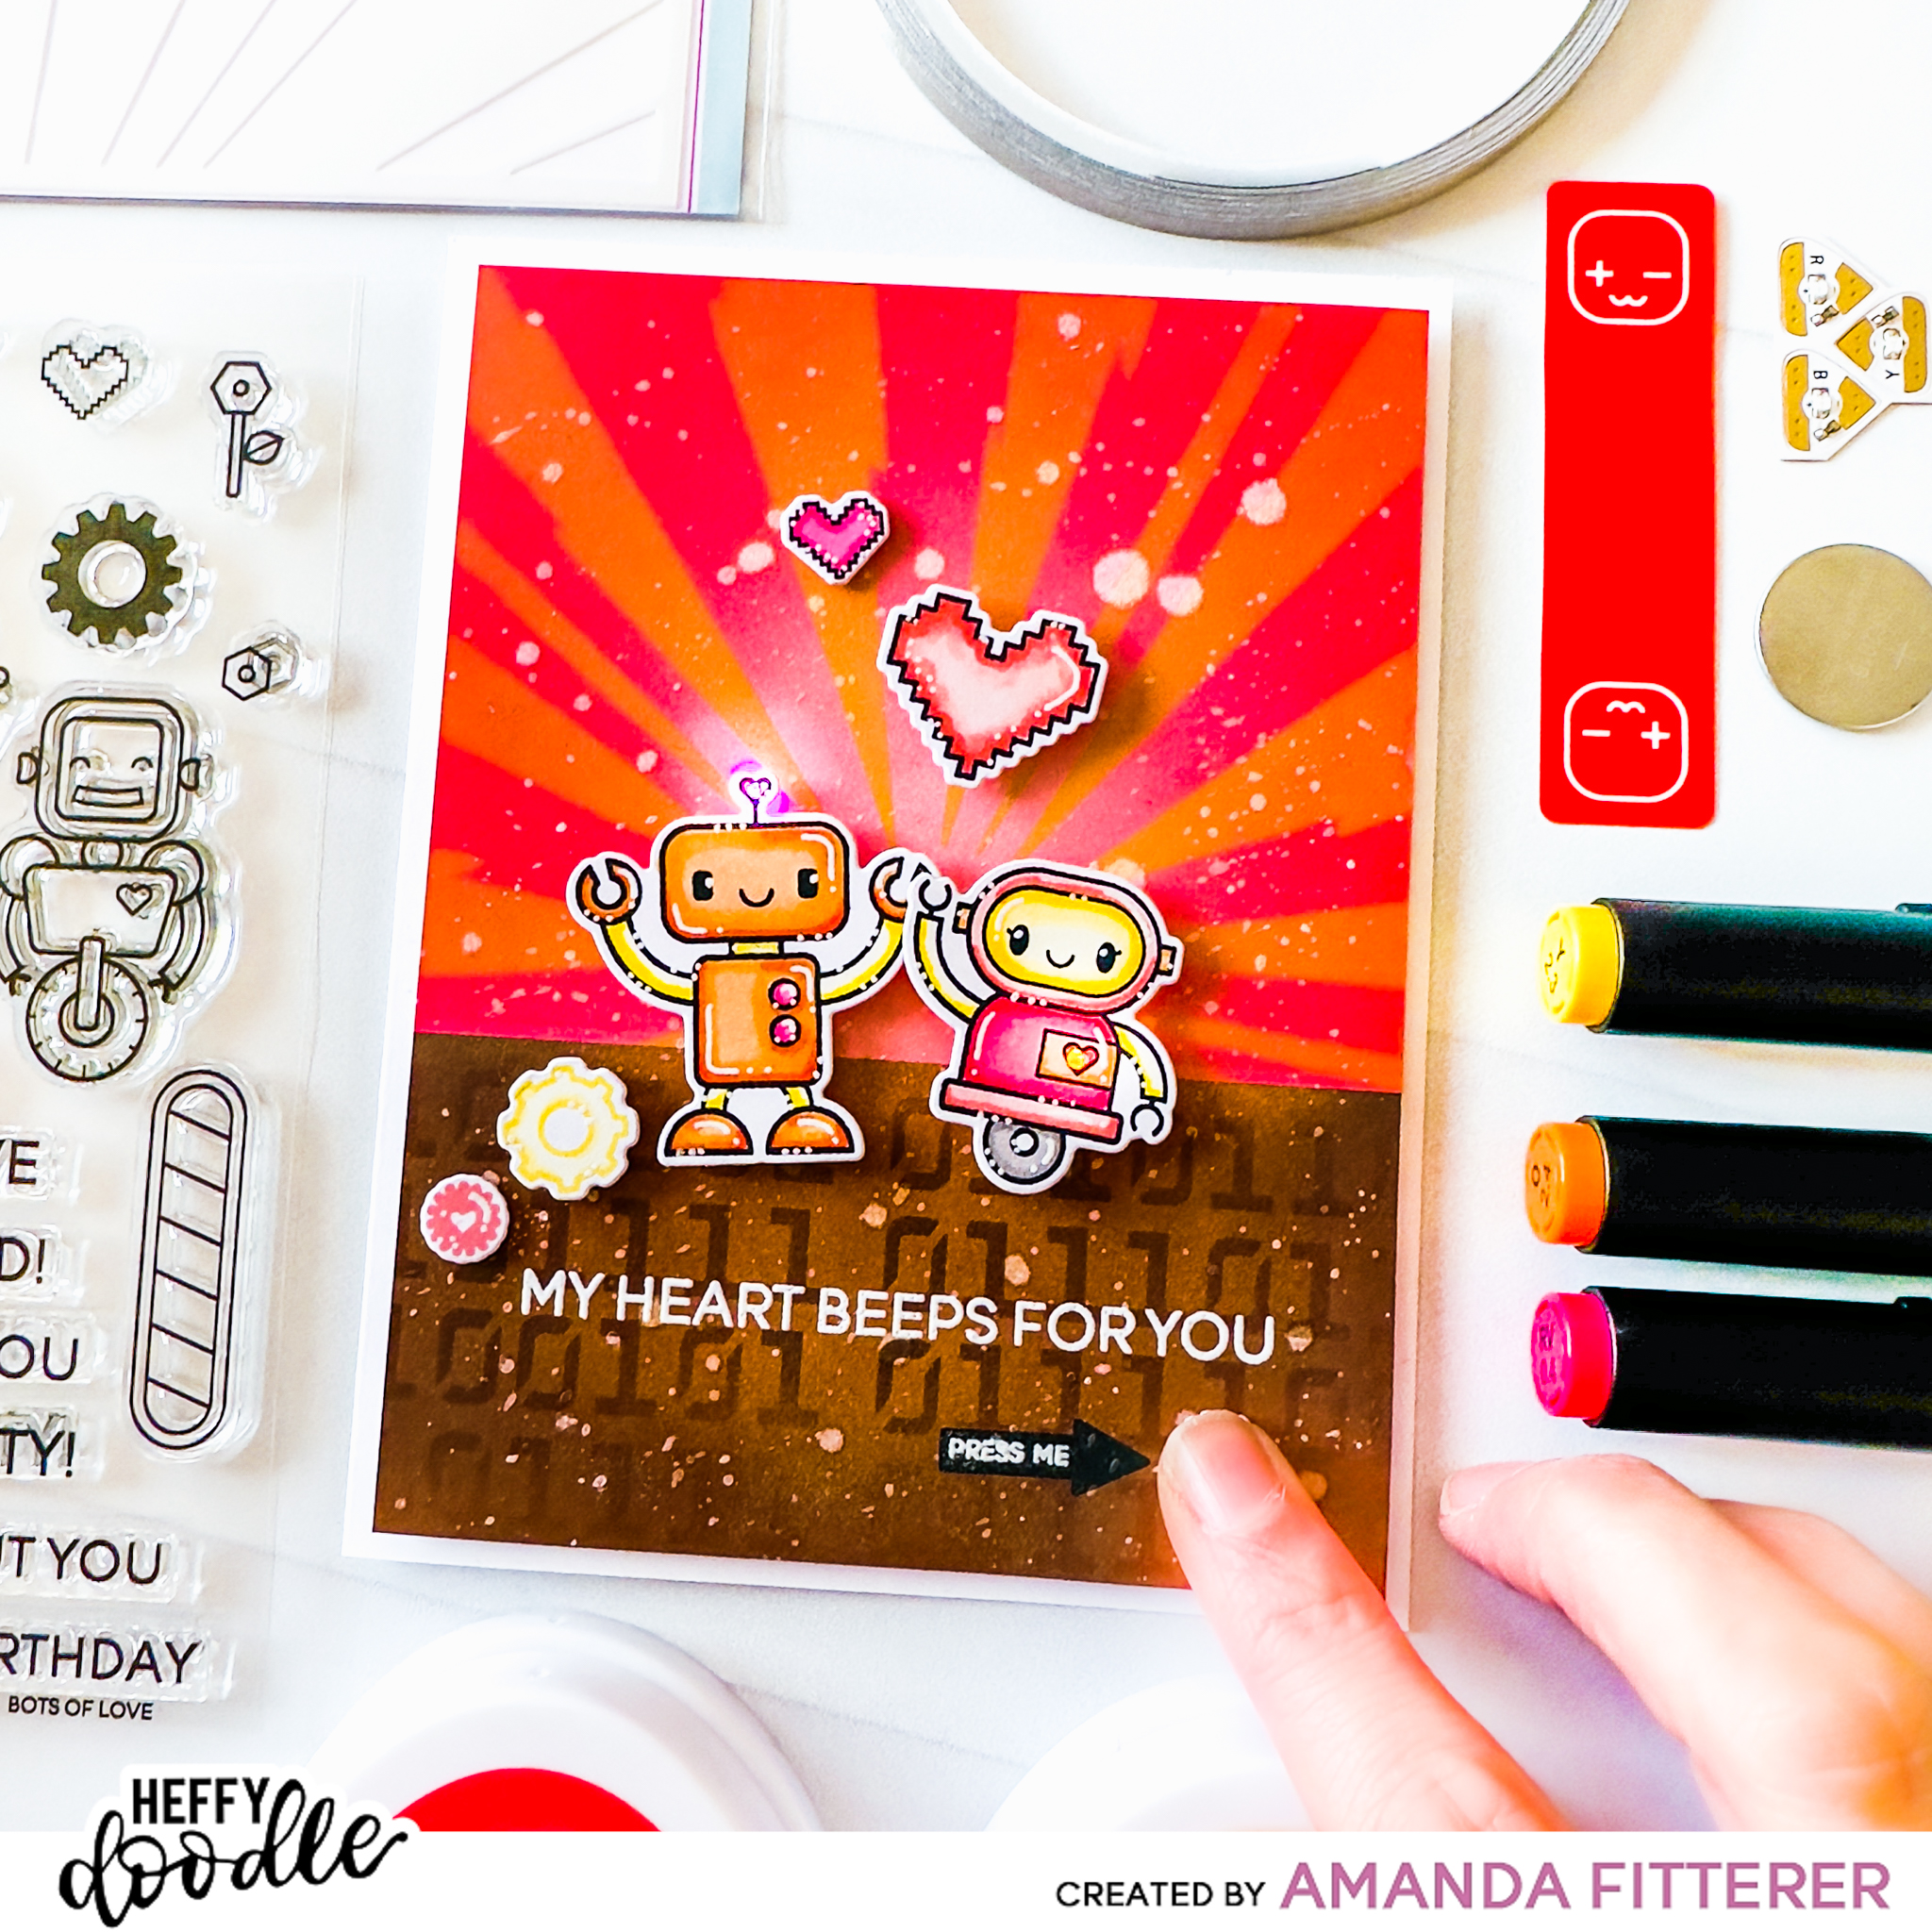
I created this fun light-up card using the Craft with Light Kit – White by Chibitronics. I used lots of Heffy Doodle products! Keep reading on for those links!
First, I created my bright background! I blended some Catherine Pooler inks through my Zapp Attack and Cogs & Code Stencil. I used Heffy Memo Tapeto mask off the top and bottom of my card.
Once I decided where I wanted my lights, I started to prepare for the wiring.
I poked holes through the robots’ hearts where I want the bulbs to show.
Then, I placed the robots on the background where they were going to be glued down once the card is assembled. I made a mark with a pencil through the robots’ heart holes onto the background.
Then, I poked holes through the pencil marks on the background panel.
Lastly, I used a pencil to make marks on my card base where the lights need to be placed.
On my card base, using the pencil marks I made in the last step as a guide, I’ve made marks where the + and – wires need to line up. I did this by taking the lights and placing them down onto my card base so the light was right over top of the pencil mark. Then, I looked at where the copper + and – are on the light unit and drew lines where I need the wires to be lined up to touch the copper part.
I’ve also created a “housing unit” for my battery with a plus and minus sign on it, so I know which way to insert the battery once it’s time. I also marked where I want the battery to be on the card base.
Next, I started by taking my tape and cutting it in half down the center to create smaller/narrower pieces. This isn’t necessary, but was helpful with navigating the tape.
I adhered my battery housing unit to my card base and started placing my + tape. This tape is the top wire which goes to the base of the battery housing unit.
Then, I placed my – tape which starts on the flap of the battery housing unit.
Next, I used 3D foam tape around the whole base of the card to “lift” my card front up so the battery doesn’t stick out farther than the rest of front panel. I attached the stamped images with 3D foam squares, making sure to line the robots up to the lights properly.
Come join in the IG HOP to enter to win the prizes from Heffy Doodle and Chibitronics!
Thank you so much for stopping by my blog today! Enjoy the Hop!
Thanks for using my affiliate links! You all are the BEST! Using an affiliate link in this post above or down below costs you nothing, but it gives me a teeny percentage of your sale to buy more crafty goodies to continue to share card tutorials with YOU! So, thank YOU! Xx, Amanda
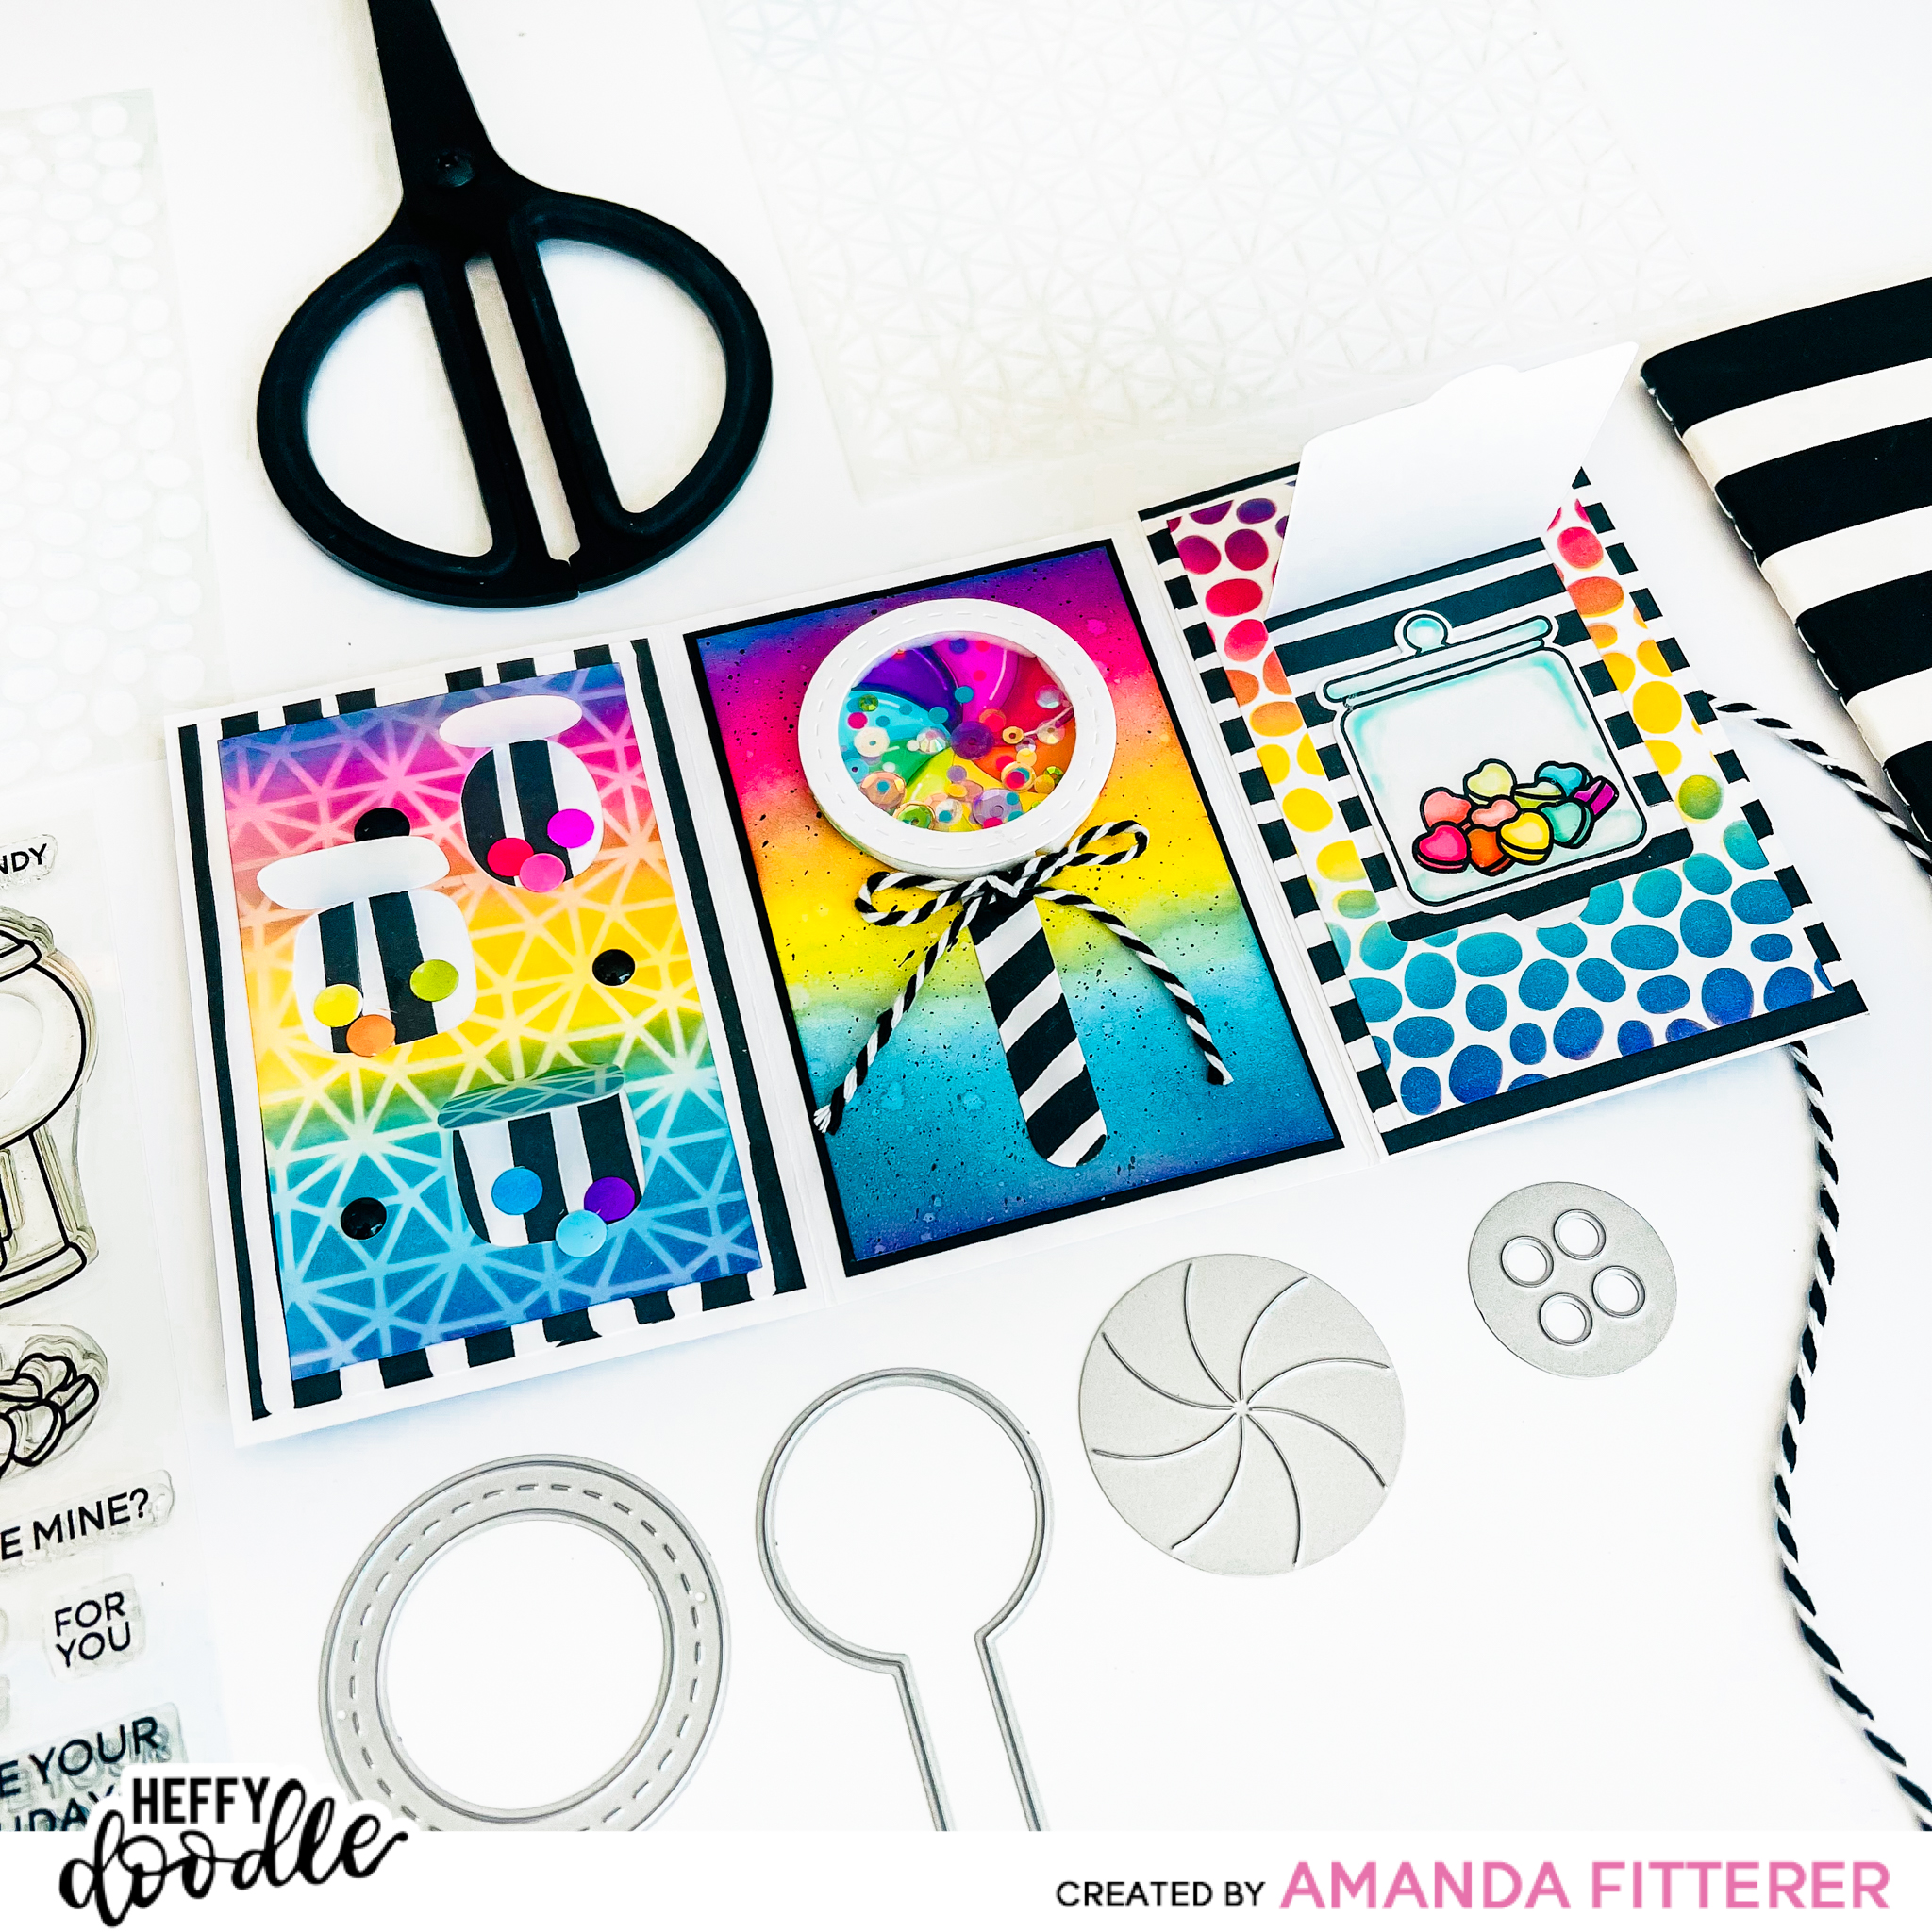
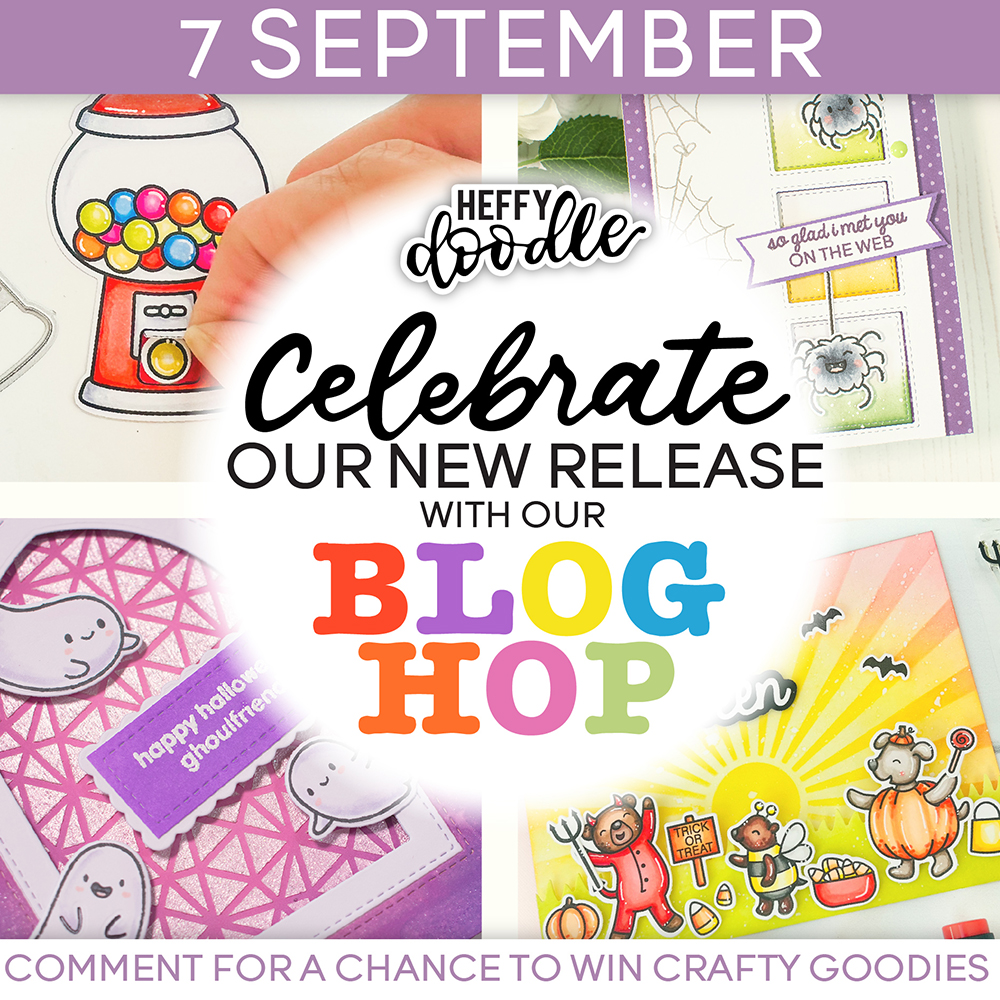
Welcome to the Heffy Doodle New Release Inspiration Blog Hop! We are so excited to share amazing cards from our Design Team members using the new release! For today’s special Blog Hop, you can win a £50 voucher to the Heffy Doodle store!
Get your Sweetie Pie stamp set for FREE with a £30 spend (not inc. shipping). And get the coordinating dies too with a £45+ spend!
To create this trifold card, I started with a sheet of cardstock trimmed to 4.5″ x 11″. I scored at the 3″ mark and the 6″ mark.
For all of my rainbow blending, I’m using Maker Forte’s Color Hive Inks in the colors Flamingo, Yellowstone, and Vegas Strip. This is my ABSOLUTE FAVORITE rainbow blend! You can get a huge range of colors from just these 3 colors!
Here’s how I get the best blend: 1. I start with Yellowstone and blend it in the center of my cardstock. 2. Next, I blend Flamingo on the top of my cardstock (reaching all the way to the top). I gently blend the Flamingo into the Yellowstone to create an orange color. 3. I grab my Vegas Strip and repeat the process on the bottom of the cardstock. 4. Now, I take my Vegas Strip and blend a purple at the very tippy top of the cardstock to create a pinky-purple blend. 5. Then, I get my Flamingo again and blend at the very bottom of the cardstock to create a blue-purple blend. 6. If needed, I will take my Yellowstone brush and just lightly blend into the Flamingo and Vegas Strip. 7. I usually also spritz my background with a Mister Perfect Spray Bottle filled with regular water. I will also sometimes flick white watercolor paint using a Watercolor Brush.
If you were wondering what sort of black and white paper I’m using for my striped paper, you’ll be happy to know that I made it myself! I simply used the chisel end of a marker! I wanted them to look hand-drawn, so I just freehanded it! Easy peasy!
For my front panel, I’ve used the Love is Everywhere Stencil. I have also used my new favorite tool (the Cropadile!) to add some eyelets to the front of my card to hold my baker’s twine! I made sure to add my eyelets and twine before gluing down the inside panel!
For my super adorable shaker lollipop, I’ve used the NEW Sweet Tooth Shaker Dies! Omg, are they adorable or what?! You can make all sorts of sweets and shakers! For my stripes, I used my chisel marker again! I mixed and matched Sparkle Mixes to get all the colors of the rainbow in there.
For my adorable candy jar and gumball machine, I’ve used the Gumbelievable Stamp Set again and then added a layer of Glossy Accents over top! I used OLO markers to color all my images.
For my little circles, I used the circle confetti dies that come in the Sweet Tooth Shaker Dies.
I hope you have LOVED seeing how I made this rainbowy fun mini trifold card!
To be entered to win the giveaway, all you need to do is comment at each stop along the Blog Hop before Sept 13, 2022 at 11:59 PM EST. The winner will be announced on the Heffy Doodle Blog on Sept 15th at 10:00 AM EST!
Thank you SO much for stopping by my blog to see my post!
Affiliate Links are used where possible. Using these links costs you nothing, but it gives me a small percentage of your purchase! This is amazinggly helpful for me so that I can continue to buy crafty goodies to share more tutorials with you! THANK YOU for using my links!!
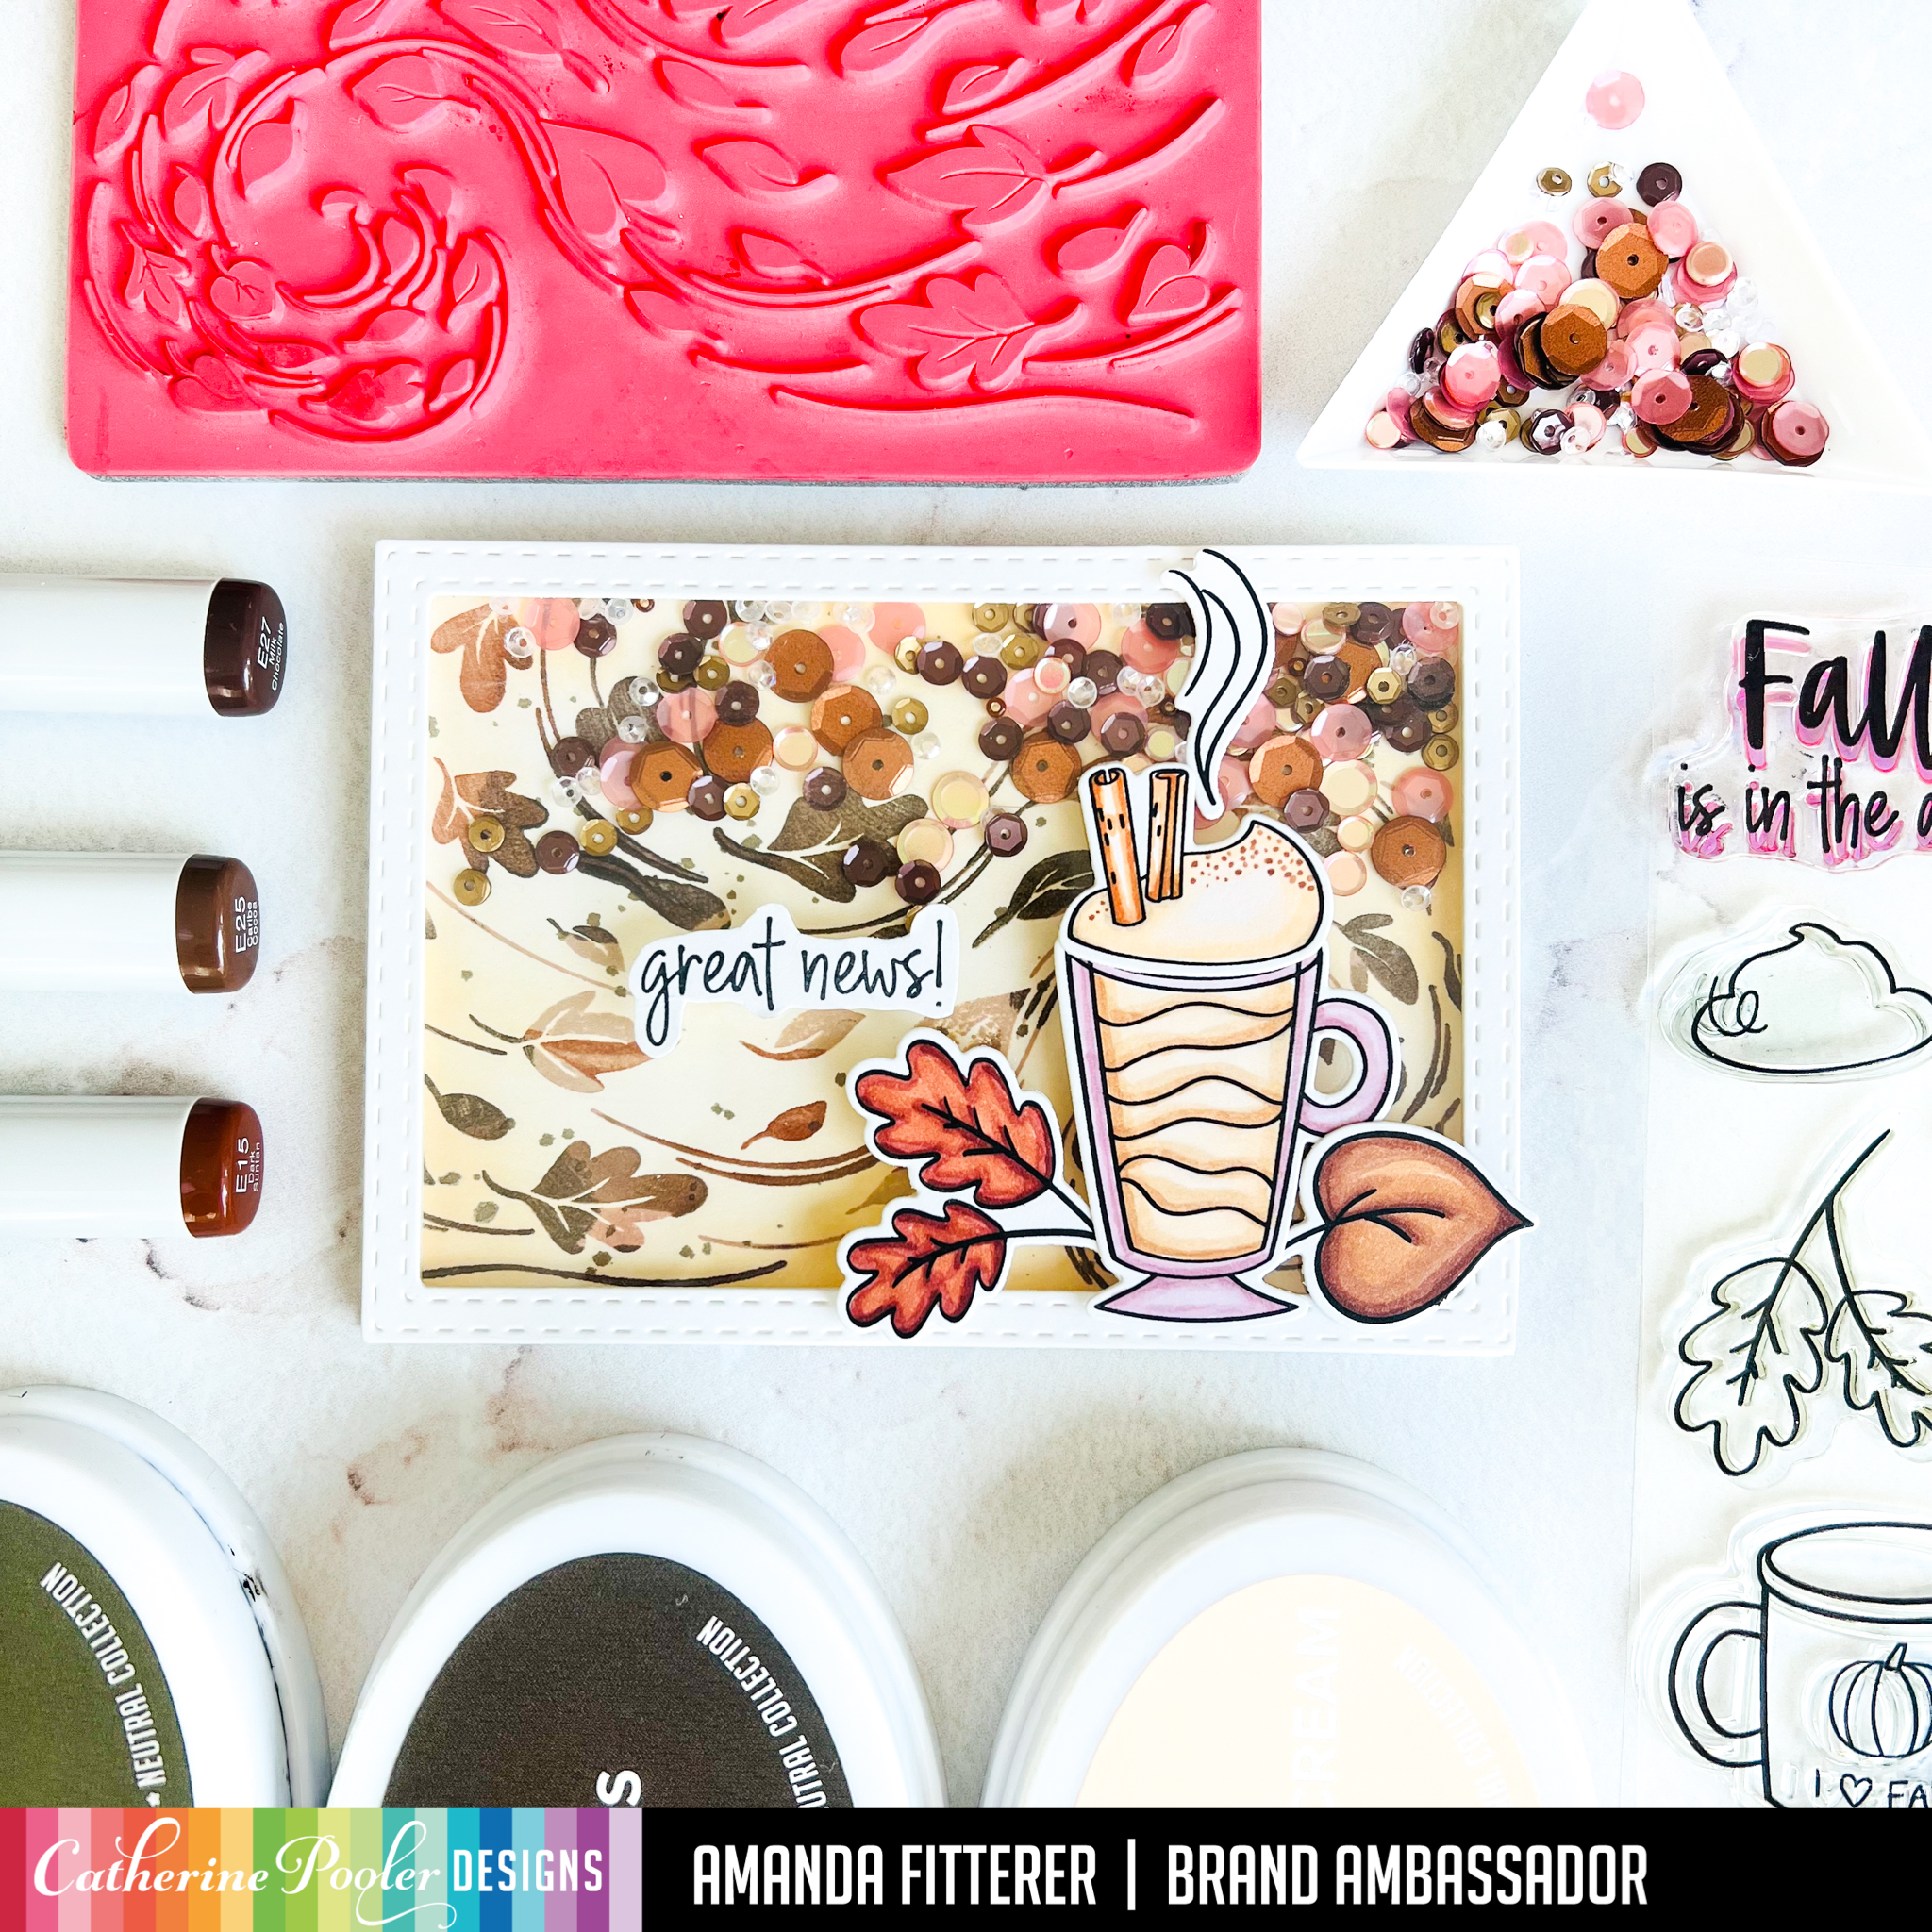
Shop the All Things Fall Collection using my affiliate linkhere. Thanks for using this link (at no cost to you)! It helps me fund my crafty addiction and lets me share more inspiration with you!
If you shop with my affiliate link, I can earn a little extra money at no extra cost to you. All you have to do is click here and get shopping or use the links in this post!
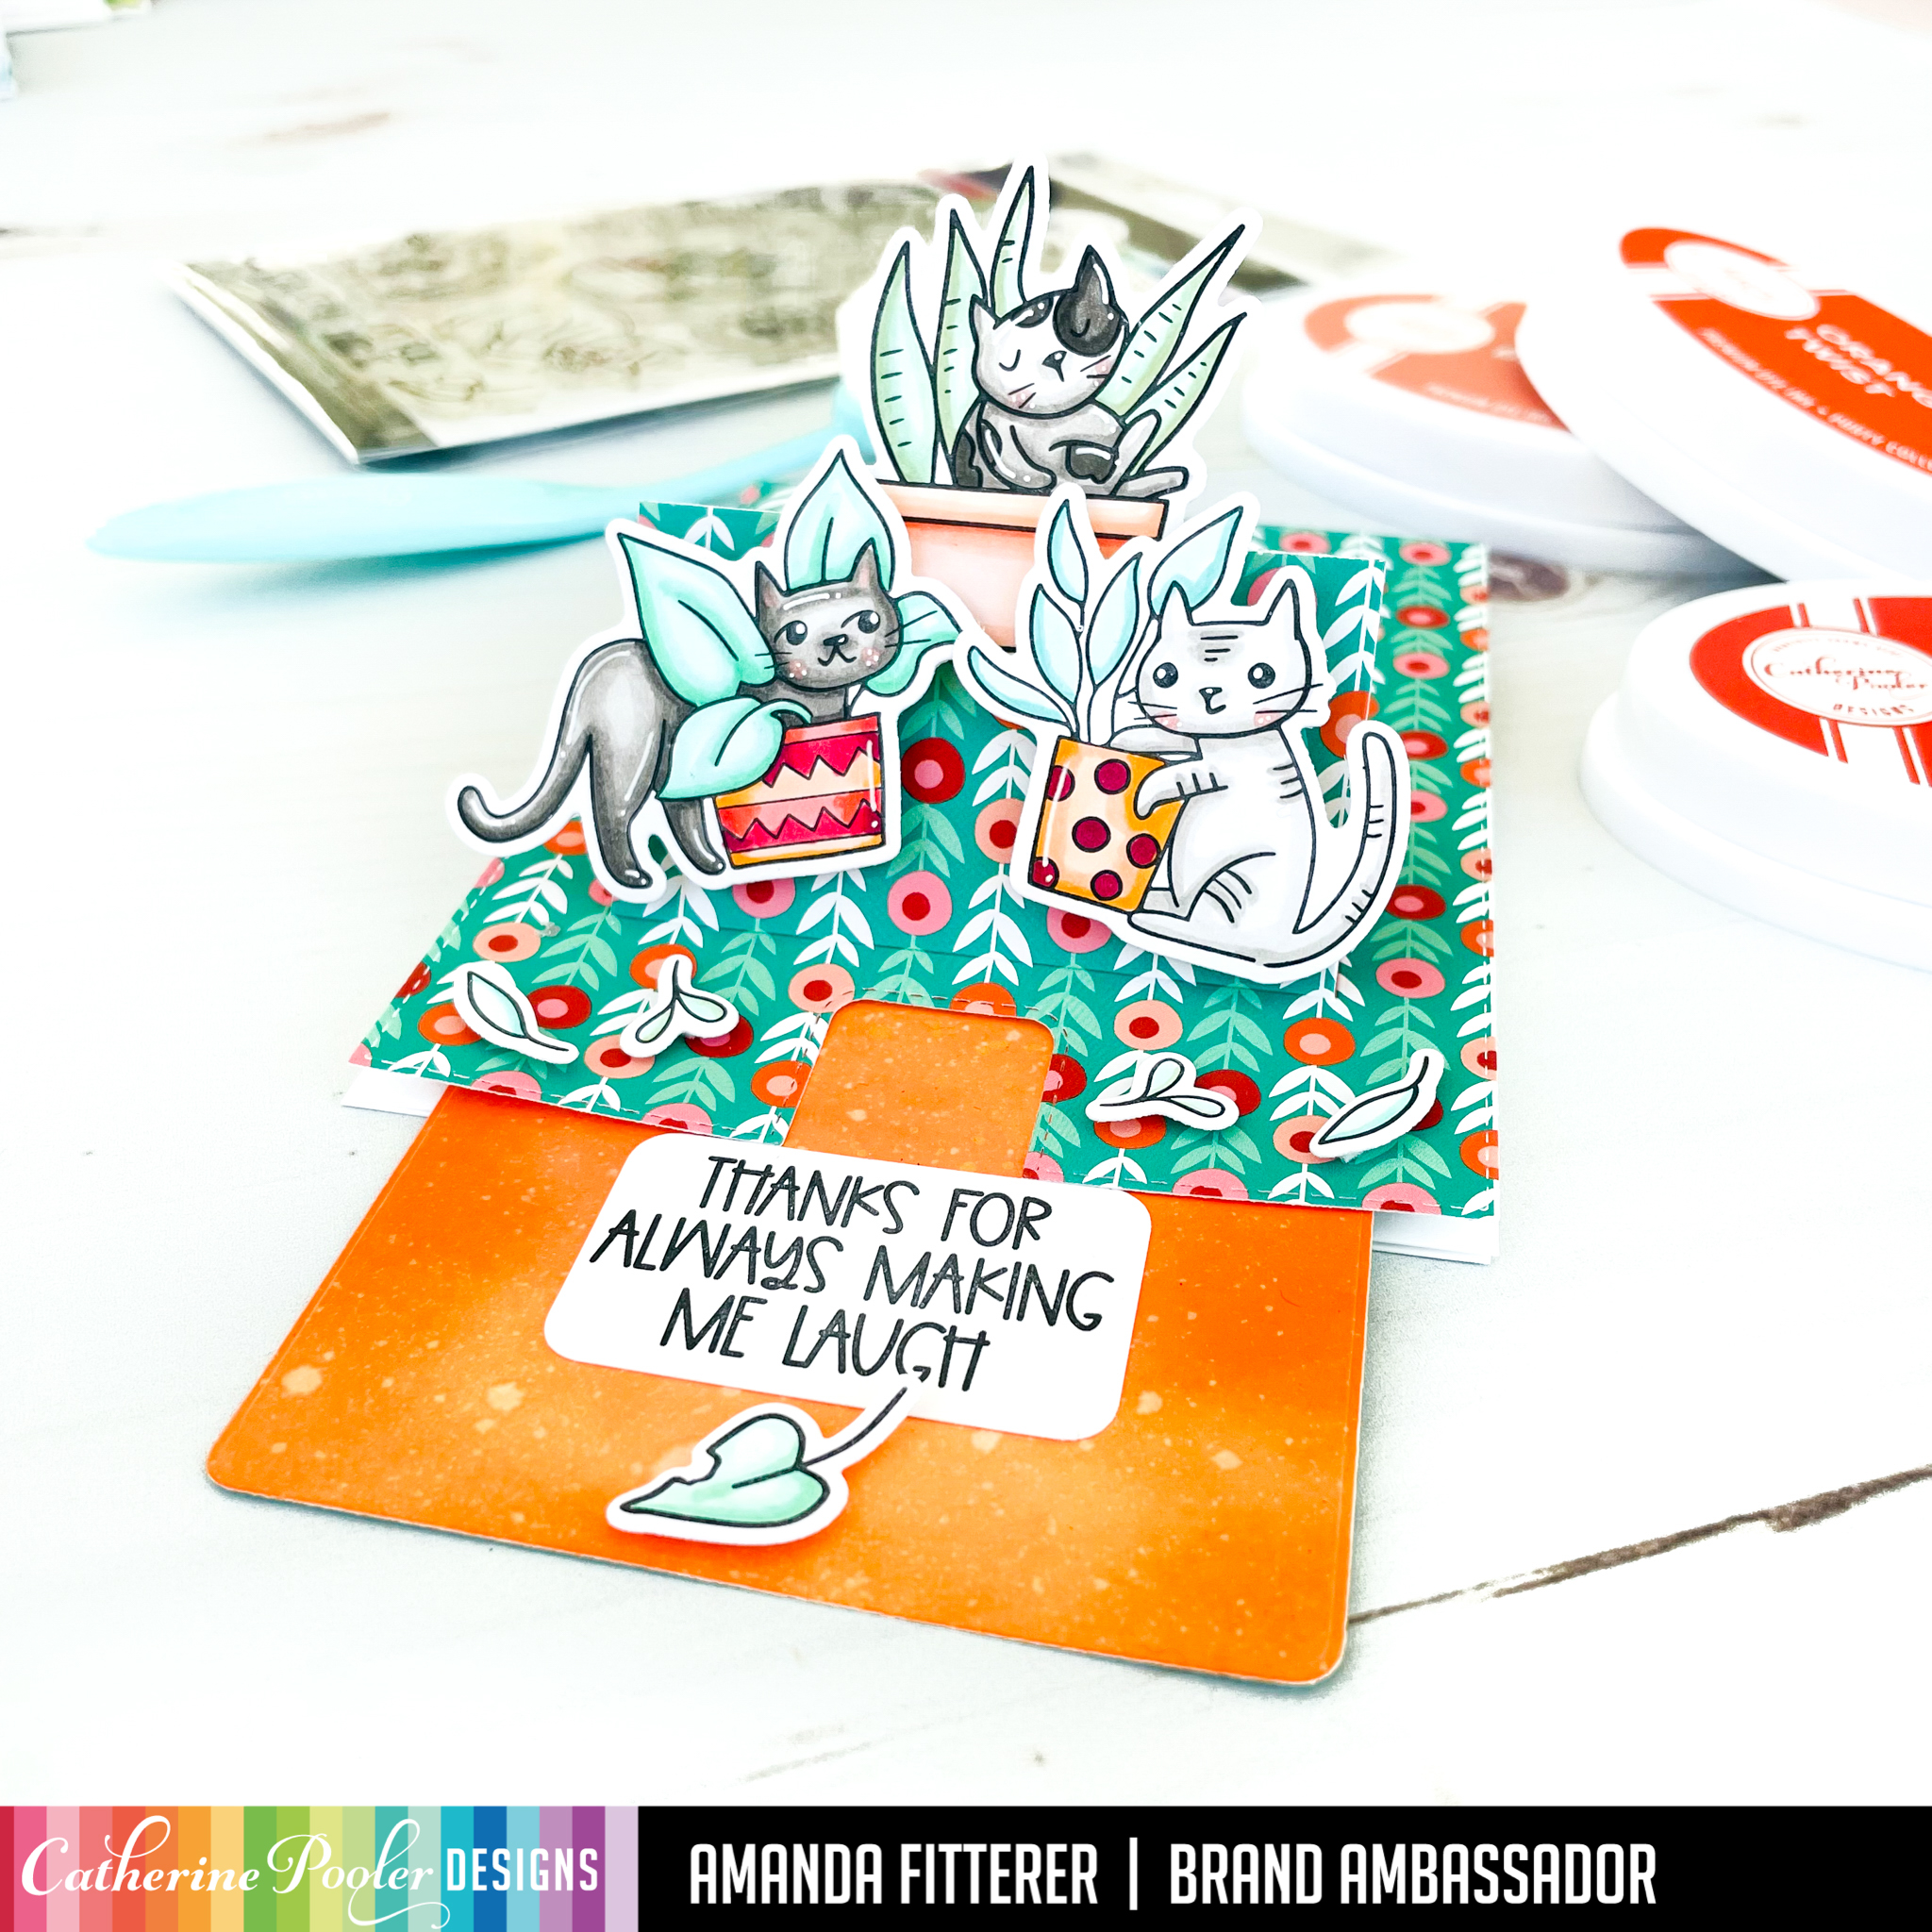
To create this card, I started with the Slider Pop-up Dies from Heffy Doodle. I love using this die to create an easy interactive card! I cut the card front with the Potted Patterned Paper.
For the inner panel, I blended Bellini, Orange Twist, and Flame.
Next, I stamped my images from the Just Roll With It stamp set and colored them with Copic markers. Then, I die cut them with the coordinating dies. I stamped a sentiment on a piece of white cardstock and then rounded the corners.
I assembled the card using 3D foam tape. I attached my kitties and leaves with foam squares and liquid glue.
And that’s it for me today! Thanks so much for stopping by!
To shop with my affiliate link and help me earn a little extra cash (at no cost to you) to buy more crafty goodies to share more projects with you, click here or use the links in this post!
Today, I’m making a card with my leftover piece from yesterday’s card. If you missed my post yesterday, you can see it here. I’m using the Just Roll With It Collection for this release!
I ran a slimline card front through my die cutting machine with the Plant Stand Slimline Die. I placed the die cut card front on top of another slimline card front. Then, I blended Limoncello, Glitz, Party Dress, Pucker Up and Flirty Fuschia inks onto both card fronts. This gives me 2 different card fronts to use!
Next, I stamped my kitty from the Just Roll With It stamp set and then colored her with Copic markers. I also stamped my sentiments on black cardstock nd then used white embossing powder on them. I used the Nested Stitched Heart Dies and then trimmed off one edge of the heart and propped it up with foam squares.
Thank you so much for hanging out with me today! I can’t wait to share more cards with you from this collection!
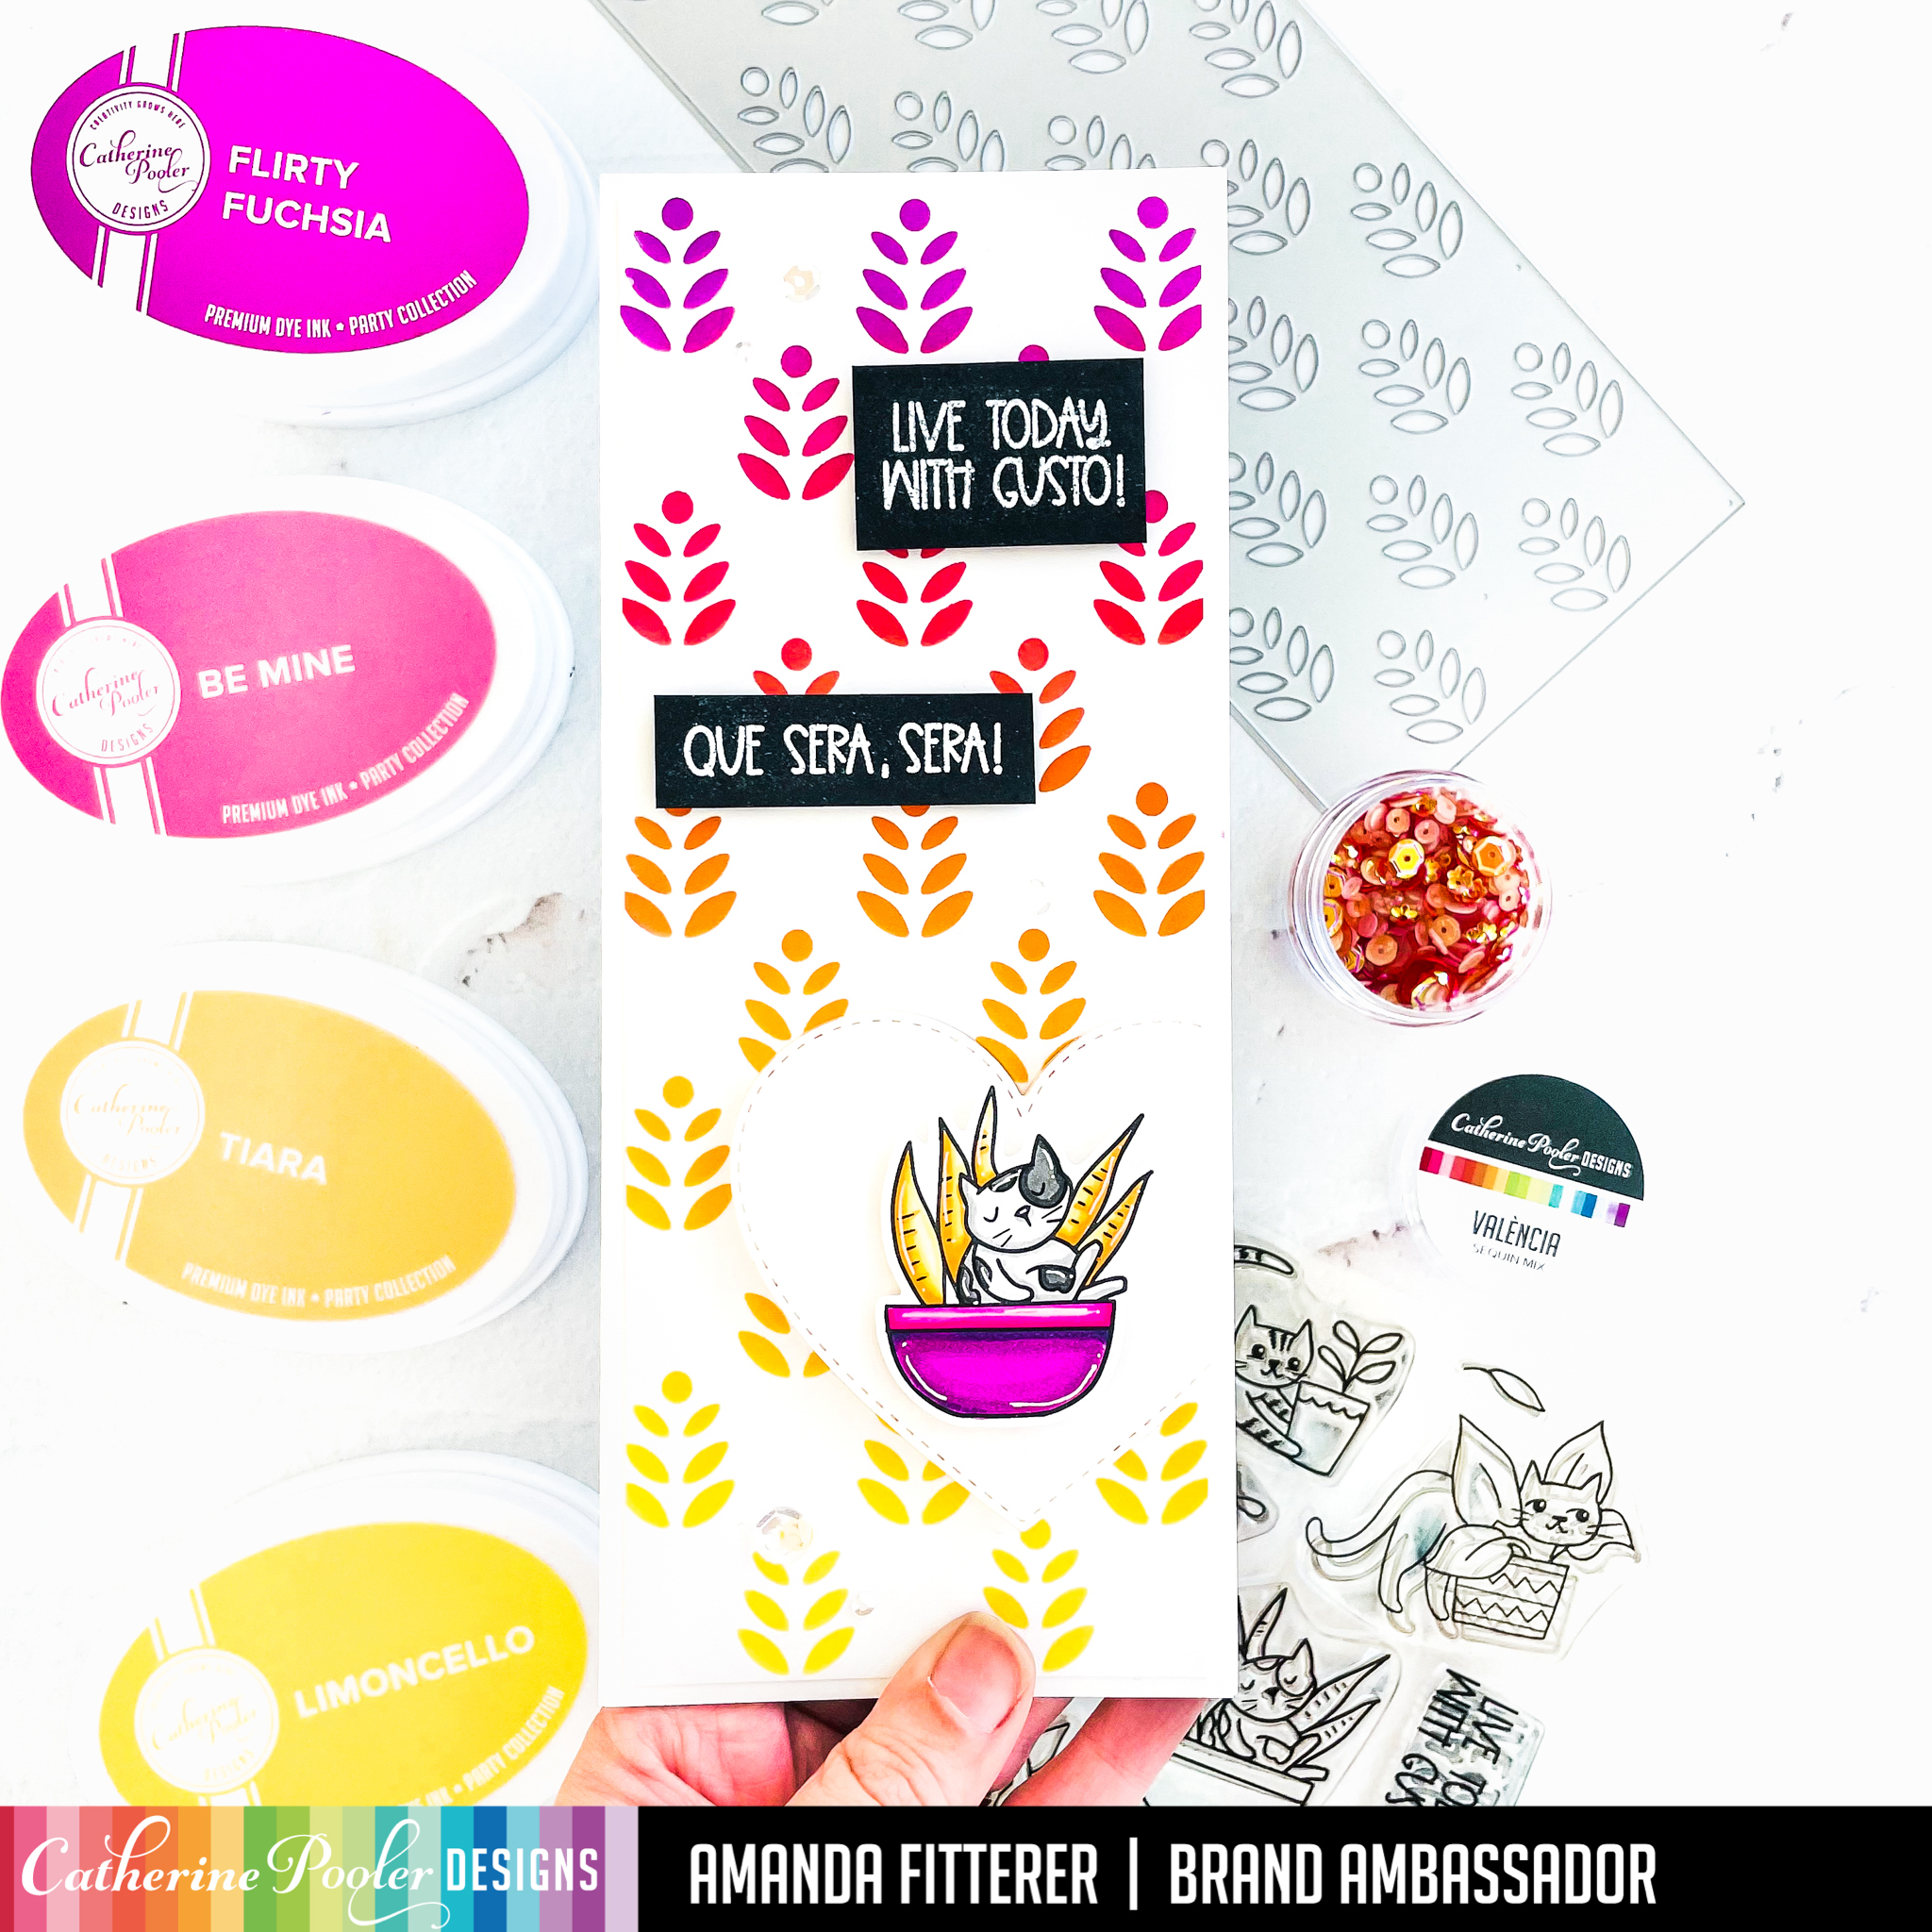
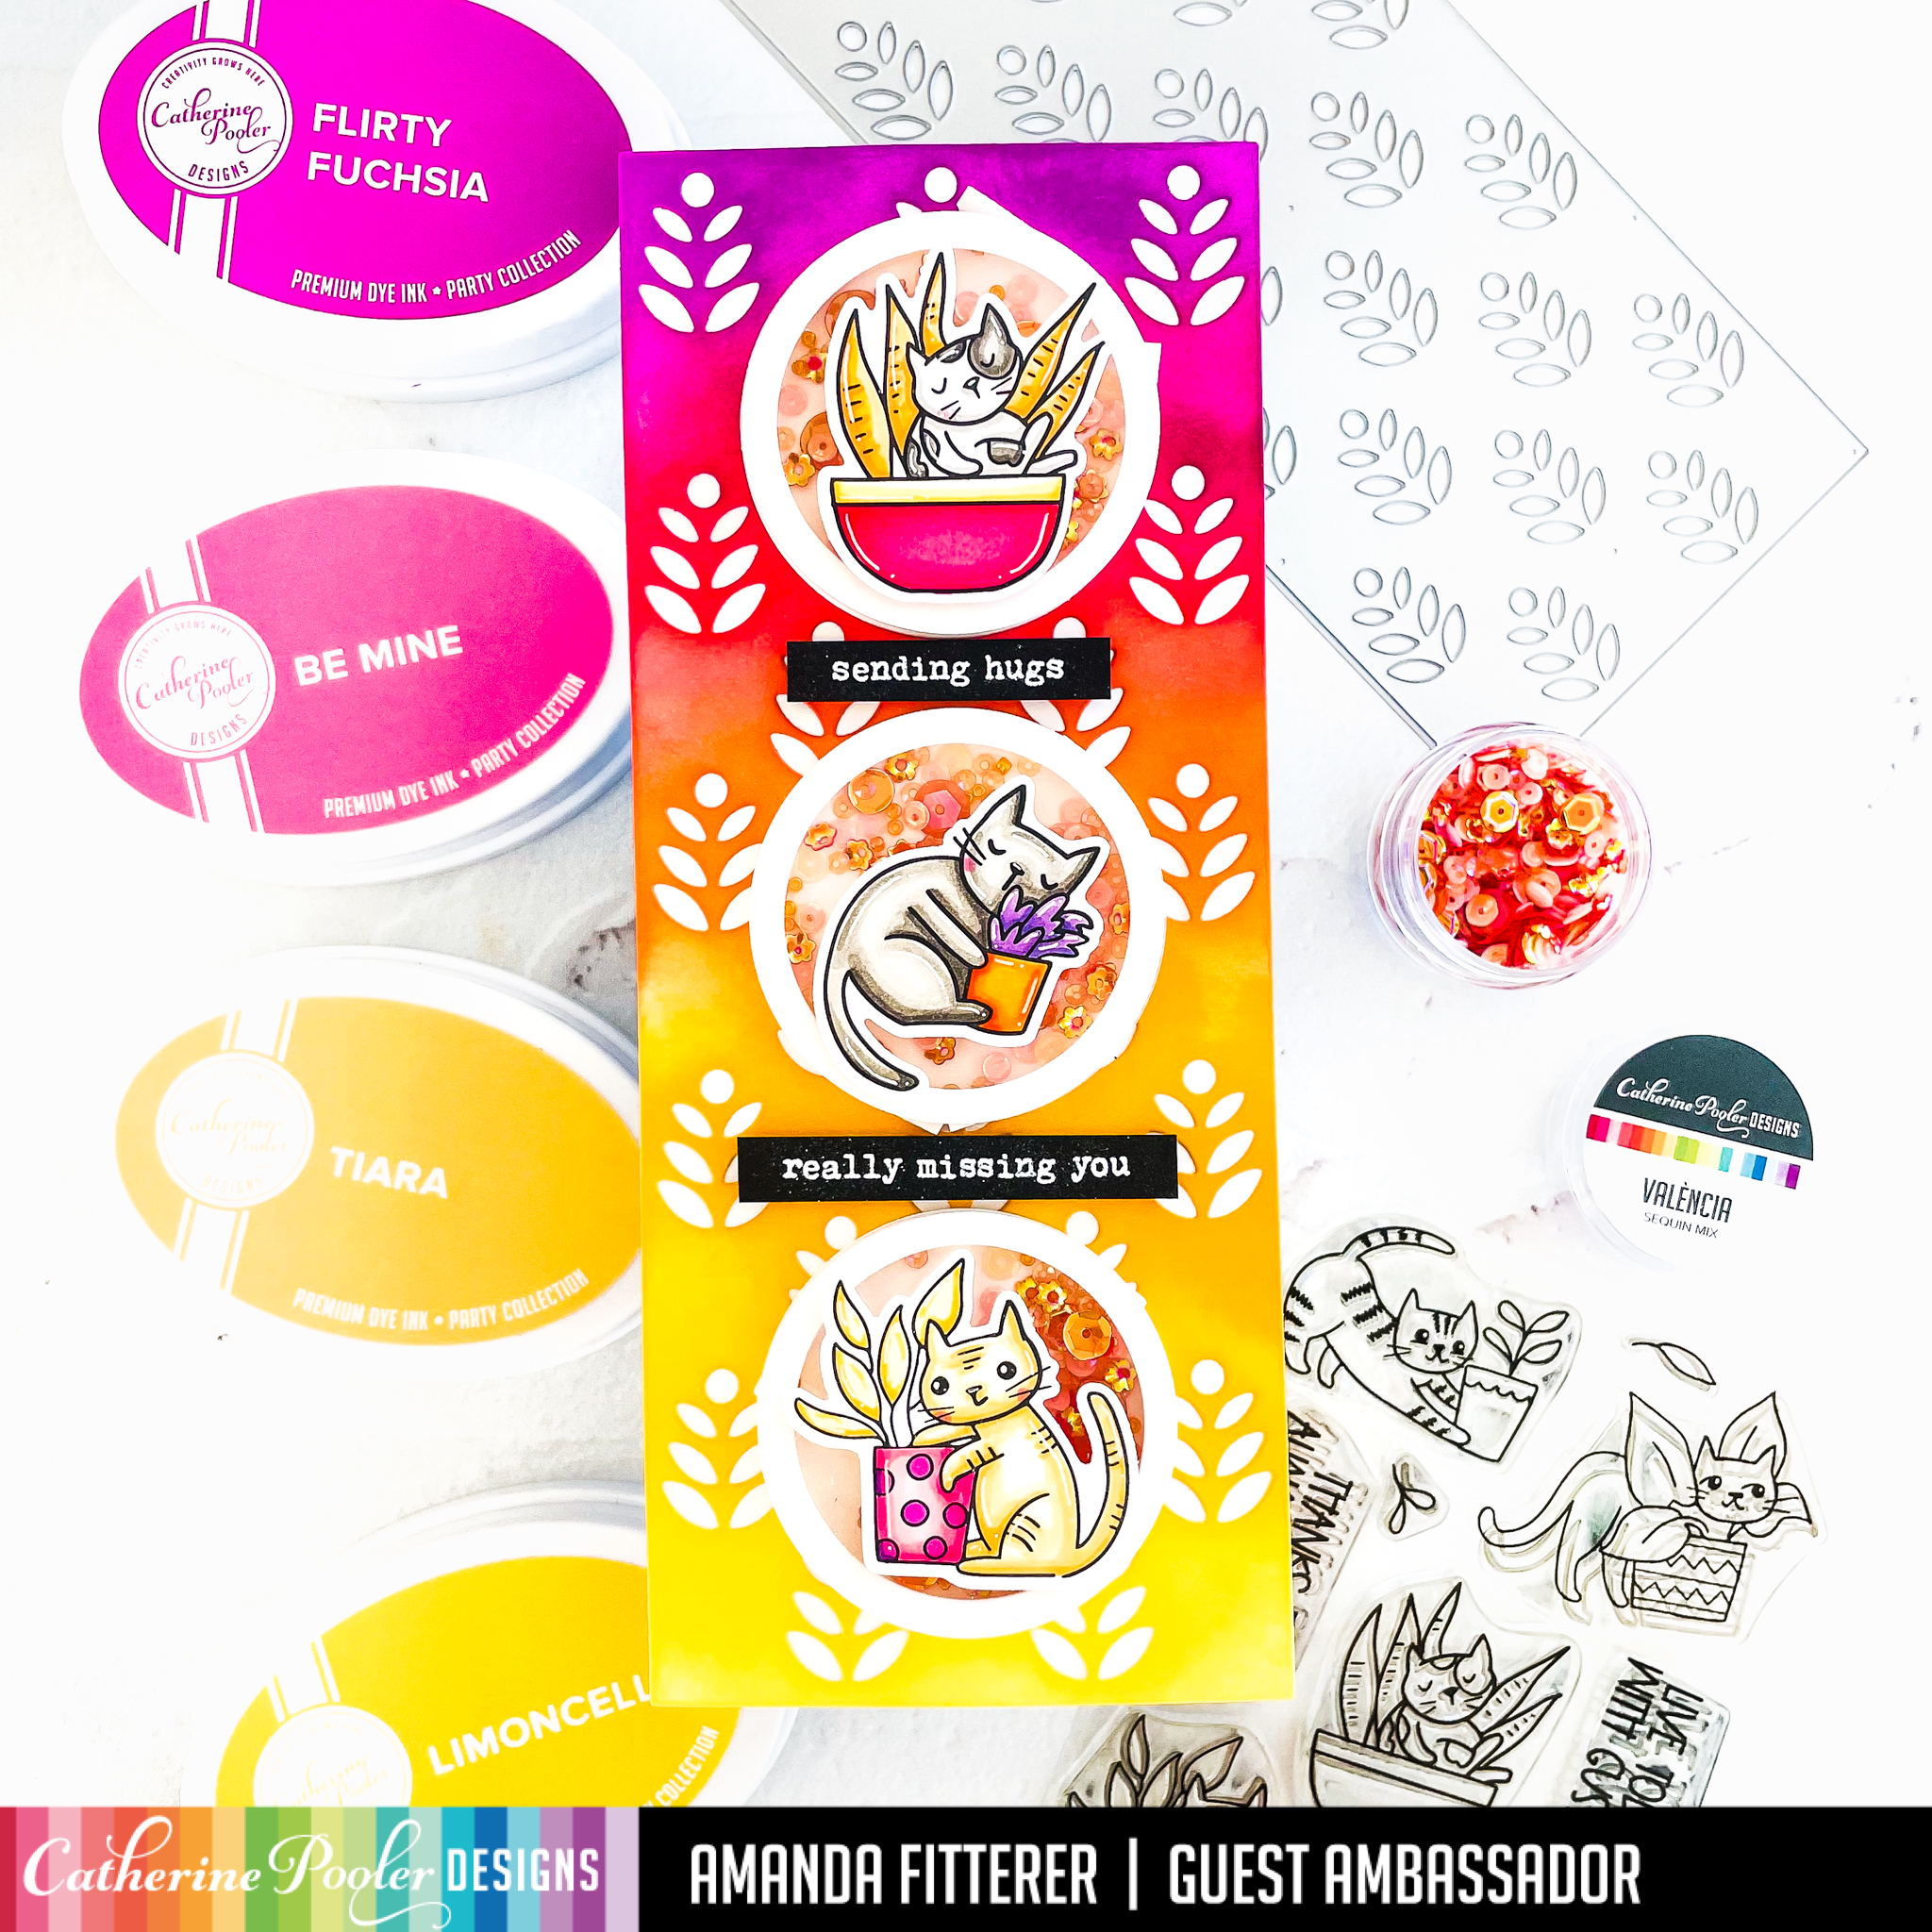
I ran a slimline card front through my die cutting machine with the Plant Stand Slimline Die. I placed the die cut card front on top of another slimline card front. Then, I blended Limoncello, Glitz, Party Dress, Pucker Up and Flirty Fuschia inks onto both card fronts. This gives me 2 different card fronts to use!
Next, I stamped my images from the Just Roll With It stamp set and colored them with Copic markers. Then, I die cut them with the coordinating dies.
I created shaker elements by cutting some Circle Dies, adding some 3D foam tape, acetate, and Valencia sequins.
Thank you so much for hanging out with me today! I can’t wait to share more cards with you from this collection!
Well hey there, crafty friends! I sure hope you had a wonderful Christmas! Did you get any crafty goodies?! I hope so!!
Today, I’m sharing a Baby Shower card! I love interactive cards and the Slider Pop-up Dies make it so easy to make one quickly!
To create this card, I have blended some gorgeous Catherine Pooler blues on my cutouts from the Slider Pop-up Dies . Next, I’m spritzing the ink with water.
I’ve stamped my images from the Beary Big Heart and Chimply the Best stamp sets. Now, I’m ready to start coloring the images with Copic markers!
To create my leaves, I am using both the Amazonian Leaves and Forest Leaves Dies. To color the leaves, I used Limoncello and Tiara inks. I am gluing my leaves, sequins, and monkey on using Glubert Glue.
Using the Classic Sentiments stamp set and the Chimply the Best stamp set, I’ve created my sentiment on a piece of white cardstock.
Voila! So easy and fun! Plus, it will make a great Baby Shower card that is sure to be gushed over!
Thank you so much for stopping by my blog today! I hope you’ve enjoyed this post as much as I’ve enjoyed sharing it with you!! Xx, Amanda
Welcome to the Heffy Doodle, Maker Forte, and SugarPea Designs Collaboration Blog Hop! Design Team members from all three companies are sharing inspiration using products from all three companies!
Today, I am sharing 2 cards that I made using tons of awesome products from these companies!
For my interactive pull tab and slider card, I’m starting by stamping my images from the Heffy Doodle Otter Side and You Go, Gull stamp sets and the Sugar Pea Designs Captain of My Heart and Waves of Love stamp sets. To ensure I get a really crisp stamped image, I’m using my Smoosher Tool from Maker Forte and my MISTI. I’m coloring my images with Copic markers and then cutting the images out with my Die Cutting Machine.
Now I’m ready to create my waves. I’m using some colored cardstock and the Breaking Waves Dies, plus the Wavy Water Slides to create my coordinating wave slider.
For my front, I created sand using Copic markers. For my waves, I used the Breaking Waves Dies.
For my images, I am using the same sets as my first card. I’ve stamped my images, used Copic markers to color them, and now I’m attaching my little fishies and birds to small strips of acetate.
To make assembling my card easier, I am using my favorite Rainbow Tweezers.
And, that’s it! Both cards completed!
To be entered to win the giveaway, all you need to do is comment at each stop along the Blog Hop! Maker Forte will be giving away $35, Heffy Doodle will be giving away £25, and SugarPea Designs will be giving away $25 to their respective stores! Be sure to comment before 11:59 PM EST on Aug 20th to be entered to win!