Hey guys! Want a chance to win prizes from both Pear Blossom Press and Picket Fence Studios?! In March, we’ll have THREE different Hops for you to enter to win!!
Today we’re kicking off the BLOG HOP!
Come hop along with us and see some awesome light-up cards! Plus, each company will be giving away $25 PRIZES! All you have to do to be entered to win is to leave a comment at each stop along our Hop Lineup before March 29th at 11:59 PM EDT. Winners will be announced on the Pear Blossom Press & Picket Fence Studios Blogs on 3.31.24!

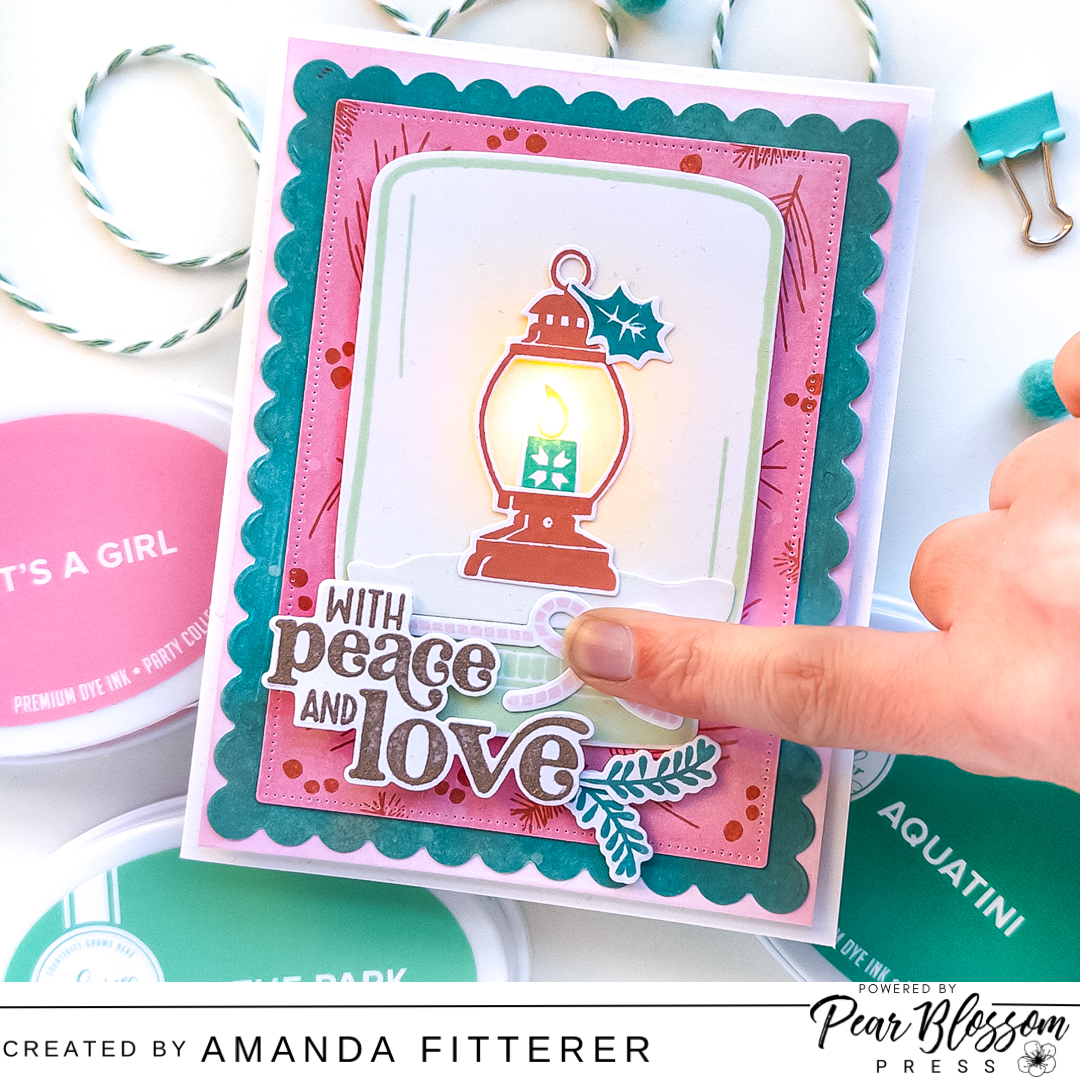
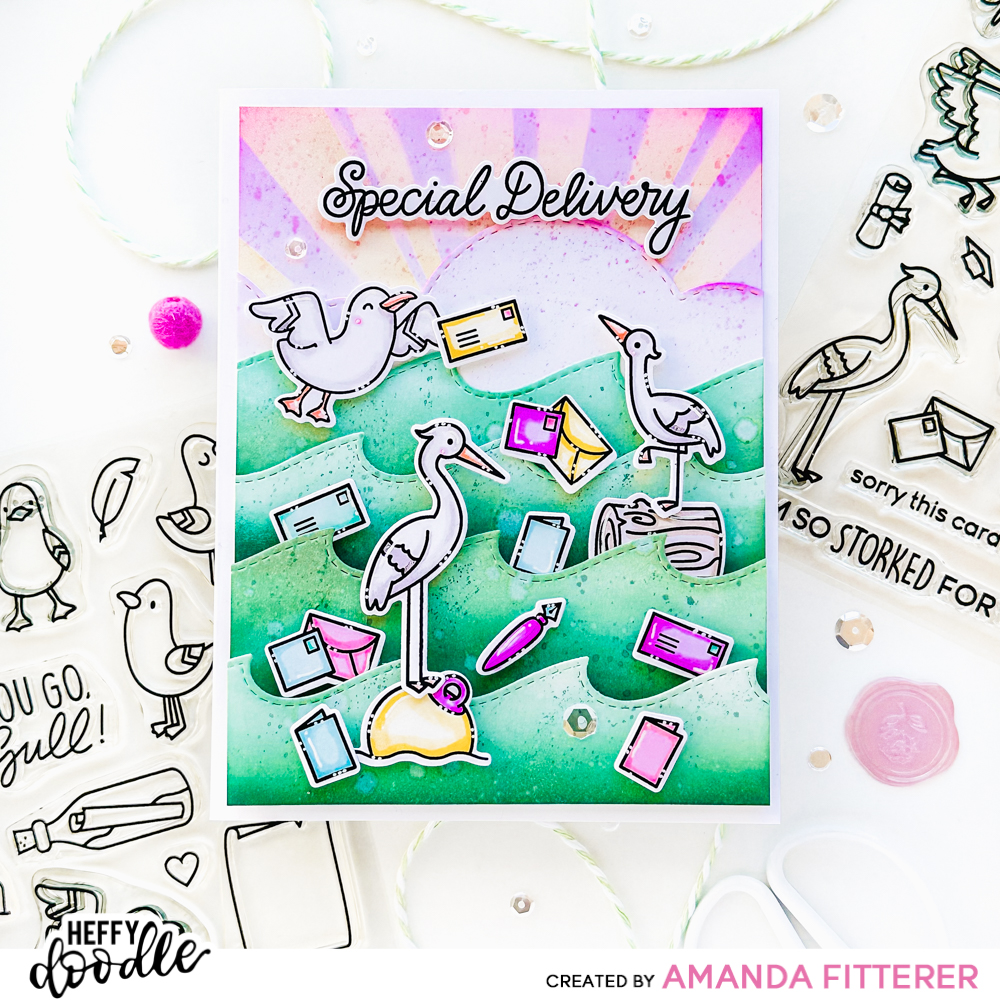
I have created this fun light-up card using products from both companies! Read on to see how I created this card! You’ll be amazed at how EASY it is!!

First, I created my background using the Picket Fence Studios What’s Your Sign Stencil and Pint Sized Paper Pouncers. I blended Catherine Pooler’s All That Jazz and Cummerbund inks.

Next, I stamped my images from the Sugar and Calorie Free Stamp Set. I colored them in with Copic markers. I stamped my sentiment on Perfect Sentiment Cardstock – Black with Embossing ink and then sprinkled white embossing powder on it. I melted the powder with my heat tool and then die cut the sentiment out with the coordinating die. I also used the coordinating dies to cut out my cakes. I used the same dies to cut out 2 plain black pieces of cardstock. I glued the cakes and their black counterparts together on a slight angle, to give the effect of a shadow!

On my card base, I made 3 little pencil dots where I wanted the candles’ flames to be. I also made a little pencil dot where I wanted the ON button to be. For this card, I’m using the Pear Blossom Press EZ-Lights. I used double sided tape to adhere my battery and button where I wanted it. Then I used masking tape to hold my wires and lights in place.
Once I had everything in place, I placed Pear Blossom Press’s World’s Best Foam Tape everywhere except over the lights and battery/button case.

On my card front, I poked 3 holes where my lights are. I placed my Pear Blossom Press Yellow Candle Flame Gems over the lights using liquid glue. Then, I placed my Clay Candles under the flames and adhered them with liquid glue.

I used 3D Foam Squares to prop up my cakes and sentiment. I added a few Catherine Pooler Crater Lake Sequins to finish it off.


That’s how easy it is to create a fun light-up card! I hope you enjoyed my stop on the Blog Hop!
Blog Hop Lineup:
Justin Adkins <<- Go here next!
Happy Hopping!!
My favorite craft essentials:
* Heffy Doodle Mini Die Cutting Machine
* MISTI
* Smart Craft Glue
* Petal Pink Gemini Jr. Die Cutting Machine
* 3D Foam Squares
* 3D Foam Tape
*Pre-scored Card Base
* Catherine Pooler Inks
* Catherine Pooler Blending Brushes
* White Glass Magnetic Craft Mat (Use code AMANDA20 for 20% off your order!)
Thanks for using my affiliate links! You all are the BEST! Using an affiliate link in this post above or down below costs you nothing, but it gives me a teeny percentage of your sale to buy more crafty goodies to continue to share card tutorials with YOU! So, thank YOU! Xx, Amanda
Scrapbook.com Affiliate Link | Catherine Pooler Affiliate Link | Become a Catherine Pooler StampNation member
👇🏻👇🏻 Subscribe 👇🏻👇🏻 to be alerted of new posts by yours truly!