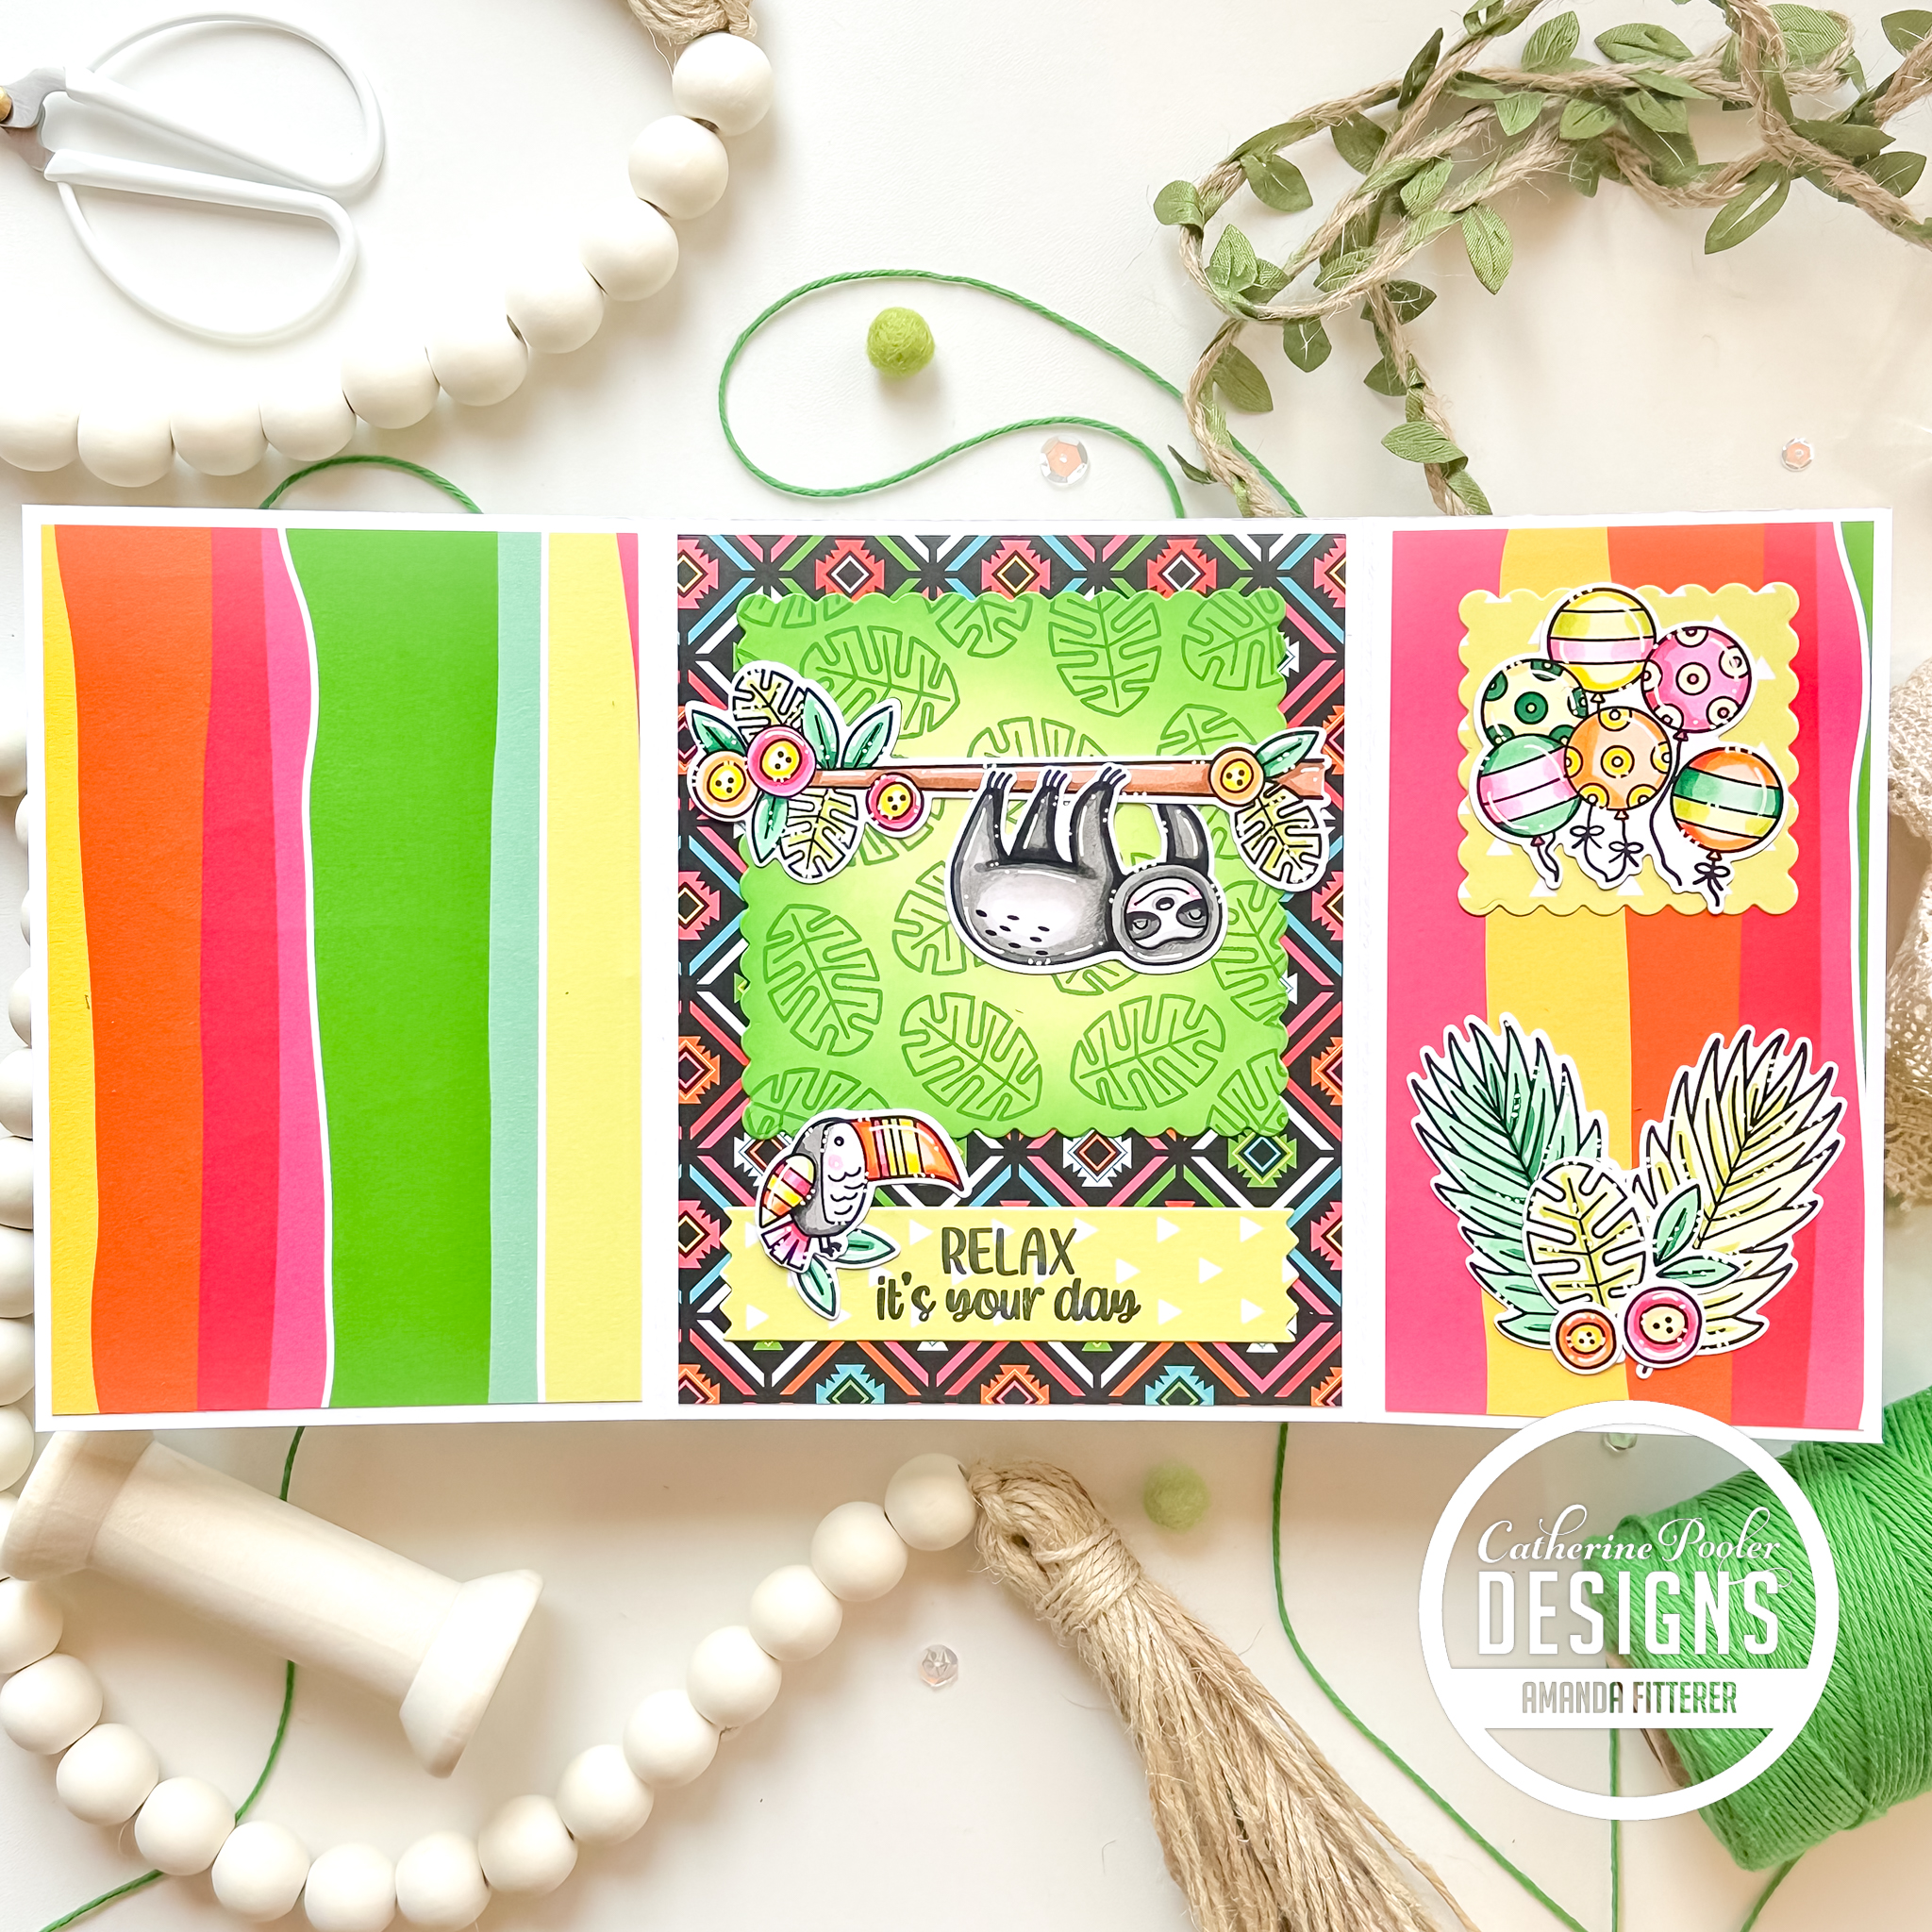
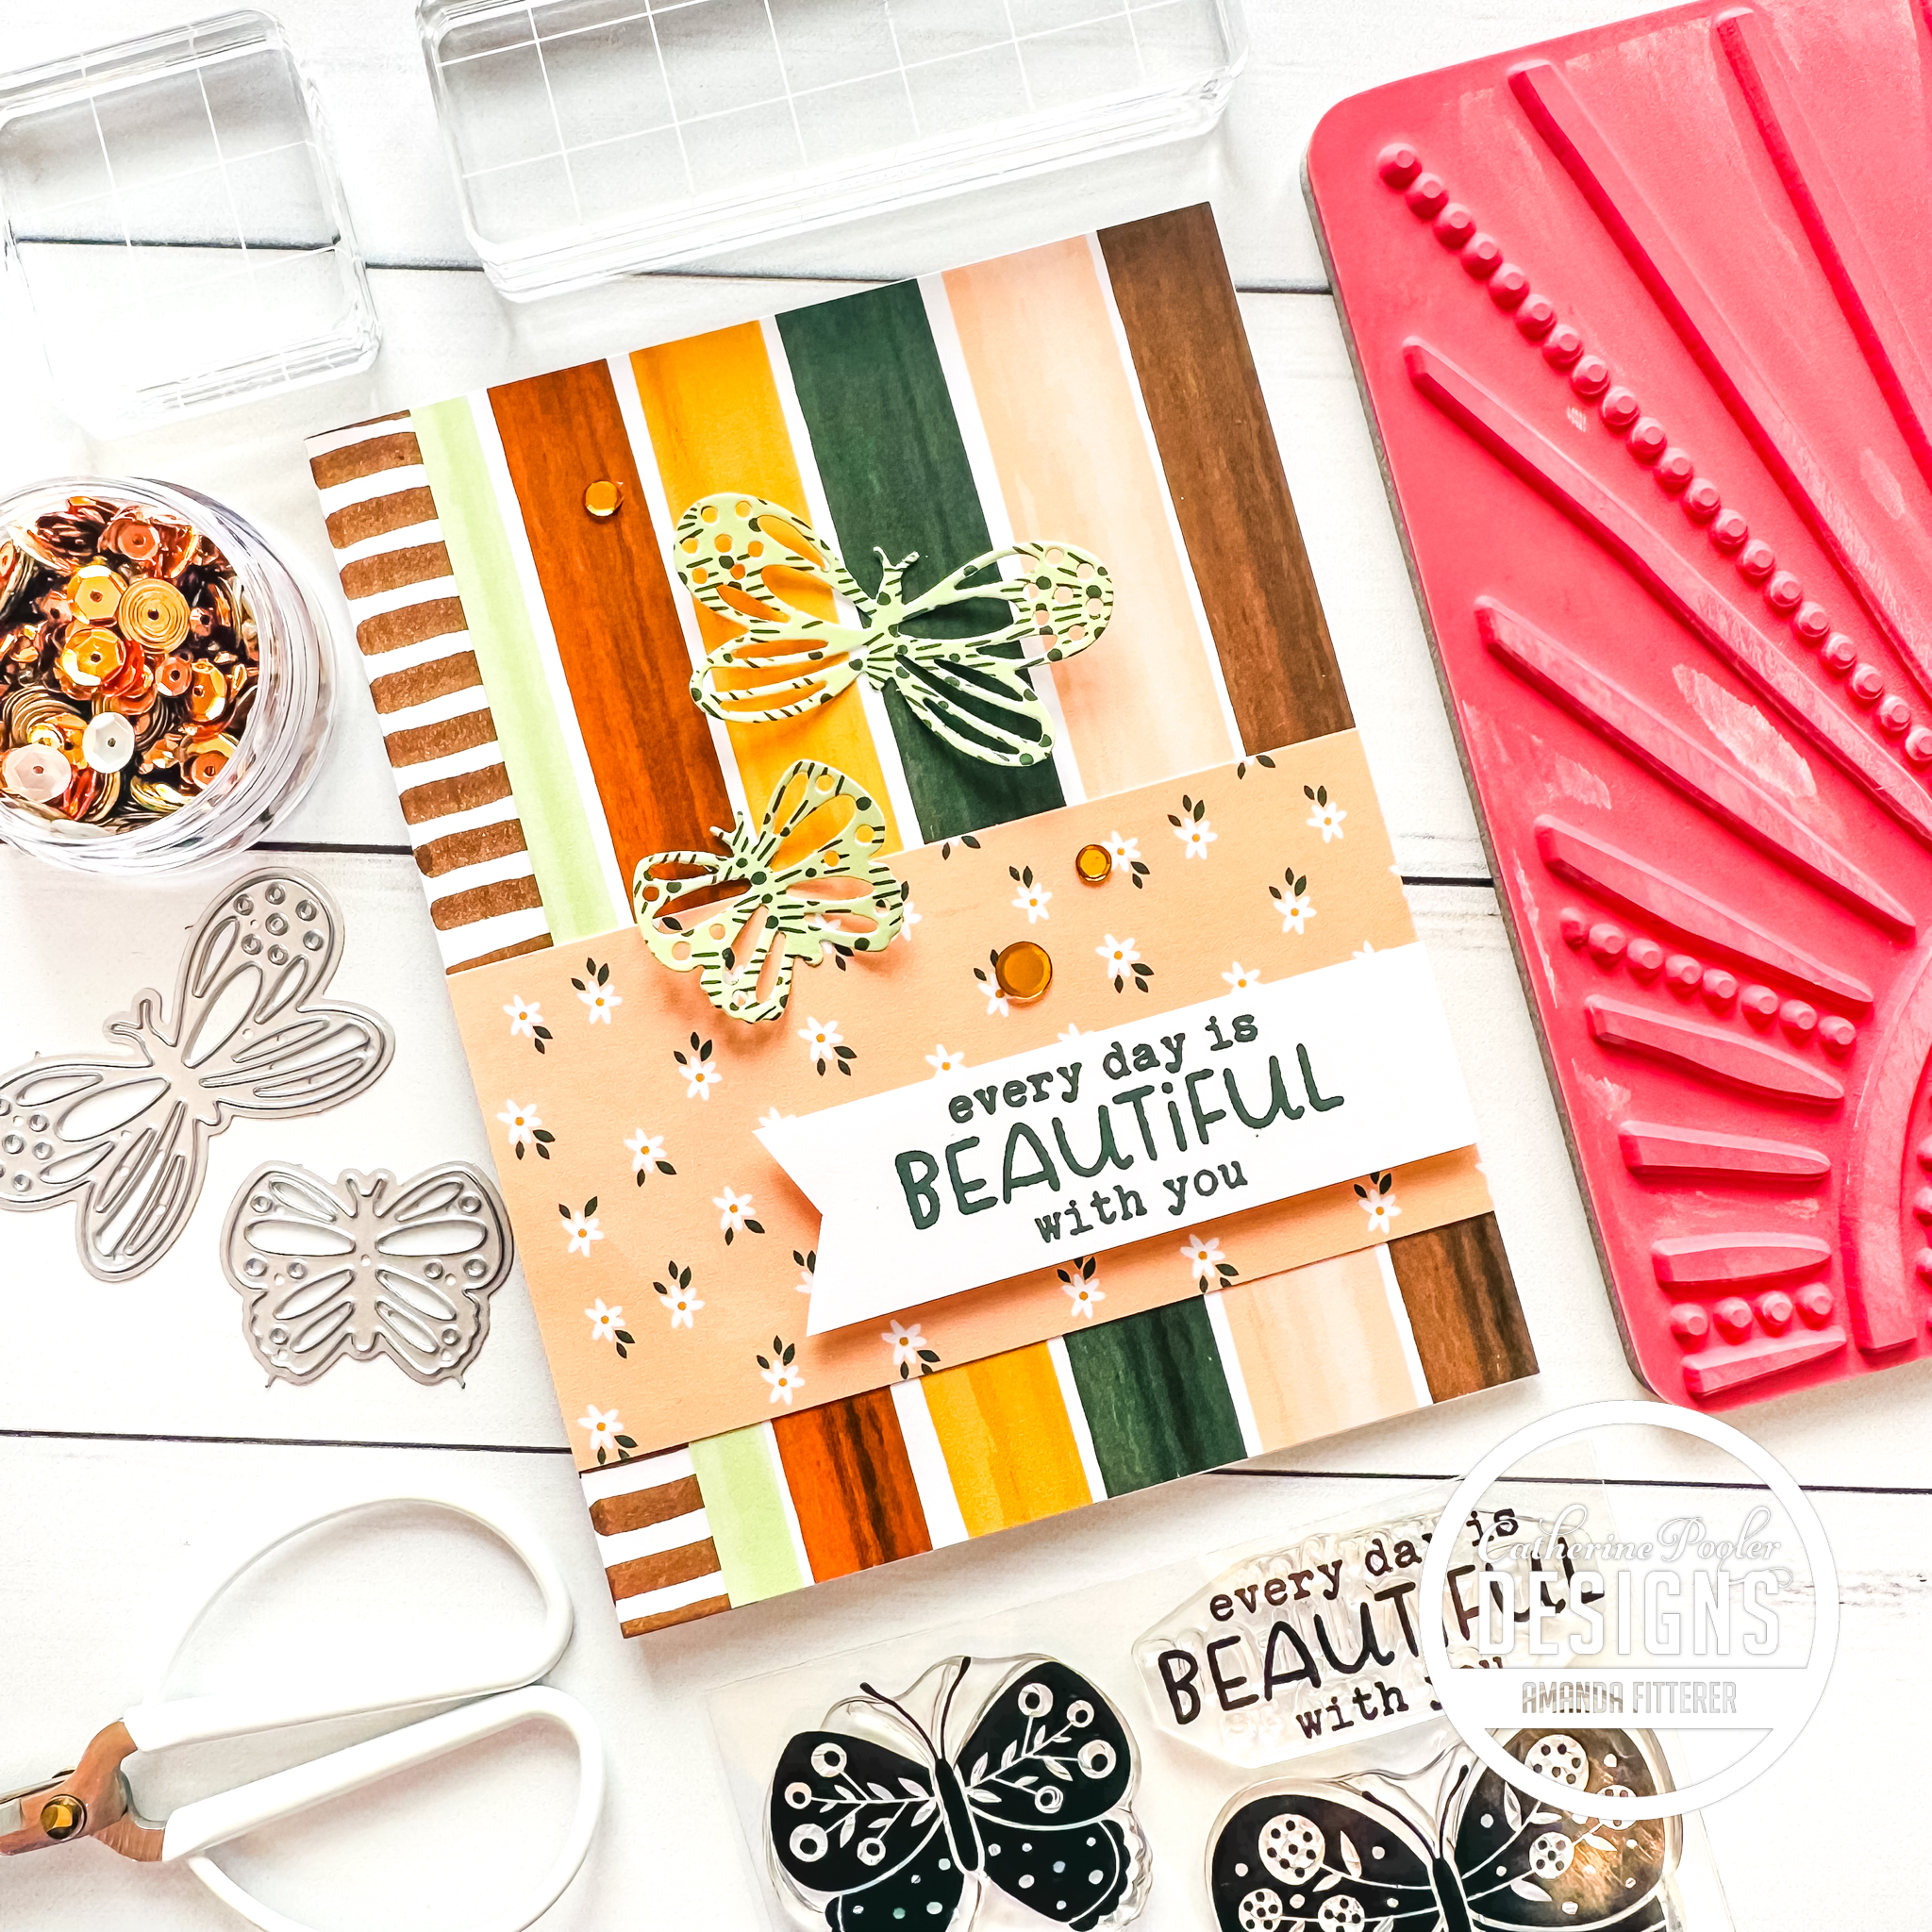
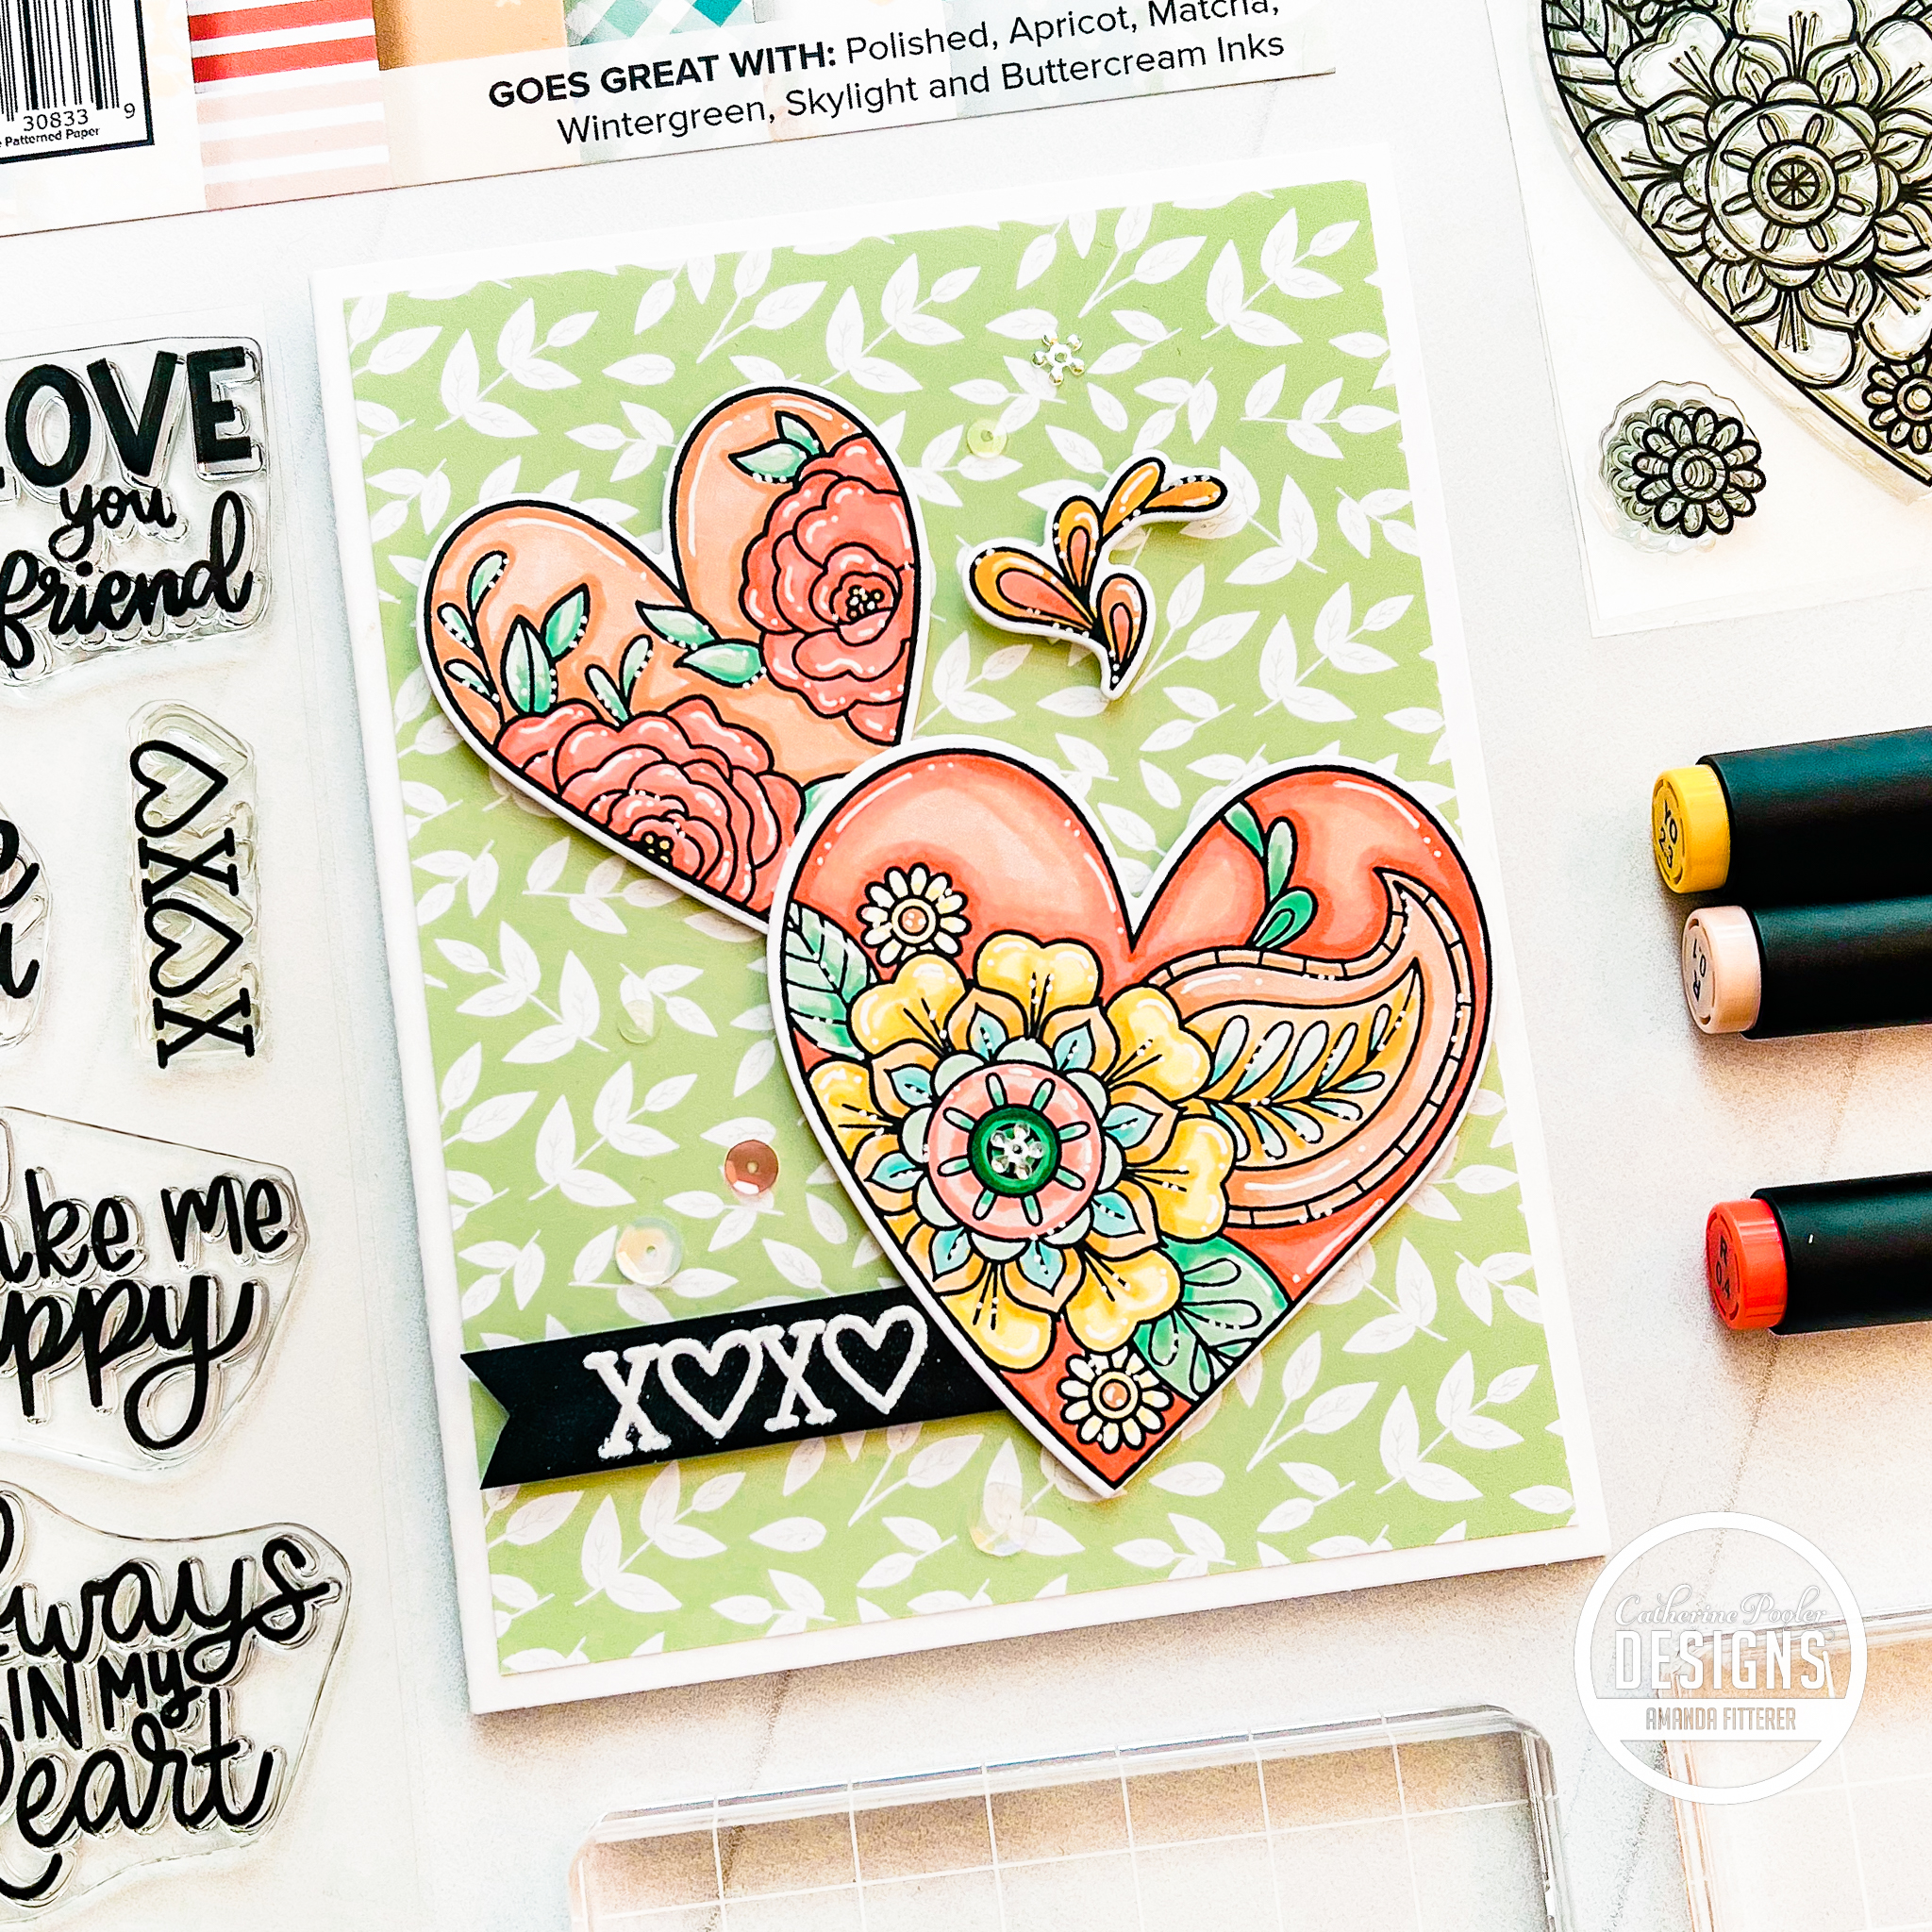
Hey friends! You can shop the BRAND NEW RELEASE from Catherine Pooler NOW! Keep scrolling to see how I made this card featuring the In the Amazon Bundle.
Don’t forget: If you’re a Catherine Pooler StampNation member, you get EARLY ACCESS to every new release (plus SOOO many other benefits)! Sign up now! It’s worth it!
Thanks for using my affiliate links! You all are the BEST! Using an affiliate link in this post above or down below costs you nothing, but it gives me a teeny percentage of your sale to buy more crafty goodies to continue to share card tutorials with YOU! So, thank YOU! Xx, Amanda
Hey friends! You can shop the BRAND NEW RELEASE from Catherine Pooler NOW! Keep scrolling to see how I made this card featuring the In the Amazon Bundle.
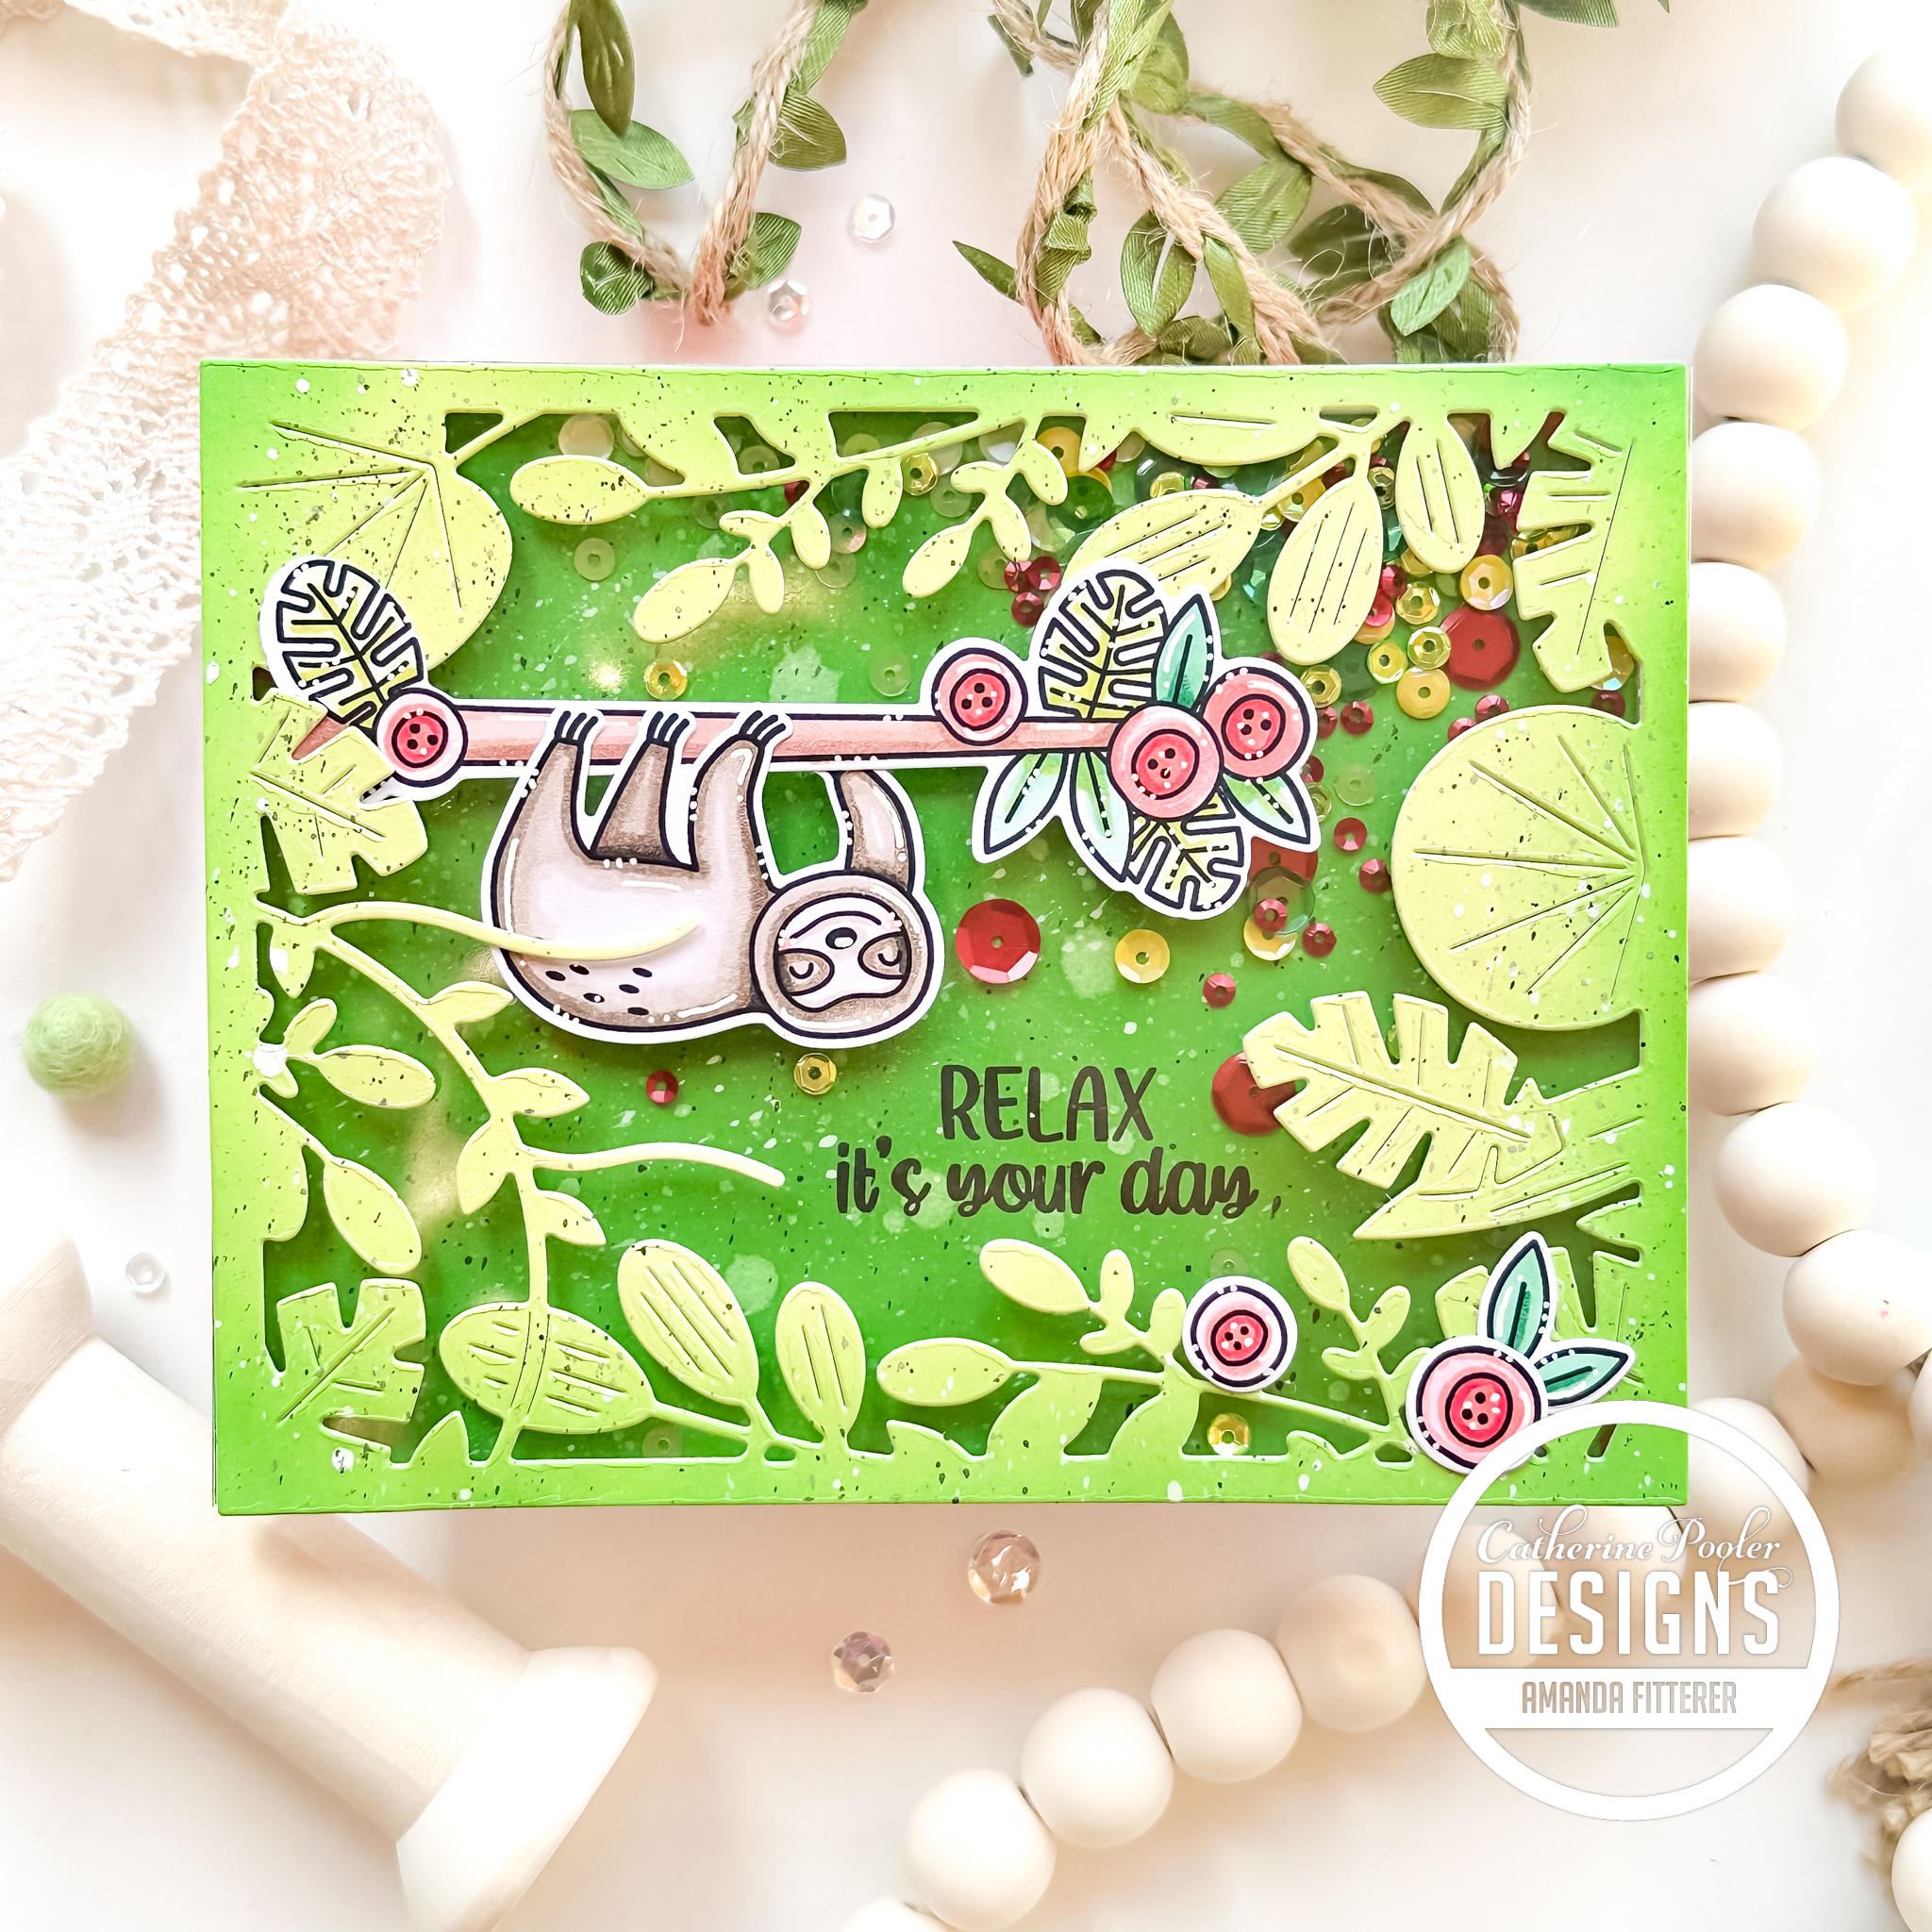
To create the shaker portion of the card, I trimmed an acetate sheet to a teeny bit smaller than my die cut frame. I adhered the sheet to my frame using redline tape. Then, I applied 3D foam tape to create depth between the layers and hold my Big Apple Sequin Mix shakers inside.
Don’t forget: If you’re a Catherine Pooler StampNation member, you get EARLY ACCESS to every new release (plus SOOO many other benefits)! Sign up now! It’s worth it!
Thanks for using my affiliate links! You all are the BEST! Using an affiliate link in this post above or down below costs you nothing, but it gives me a teeny percentage of your sale to buy more crafty goodies to continue to share card tutorials with YOU! So, thank YOU! Xx, Amanda
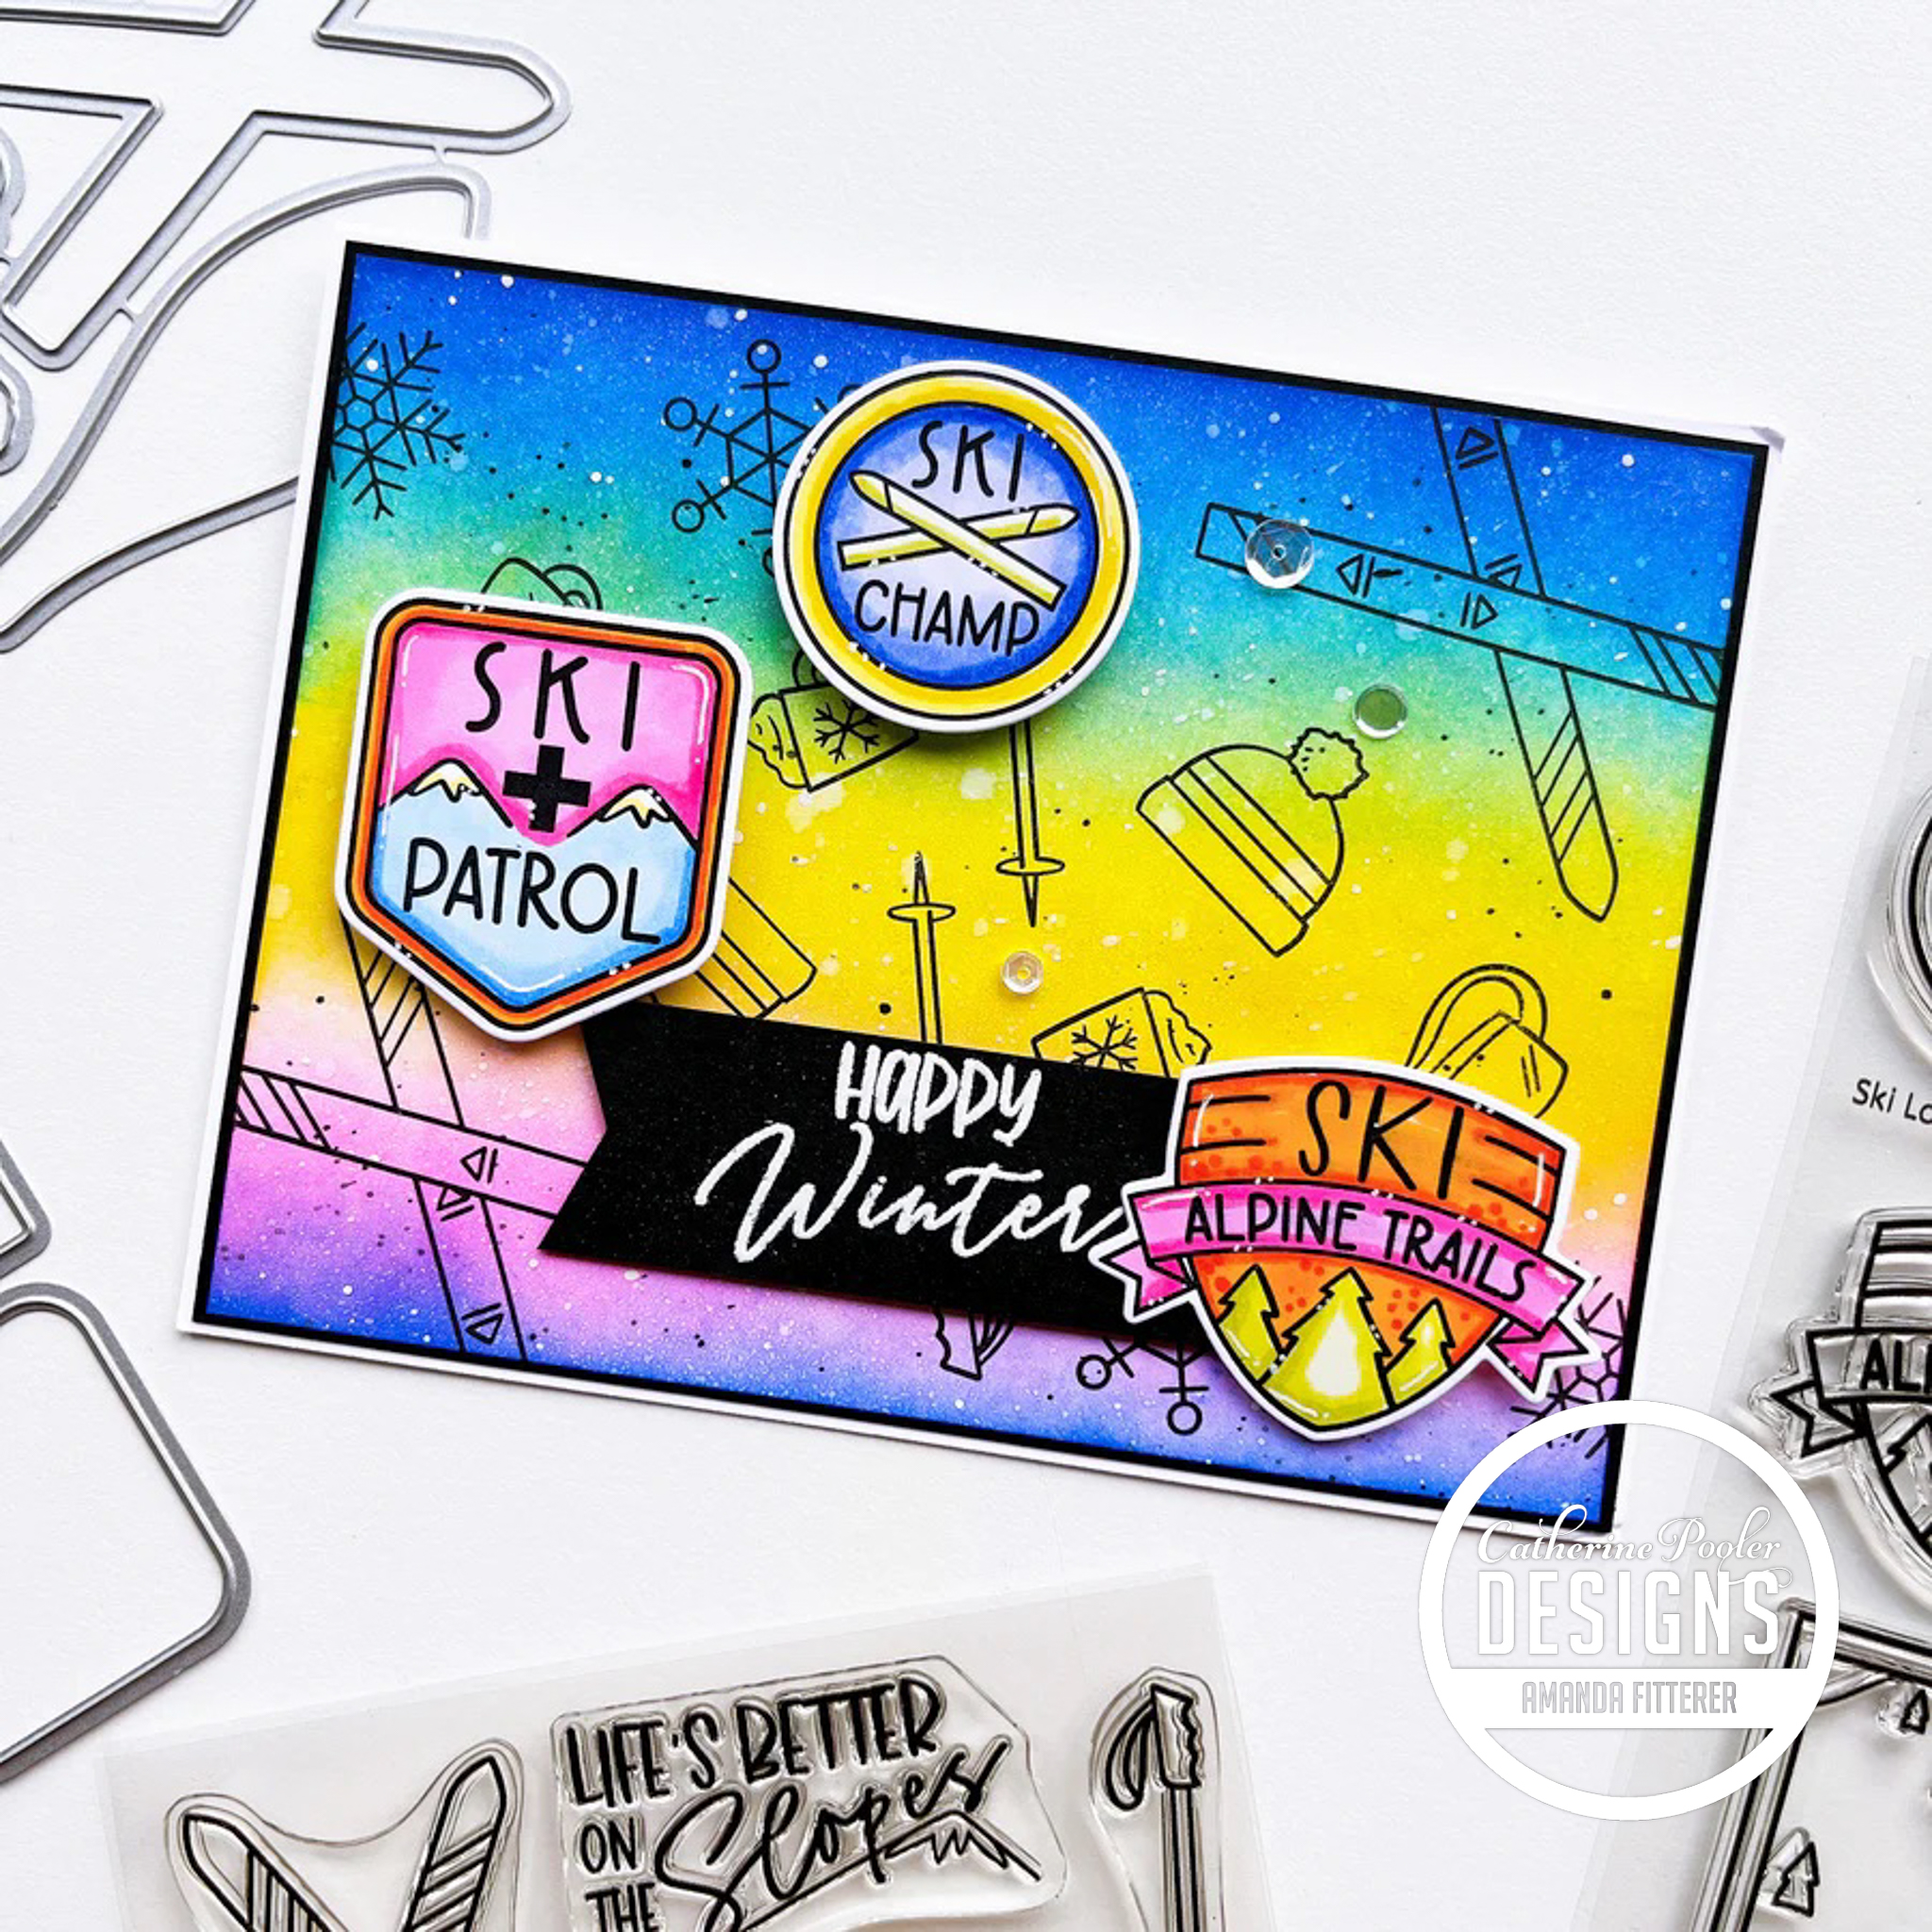
Hey friends! Have you heard the good news?! There’s a new release coming.. and boy, is this a FUN one!! StampNation Members can shop the new collection EARLY on Tues, March 21st! General ordering opens on Weds, March 22nd!
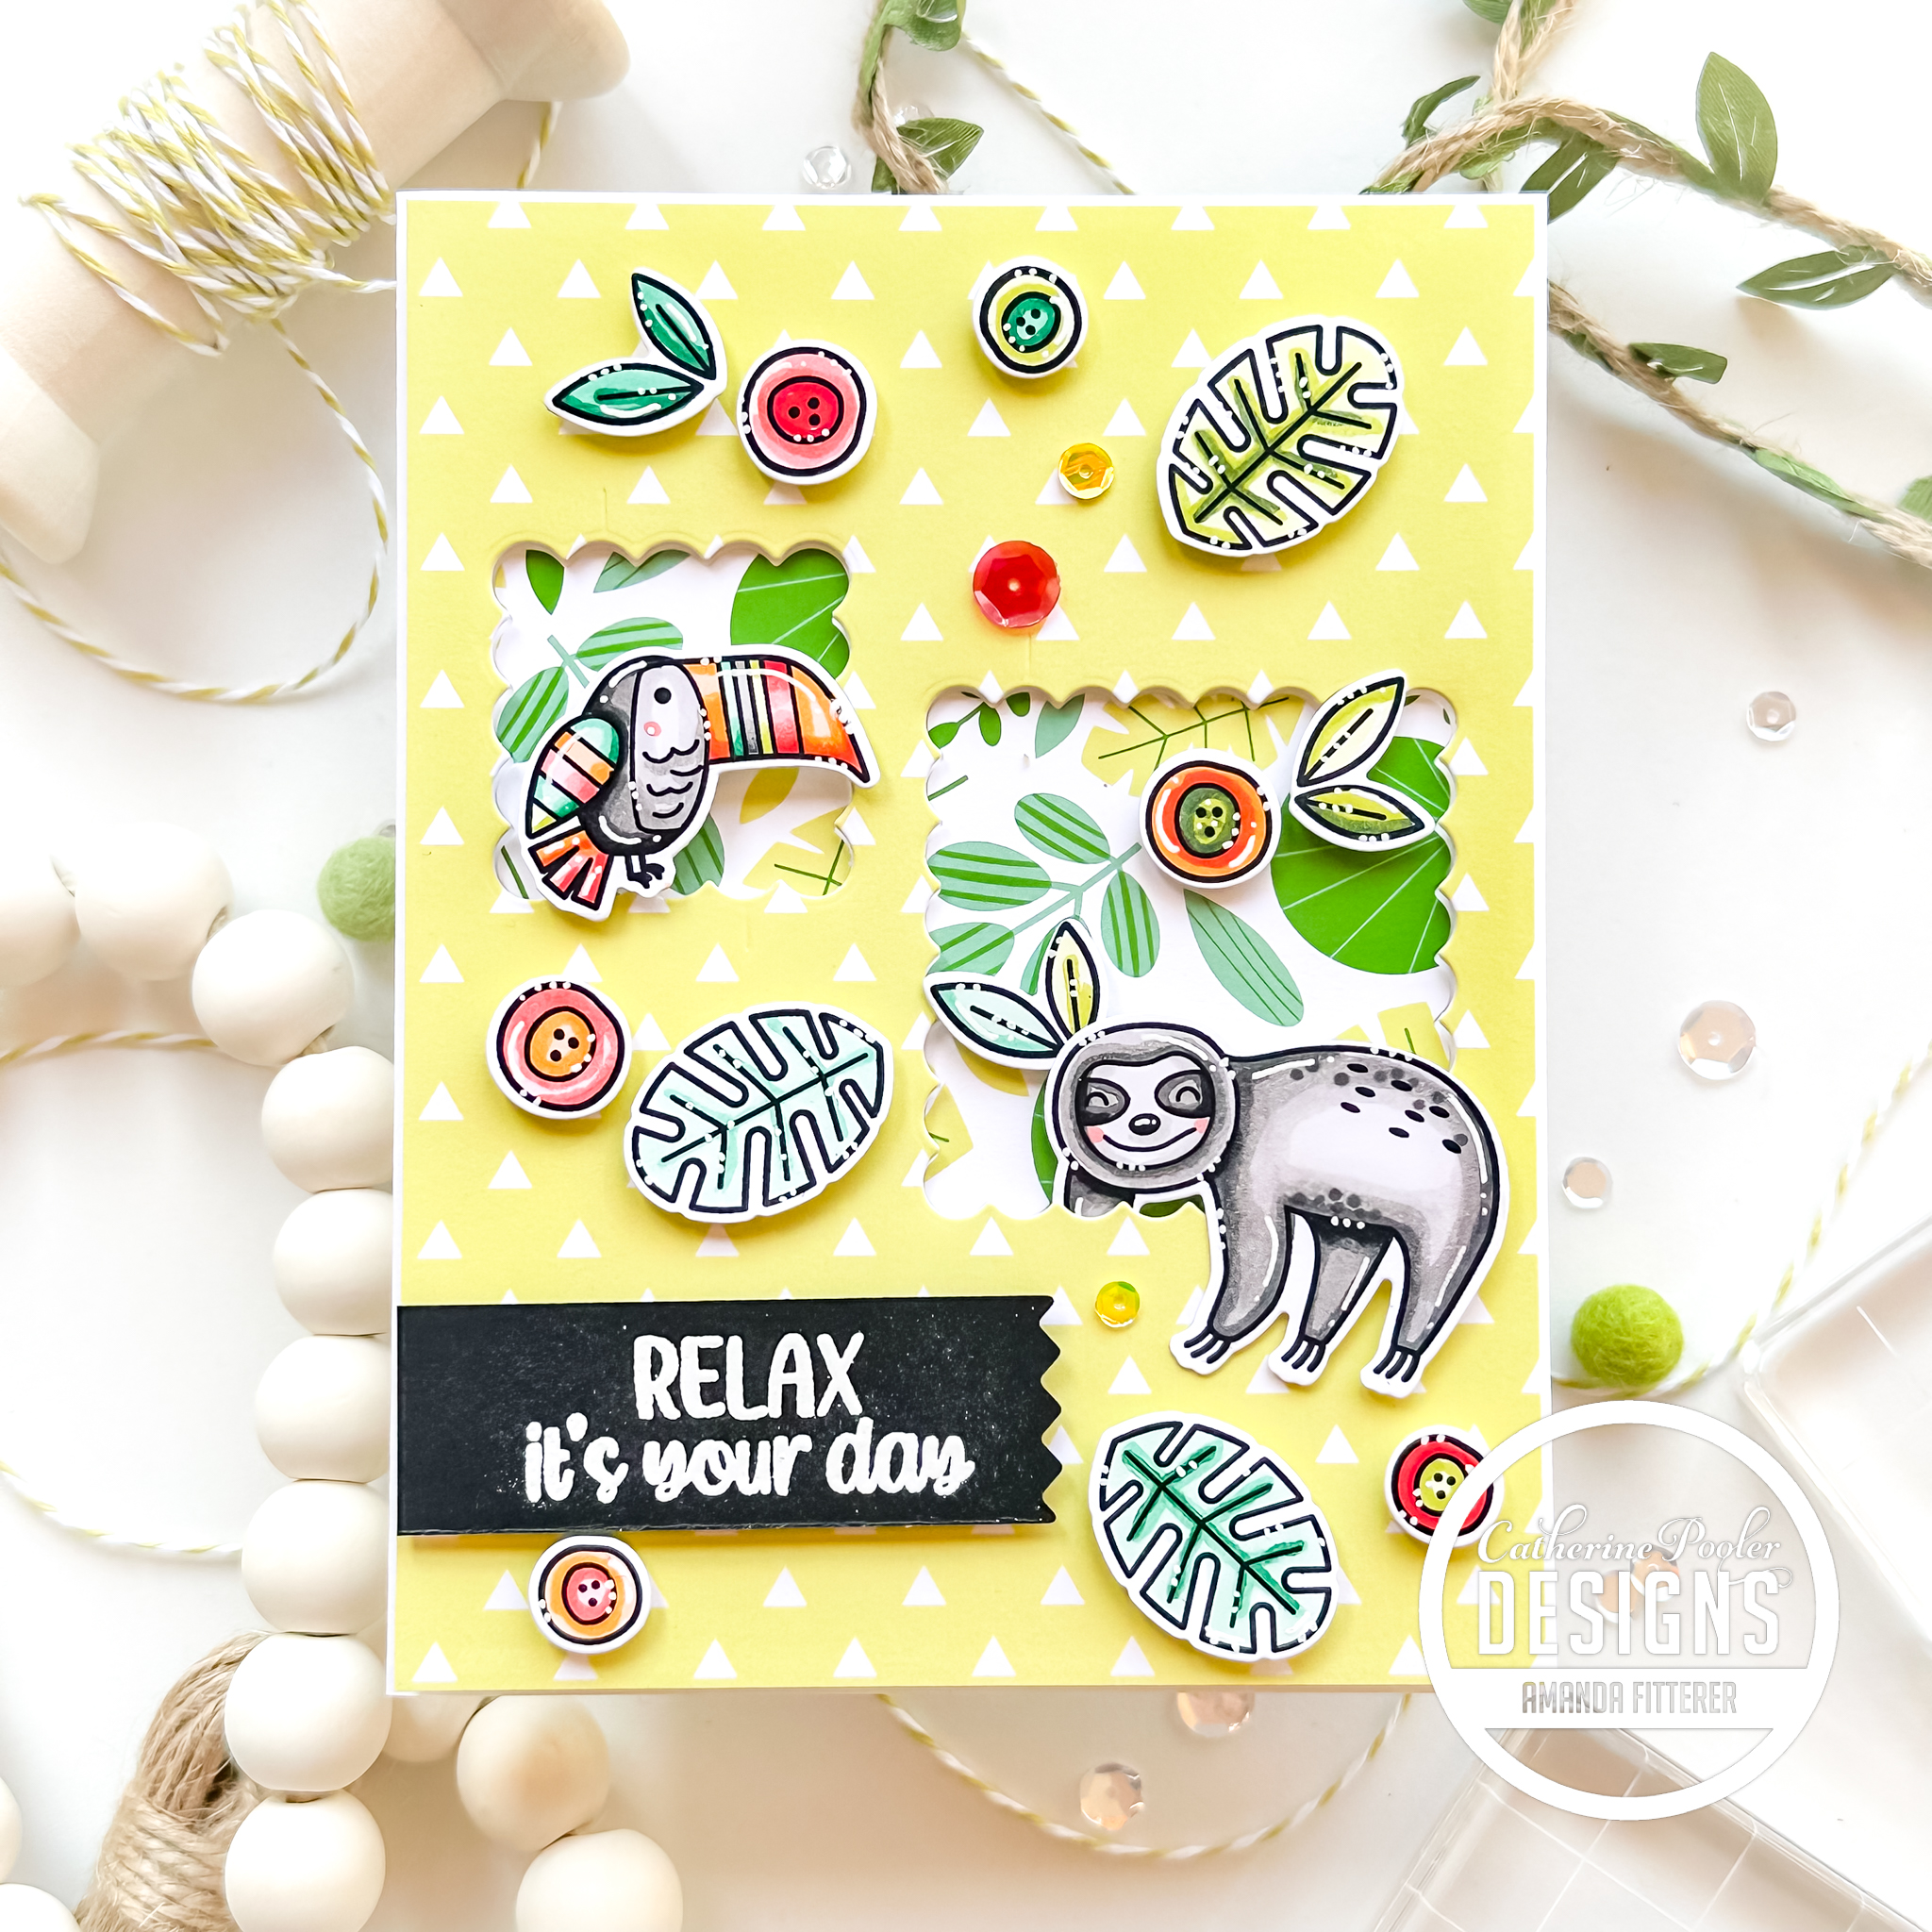
I propped my patterned paper up using 3D foam tape to create depth between the layers. Then, I attached my card panel to a pre-scored card base. I propped all of my cute critters and flowers up using my favorite 3D foam squares.
Don’t forget: If you’re a Catherine Pooler StampNation member, you get EARLY ACCESS to every new release (plus SOOO many other benefits)! Sign up now! It’s worth it!
Thanks for using my affiliate links! You all are the BEST! Using an affiliate link in this post above or down below costs you nothing, but it gives me a teeny percentage of your sale to buy more crafty goodies to continue to share card tutorials with YOU! So, thank YOU! Xx, Amanda
Welcome to the Heffy Doodle New Release Inspiration Blog Hop! We are so excited to share amazing cards from our Design Team members using the new release! For today’s special Blog Hop, you can win a £50 voucher to the Heffy Doodle store!
I love seeing how people “sketch out” their ideas for their cards, so I wanted to show you how I do it! This is how I visual the card: I knew I wanted to use the Stitched Birthday Trio Frame so I die cut that out first. Then, I lay out my stamped images and any other dies I want to use. I then take a photo so I can remember how I have things laid out!
Now, I’m going to ink blend my pond and grass and 1 panel cutout. I’m using Catherine Pooler’s Melon Ice and Martini for the grass. I’m also using All That Jazz and Uptown for the Ripple Waves Stencil pond. I LOVE this color combo! I like to do my ink blending before coloring my stamped images so that I can make sure my stamped images coordinate with the ink colors.
So, now I can color my images! I’m using OLO Alcohol Markers to color my images. I add highlights with my ABSOLUTE FAV white Gelly Roll pen.
Let’s cut these little guys out now! Like I mentioned earlier, I use 3″ wide cardstock so that I can run it through my Mini Die Cutting Machine! If you don’t have a mini die cutting machine, you HAVE to get one! They’re also available on Scrapbook.com, if you’re in the US!
Using my frame as a guide (held in place with washi tape), I’m gluing my panels down with Glubert Glue.
For my frame, I’m using Deep Foam Tape because I want it to really have a LOT of dimension!
The last step is to add my images with 3D foam squares! For some of the images, I used 2 foam squares on top of each other to get even more dimension!
Here are some close-up images!
To be entered to win the giveaway, all you need to do is comment at each stop along the Blog Hop before March 14th, 2023 at 11:59 PM EST. The winner will be announced on the Heffy Doodle Blog on March 16th at 10:00 AM EST!
Thank you so much for stopping by my part of the Blog Hop today! I really appreciate your love and support! Happy Hopping, friends!
Thanks for using my affiliate links! You all are the BEST! Using an affiliate link in this post above or down below costs you nothing, but it gives me a teeny percentage of your sale to buy more crafty goodies to continue to share card tutorials with YOU! So, thank YOU! Xx, Amanda
Thanks for using my affiliate links! You all are the BEST! Using an affiliate link in this post above or down below costs you nothing, but it gives me a teeny percentage of your sale to buy more crafty goodies to continue to share card tutorials with YOU! So, thank YOU! Xx, Amanda
Thanks for using my affiliate links! You all are the BEST! Using an affiliate link in this post above or down below costs you nothing, but it gives me a teeny percentage of your sale to buy more crafty goodies to continue to share card tutorials with YOU! So, thank YOU! Xx, Amanda
Hey friends! Have you heard the good news?! There’s a new release coming.. and boy, is this a gorgeous one!! StampNation Members can shop the new collection EARLY on Tues, Feb 21st! General ordering opens on Weds, Feb 22nd!
Thanks for using my affiliate links! You all are the BEST! Using an affiliate link in this post above or down below costs you nothing, but it gives me a teeny percentage of your sale to buy more crafty goodies to continue to share card tutorials with YOU! So, thank YOU! Xx, Amanda
Hey friends! Are you into bullet journaling? Do you struggle with your layouts? Do you always use the same layout? Do you have an IG account I should follow?? Comment below!! I can’t wait to hear from you!
Today, I’m showing some of my weekly layout ideas!
I use the Catherine Pooler Canvo Bullet Journal. It is 150 numbered pages, and at 199gsm, the pages are SO thick! So you can use inks, pens, markers, and more without worrying about it bleeding through. There’s also a slew of stencils that coordinate perfectly with the journal. The dots are gray, not too light and not too dark.
I use LePen Black Pens (usually 0.3 and 0.5) and Zebra Mildliner Creative Markers. Shop now:
Thanks for using my affiliate links! You all are the BEST! Using an affiliate link in this post above or down below costs you nothing, but it gives me a teeny percentage of your sale to buy more crafty goodies to continue to share card tutorials with YOU! So, thank YOU! Xx, Amanda
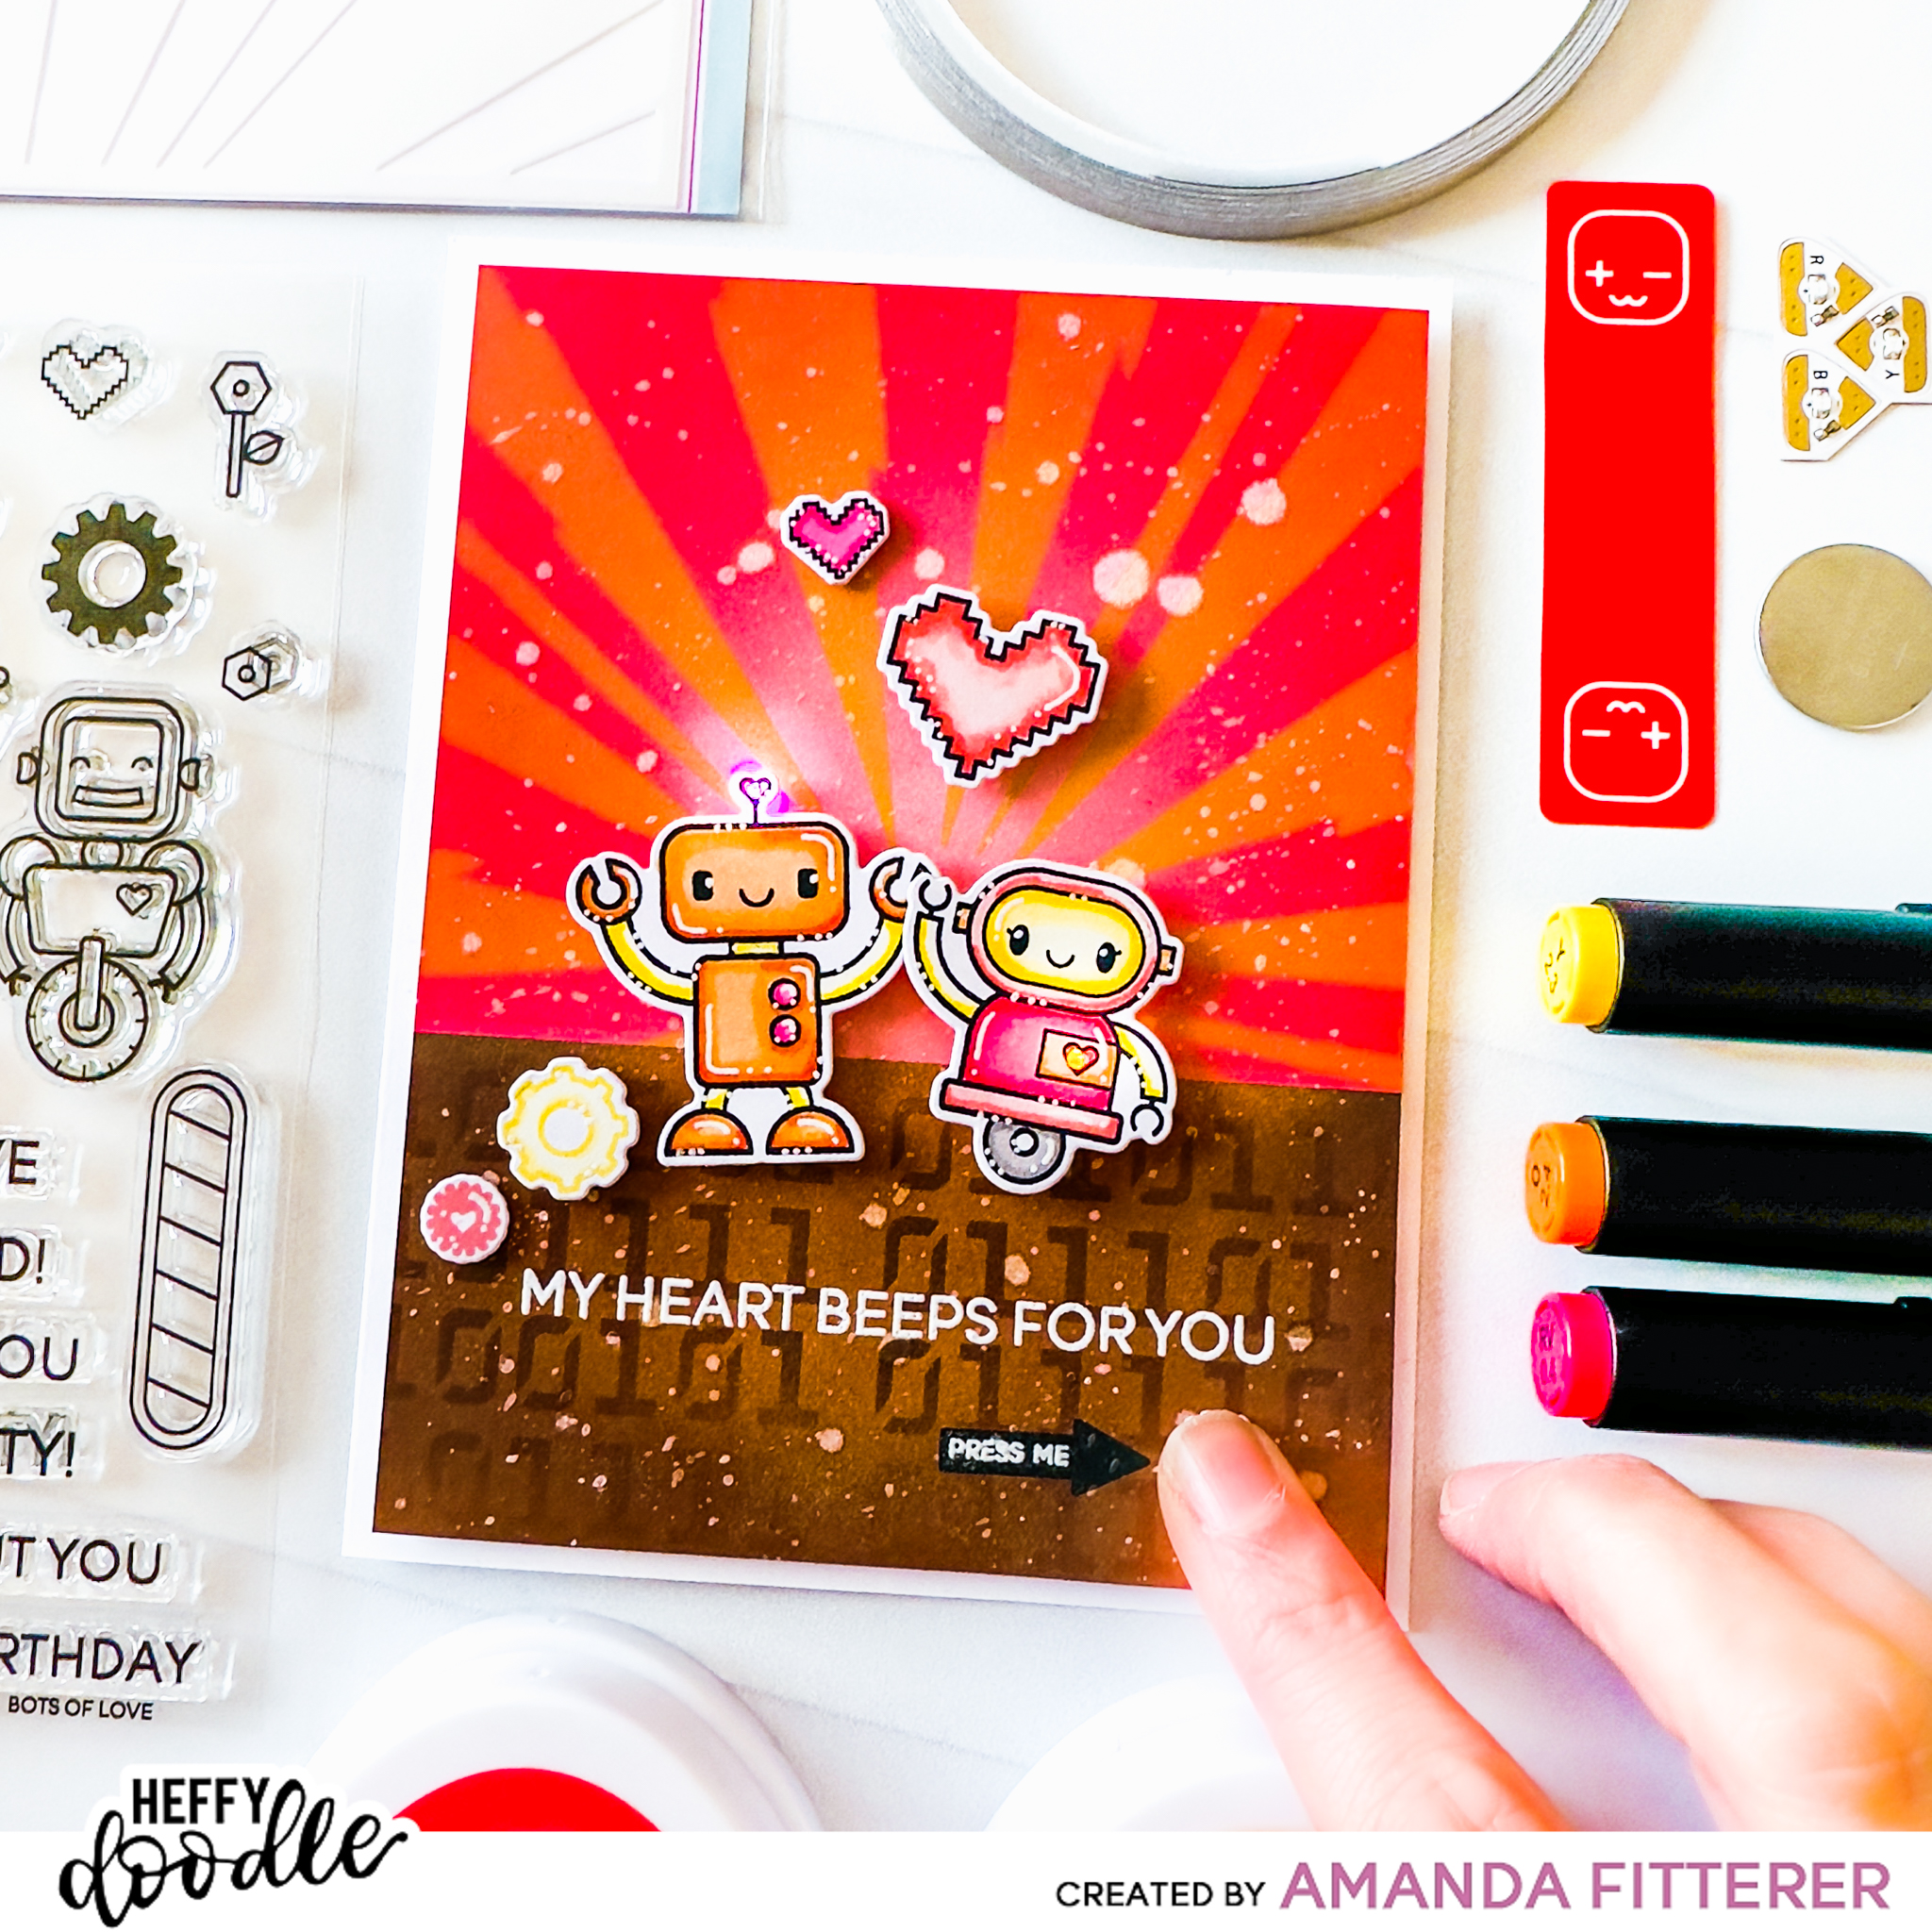
I created this fun light-up card using the Craft with Light Kit – White by Chibitronics. I used lots of Heffy Doodle products! Keep reading on for those links!
First, I created my bright background! I blended some Catherine Pooler inks through my Zapp Attack and Cogs & Code Stencil. I used Heffy Memo Tapeto mask off the top and bottom of my card.
Once I decided where I wanted my lights, I started to prepare for the wiring.
I poked holes through the robots’ hearts where I want the bulbs to show.
Then, I placed the robots on the background where they were going to be glued down once the card is assembled. I made a mark with a pencil through the robots’ heart holes onto the background.
Then, I poked holes through the pencil marks on the background panel.
Lastly, I used a pencil to make marks on my card base where the lights need to be placed.
On my card base, using the pencil marks I made in the last step as a guide, I’ve made marks where the + and – wires need to line up. I did this by taking the lights and placing them down onto my card base so the light was right over top of the pencil mark. Then, I looked at where the copper + and – are on the light unit and drew lines where I need the wires to be lined up to touch the copper part.
I’ve also created a “housing unit” for my battery with a plus and minus sign on it, so I know which way to insert the battery once it’s time. I also marked where I want the battery to be on the card base.
Next, I started by taking my tape and cutting it in half down the center to create smaller/narrower pieces. This isn’t necessary, but was helpful with navigating the tape.
I adhered my battery housing unit to my card base and started placing my + tape. This tape is the top wire which goes to the base of the battery housing unit.
Then, I placed my – tape which starts on the flap of the battery housing unit.
Next, I used 3D foam tape around the whole base of the card to “lift” my card front up so the battery doesn’t stick out farther than the rest of front panel. I attached the stamped images with 3D foam squares, making sure to line the robots up to the lights properly.
Come join in the IG HOP to enter to win the prizes from Heffy Doodle and Chibitronics!
Thank you so much for stopping by my blog today! Enjoy the Hop!
Thanks for using my affiliate links! You all are the BEST! Using an affiliate link in this post above or down below costs you nothing, but it gives me a teeny percentage of your sale to buy more crafty goodies to continue to share card tutorials with YOU! So, thank YOU! Xx, Amanda
Hey friends! If you’re not signed up for the Club Sursee subscription through Catherine Pooler, YOU SHOULD BE! I love these kits!! So many fun things to be surprised by every month!!
Thanks for using my affiliate links! You all are the BEST! Using an affiliate link in this post above or down below costs you nothing, but it gives me a teeny percentage of your sale to buy more crafty goodies to continue to share card tutorials with YOU! So, thank YOU! Xx, Amanda
Thanks for using my affiliate links! You all are the BEST! Using an affiliate link in this post above or down below costs you nothing, but it gives me a teeny percentage of your sale to buy more crafty goodies to continue to share card tutorials with YOU! So, thank YOU! Xx, Amanda
Hey friends! How do we feel about the color purple?? I tend to lean towards the pinks and yellows for my cards, for whatever reason. However, I am loving this color combo of Sixteen Candles, Pixie Dust, and Drive-In! What do you think??
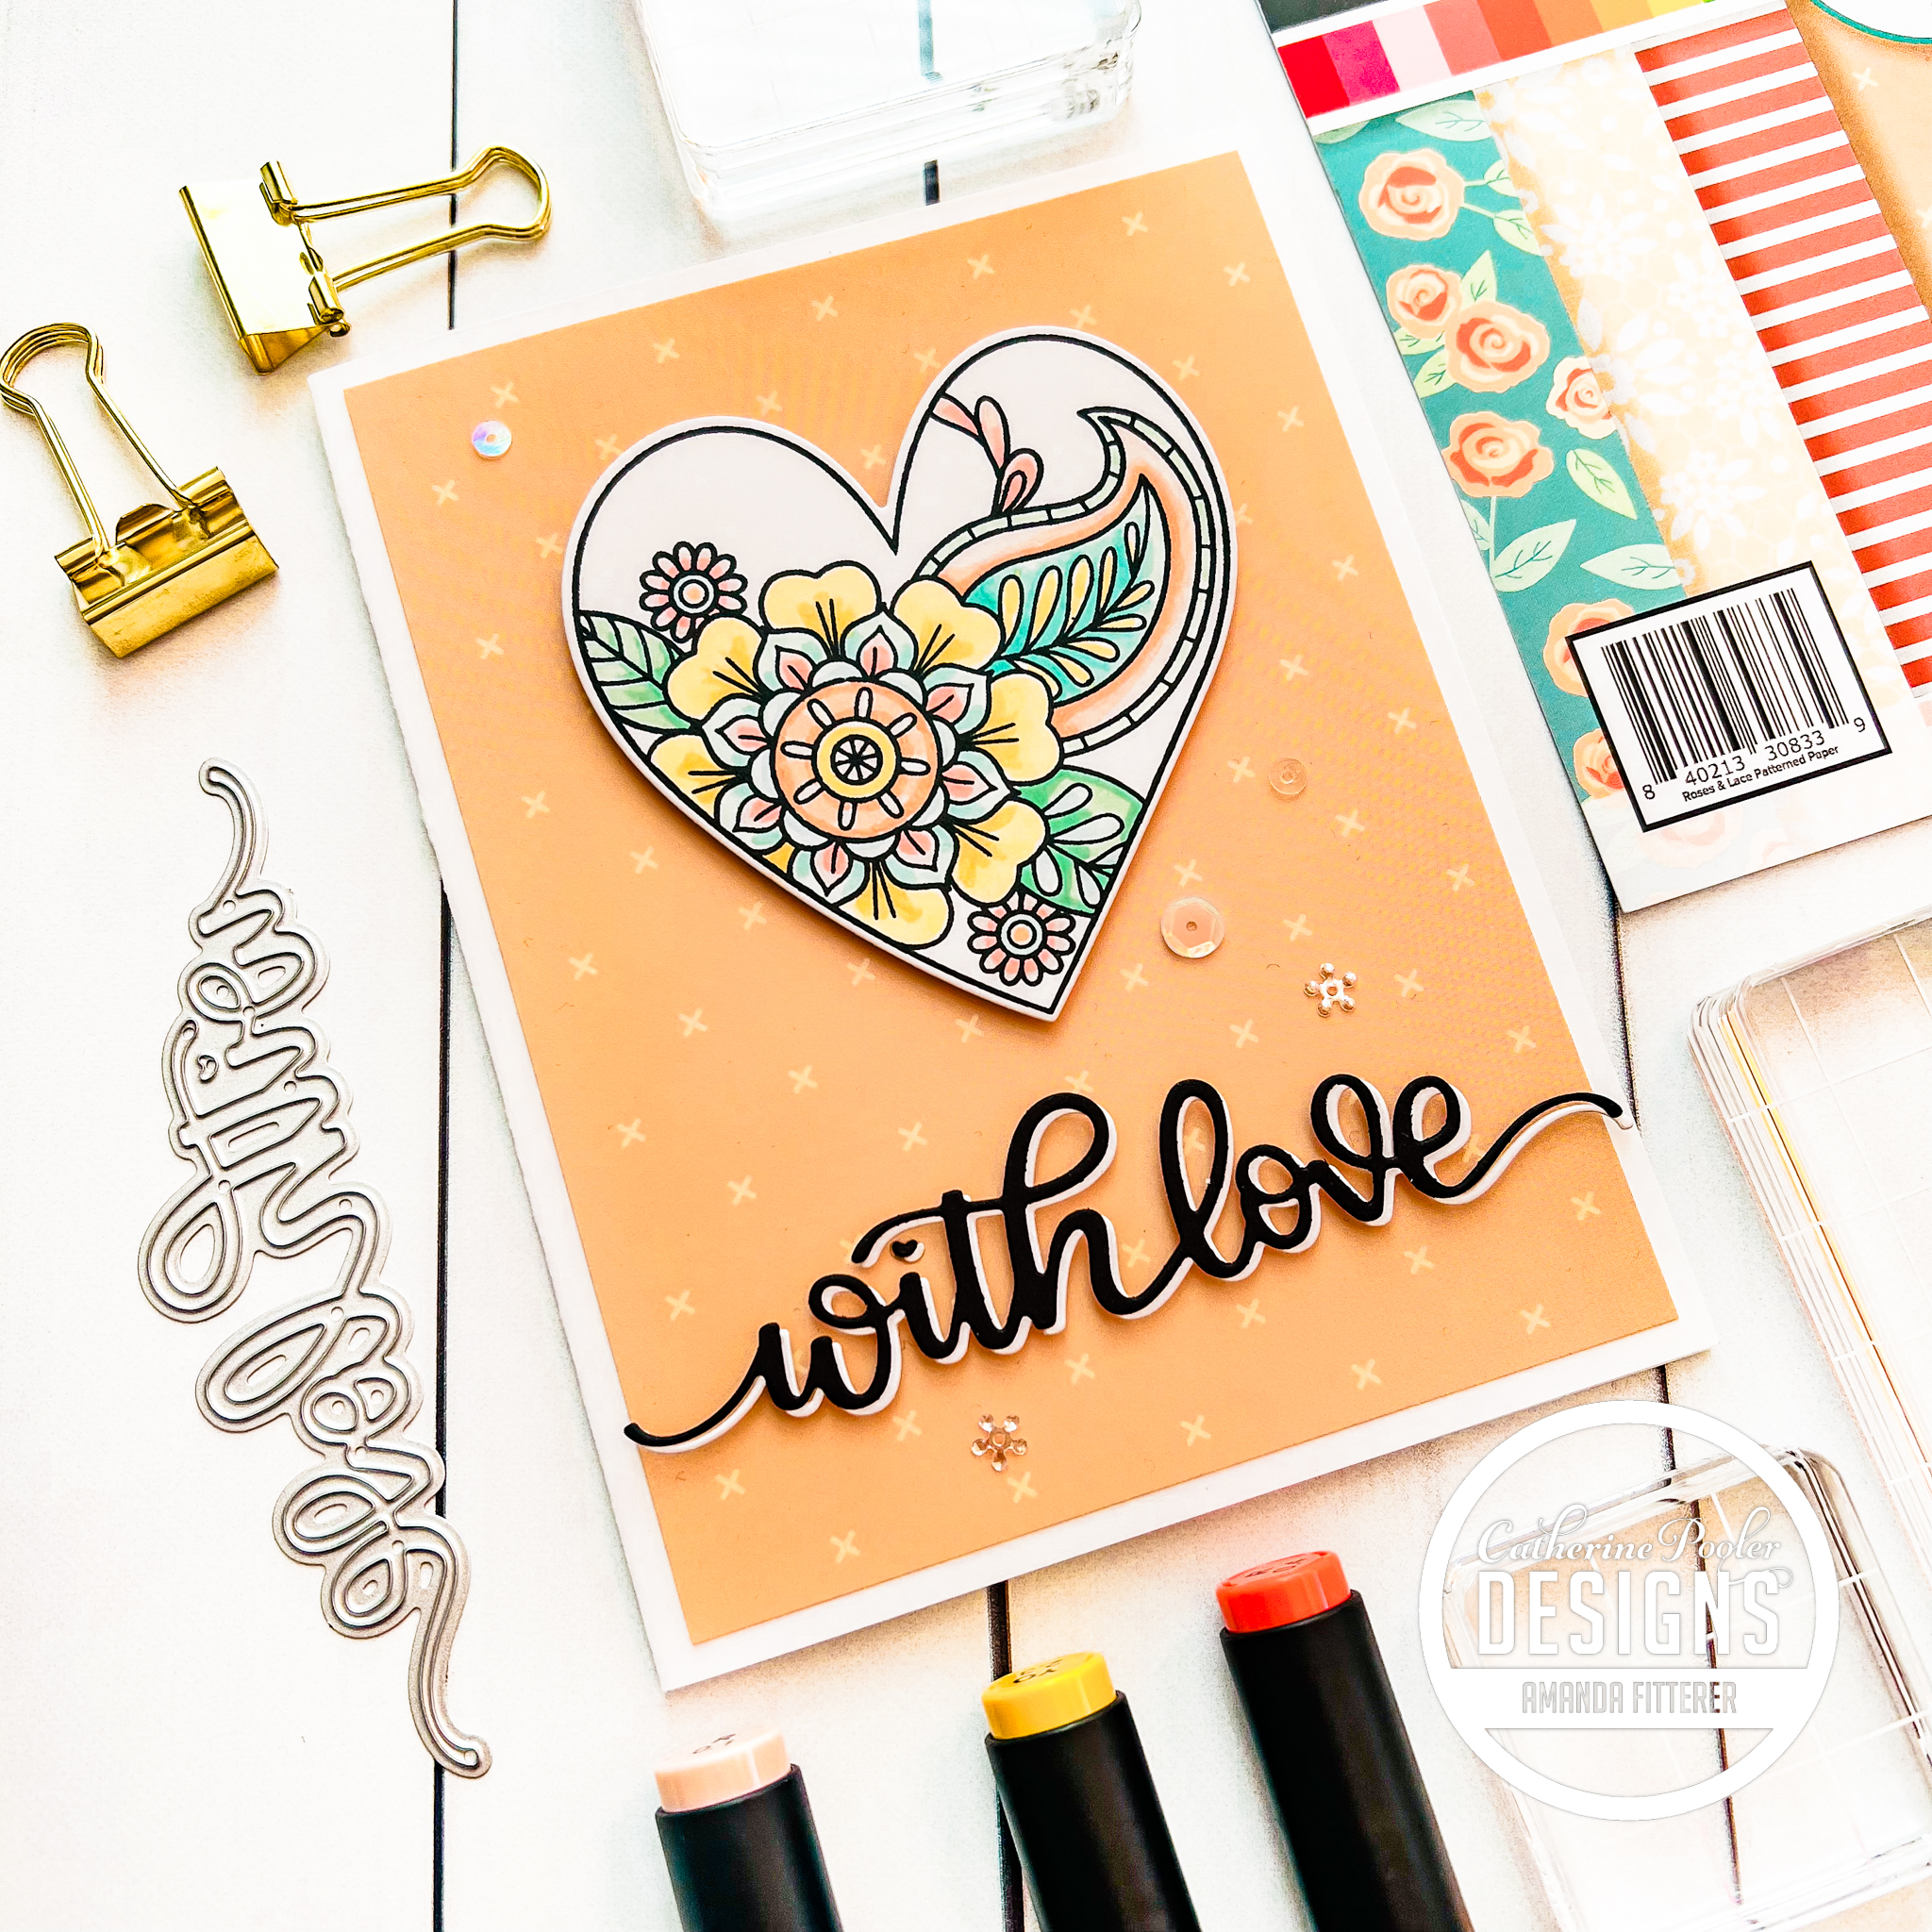
Today, I am sharing a new card using the NEWLY RELEASED Love and Lace Collection from Catherine Pooler!
Thanks for using my affiliate links! You all are the BEST! Using an affiliate link in this post above or down below costs you nothing, but it gives me a teeny percentage of your sale to buy more crafty goodies to continue to share card tutorials with YOU! So, thank YOU! Xx, Amanda
Thanks for using my affiliate links! You all are the BEST! Using an affiliate link in this post above or down below costs you nothing, but it gives me a teeny percentage of your sale to buy more crafty goodies to continue to share card tutorials with YOU! So, thank YOU! Xx, Amanda
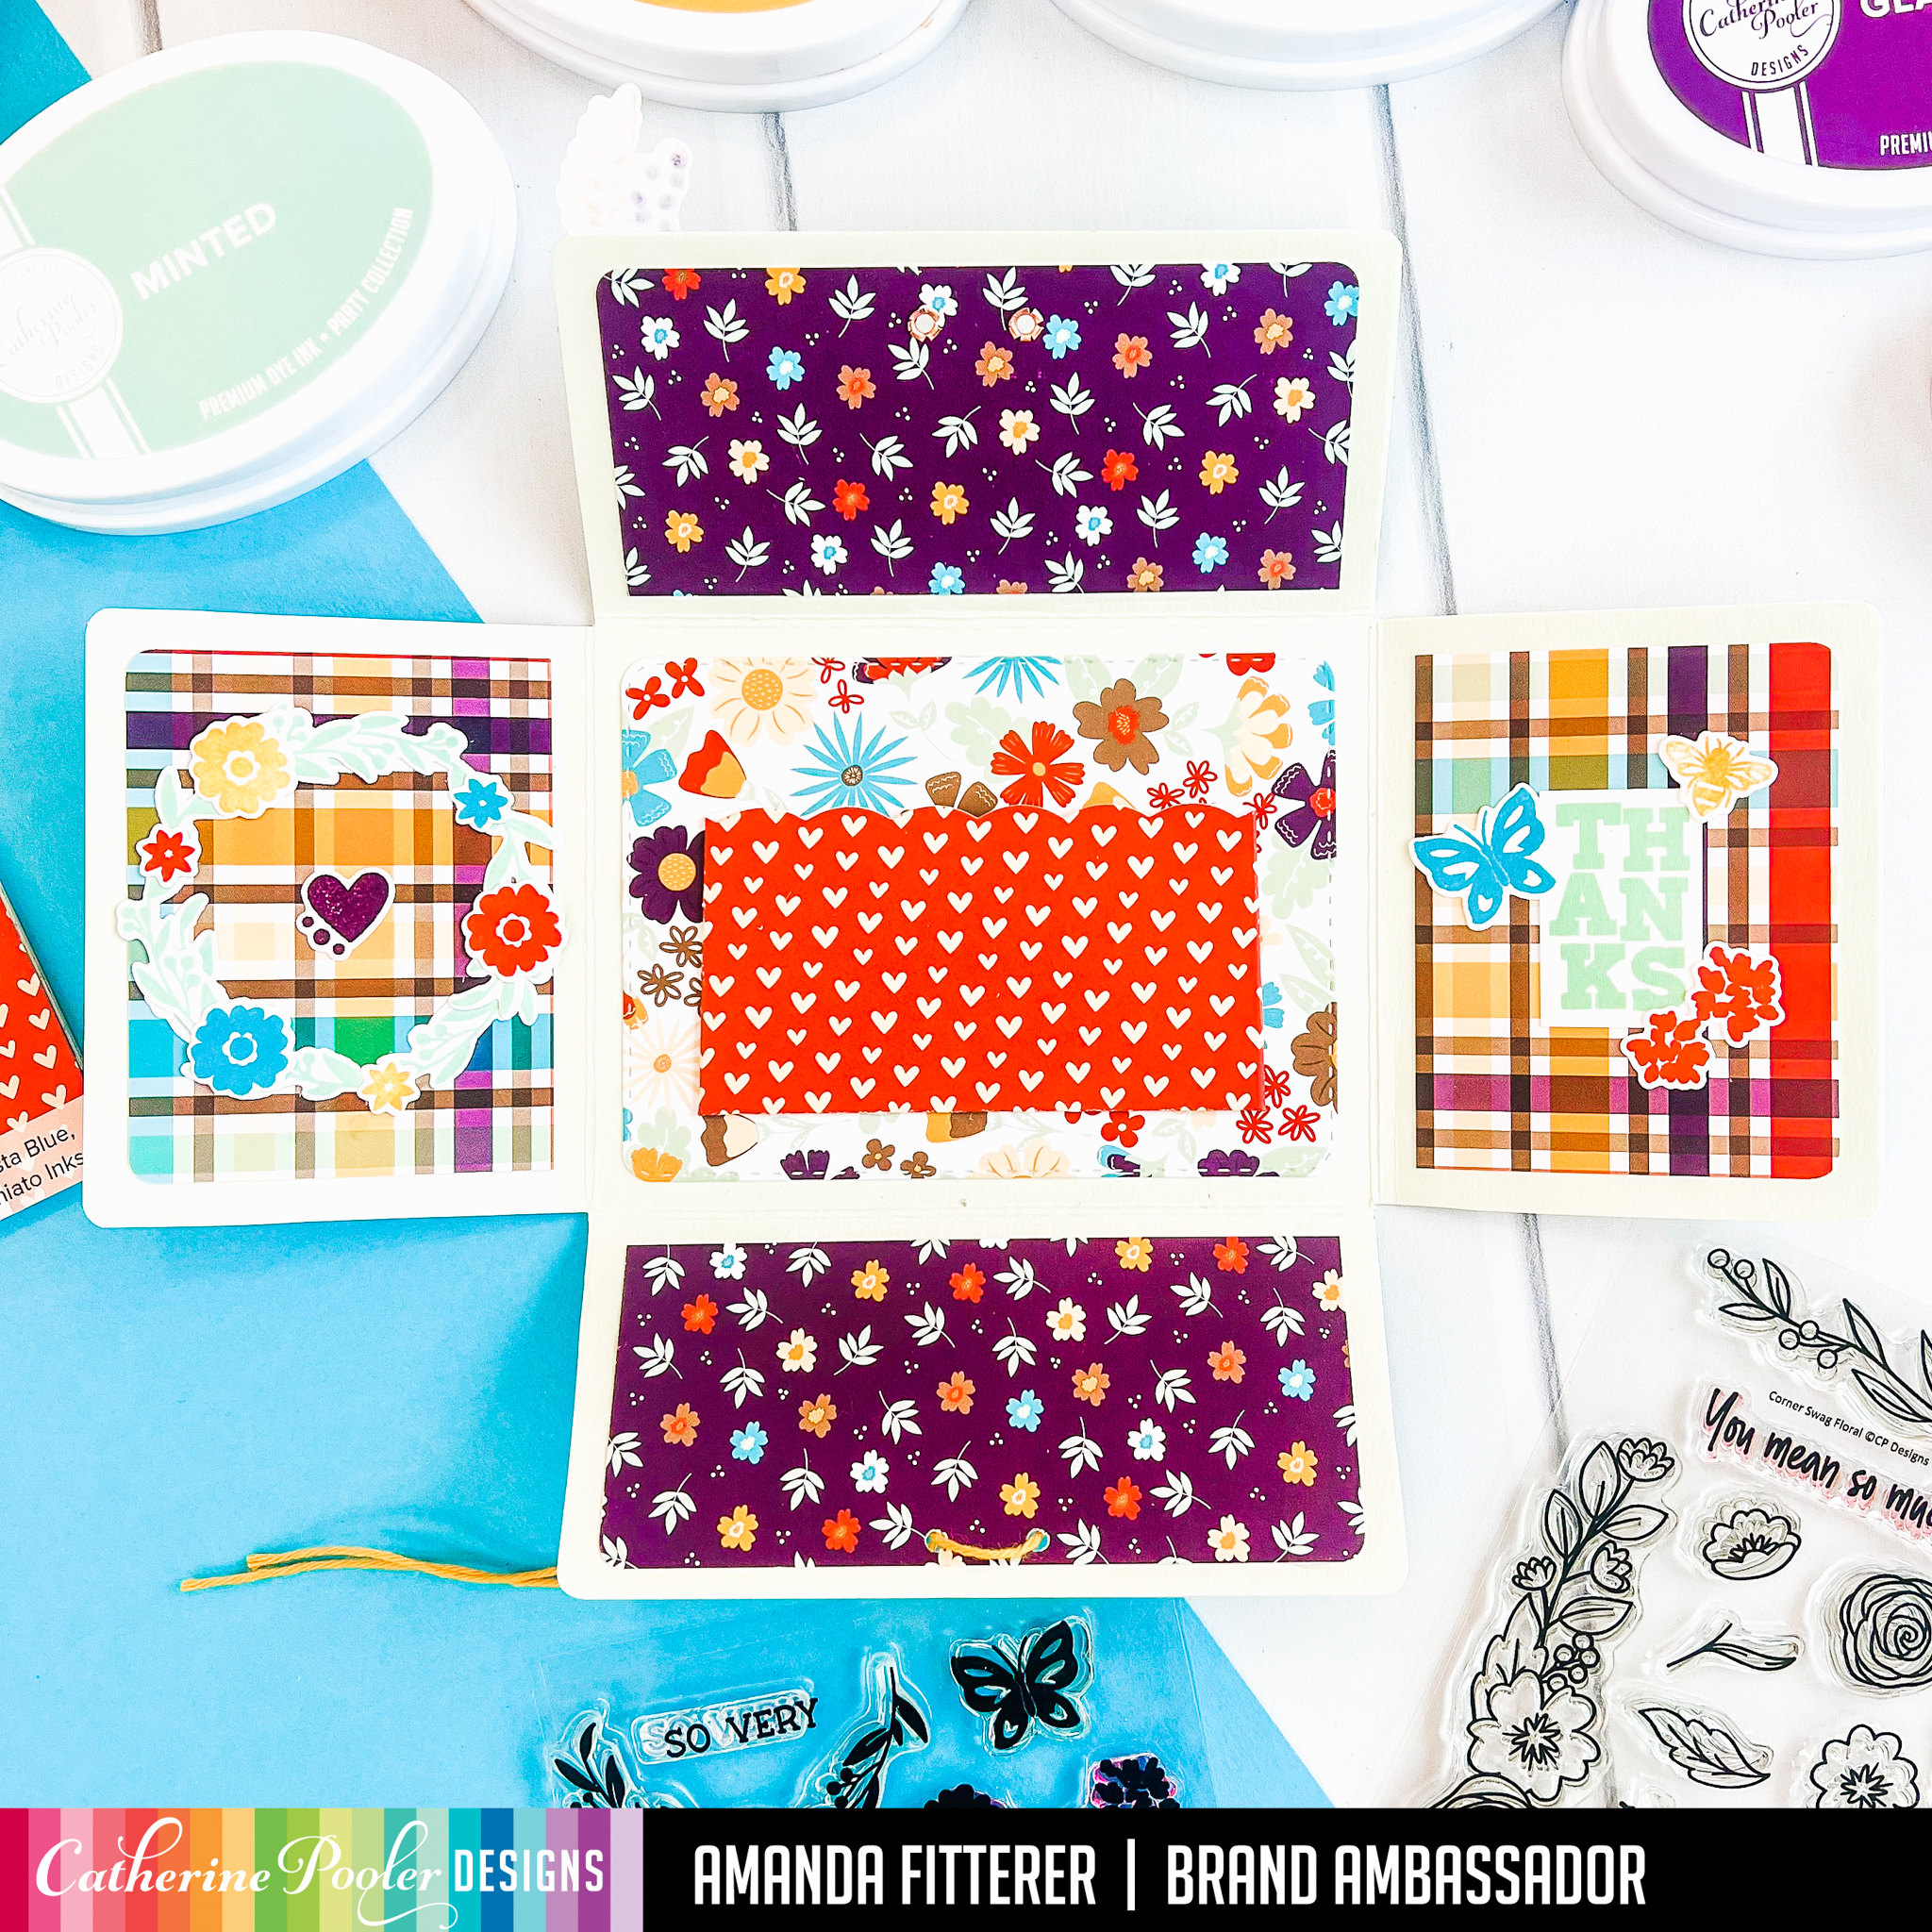
Hey friends! Did you come to learn how to make this gift card holder? It’s SO easy to make! Craft along with me! Grab your scoring board and bone folder, a piece of 8.5″x11″ cardstock, some patterned paper, some stamp sets and some dies!
Start by creating your pocketfold out of 8.5″x11″ cardstock and your scoring board. On the longer edge, score at 3″ and 8″. Turn the paper 90 degrees and score the shorter edge at 2 3/8″ and 6 1/8″. Using scissors, cut your corners off completely. Fold and score on the remaining score lines. Use a corner punch to round your corners.
Now, you can decorate your pocketfold! Use patterned paper, such as the Bee Thankful Paper Pad! I also used the Ruffles and Dashes Dies to add a stitched border to my inside paper.
Don’t forget to decorate both sides!
Now, let’s make the gift card holder pocket. Using the 2nd smallest scallop frame from the Ruffles and Dashes Dies, cut out a piece of patterned cardstock. You want the inside of your pocket to be 2″ x 3.5″. Make a score line on your sides at 3/4″. Trim off the bottom so you’re left with 2 3/4″. Score the bottom so you have a 3/4″ flap. Use scissors to angle cut the 2 bottom corners.
Now create some decorations! I used the Corner Swag Stamp Set and the Thank You Kindle Stamp Set. I used OLO markers to color in my stamped images and a Gelly Roll pen to create my highlights. I cut out the stamped images with the coordinating die sets.
To hold my pocketfold together, I punched 2 holes on the front flap and the bottom flap and threaded through some Torch Twine.
Stay tuned as I continue to share more projects made using this New Collection!
Thanks for using my affiliate links! You all are the BEST! Using an affiliate link in this post above or down below costs you nothing, but it gives me a teeny percentage of your sale to buy more crafty goodies to continue to share card tutorials with YOU! So, thank YOU! Xx, Amanda
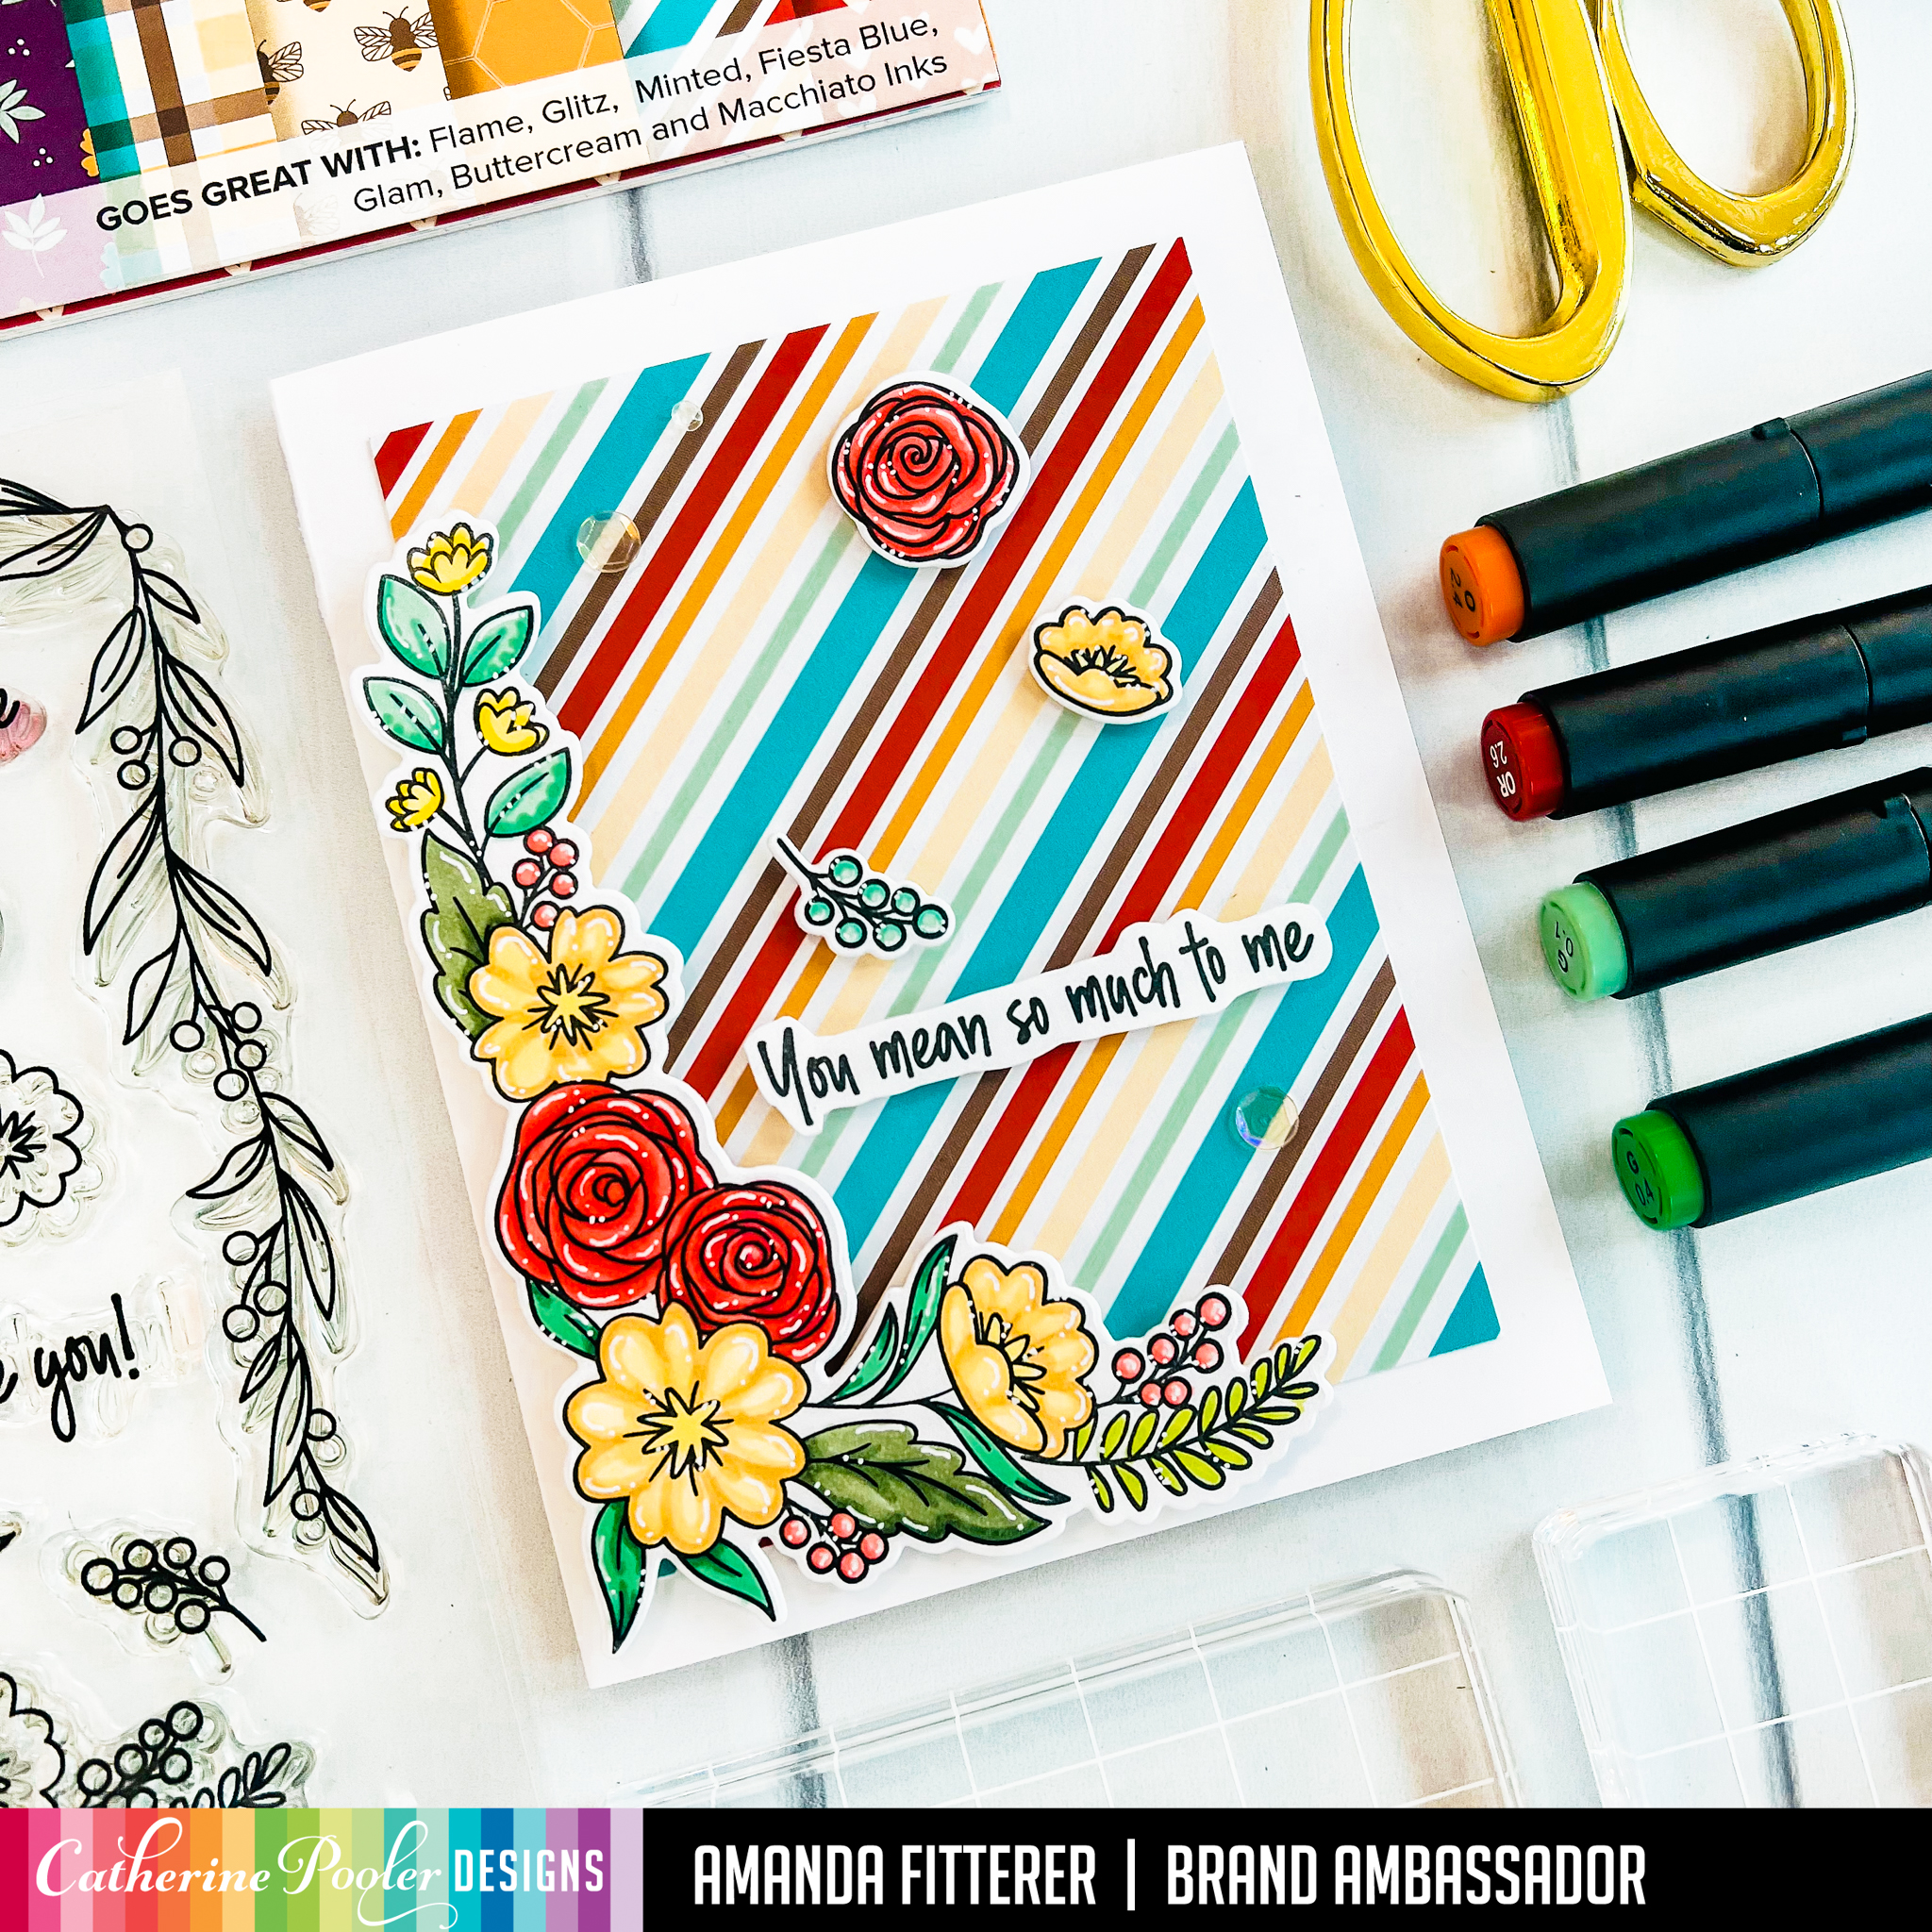
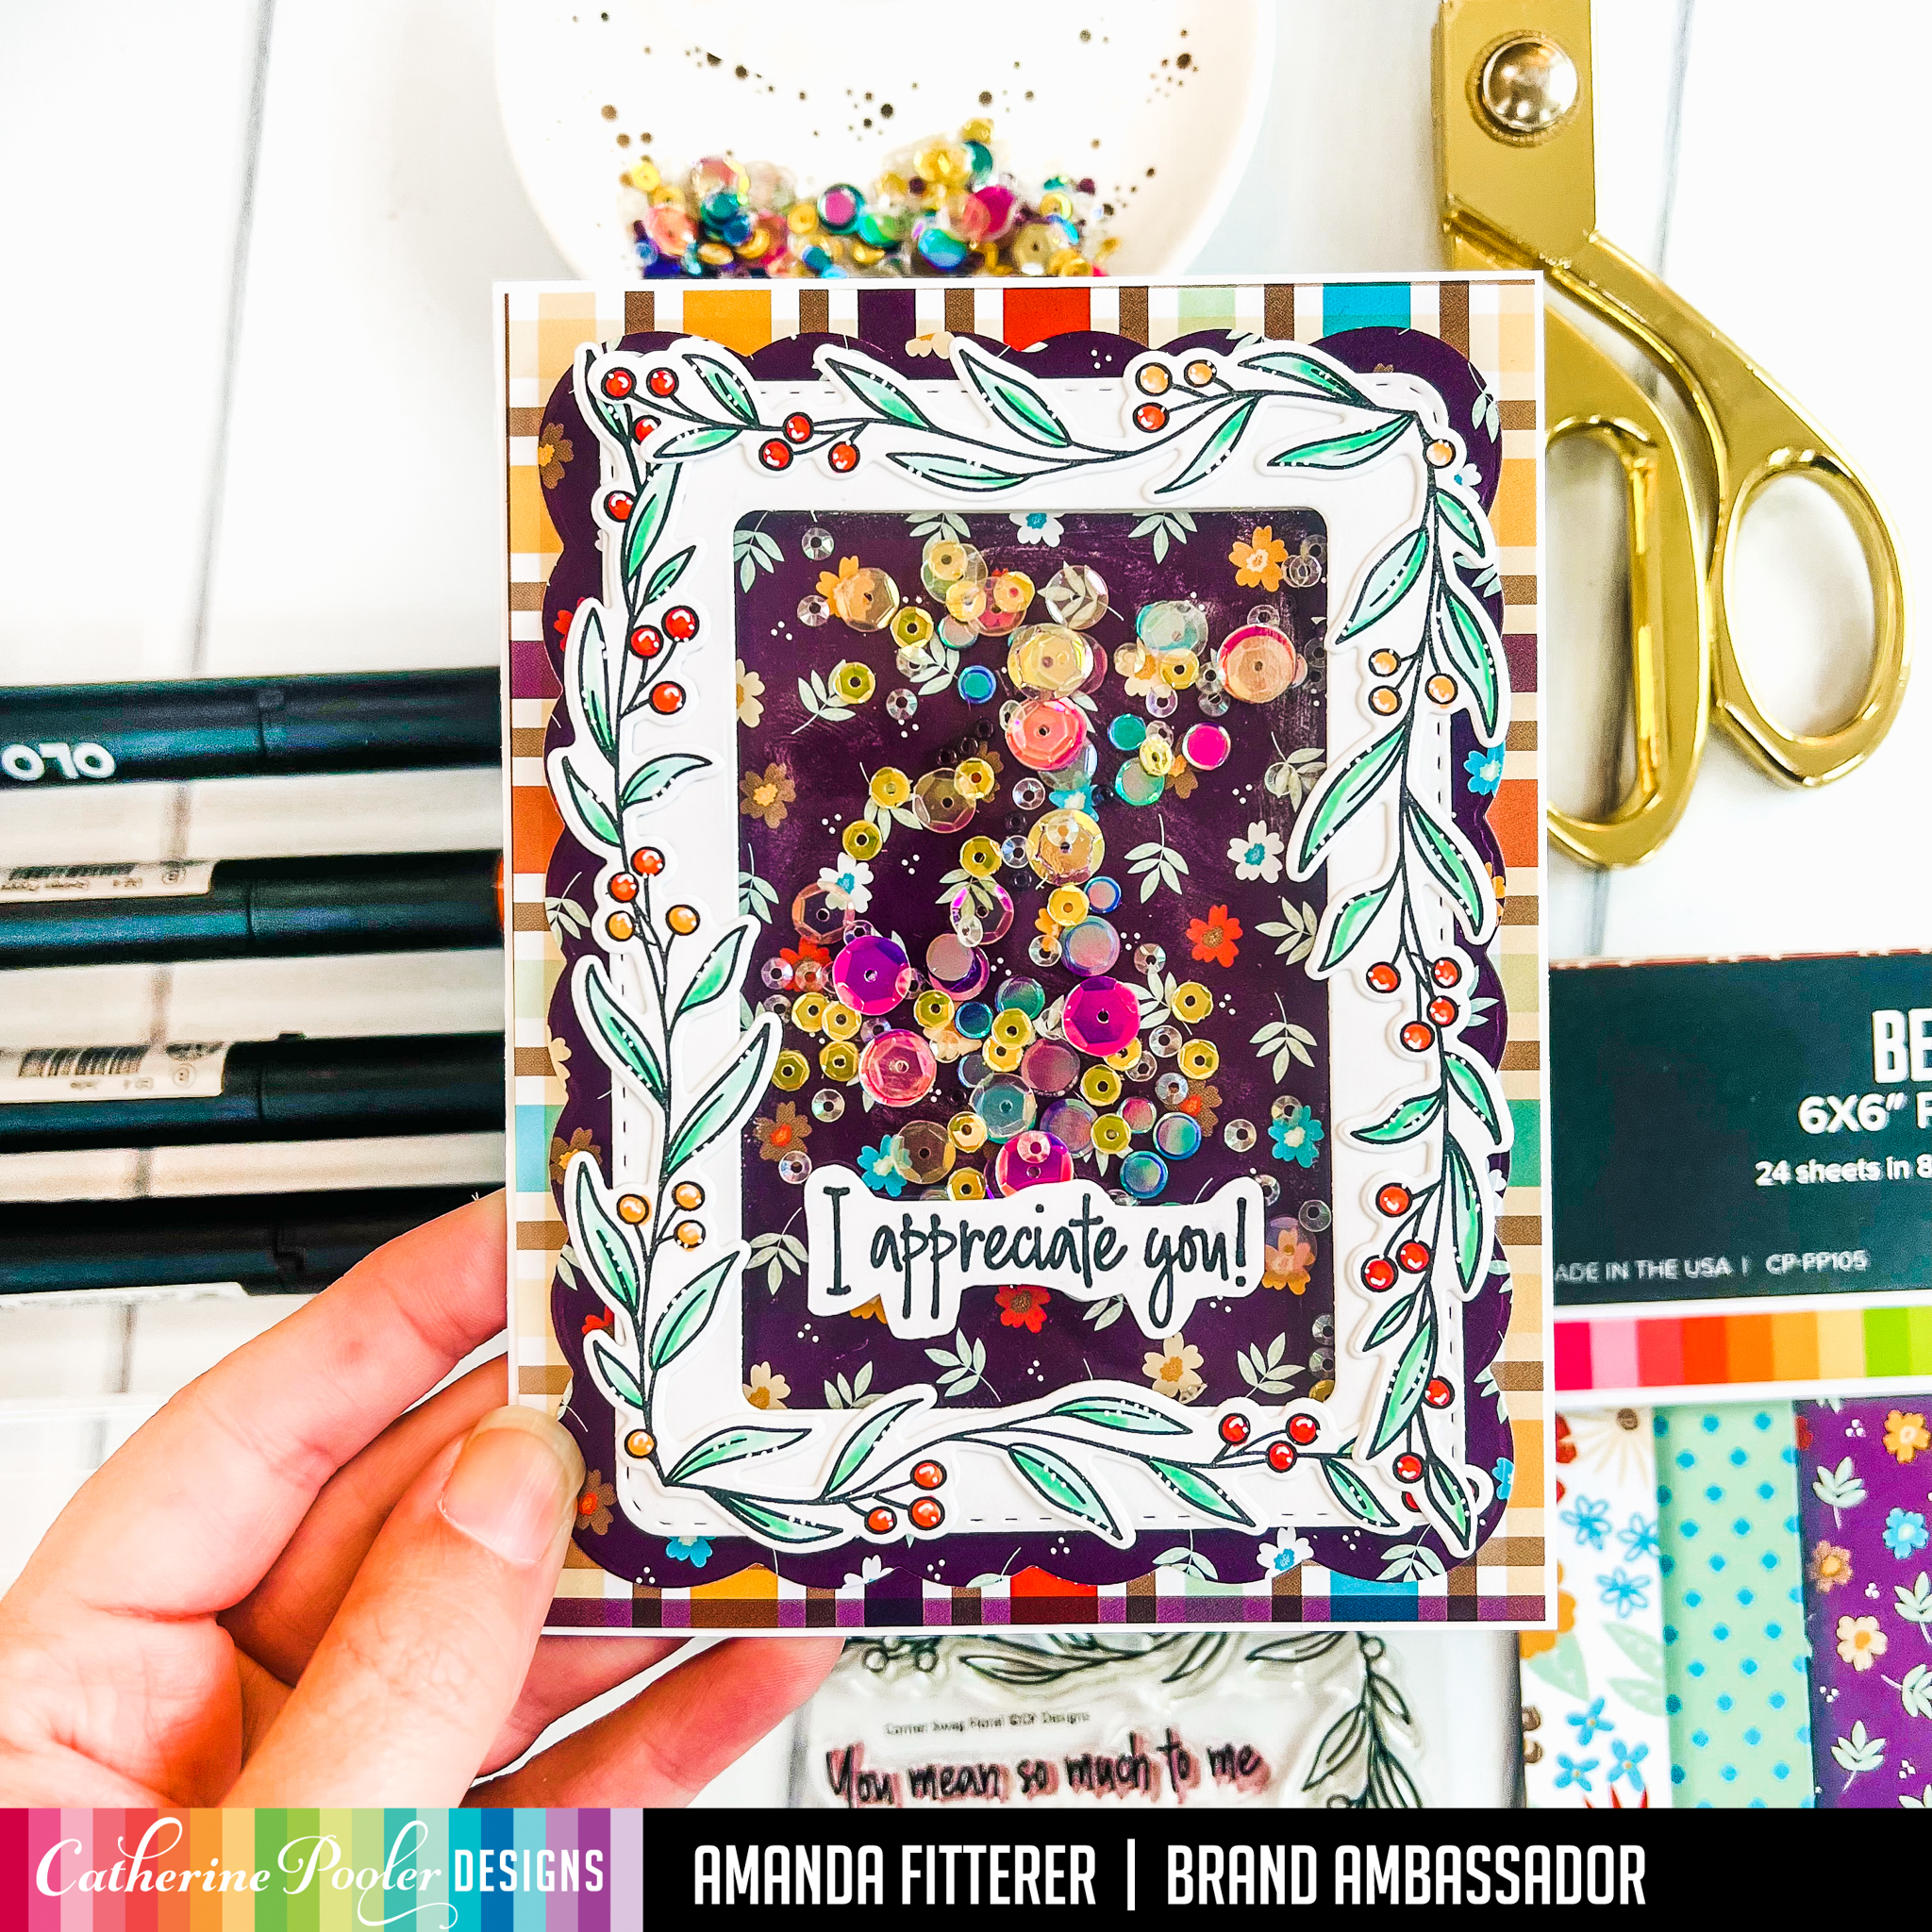
Do you always find yourself wishing for some easy and versatile “Thank You” stamp sets? The new Catherine Pooler Thank You Kindly Bundle is an excellent bundle for creating appreciation cards!
Thanks for using my affiliate links! You all are the BEST! Using an affiliate link in this post above or down below costs you nothing, but it gives me a teeny percentage of your sale to buy more crafty goodies to continue to share card tutorials with YOU! So, thank YOU! Xx, Amanda
Hey friends!! Did you see that Catherine Pooler’s New Release is available for purchase now if you’re a StampNation Member? If you’re not a StampNation member, you can purchase the new release TOMORROW!
Thanks for using my affiliate links! You all are the BEST! Using an affiliate link in this post above or down below costs you nothing, but it gives me a teeny percentage of your sale to buy more crafty goodies to continue to share card tutorials with YOU! So, thank YOU! Xx, Amanda
Thanks for using my affiliate links! You all are the BEST! Using an affiliate link in this post above or down below costs you nothing, but it gives me a teeny percentage of your sale to buy more crafty goodies to continue to share card tutorials with YOU! So, thank YOU! Xx, Amanda
To create this fun card, I blended Twilight and Blackjack Inks and then spritzed the background with water. Next, I stamped my chalkboard menu from the Coffee Shop Stamp Set with WOW! Clear Glue ink. I applied white embossing powder and then melted it with a heat gun. I die cut it using the Coffee Shop Dies.
Stay tuned as I continue to share more projects made using this New Collection!
Thanks for using my affiliate links! You all are the BEST! Using an affiliate link in this post above or down below costs you nothing, but it gives me a teeny percentage of your sale to buy more crafty goodies to continue to share card tutorials with YOU! So, thank YOU! Xx, Amanda
Do you love coordinating your envelopes with your cards? The new Java Fix 12×12 Paper Pad is the perfect size for creating envelopes using the Notecard Envelope Dies! This paper is part of the Coffee Shop New Release that is available now in the Catherine Pooler shop!!
Thanks for using my affiliate links! You all are the BEST! Using an affiliate link in this post above or down below costs you nothing, but it gives me a teeny percentage of your sale to buy more crafty goodies to continue to share card tutorials with YOU! So, thank YOU! Xx, Amanda
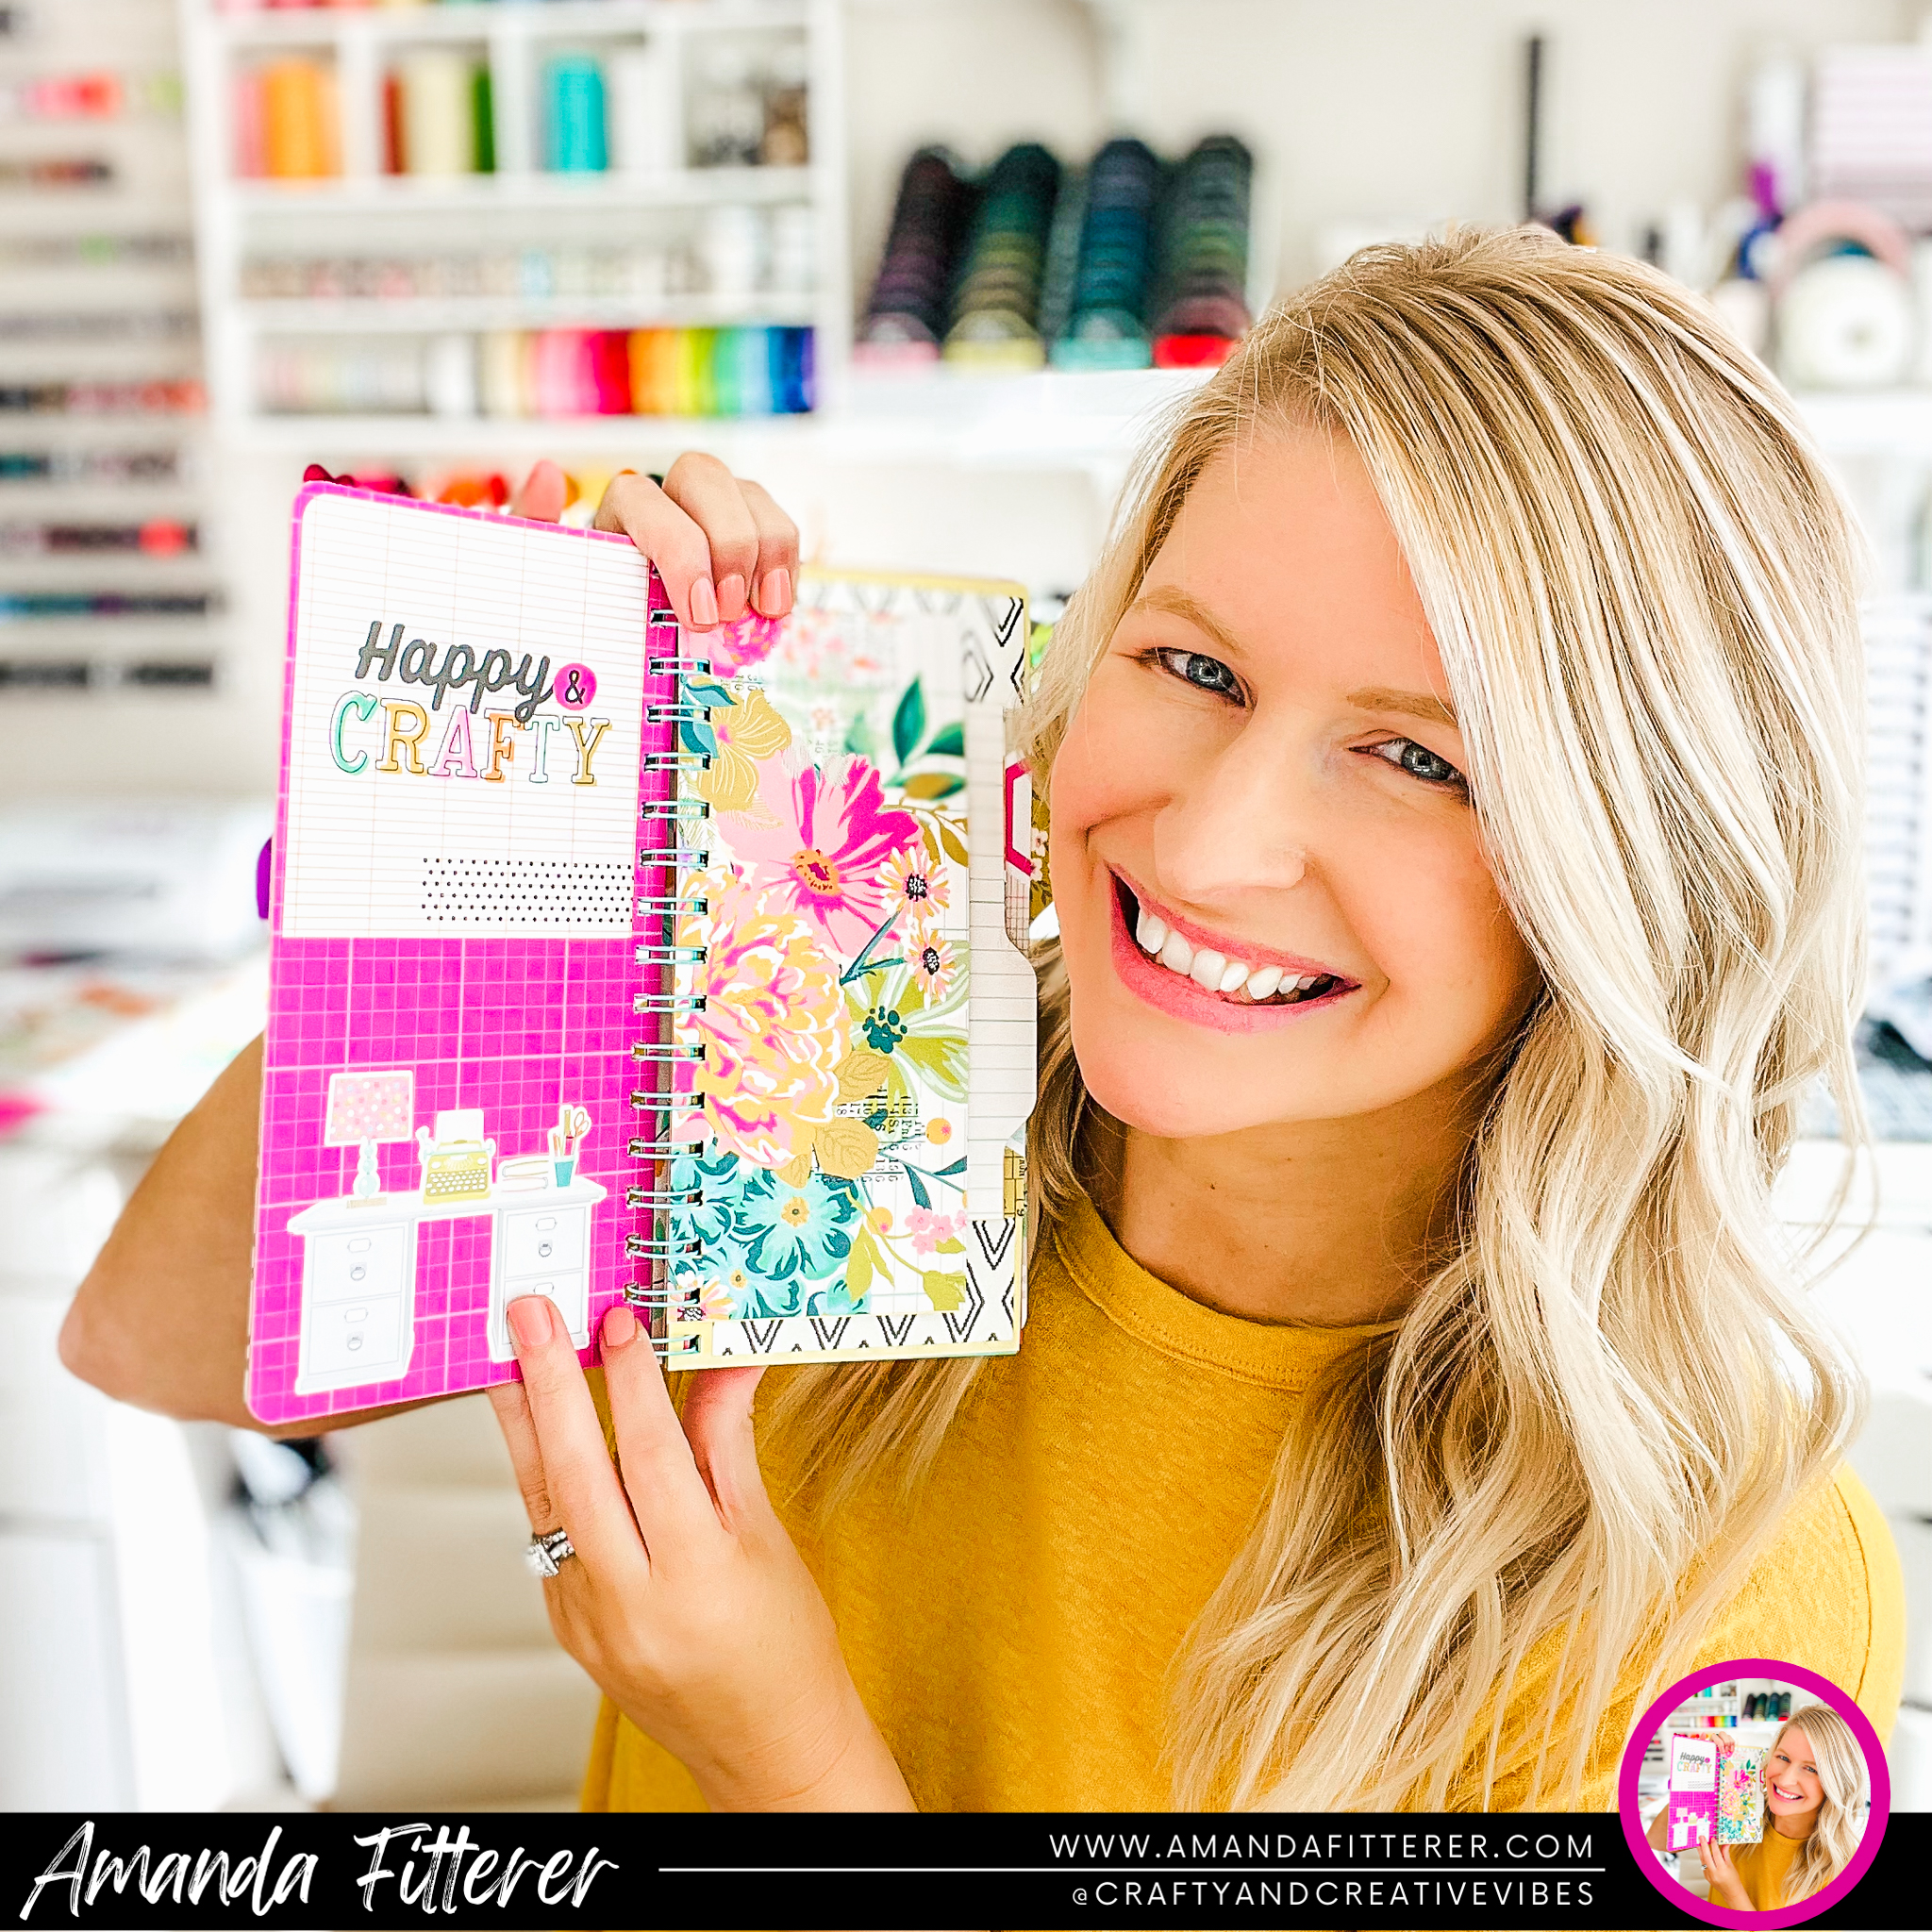
Hey friends! I’m sharing a very special project with you today! I’ve gone from using digital planners to physical planners! While I was searching around for the perfect planner, I decided that I couldn’t find anything that fit my desk perfectly and had the right layout for MY everyday! So.. I decided to make my own! Since I put so much effort into it, I wanted to share it with my crafty friends who want to give it a shot!
I’ve created a Printable Instructions Booklet that also has a bunch of Planner Sheet Options that fit the book! This template includes instructions (including measurements) and photos. It also includes links to products!
I’m happy to share this for FREE, but I’ve also included a Donation Form on the bottom of this post, in case you’d like to share the love! (Obviously, you don’t have to, but I do really appreciate it!)
Do you love 12×12 paper?! You’re in luck! Catherine Pooler has just released this gorgeous Java Fix 12×12 Paper Pad! This paper is part of the Coffee Shop New Release that is available now in the Catherine Pooler shop!!
As always, thanks for using my affiliate links. It costs you nothing, but it gives me a teeny percentage of your sale to buy more crafty goodies to continue to share card tutorials with YOU! So, thank YOU! Xx, Amanda
Hey crafty friends! In case you missed it, the Coffee Shop New Release is available now in the Catherine Pooler shop!! Please feel free to shop with my affiliate link (you know it’s SOO appreciated).
As always, thanks for using my affiliate links. It costs you nothing, but it gives me a teeny percentage of your sale to buy more crafty goodies to continue to share card tutorials with YOU! So, thank YOU! Xx, Amanda
Welcome to the Heffy Doodle and WOW! Embossing Powders Collaboration Blog Hop! Design Team members from both companies are sharing inspiration using products from both companies!
I’m super excited to be taking part in the collaboration because I get to use products from two of my FAVORITE companies! I’m going to walk you through how I made this fun GLOW IN THE DARK Halloween card!
Cut out a circle using either a punch or circle die. Any size will work!
10. Color your images with any medium (I prefer OLO or Copic markers!)
11. Die cut your images with the coordinating die sets.
12. Use 3D foam squares to adhere your images and sentiment to your card!
13. Turn off the lights and see how amazing the WOW! Glow in the Dark Embossing Powder looks!
To be entered to win the giveaway, all you need to do is comment at each stop along the Blog Hop! WOW! Embossing Powders will be giving away $25/£25 and Heffy Doodle will be giving away £25 to their respective stores! Be sure to comment before 11:59 PM EST on Oct 25th to be entered to win!
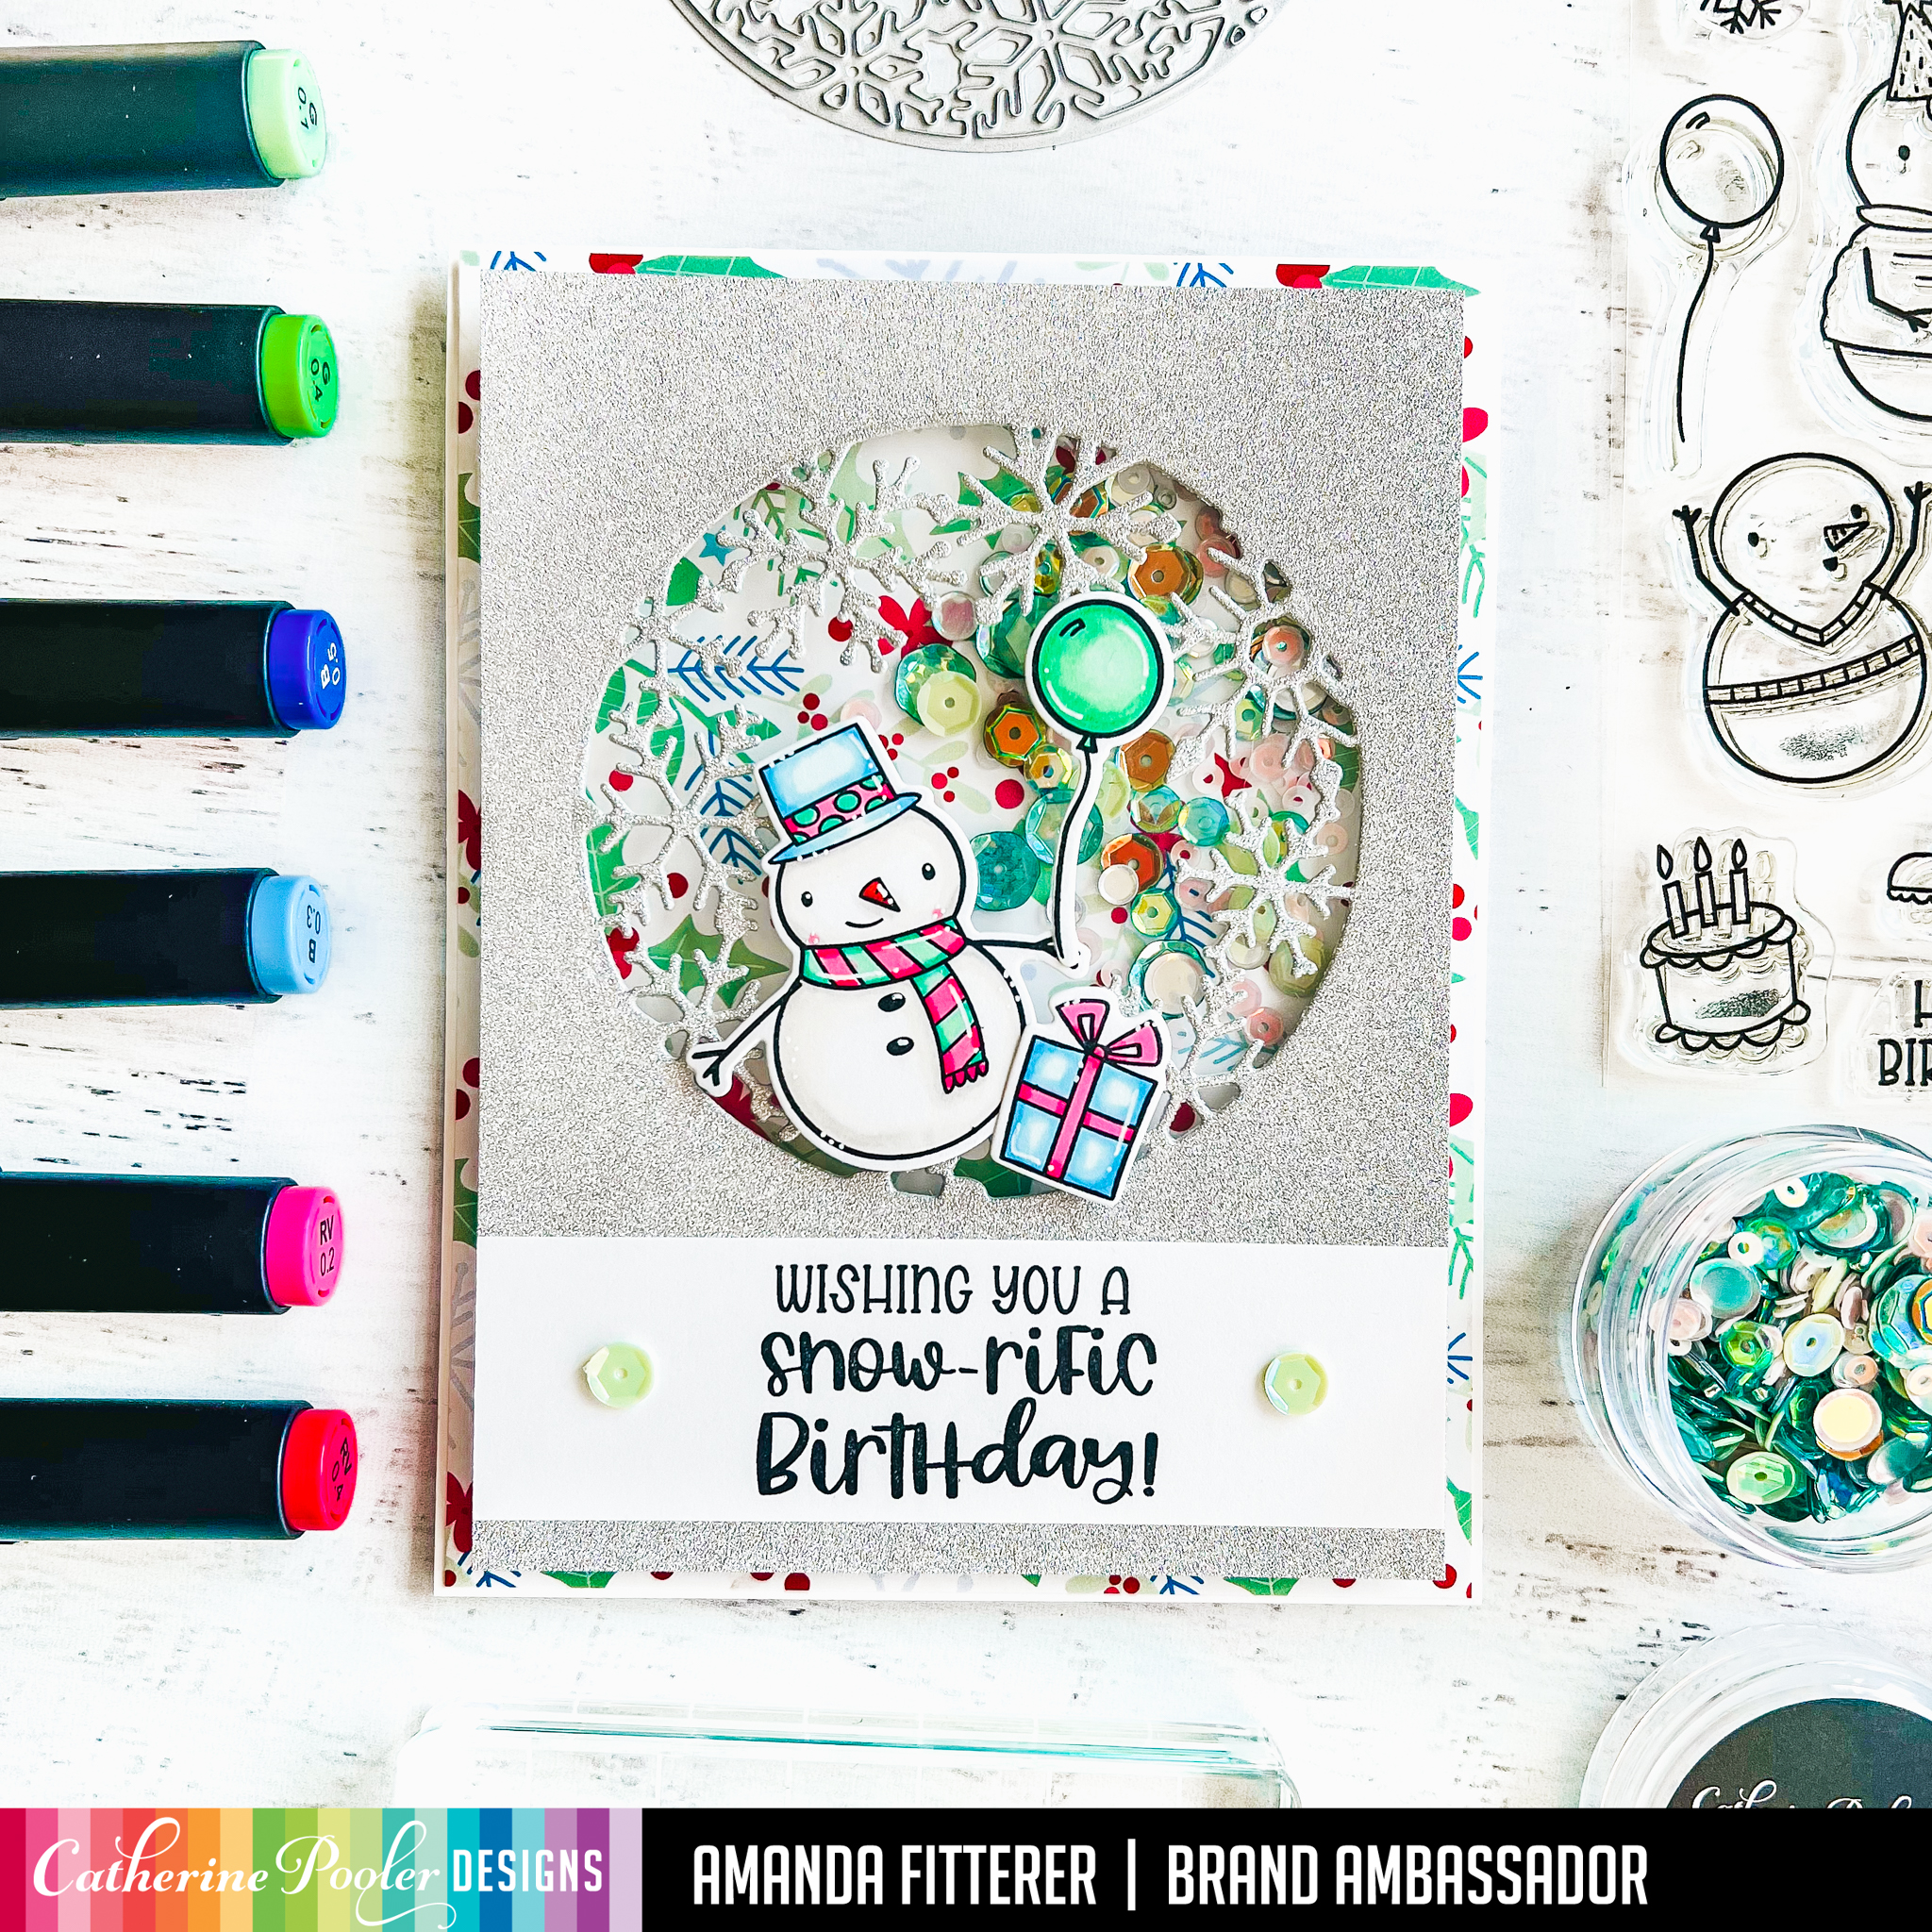
Hey crafty friends! The Snow-rific Birthday Collection is available now!! Please feel free to shop with my affiliate link (you know it’s SOO appreciated). If you want the ENTIRE Collection, click here.
For this card, I used a bunch of new products, including: Snow-rific Party Stamp Set, Snow Many Flakes Dies, the Snow Day Birthday Patterned Paper, and the Frosted Window Die!
Stay tuned as I continue to share more cards made using this New Collection!
As always, thanks for using my affiliate links. It costs you nothing, but it gives me a teeny percentage of your sale to buy more crafty goodies to continue to share card tutorials with YOU! So, thank YOU! Xx, Amanda
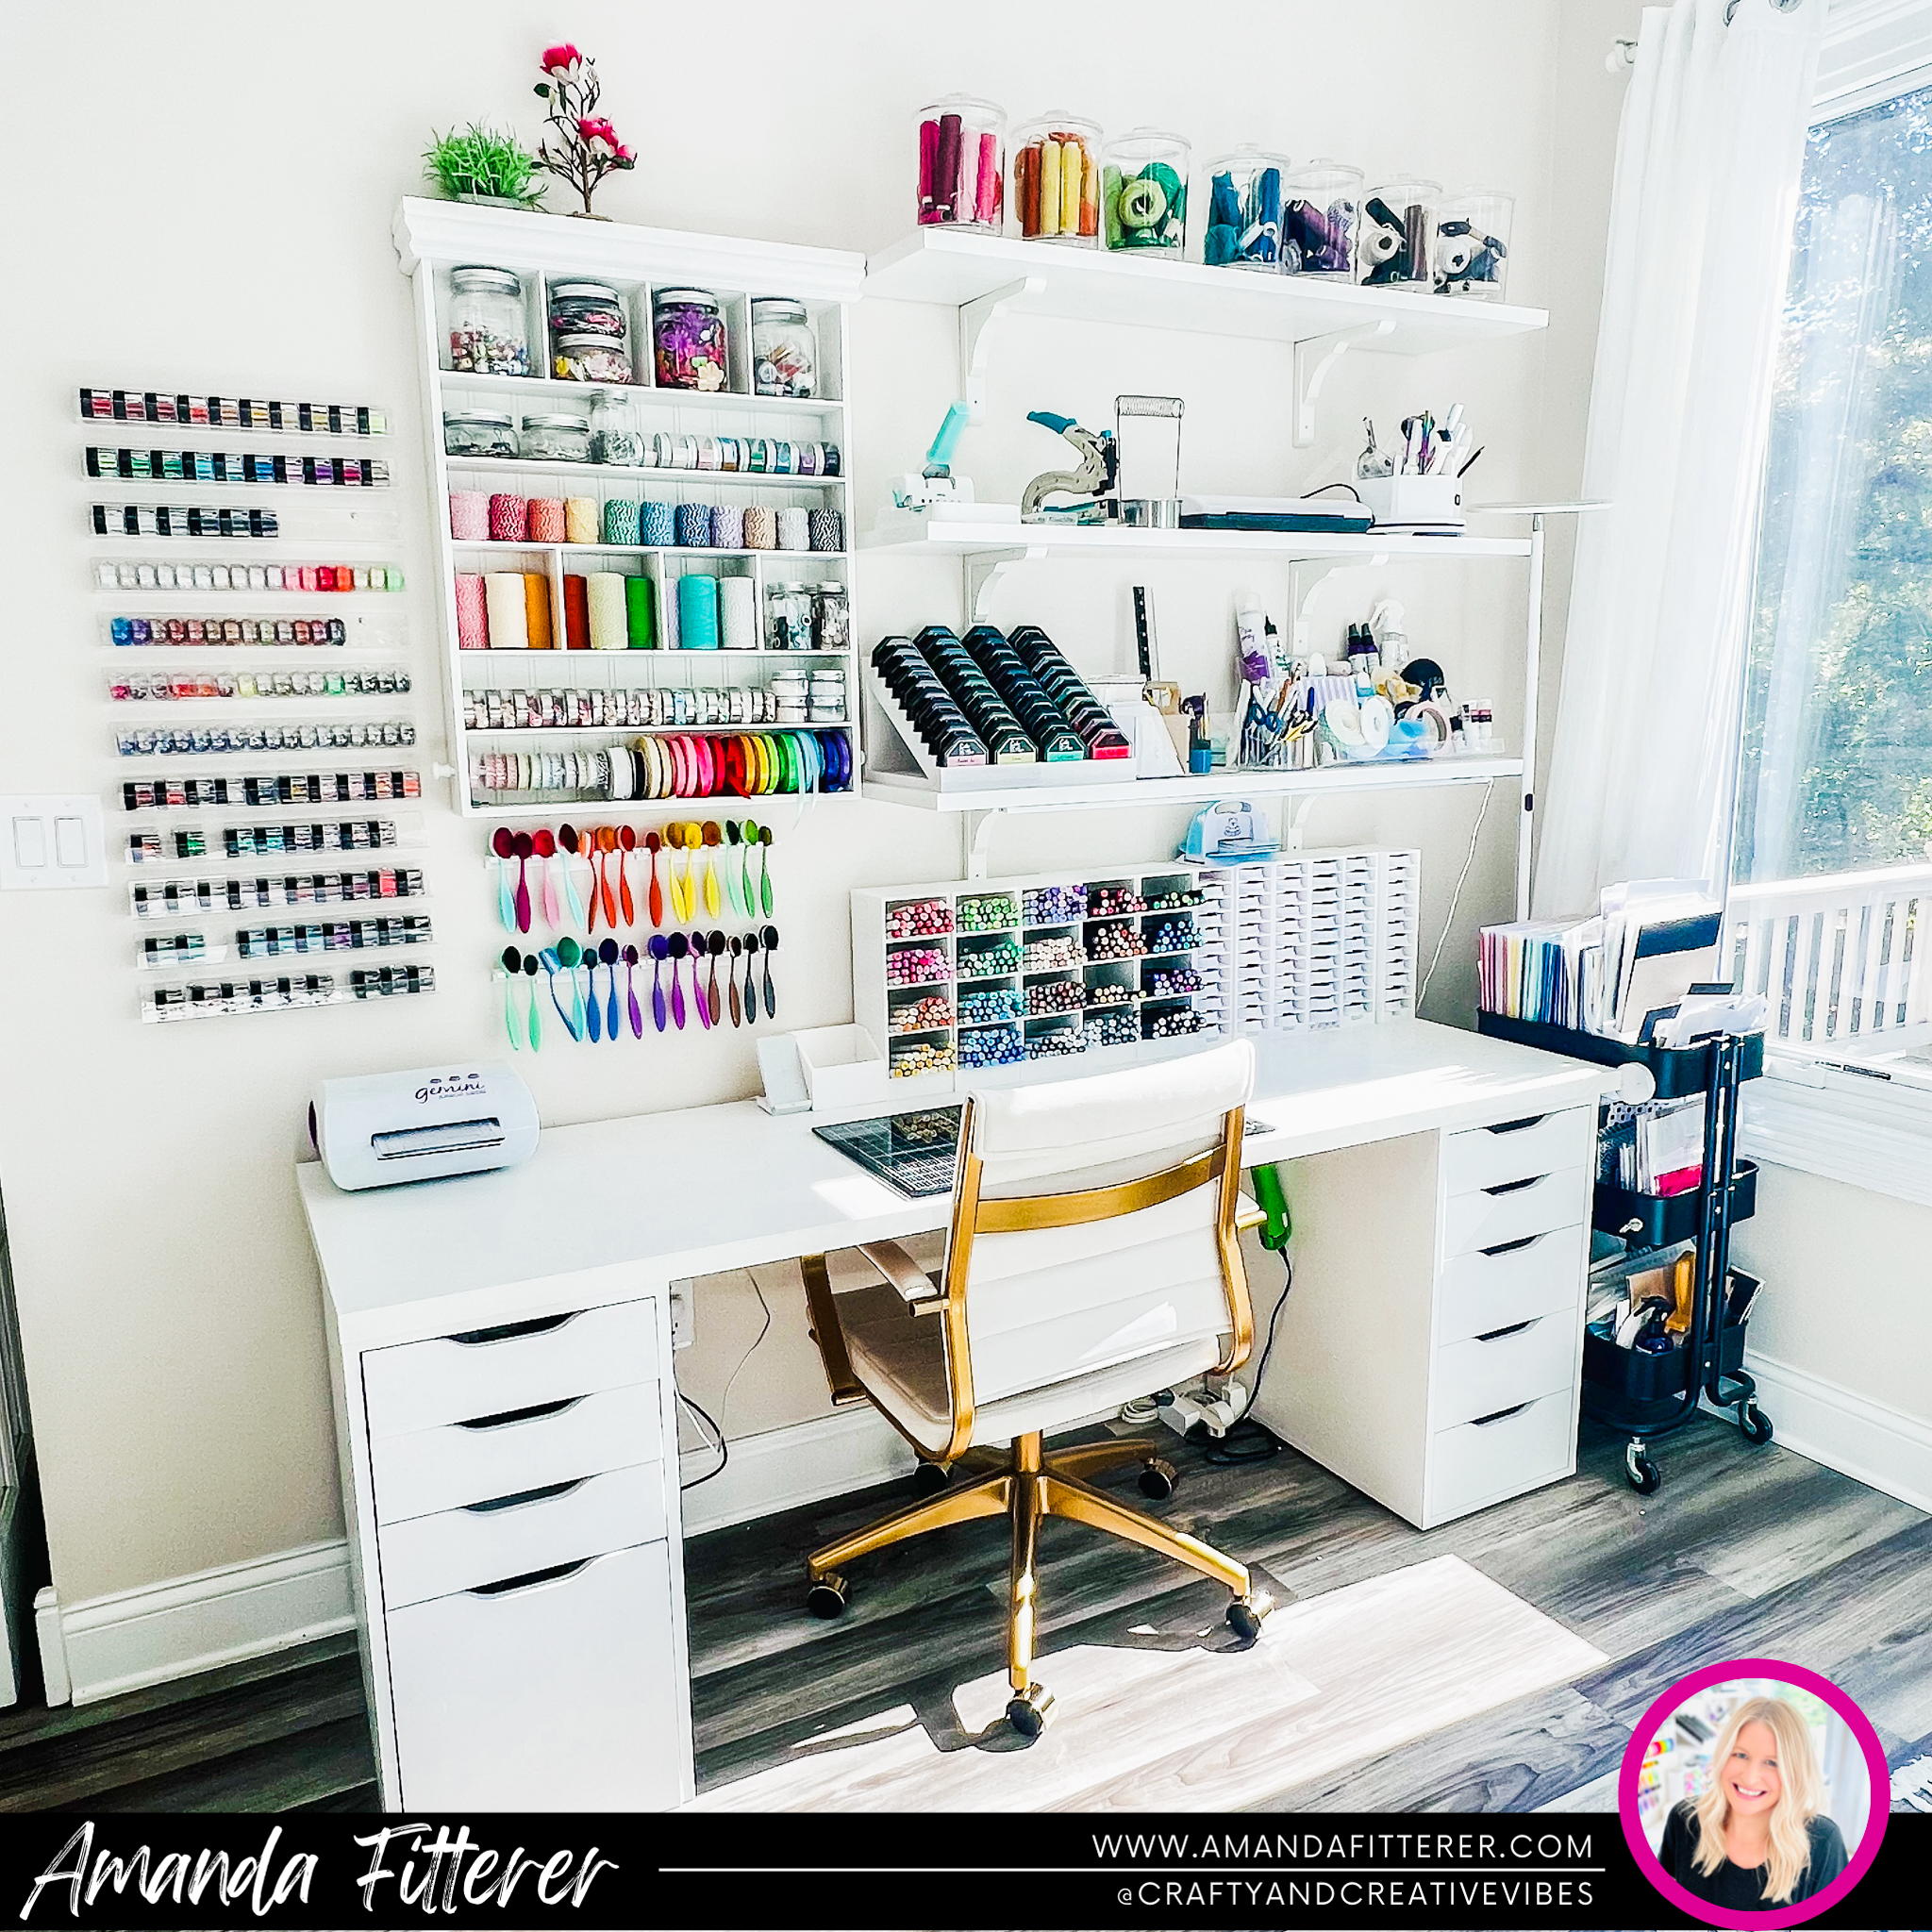
Hey guys! I’m so excited to share some updated photos of my craftroom! If you have any questions at all, please feel free to message me on Instagram or leave a comment on this post!
The pegboard and accessories are from IKEA!
These are the Alex drawers from IKEA. That’s my Bernadoodle pup – Knox! He says, “HI!” This is where I take all my photos of my projects!
I did find these Ink Pad Storage on Scrapbook.com that are similar!
I love having everything sorted by rainbow! These are acrylic jars I got from Amazon. I also ordered a bunch of different twines and ribbons from Amazon and sorted them all by color.
I love having my colored cardstock nearby, so I keep them in their packaging and have them organized in my cart. I used IKEA’s dish separator to keep them up straight!
Thank you SO much for coming to my blog today! As always, I REALLY appreciate when you use my affiliate links (which can be found throughout my post). It doesn’t cost you anything or affect your order in any way, other than giving me a teeny percentage of your sale! This allows me to continue to buy crafty goodies and share tutorials and cards with you! So THANK YOU! Xx, Amanda
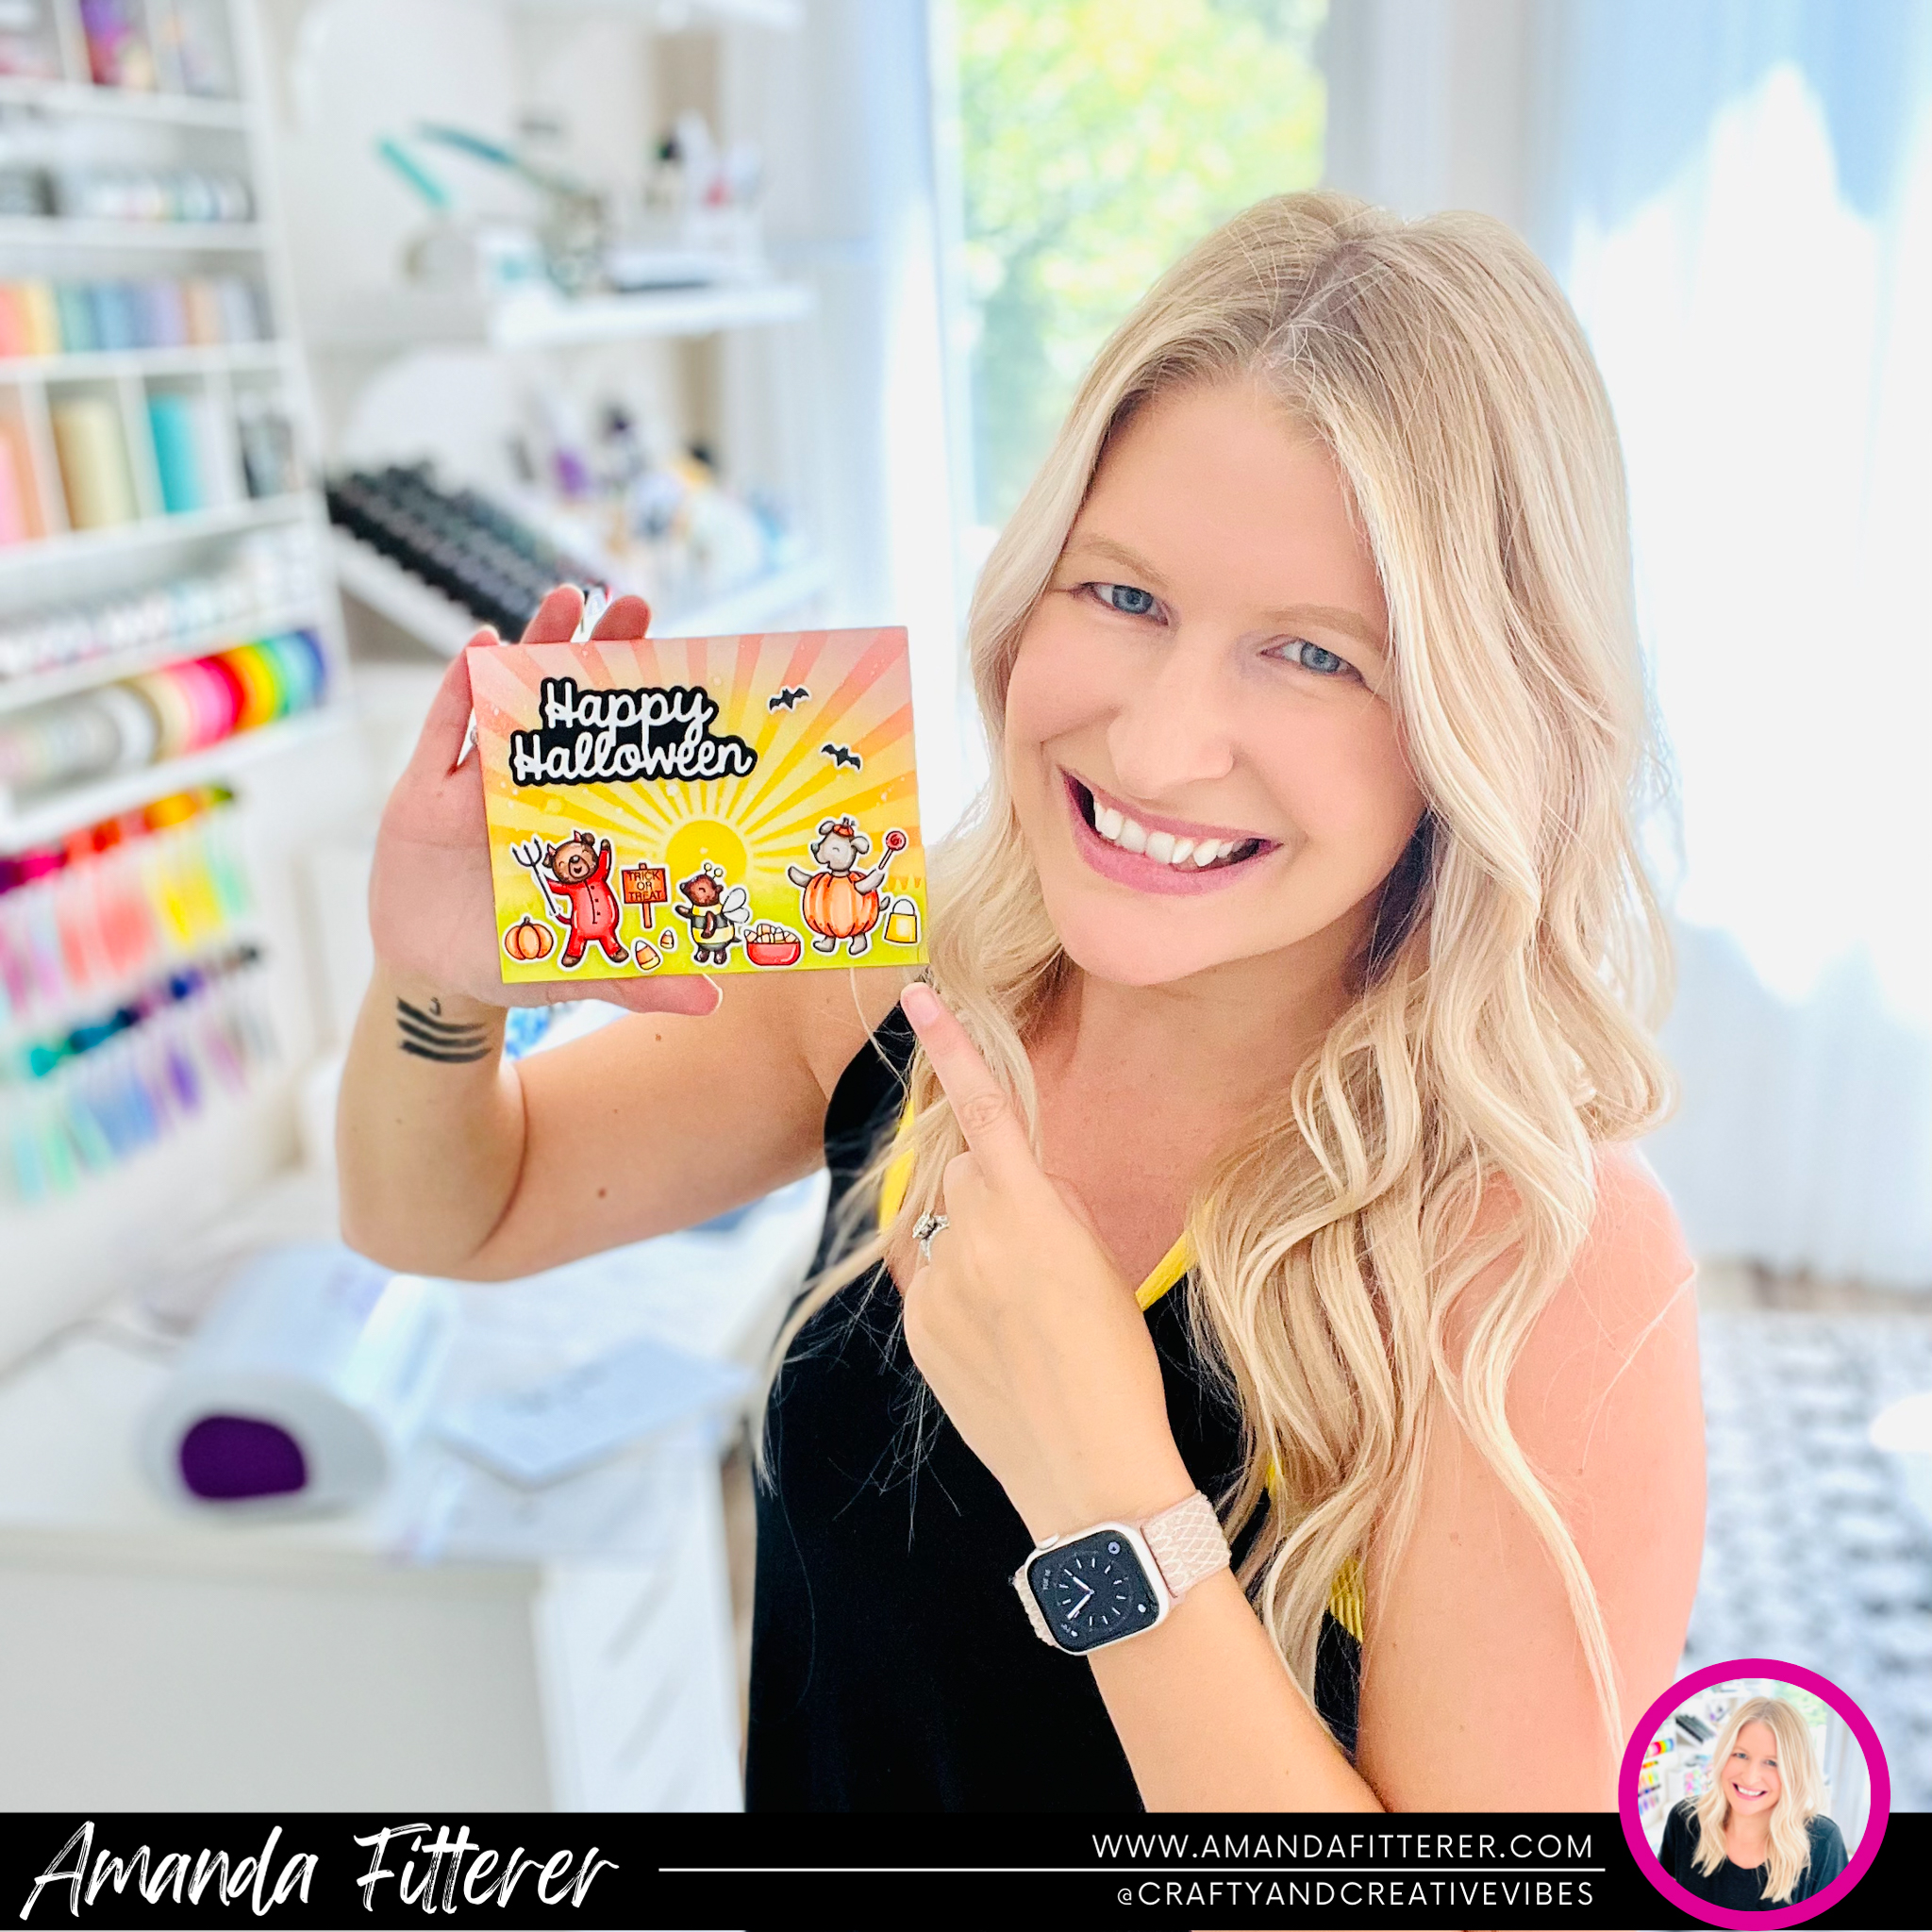
Hello crafty friends! It’s only 20 days until Halloween! I thought I’d share my favorite spooky cards with you today!
First off – who doesn’t LOVE a glow-in-the-dark card?! I know I do! For this card, I used the glow-in-dark-embossing powder on the stars and the spider webs!
Next, we have some of my favorites from the Catherine Pooler Sweet-n-Spooky Collection! This bundle is ON SALE and has already went out of stock once! Don’t miss out on the cutest Halloween papers, stamps, and dies!
We can’t have a Halloween post without some cute critters wearing costumes!! Check out these Heffy Doodle Costume Critters! I love how adorable they look colored in with OLO markers! I paired these critters with the Sunburst Stencil to create a focal point!
Oh and I CANNOT forget this stunning scene! I love mixing and matching stamp sets! For this card, I used the Let’s Hang Out, Costume Critters, and Veggie Patch stamp sets.
Thank you SO much for coming to my blog today! As always, I REALLY appreciate when you use my affiliate links (which can be found throughout my post). It doesn’t cost you anything or affect your order in any way, other than giving me a teeny percentage of your sale! This allows me to continue to buy crafty goodies and share tutorials and cards with you! So THANK YOU! Xx, Amanda
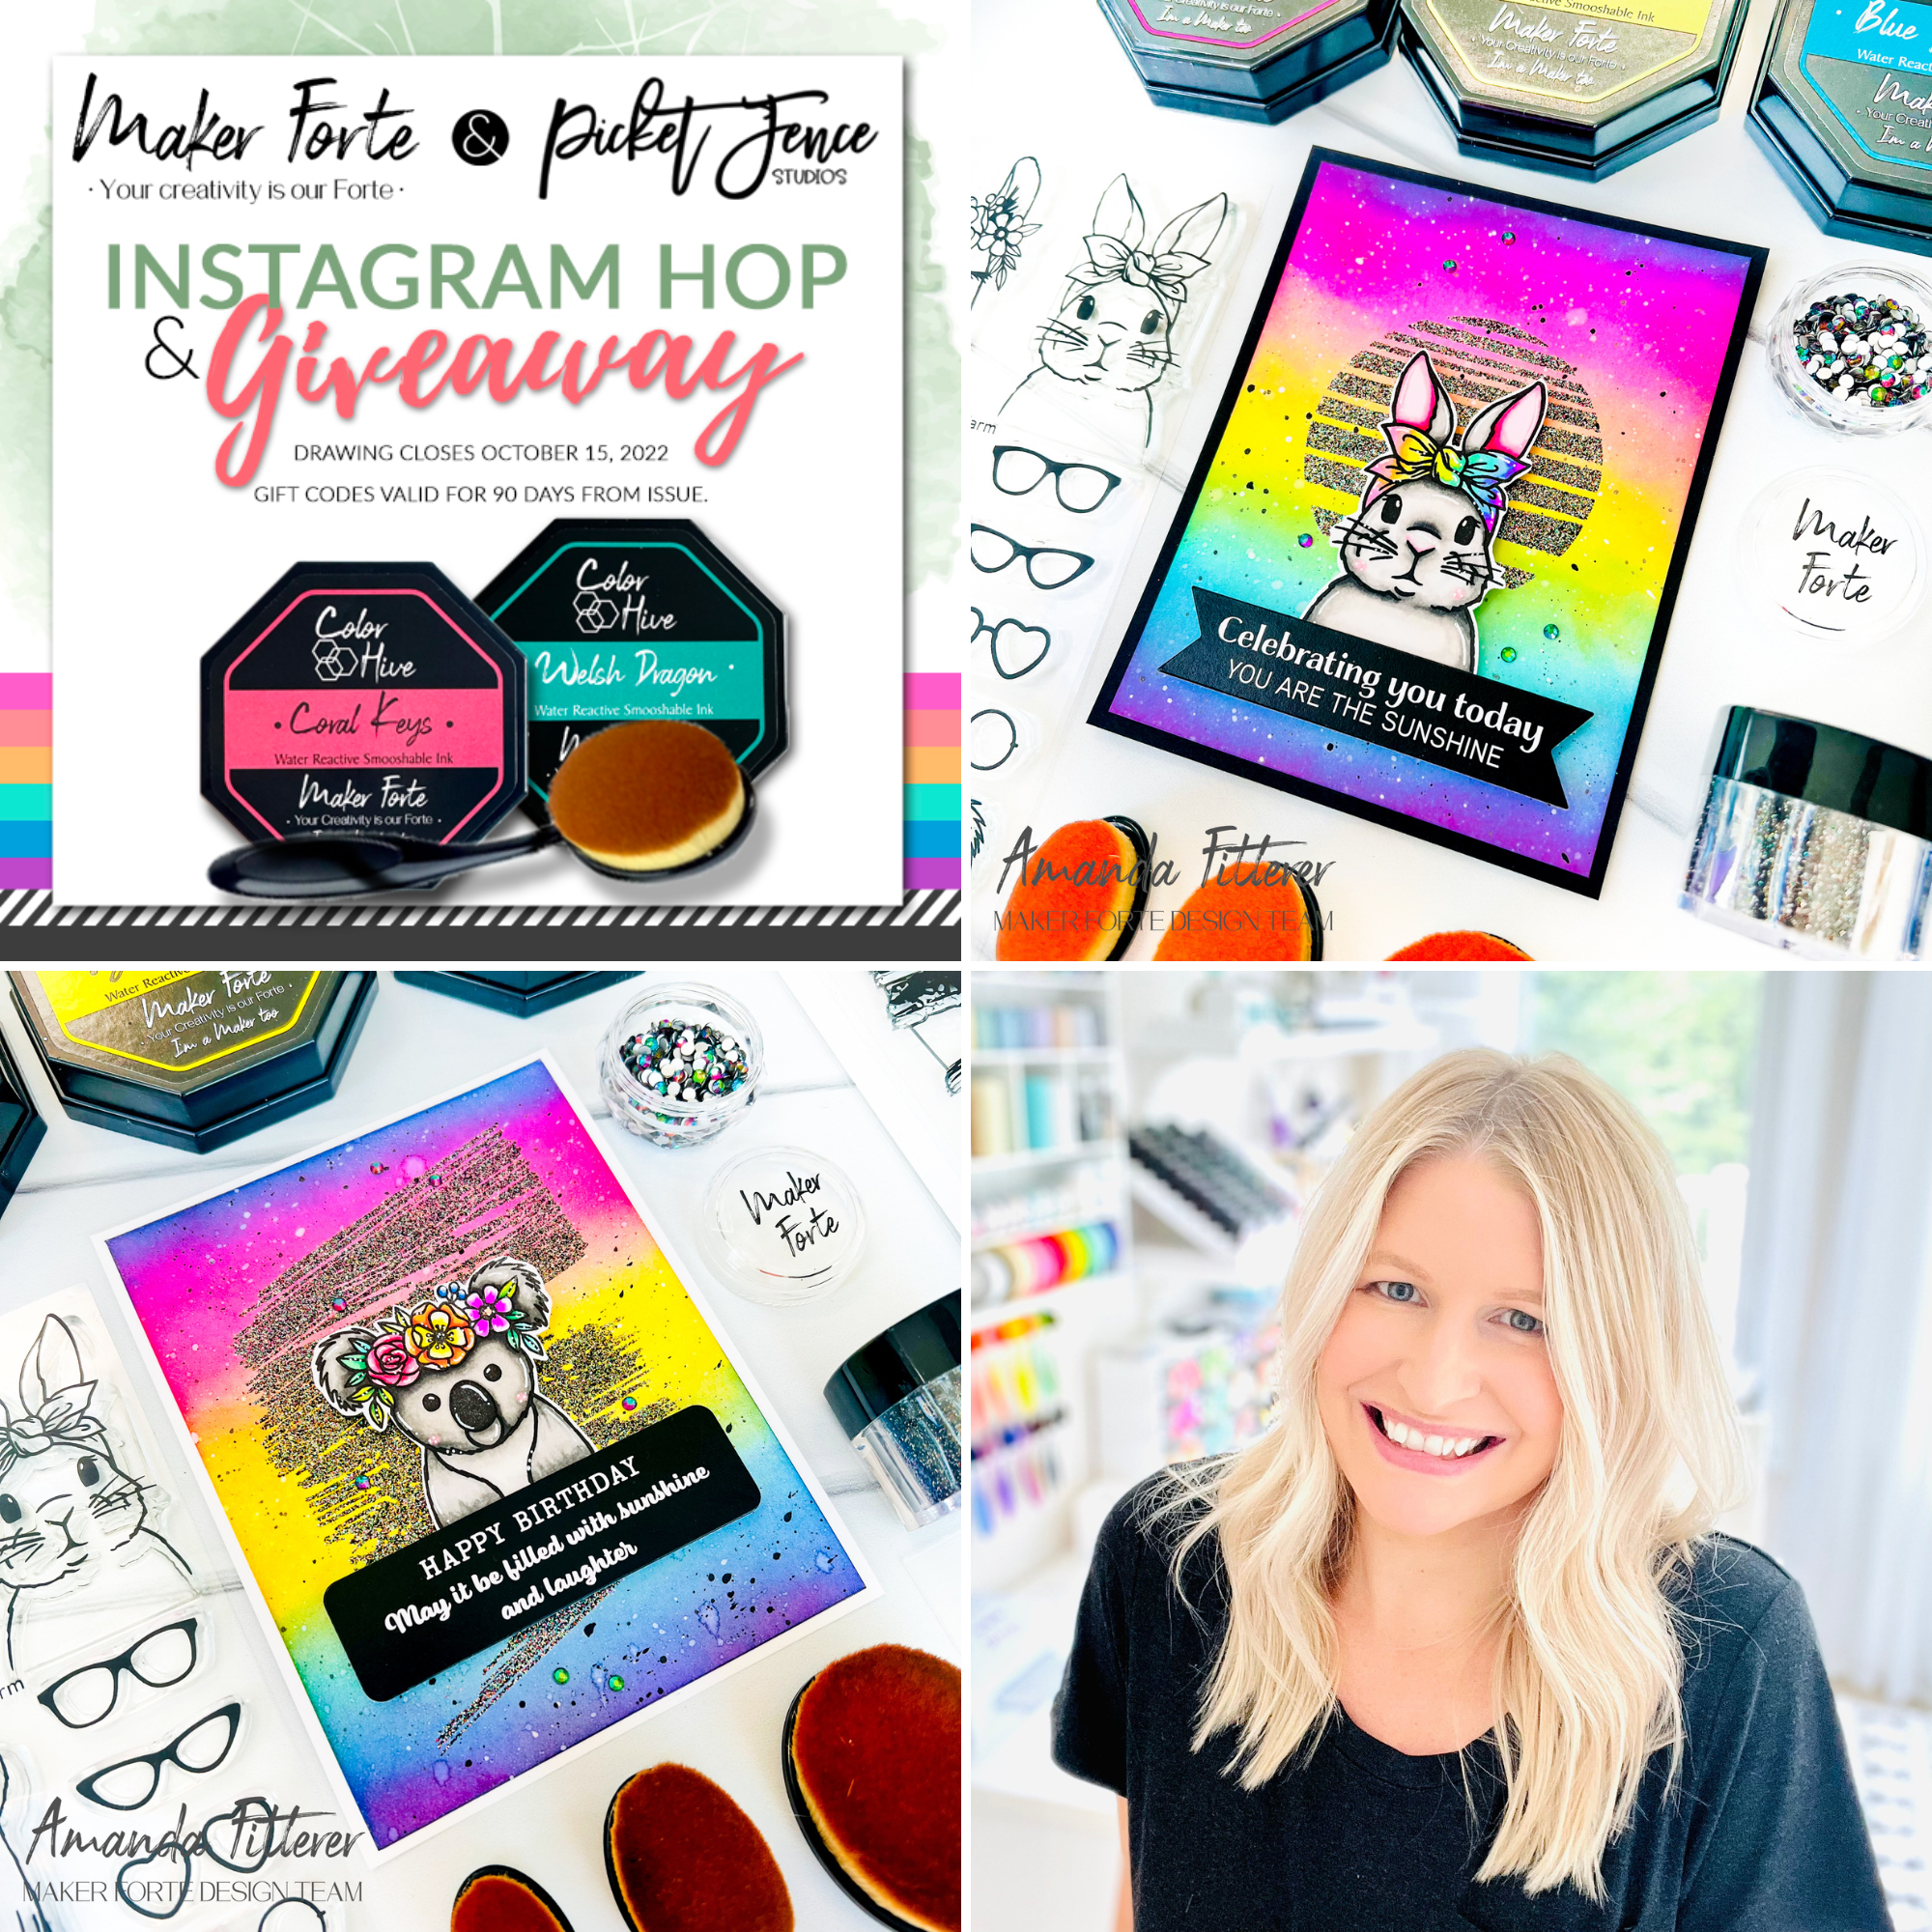
Hello friends! I am SO excited to be part of this amazing IG Hop with Maker Forte and Picket Fence Studios! Come join in the fun HERE. You could win prizes from both companies!
Maker Forte’s Color Hive Inks are ABSOLUTELY FANTASTIC! They are juicy and smooshy and vibrant! And I LOVE how they react with water! Picket Fence Studios Blending Brushes make blending these inks a breeze!! They are the perfect match for beautiful backgrounds, such as the ones I made for the Hop!
–> I have 2 RAINBOW BLENDS TO SHARE with you!
Blend 1: For my first card, I’m blending: * Pitstop Pink * Lemon * Blue Raspberry
For both of my cards, I’m using the CUTEST Maker Forte stamp set called Grovehill Farm. You can see the rest of the products used below!
Thank you so much for stopping by my blog today! To shop any of these products, you can use the affiliate links in my post! It doesn’t cost anything to you, but it does give me a teeny percentage which helps to fund my crafty tutorials for YOU! So THANK YOU for coming to my blog and using my links! I appreciate you!
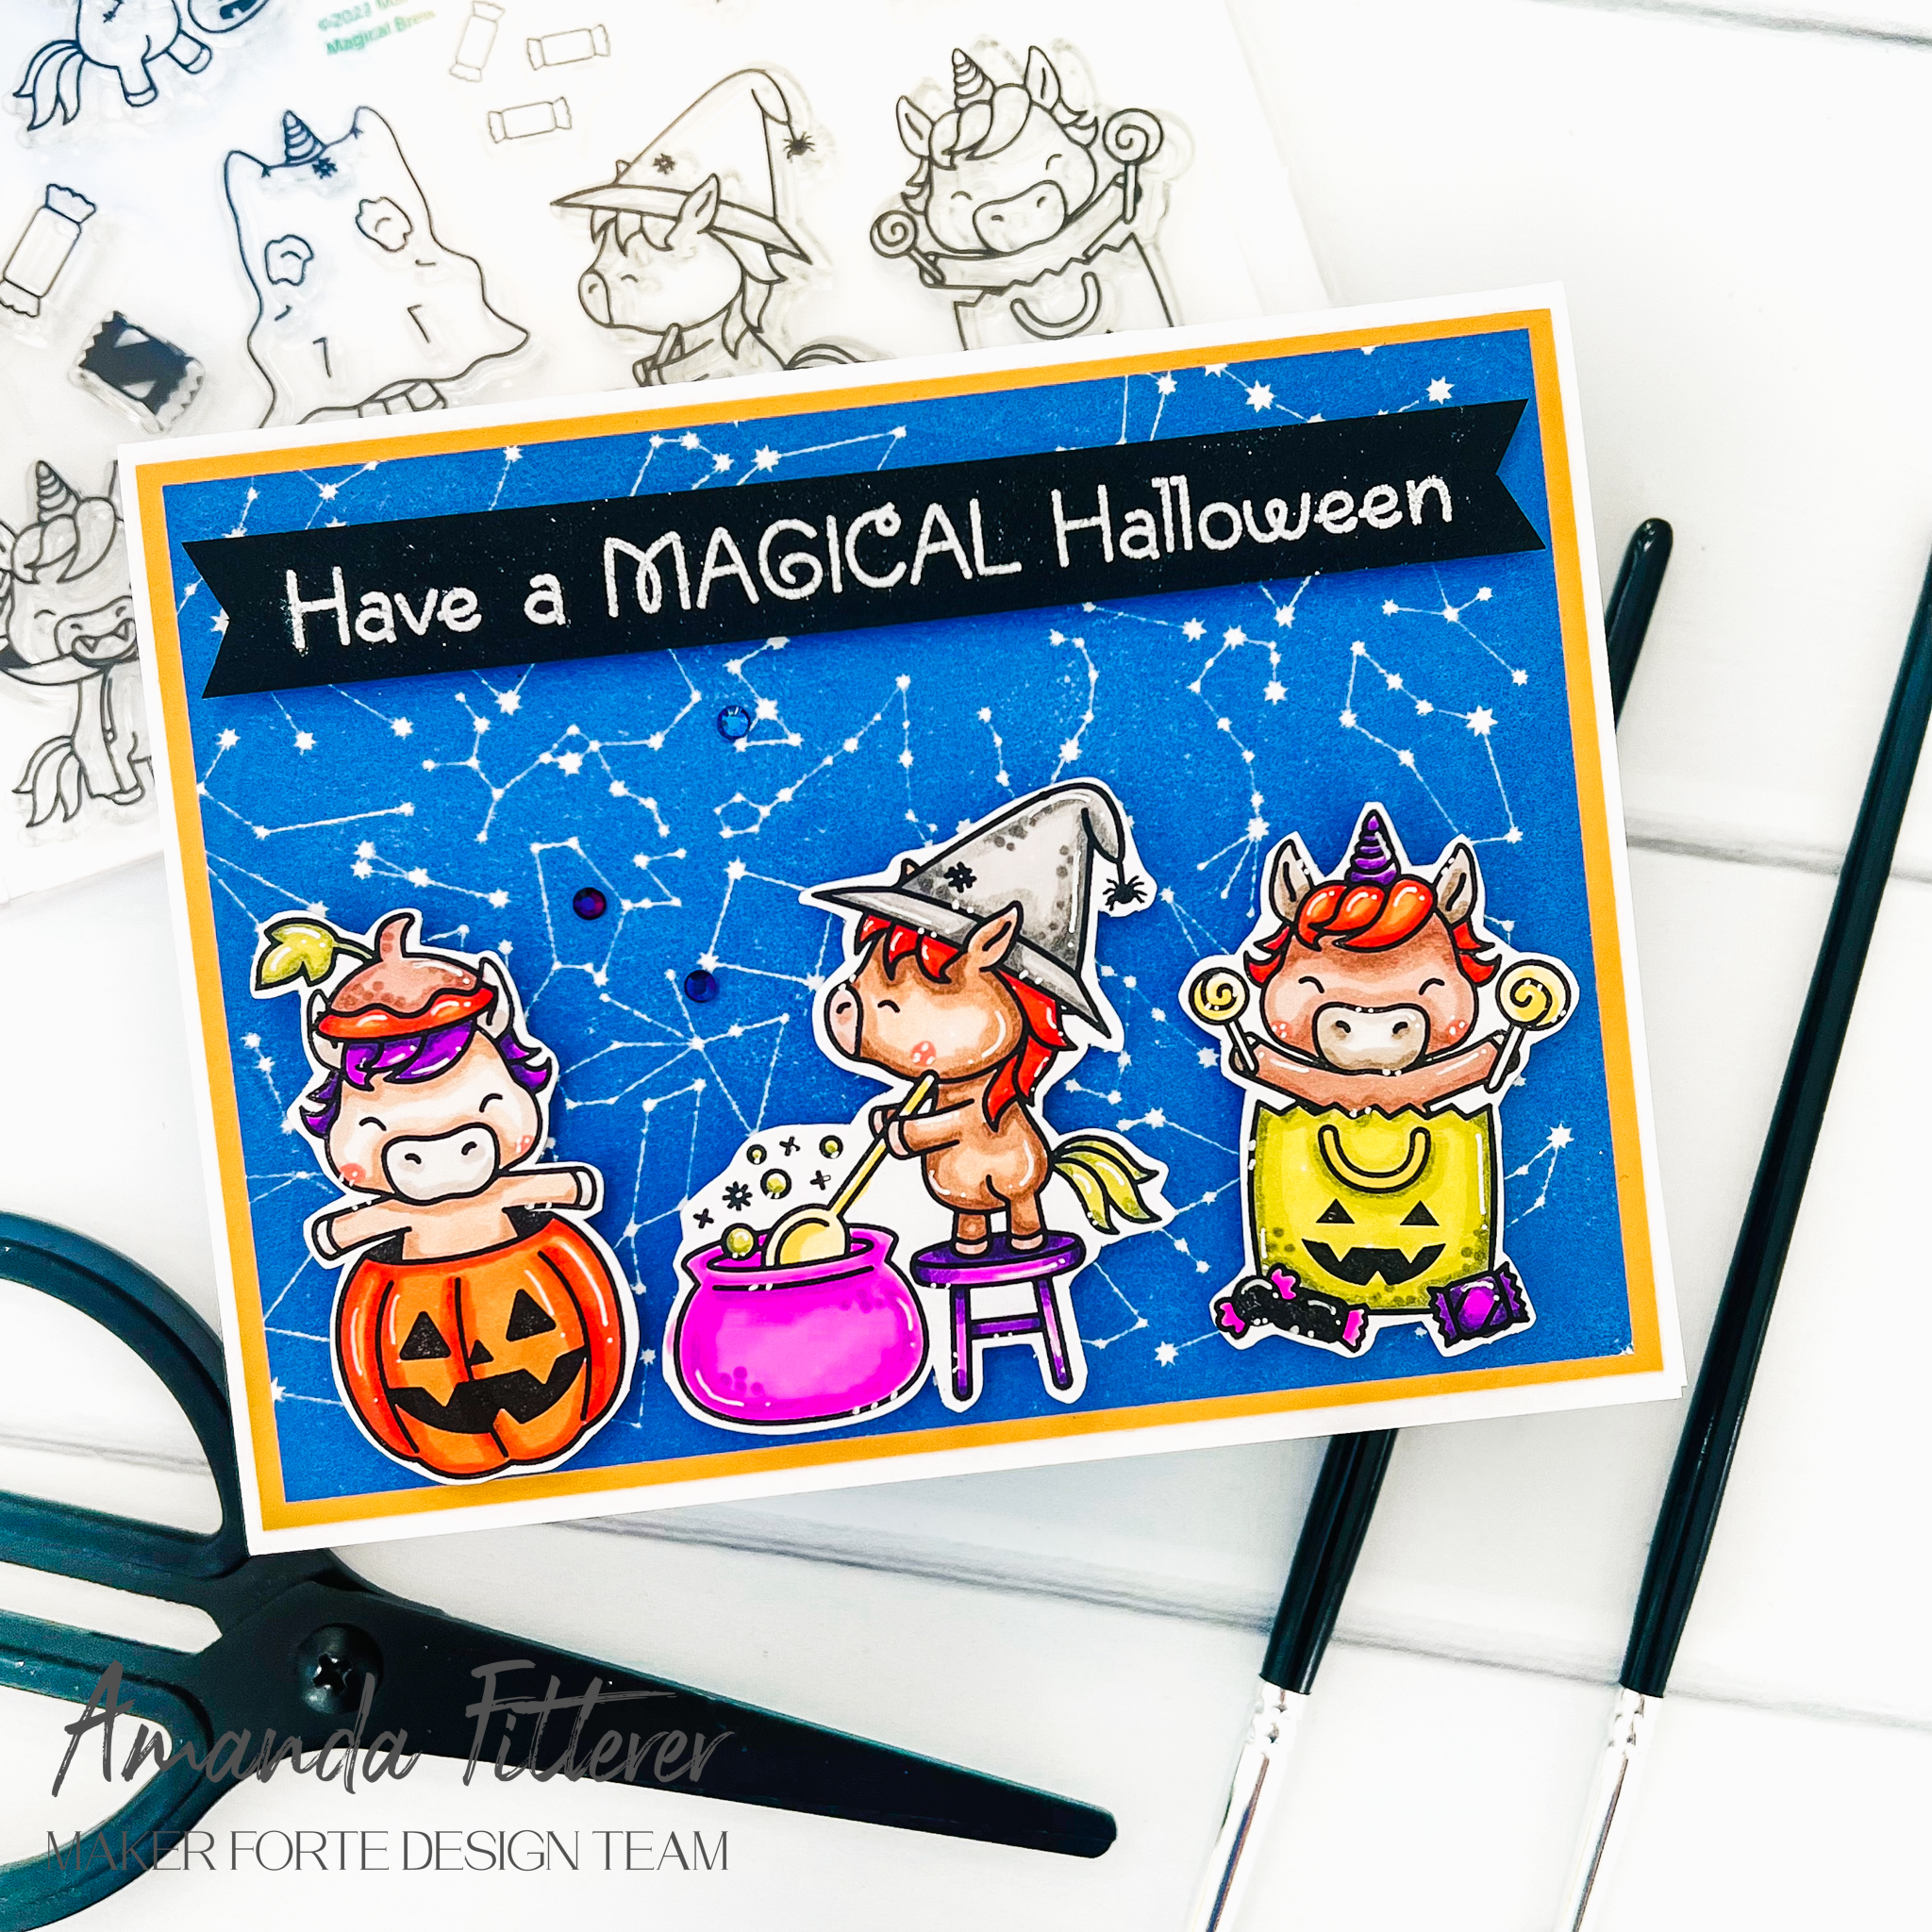
Hey Friends!! I am just IN LOVE with these SUPER adorbs cuties from the Magical Brew Stamp Set from the newest release from Maker Forte!! For my background, I used the NEW Stargazer Background Stamp! I simply stamped it with Vegas Strip ink and it was done! Love it! For my stamped images, I used OLO Markers to color them in!
Hey crafty friends! It’s SNEAK PEEK TIME!!! Catherine Pooler has a Snow-rific Birthday Collection COMING SOON! I will be sharing cards from the Snow Day Bundle over the next week or so! Please feel free to shop with my affiliate link (you know it’s SOO appreciated).
For this card, I used a bunch of new products, including: Snow-rific Party Stamp Set, Snow Many Flakes Dies, and the Snow Day Birthday Patterned Paper!
Stay tuned as I continue to share more cards made using this New Collection!
As always, thanks for using my affiliate links. It costs you nothing, but it gives me a teeny percentage of your sale to buy more crafty goodies to continue to share card tutorials with YOU! So, thank YOU! Xx, Amanda
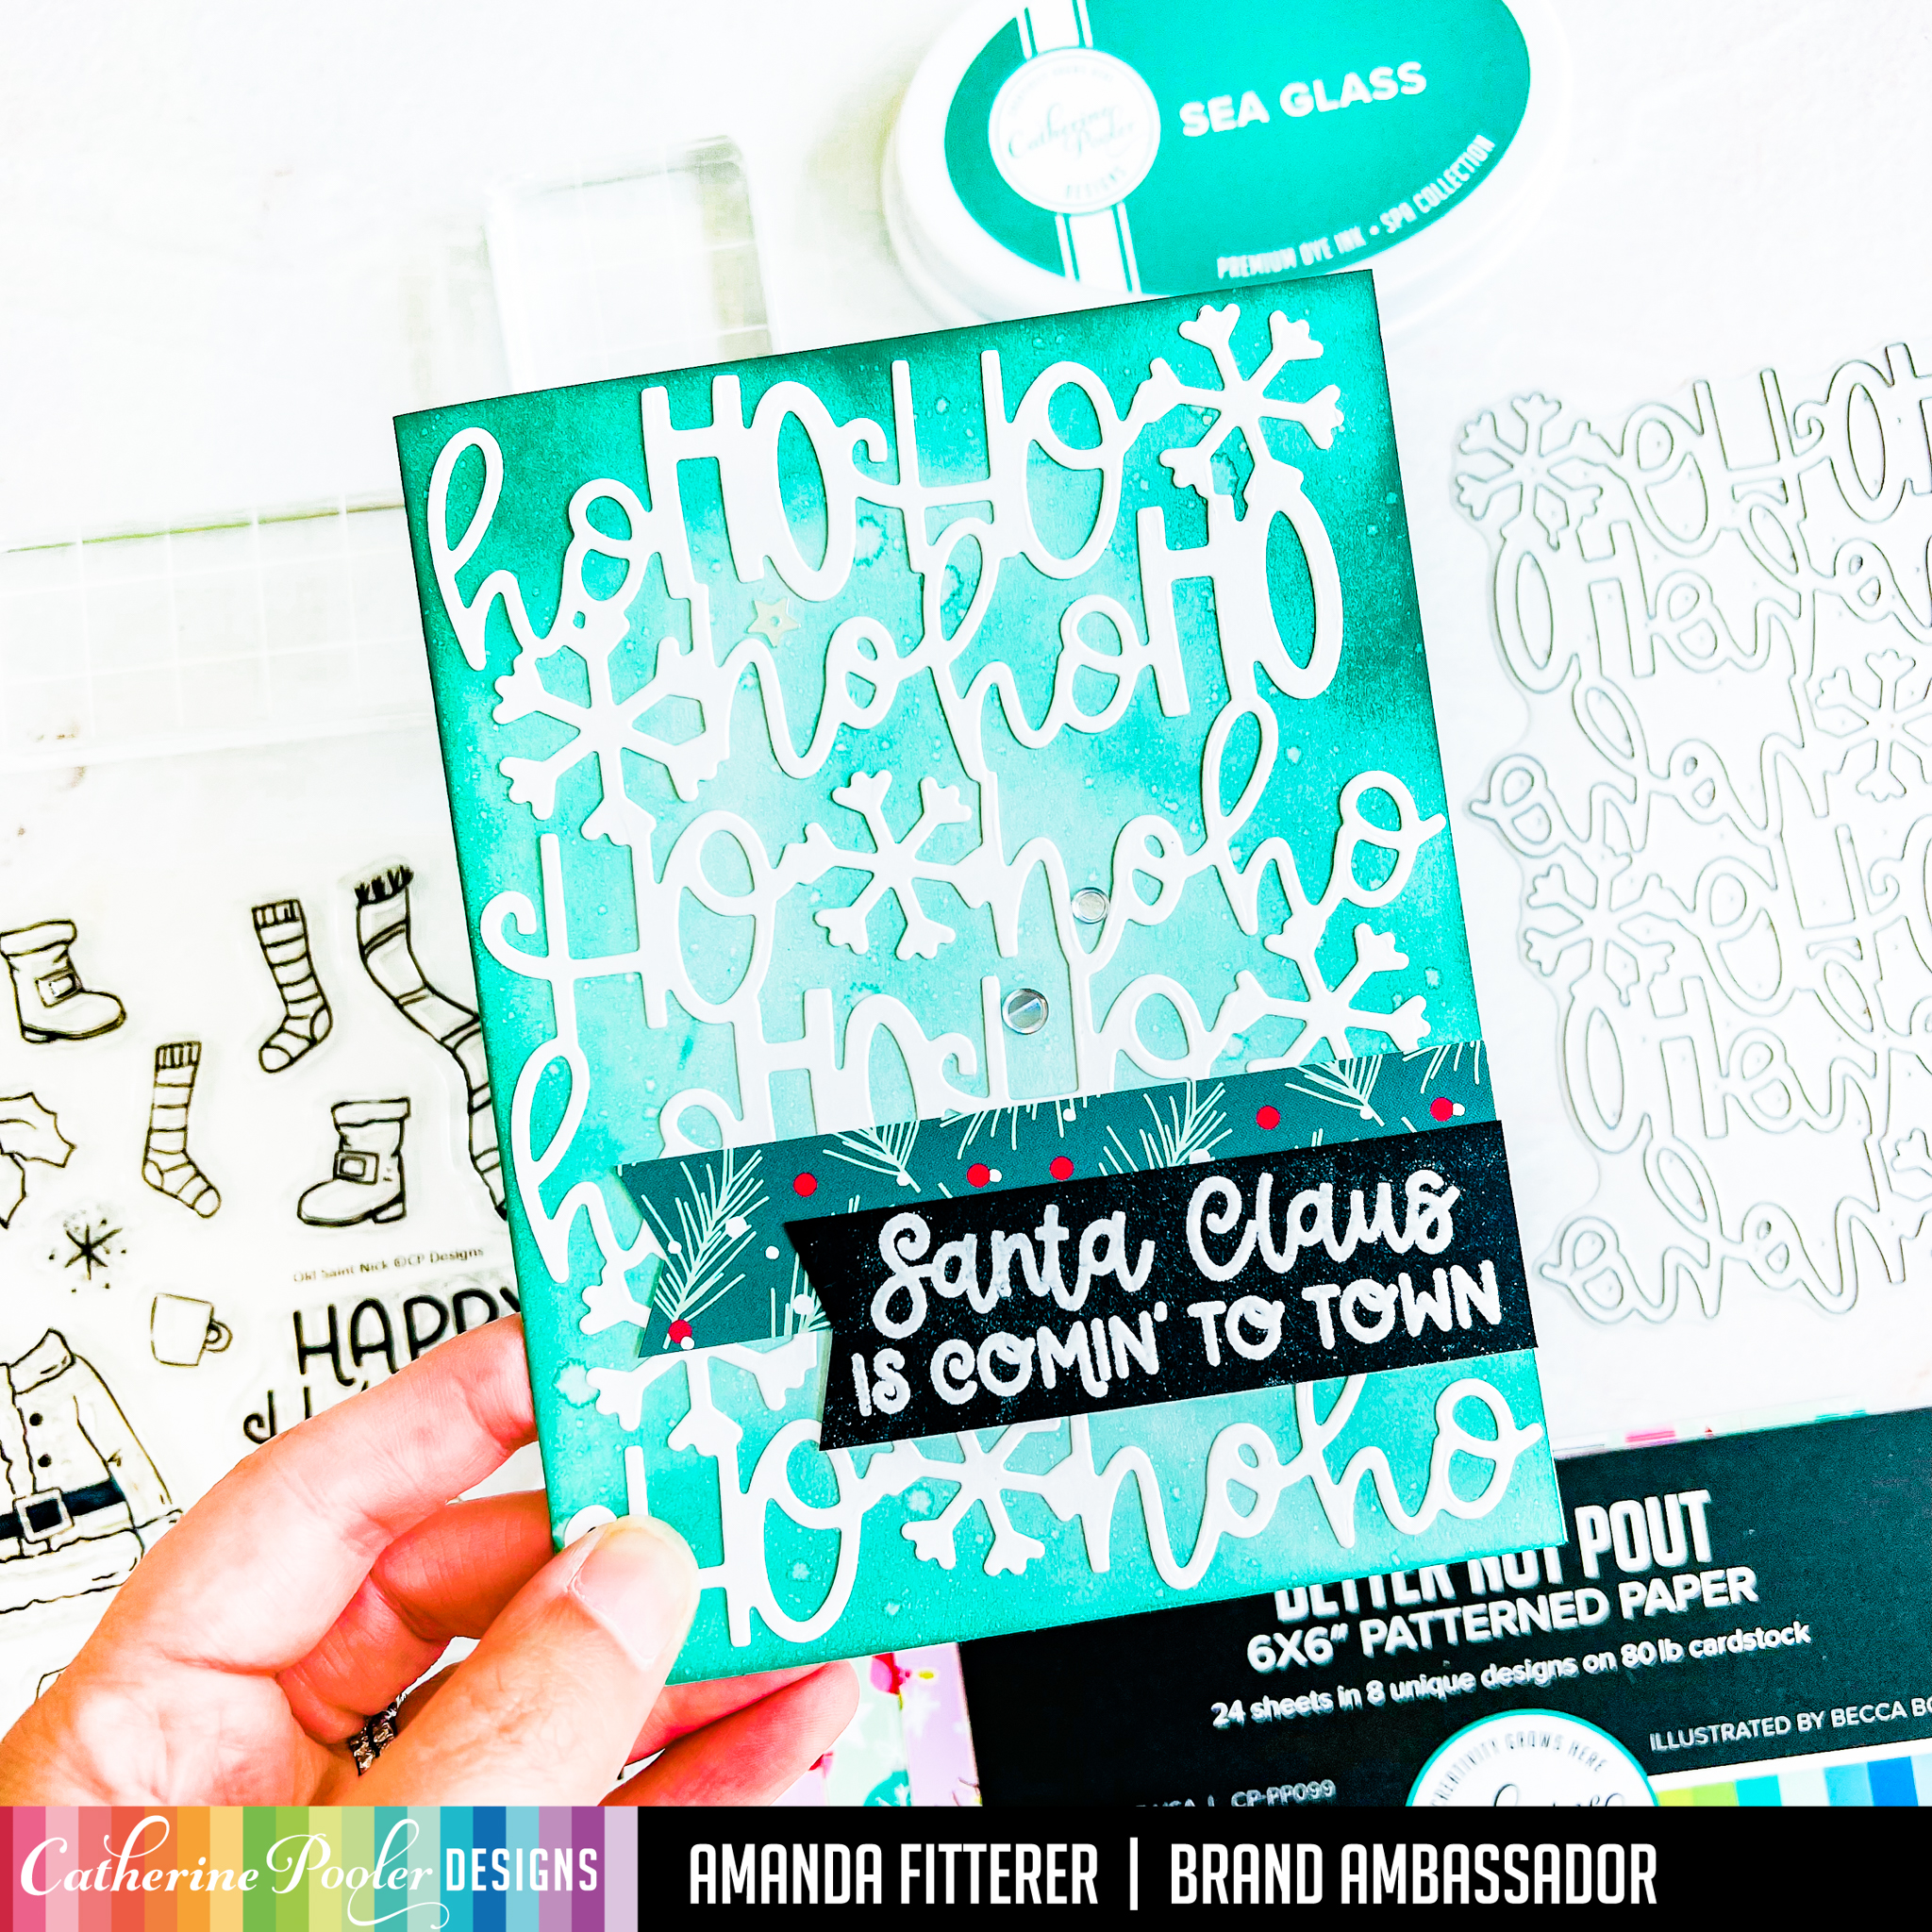
I stamped my images from the Naughty List Stamp Set, colored them with Copic markers, and then die cut them with the coordinating die set. I cut my Better Not Pout Patterned Paper Pack at an angle and then adhered it straight to my card front. I propped up my stamped image with 3D foam squares.
Thank you SO much for stopping by my blog today! I appreciate you so much!!
Don’t forget to use my affiliate link while shopping the Catherine Pooler site! It costs you nothing, but it gives me a teeny percentage back to help fund my crafty tutorials to share with YOU! Thank you SO much for your support!! Xx, Amanda
Hello, my fav crafty peeps! How are you doing? I’m doing AMAZING because I get to share this fun card with you! The new Holly Jolly Christmas Collection from Catherine Pooler is available for purchase now! So make sure you get your goodies before they sell out!!
To tie the whole thing together, I used a brad and the Party Twist Twine.
Such a fun card filled with cheeriness! Thank you SO much for stopping by my blog today! I appreciate you so much!!
Don’t forget to use my affiliate link while shopping the Catherine Pooler site! It costs you nothing, but it gives me a teeny percentage back to help fund my crafty tutorials to share with YOU! Thank you SO much for your support!! Xx, Amanda
What are you buying from this release?! Leave a comment and let me know!
Don’t forget to use my affiliate link while shopping the Catherine Pooler site! It costs you nothing, but it gives me a teeny percentage back to help fund my crafty tutorials to share with YOU! Thank you SO much for your support!! Xx, Amanda
DID YOU SEE?! Catherine Pooler has a NEW COLLECTION coming out!! It’s called Holly Jolly Christmas and it’s full of the CUTEST holiday products!! This release isn’t available quite yet, but it will be available on Sept 14th! If you’re a StampNation member, you get EARLY ACCESS on Sept 13th (along with tons of other perks!!!
Plus, get this FREE DASHER STAMP SET on orders of $50 or more!
I love using non-traditional colors for holiday cards, don’t you!? I am not a big fan of red and green 😛! So, for this card, I made my entire background Chiffon and Limoncello.
What are you excited about getting from this release??! Leave me a comment!! I can’t wait to hear!
Don’t forget to use my affiliate link while shopping the Catherine Pooler site! It costs you nothing, but it gives me a teeny percentage back to help fund my crafty tutorials to share with YOU! Thank you SO much for your support!! Xx, Amanda
DID YOU SEE?! Catherine Pooler has a NEW COLLECTION coming out!! It’s called Holly Jolly Christmas and it’s full of the CUTEST holiday products!! This release isn’t available quite yet, but it will be available on Sept 14th! If you’re a StampNation member, you get EARLY ACCESS on Sept 13th (along with tons of other perks!!!
What are you excited about getting from this release??! Leave me a comment!! I can’t wait to hear!
Don’t forget to use my affiliate link while shopping the Catherine Pooler site! It costs you nothing, but it gives me a teeny percentage back to help fund my crafty tutorials to share with YOU! Thank you SO much for your support!! Xx, Amanda
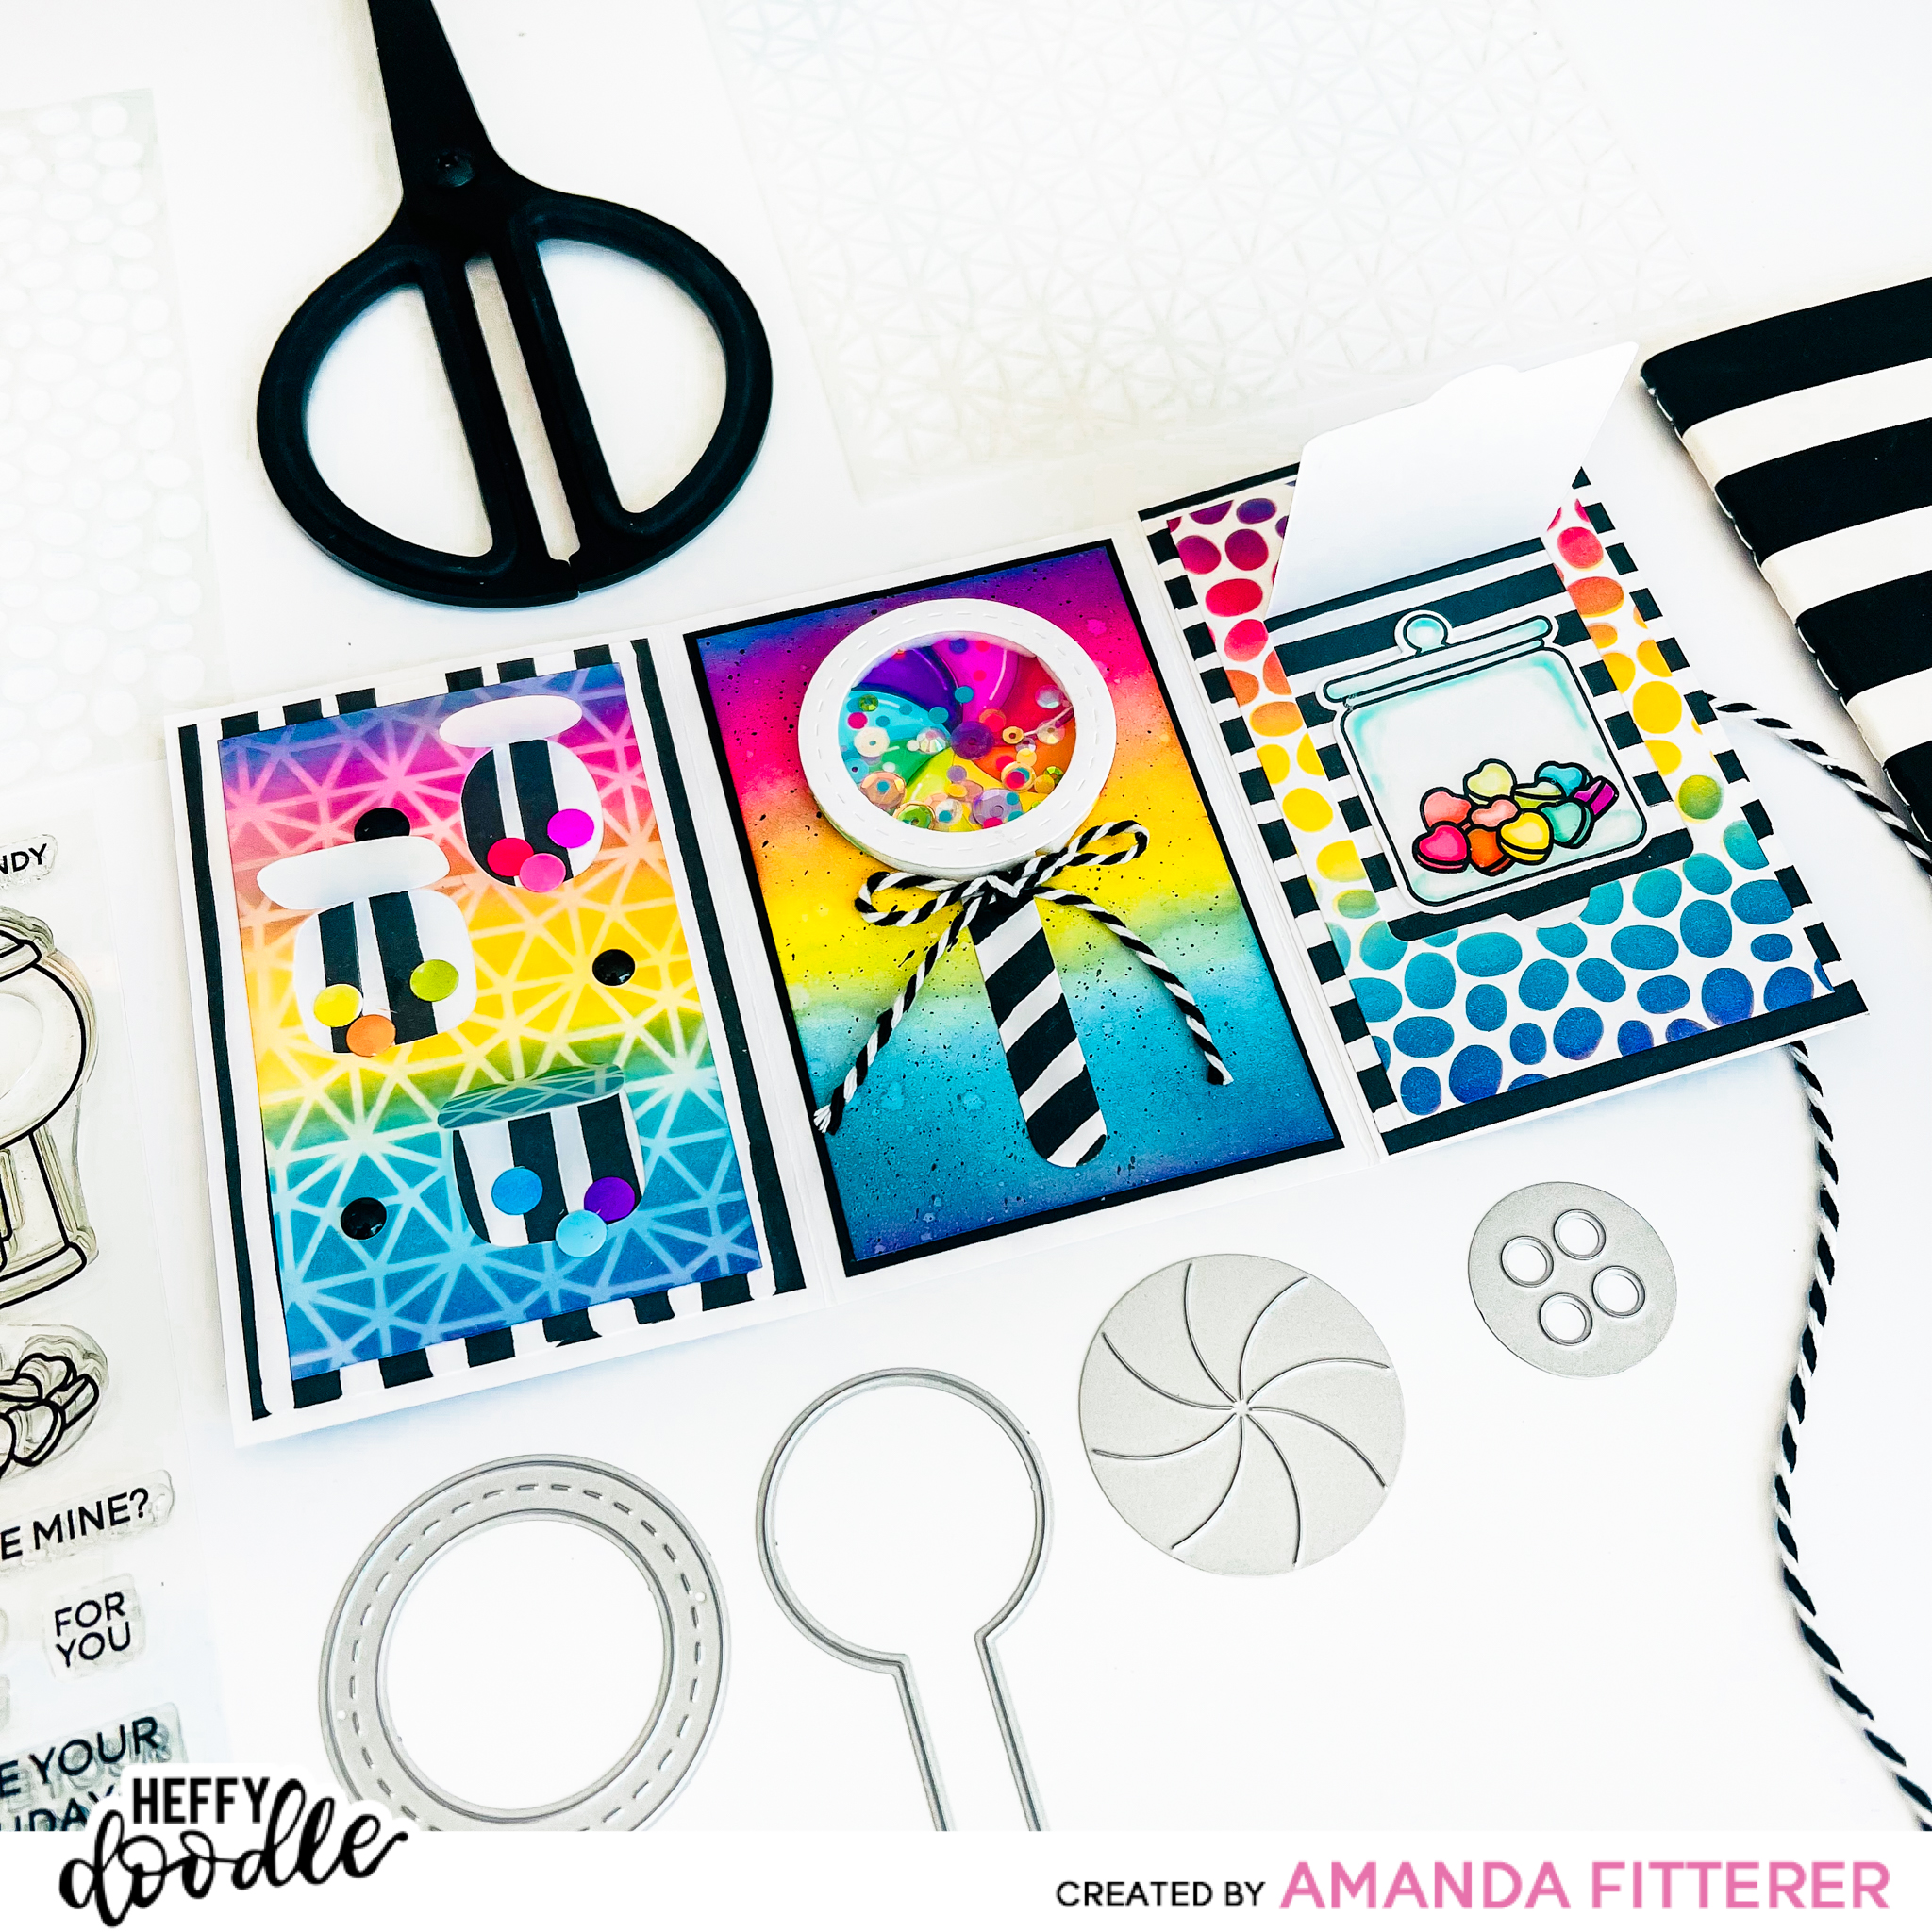
Welcome to the Heffy Doodle New Release Inspiration Blog Hop! We are so excited to share amazing cards from our Design Team members using the new release! For today’s special Blog Hop, you can win a £50 voucher to the Heffy Doodle store!
Get your Sweetie Pie stamp set for FREE with a £30 spend (not inc. shipping). And get the coordinating dies too with a £45+ spend!
To create this trifold card, I started with a sheet of cardstock trimmed to 4.5″ x 11″. I scored at the 3″ mark and the 6″ mark.
For all of my rainbow blending, I’m using Maker Forte’s Color Hive Inks in the colors Flamingo, Yellowstone, and Vegas Strip. This is my ABSOLUTE FAVORITE rainbow blend! You can get a huge range of colors from just these 3 colors!
Here’s how I get the best blend: 1. I start with Yellowstone and blend it in the center of my cardstock. 2. Next, I blend Flamingo on the top of my cardstock (reaching all the way to the top). I gently blend the Flamingo into the Yellowstone to create an orange color. 3. I grab my Vegas Strip and repeat the process on the bottom of the cardstock. 4. Now, I take my Vegas Strip and blend a purple at the very tippy top of the cardstock to create a pinky-purple blend. 5. Then, I get my Flamingo again and blend at the very bottom of the cardstock to create a blue-purple blend. 6. If needed, I will take my Yellowstone brush and just lightly blend into the Flamingo and Vegas Strip. 7. I usually also spritz my background with a Mister Perfect Spray Bottle filled with regular water. I will also sometimes flick white watercolor paint using a Watercolor Brush.
If you were wondering what sort of black and white paper I’m using for my striped paper, you’ll be happy to know that I made it myself! I simply used the chisel end of a marker! I wanted them to look hand-drawn, so I just freehanded it! Easy peasy!
For my front panel, I’ve used the Love is Everywhere Stencil. I have also used my new favorite tool (the Cropadile!) to add some eyelets to the front of my card to hold my baker’s twine! I made sure to add my eyelets and twine before gluing down the inside panel!
For my super adorable shaker lollipop, I’ve used the NEW Sweet Tooth Shaker Dies! Omg, are they adorable or what?! You can make all sorts of sweets and shakers! For my stripes, I used my chisel marker again! I mixed and matched Sparkle Mixes to get all the colors of the rainbow in there.
For my adorable candy jar and gumball machine, I’ve used the Gumbelievable Stamp Set again and then added a layer of Glossy Accents over top! I used OLO markers to color all my images.
For my little circles, I used the circle confetti dies that come in the Sweet Tooth Shaker Dies.
I hope you have LOVED seeing how I made this rainbowy fun mini trifold card!
To be entered to win the giveaway, all you need to do is comment at each stop along the Blog Hop before Sept 13, 2022 at 11:59 PM EST. The winner will be announced on the Heffy Doodle Blog on Sept 15th at 10:00 AM EST!
Thank you SO much for stopping by my blog to see my post!
Affiliate Links are used where possible. Using these links costs you nothing, but it gives me a small percentage of your purchase! This is amazinggly helpful for me so that I can continue to buy crafty goodies to share more tutorials with you! THANK YOU for using my links!!
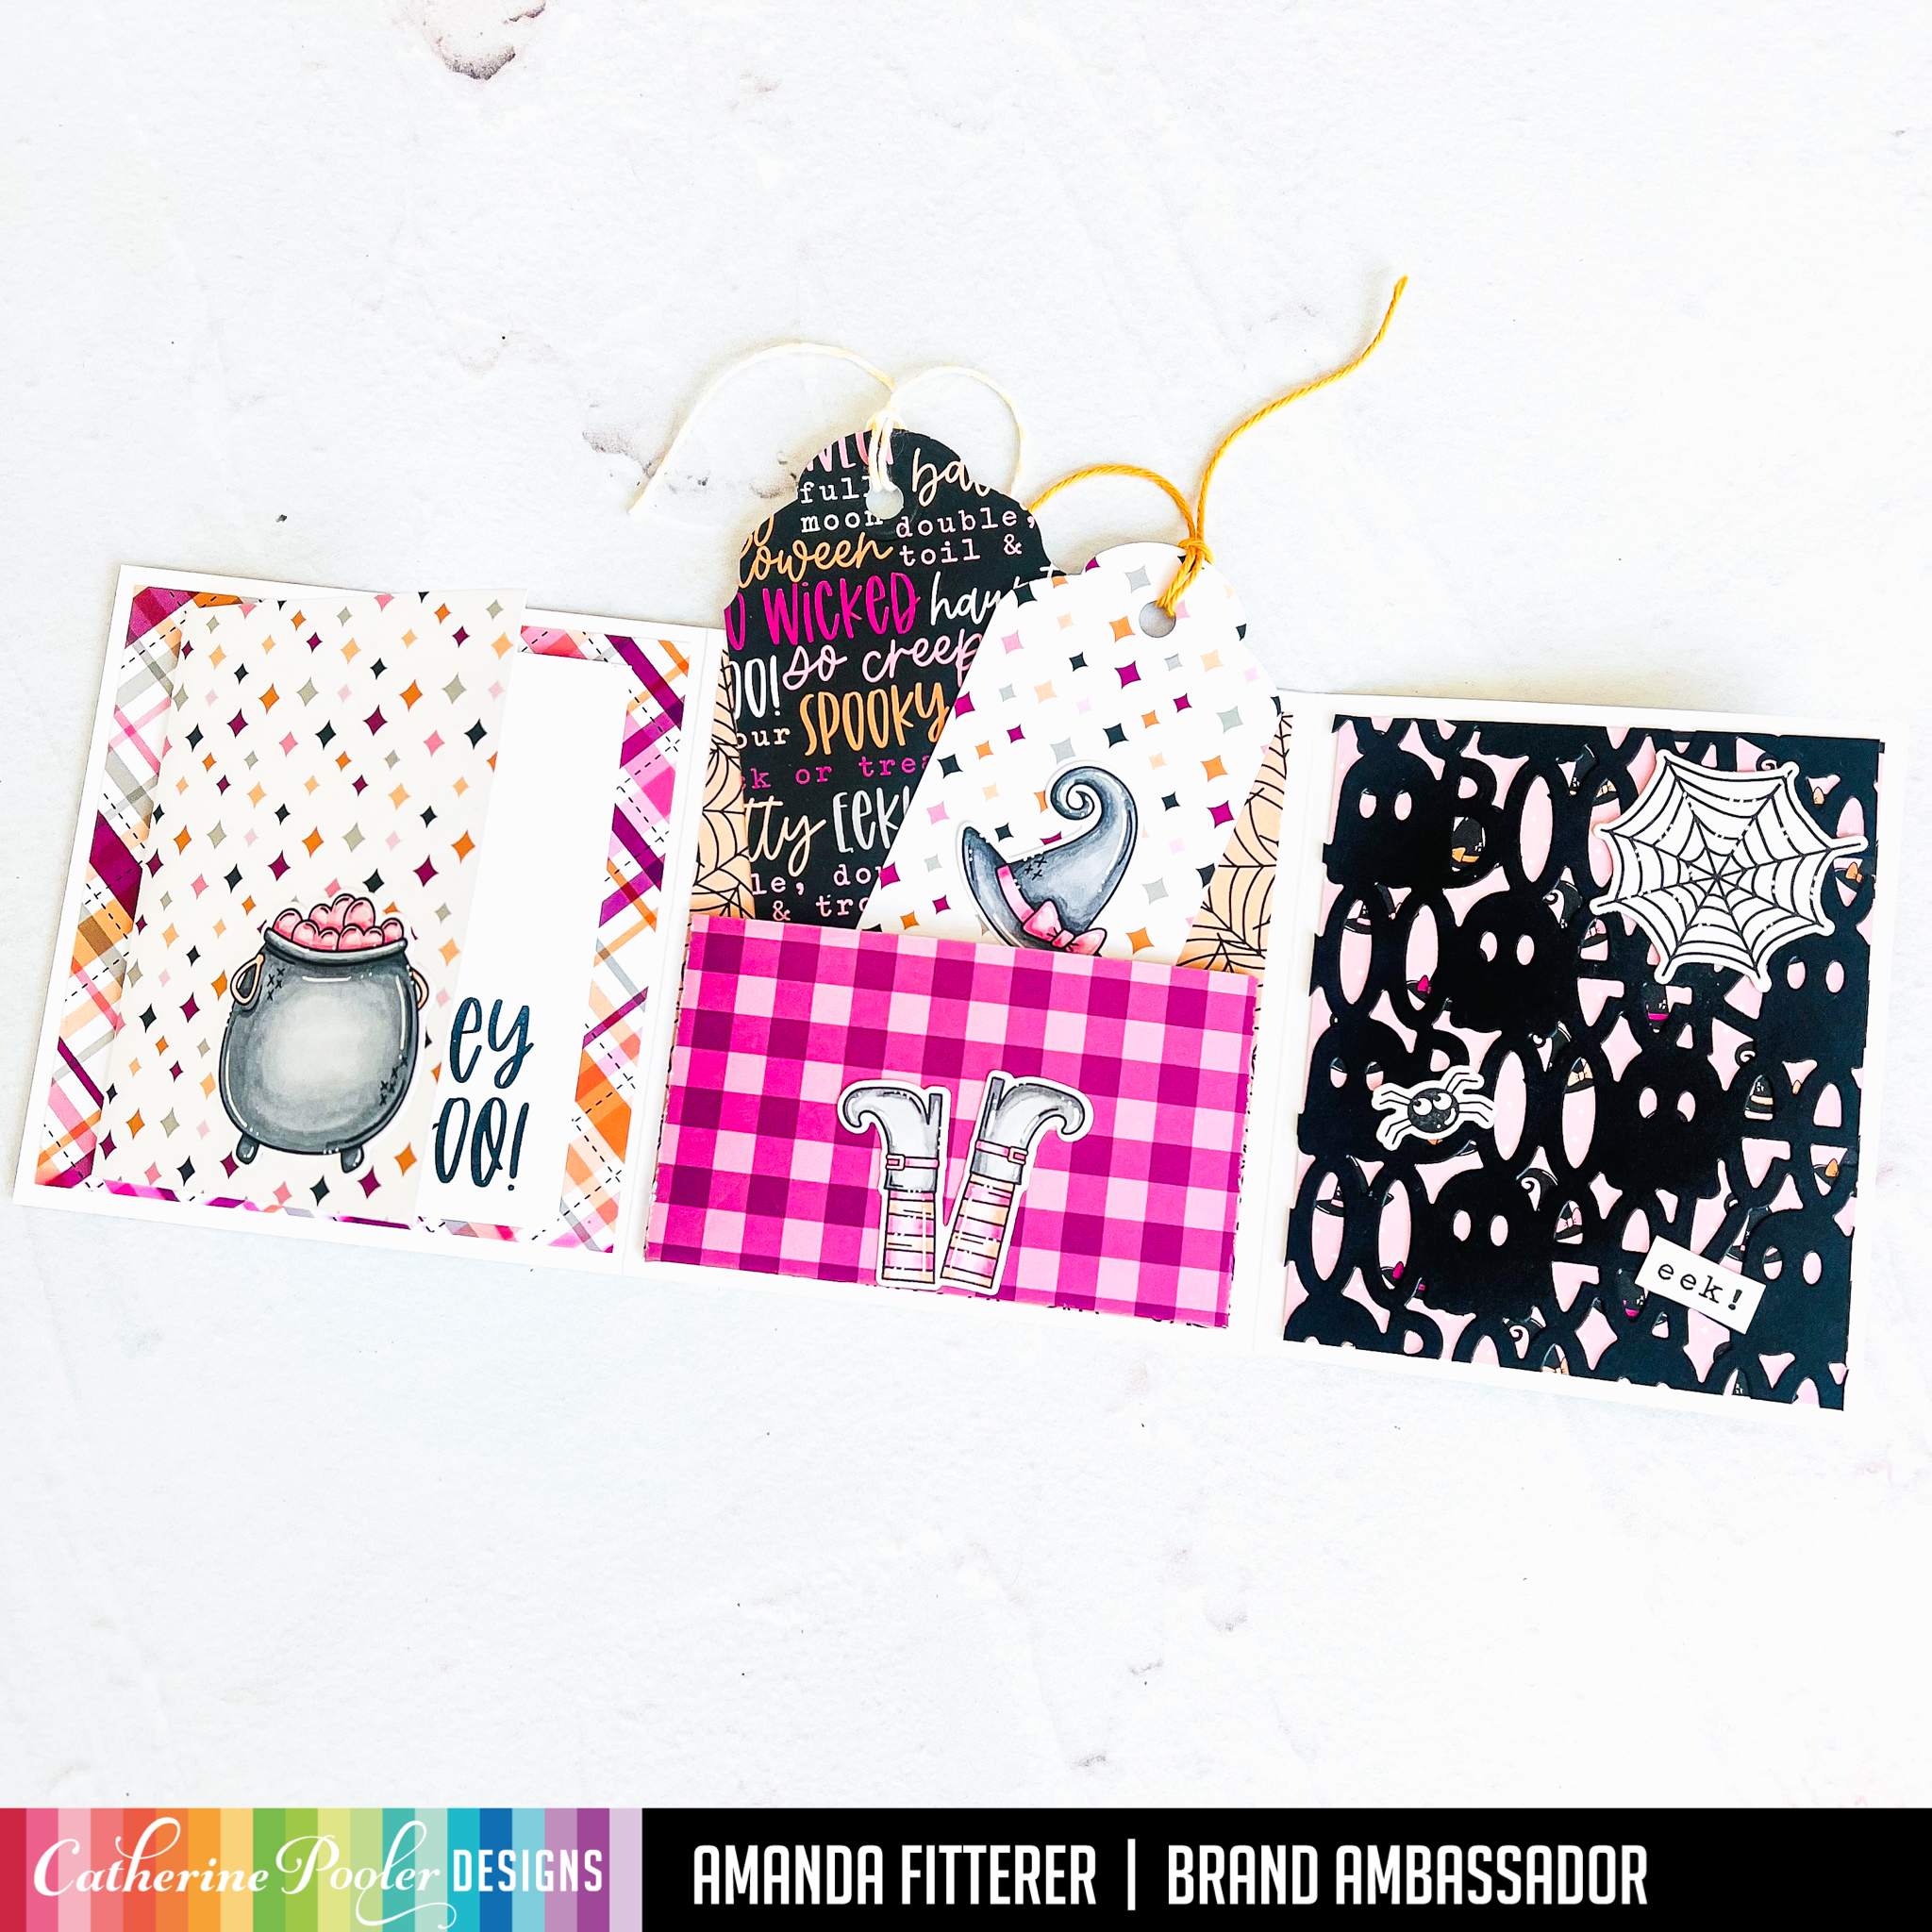
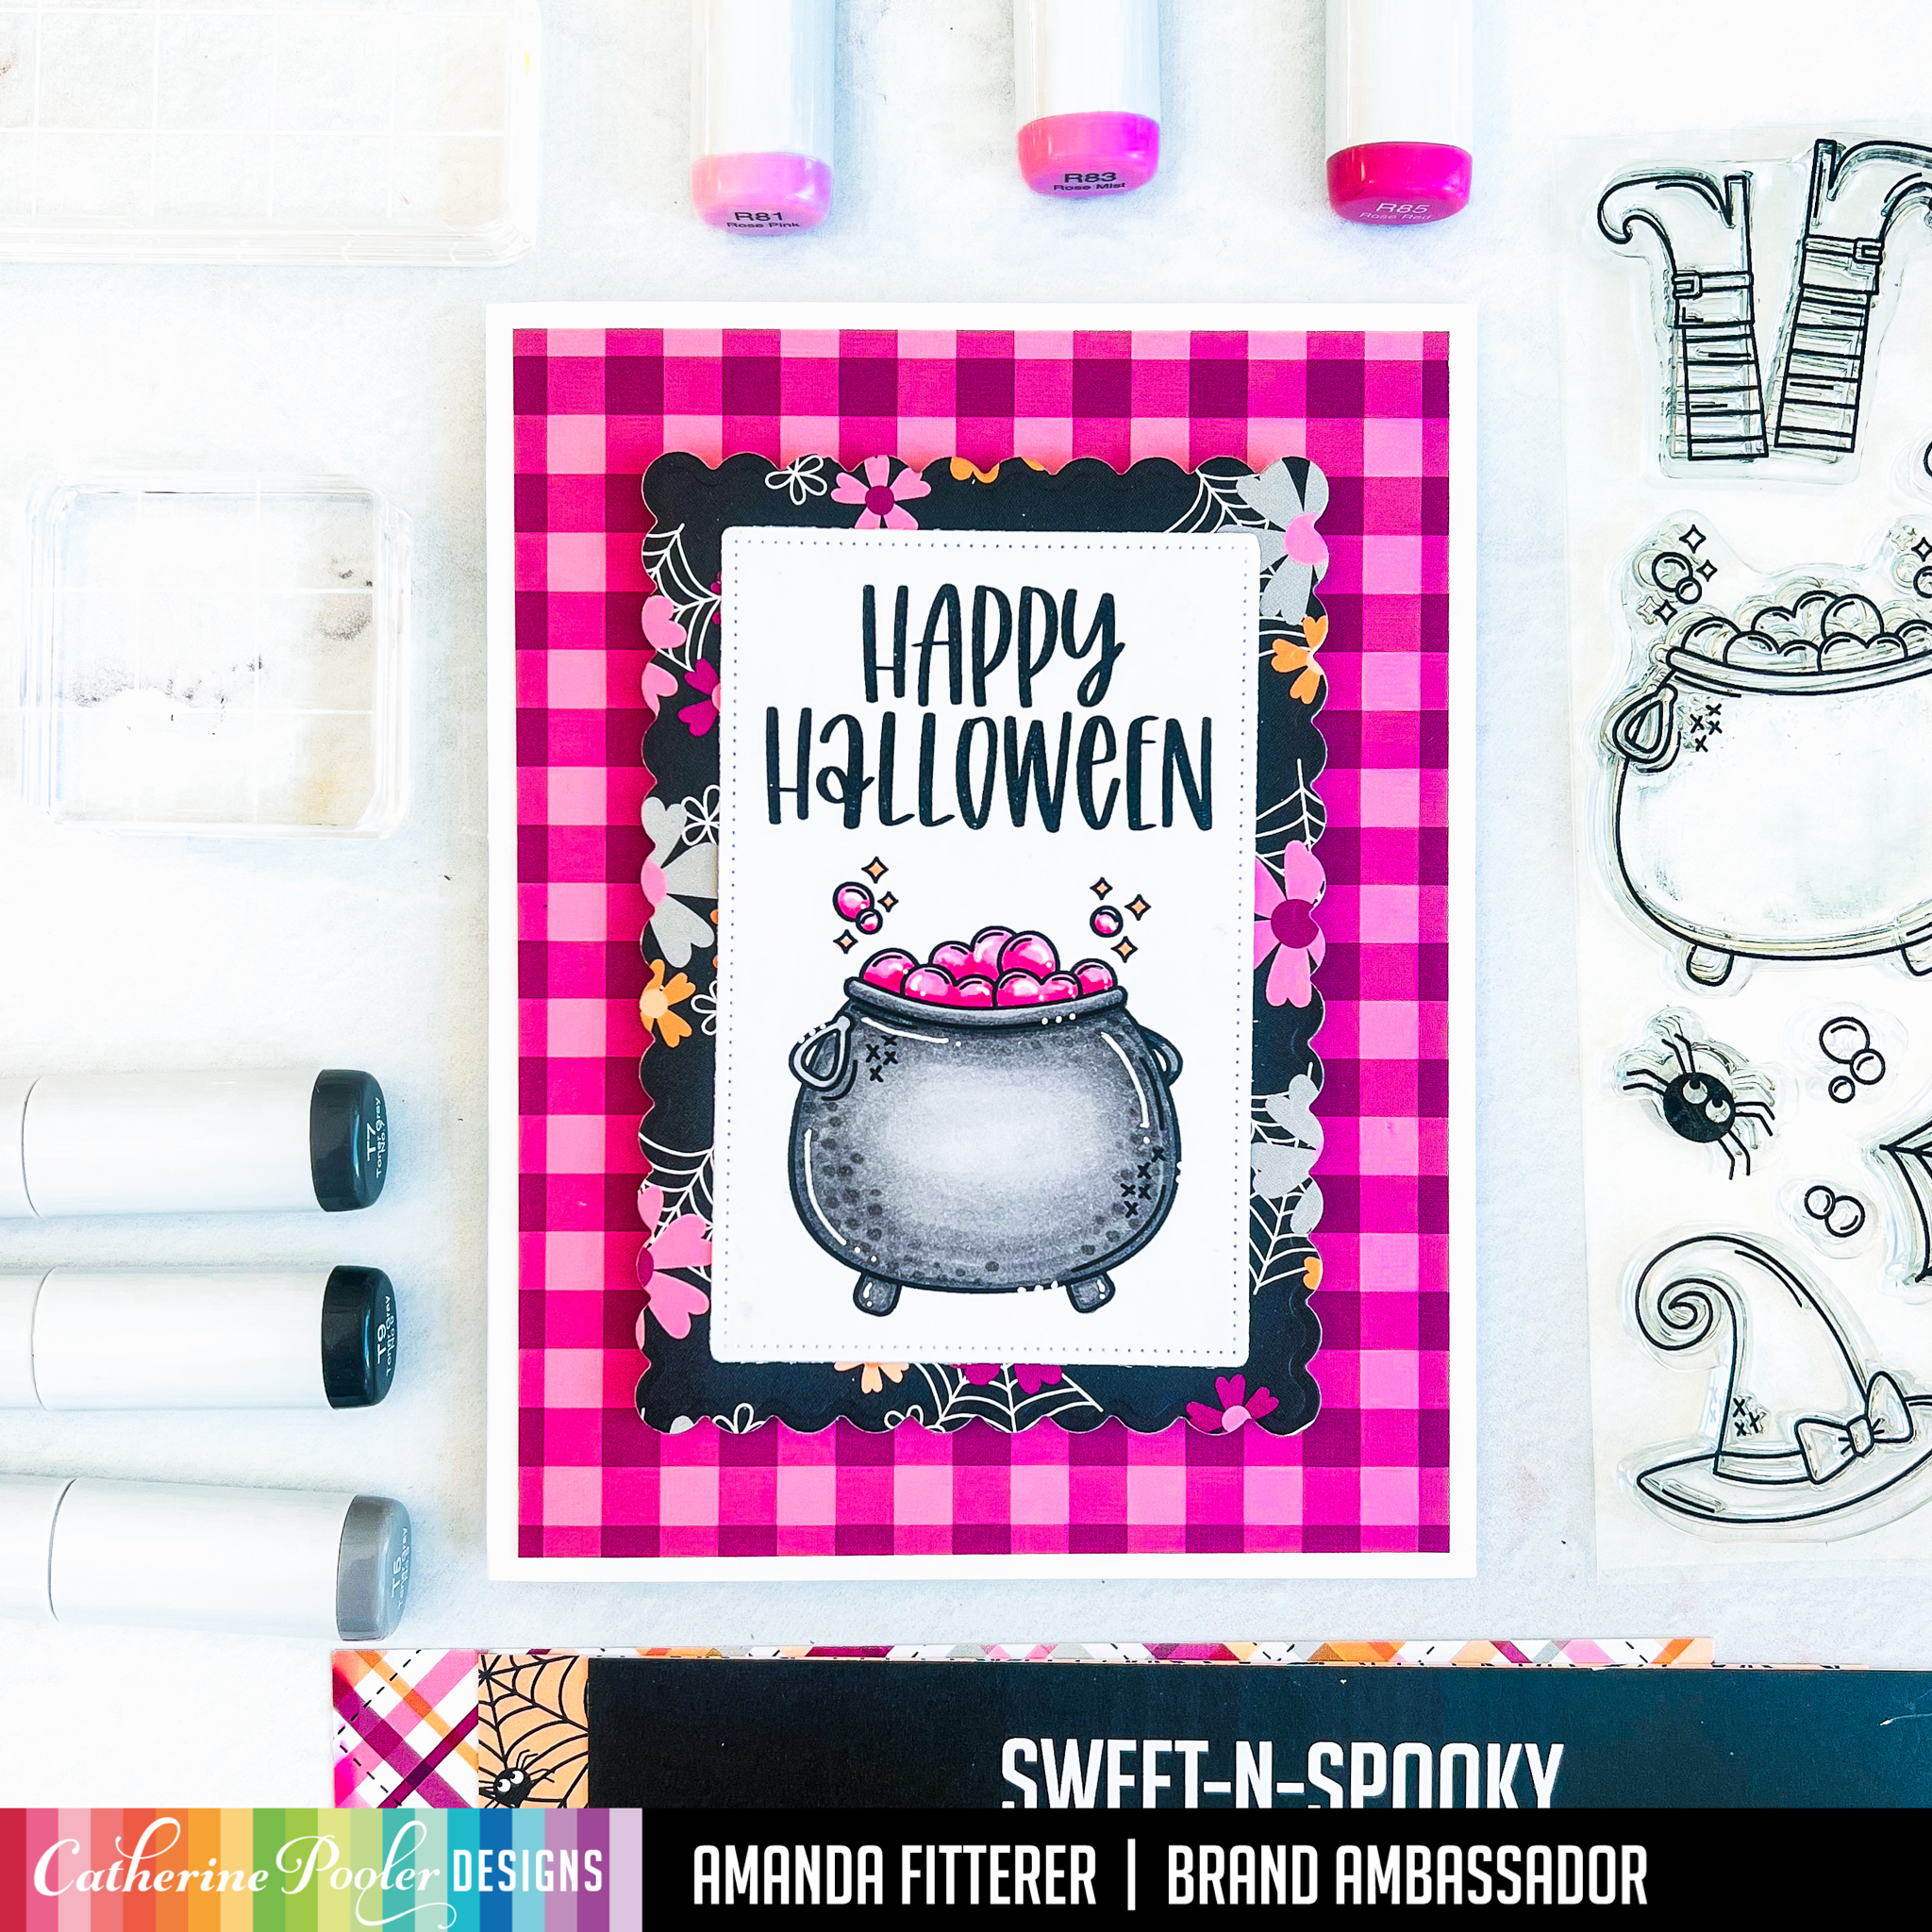
Have you seen the New Sweet-n-Spooky Bundle from Catherine Pooler?! The release is available now for purchase! Make sure to get your spooky bundle before they sell out!
To make this really fun pocketfold notebook, I trimmed down a piece of Letter size white cardstock to 11″ x 4″ and then folded it into a trifold. Then, I added the too cute Sweet-n-Spooky Patterned Paper to each flap on the inside and the outside.
Then, I created a pocket by trimming down a rectangle piece of patterned paper. I scored at .5″ on 3 sides and then folded at the score lines. Using scissors, I trimmed off the corners of the side and bottom flaps. Next, I can add double sided tape to each flap and then adhere it to my pocketfold.
For the mini notebook, I simply trimmed down a piece of the patterned paper to form a book cover. I folded some regular computer paper to form the pages and then stapled them together. I used red SuperTape to adhere my pages to the cover because this tape is super strong.
I trimmed down some twine to wrap around my pocketfold, leaving enough to tie into a bow.
Here are more photos of the finished mini pocketfold notebook!
What are you excited about getting from this release??!
Don’t forget to use my affiliate link while shopping the Catherine Pooler site! It costs you nothing, but it gives me a teeny percentage back to help fund my crafty lifestyle! Thank you SO much for your support!! Xx, Amanda
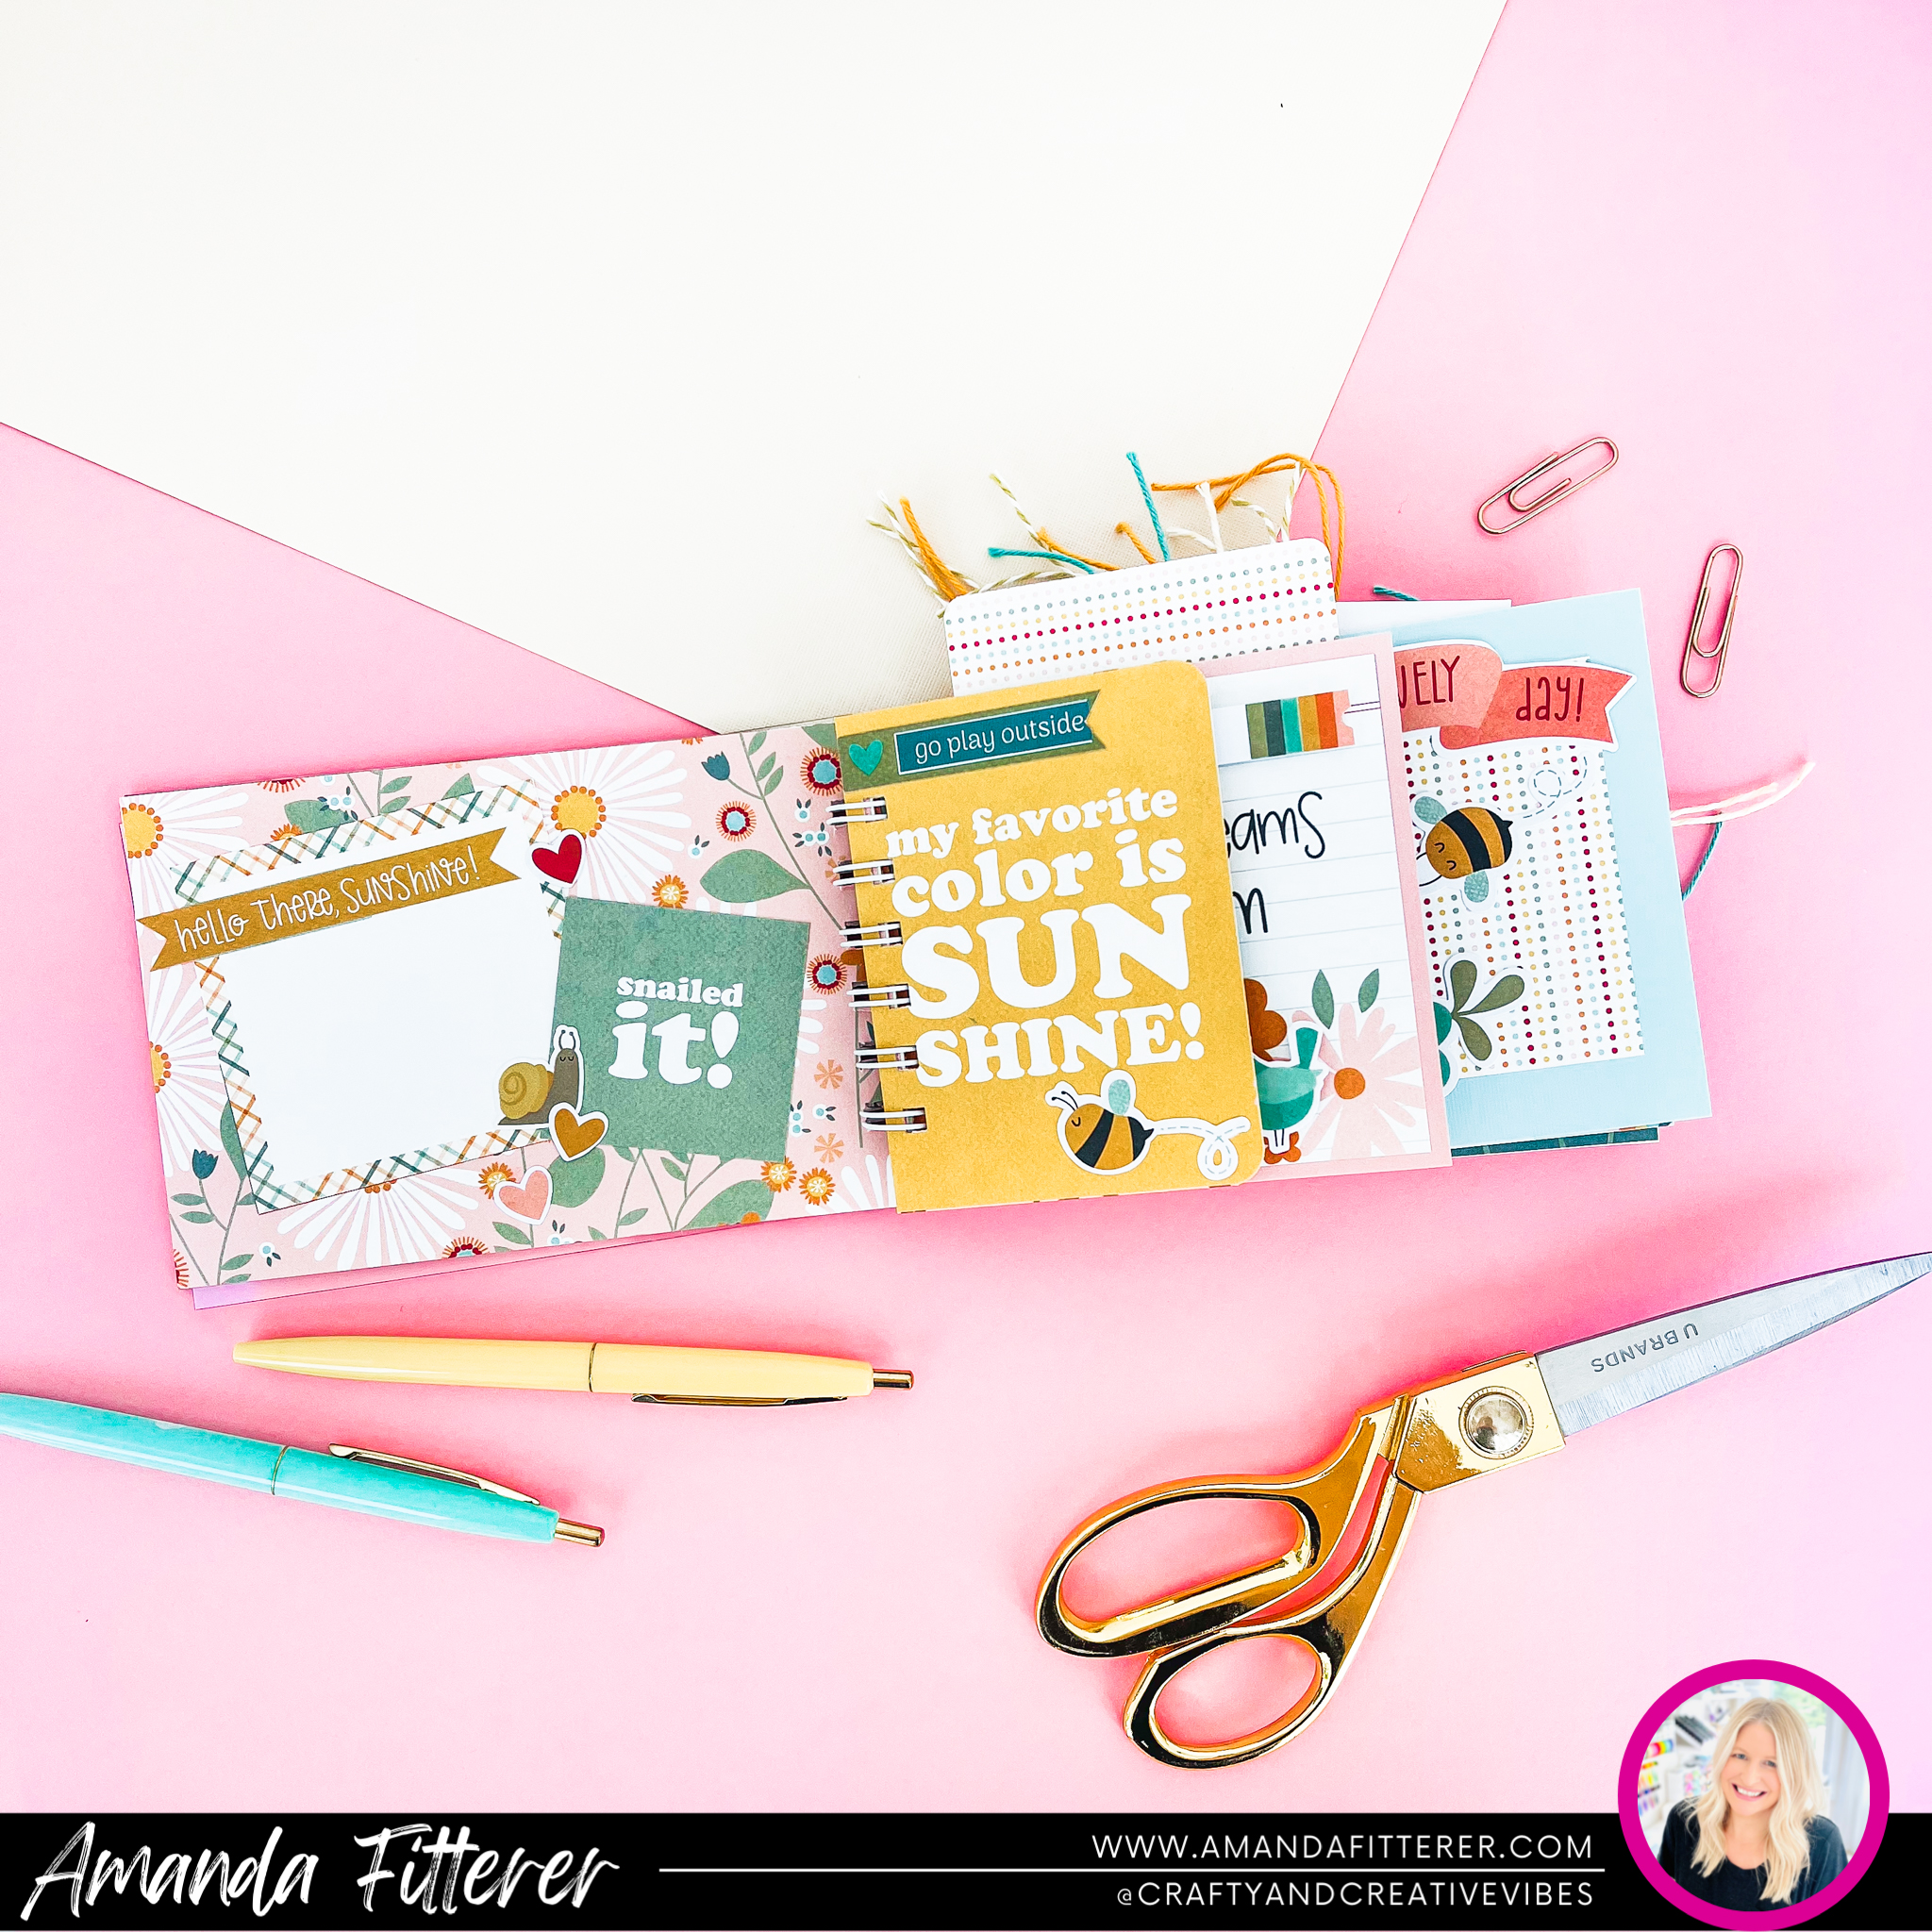
Hey friends! I’m SO excited to share my finished DIY mini photo album I made using the Simple Stories Full Bloom Collection! This collection just makes me SMILE! I bound my entire book using the Mini Cinch.
If you’d like to shop this Full Bloom Collection, you can use my affiliate link here. *It doesn’t cost you anything at all, but it does give me a teeny percentage of your purchase to help me fund my craftiness!
Thank you SO much for using my links. You can always shop at scrapbook.com using my link here.
I’m SO pumped about this New Sweet-n-Spooky Bundle from Catherine Pooler! The release is available now for purchase! Make sure to get your spooky bundle before they sell out!
What are you excited about getting from this release??!
Don’t forget to use my affiliate link while shopping the Catherine Pooler site! It costs you nothing, but it gives me a teeny percentage back to help fund my crafty lifestyle! Thank you SO much for your support!! Xx, Amanda
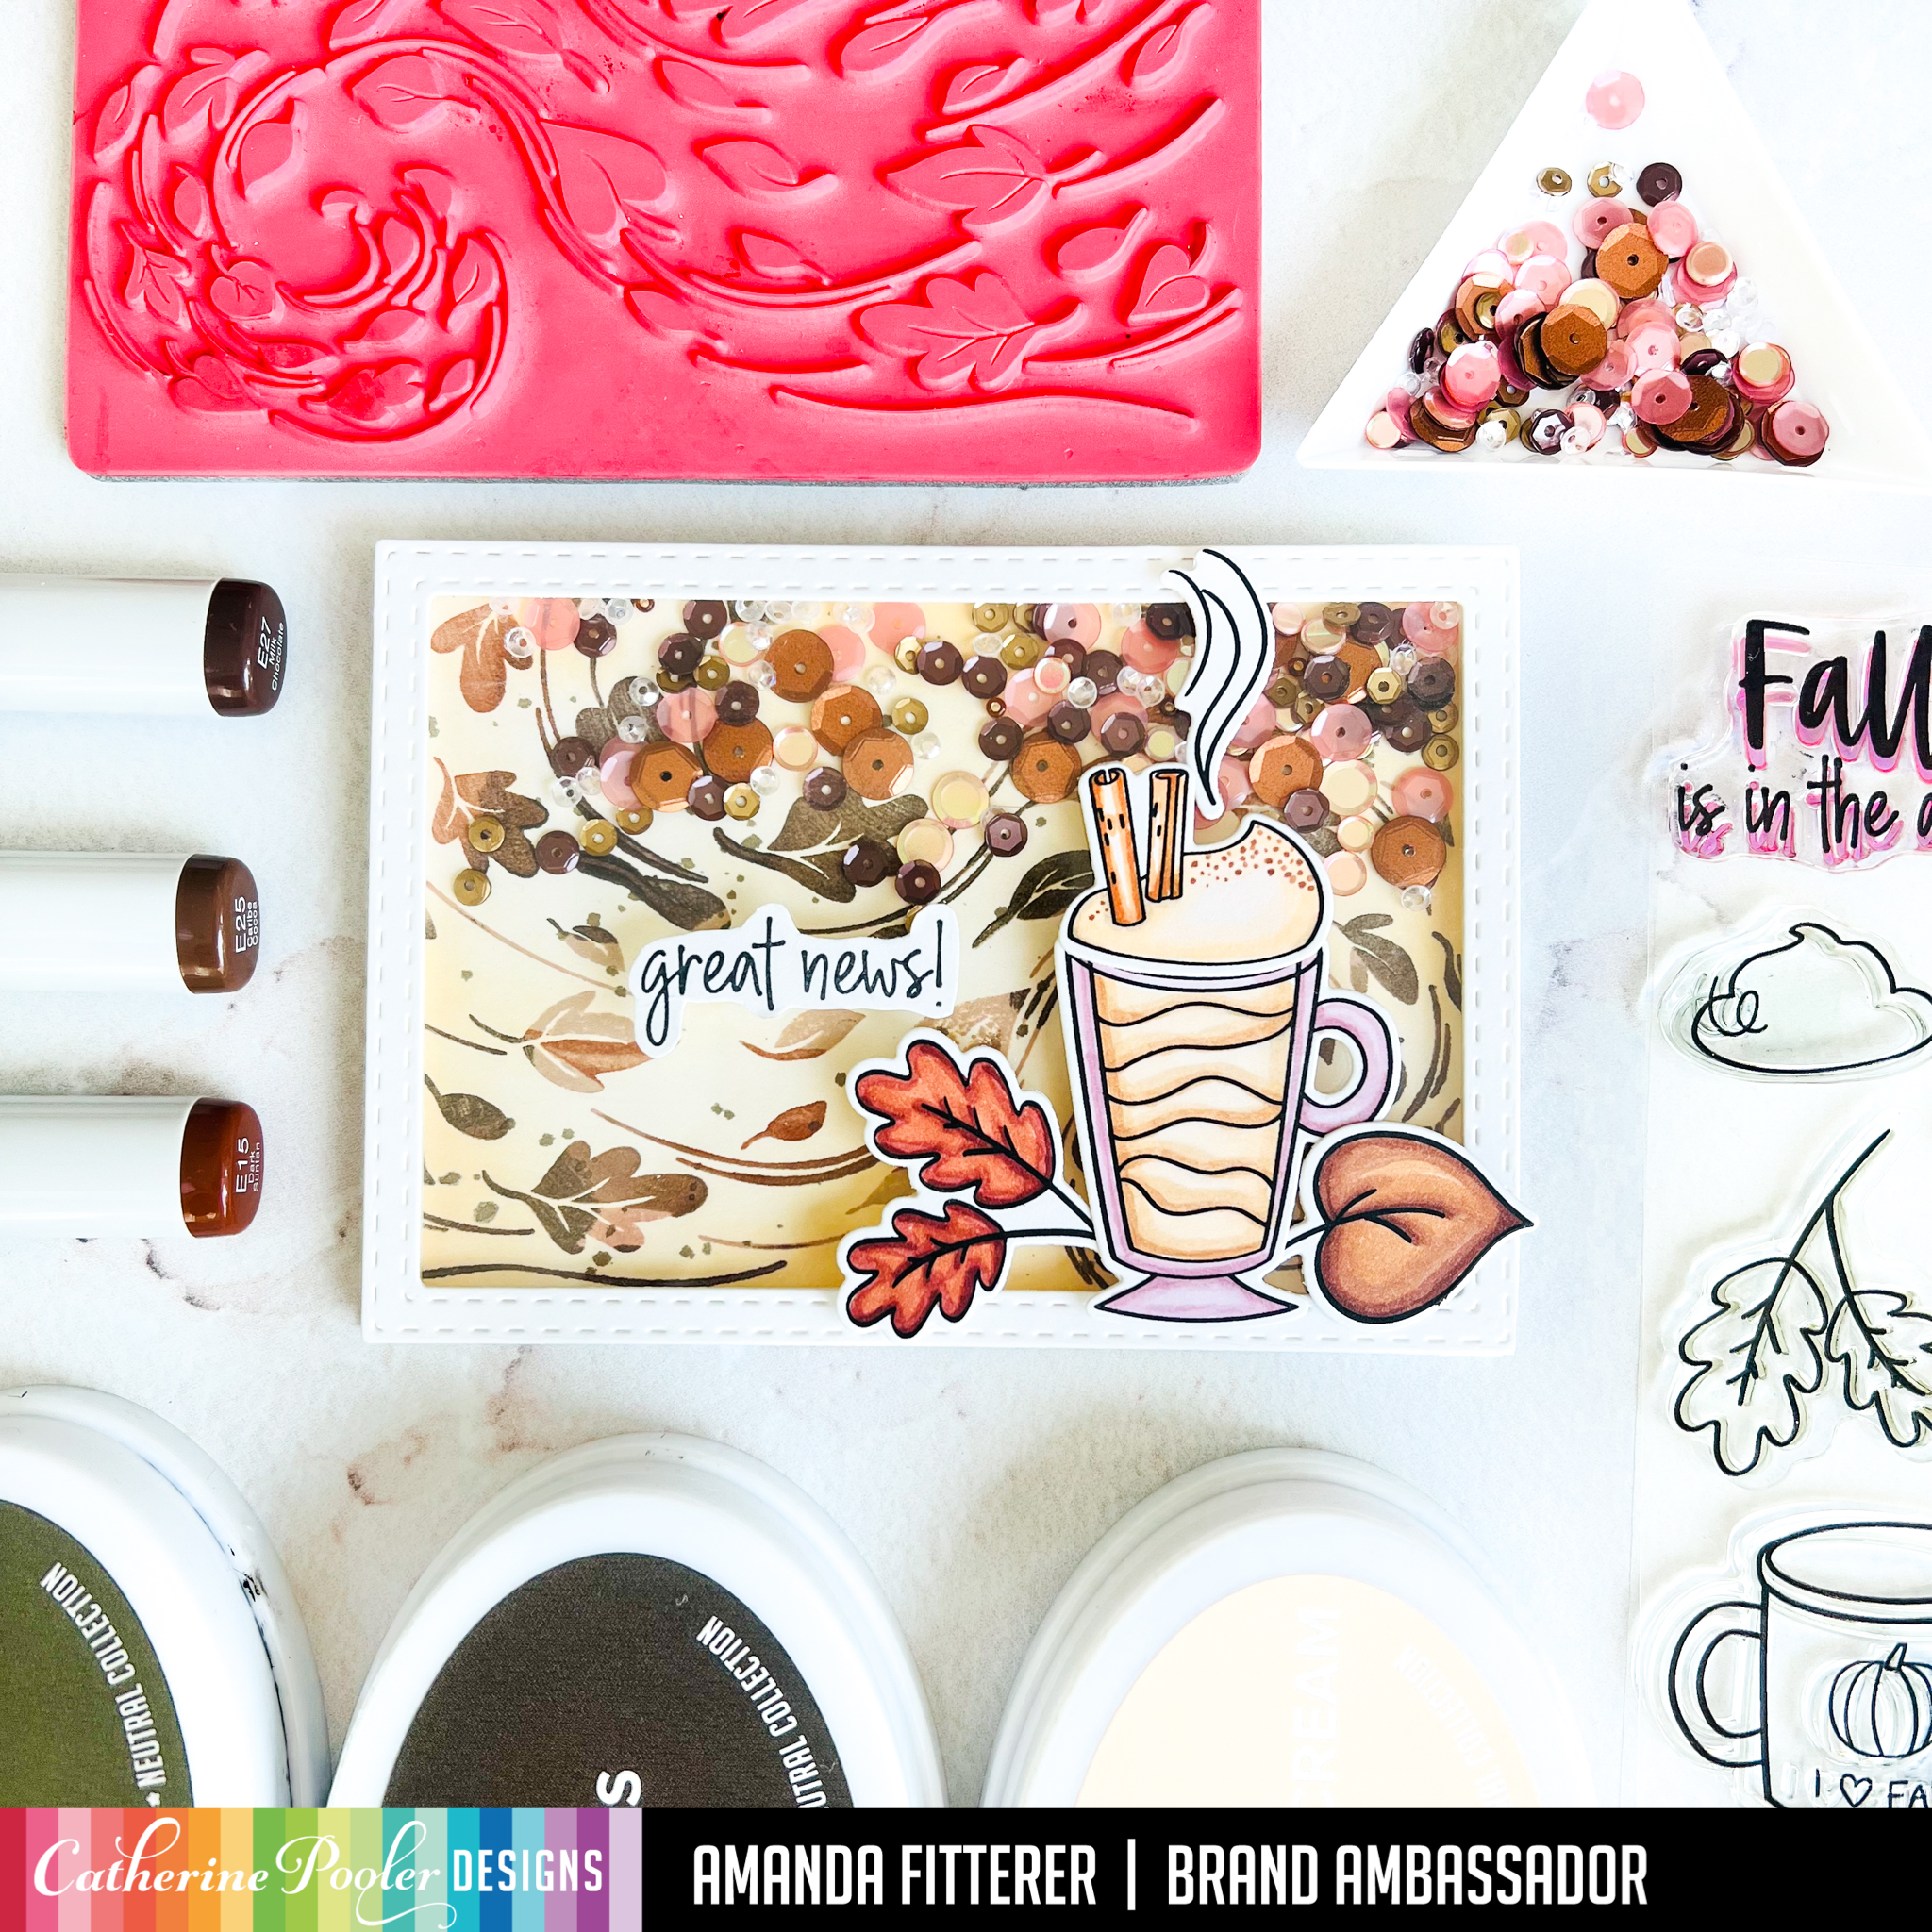
Shop the All Things Fall Collection using my affiliate linkhere. Thanks for using this link (at no cost to you)! It helps me fund my crafty addiction and lets me share more inspiration with you!