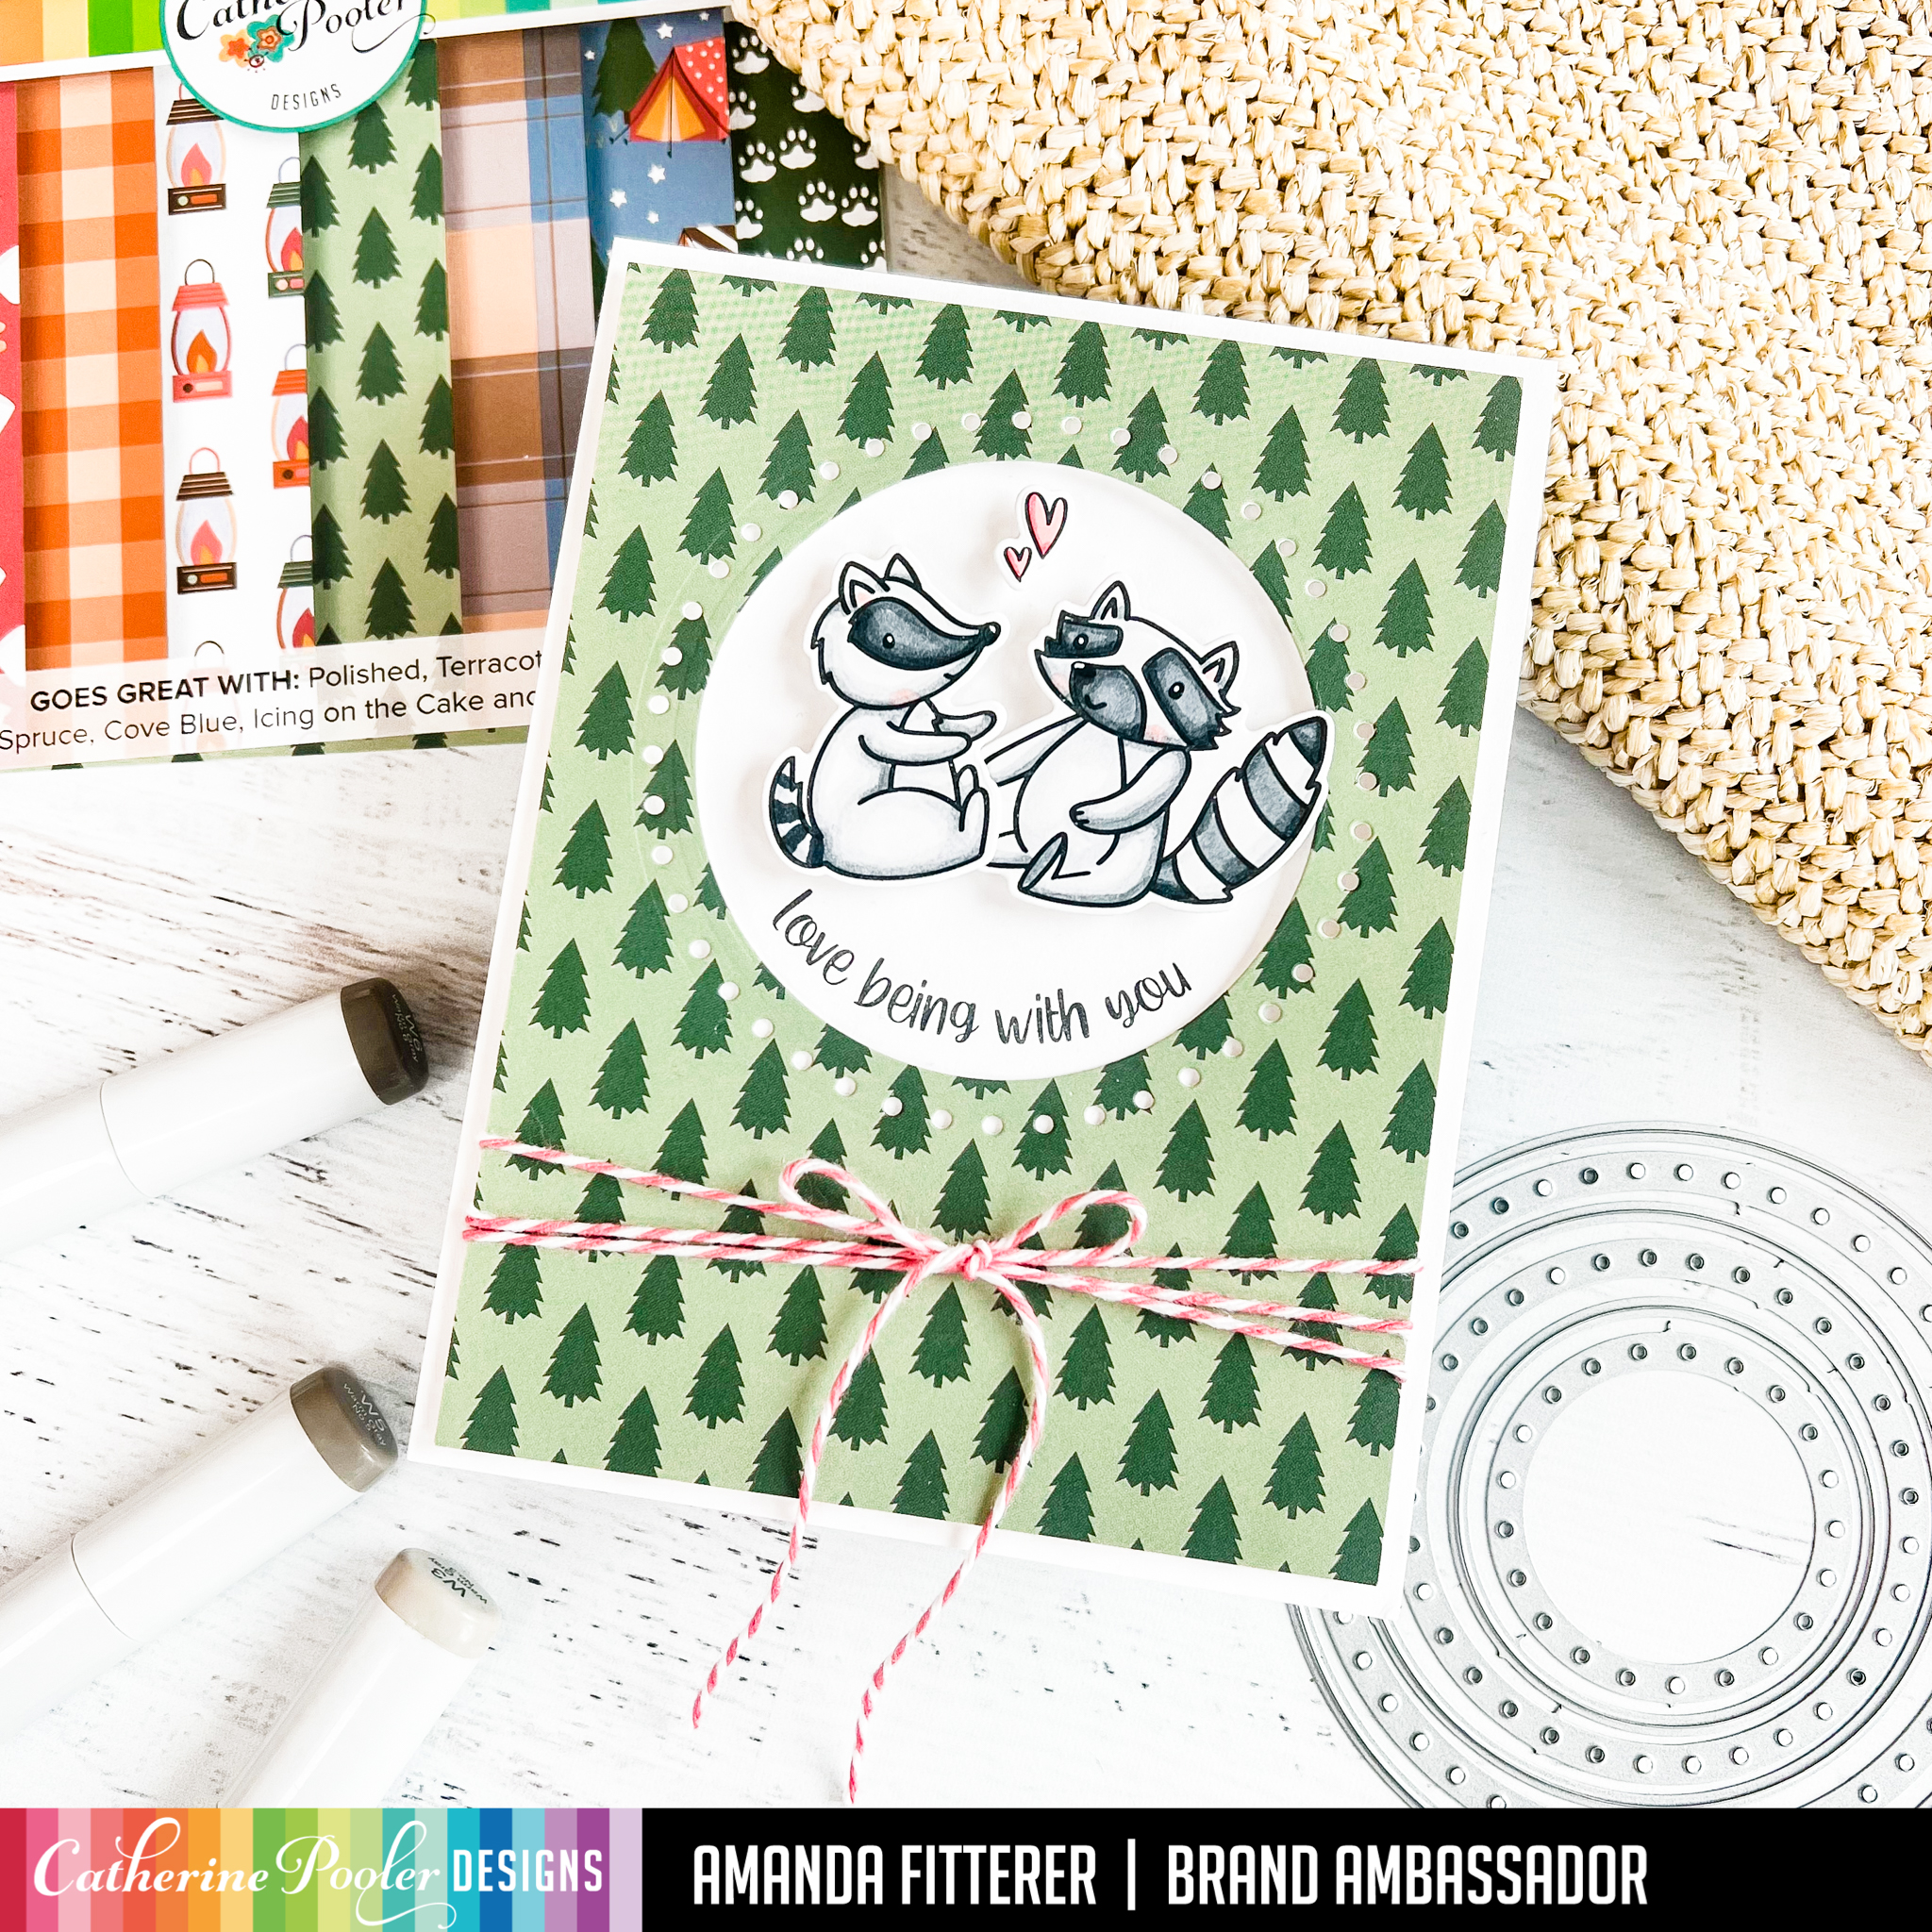
Shop the All Things Fall Collection using my affiliate linkhere. Thanks for using this link (at no cost to you)! It helps me fund my crafty addiction and lets me share more inspiration with you!
I’m excited to share more sneak peeks with you in the upcoming days! This new release will be available for StampNation members to purchase on Aug 2nd. Everyone else can begin ordering on Aug 3rd! Come back here soon for more inspo using the new release!
Shop the All Things Fall Collection using my affiliate linkhere. Thanks for using this link (at no cost to you)! It helps me fund my crafty addiction and lets me share more inspiration with you!
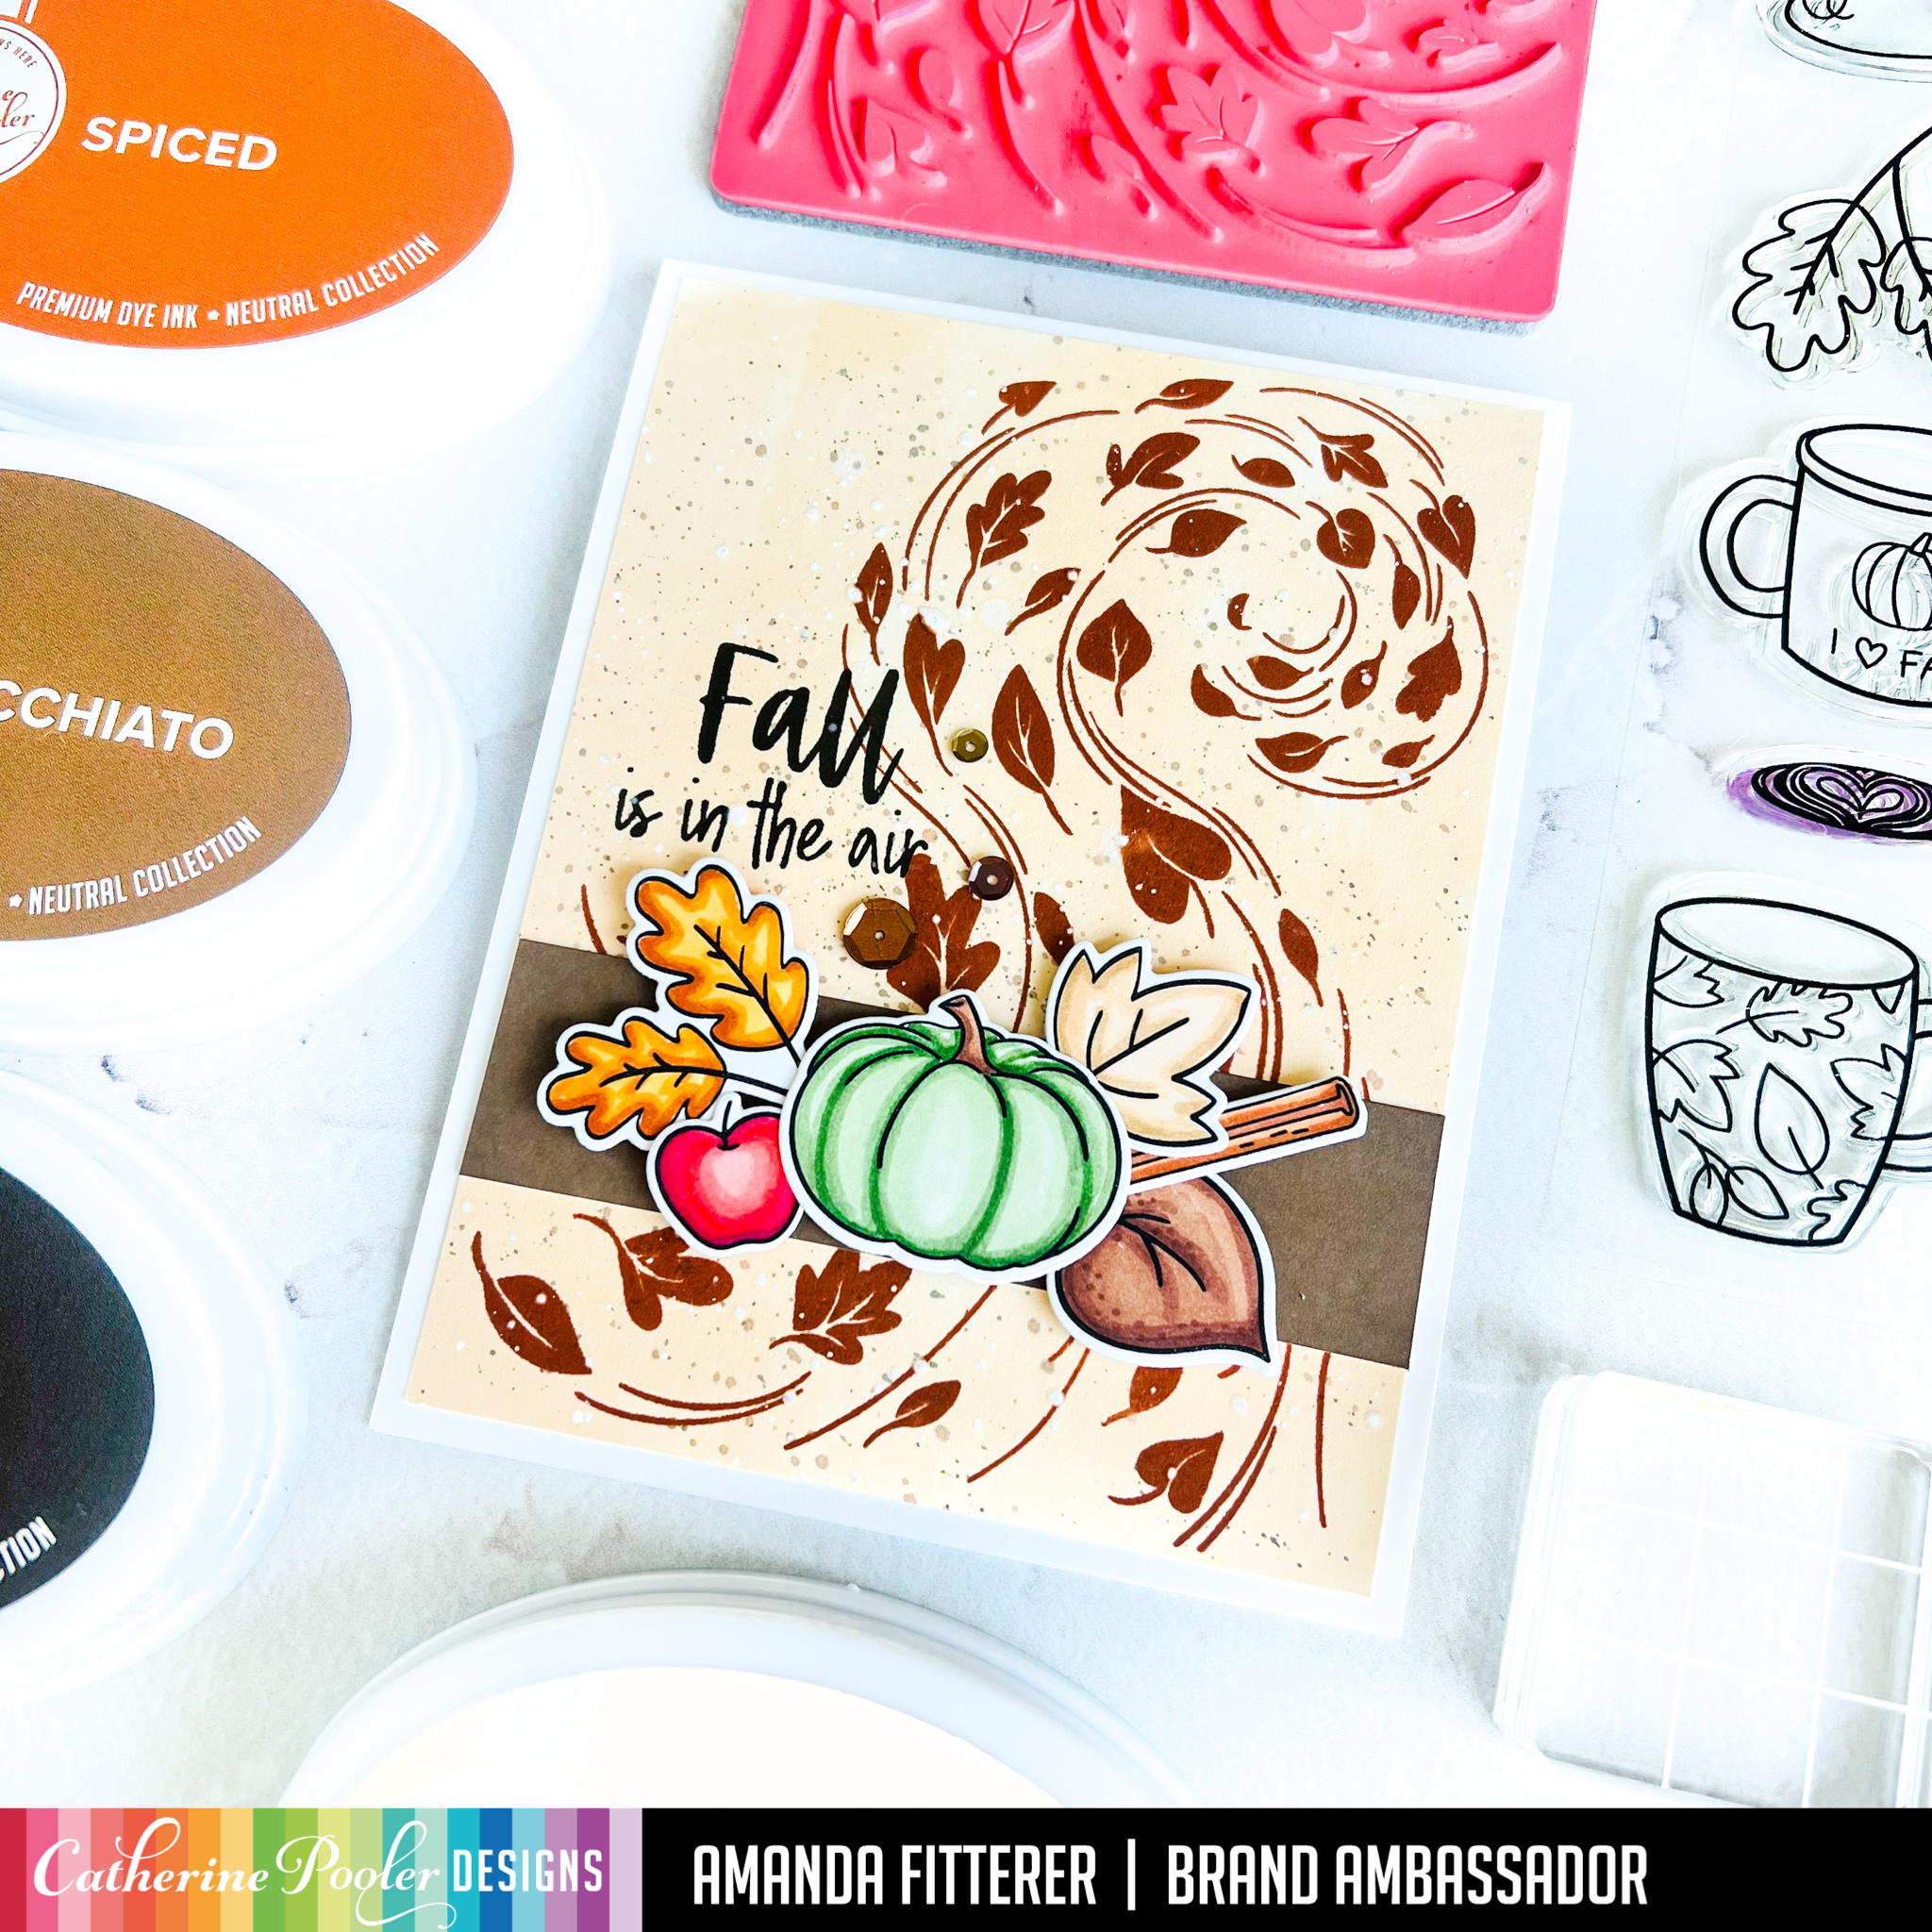
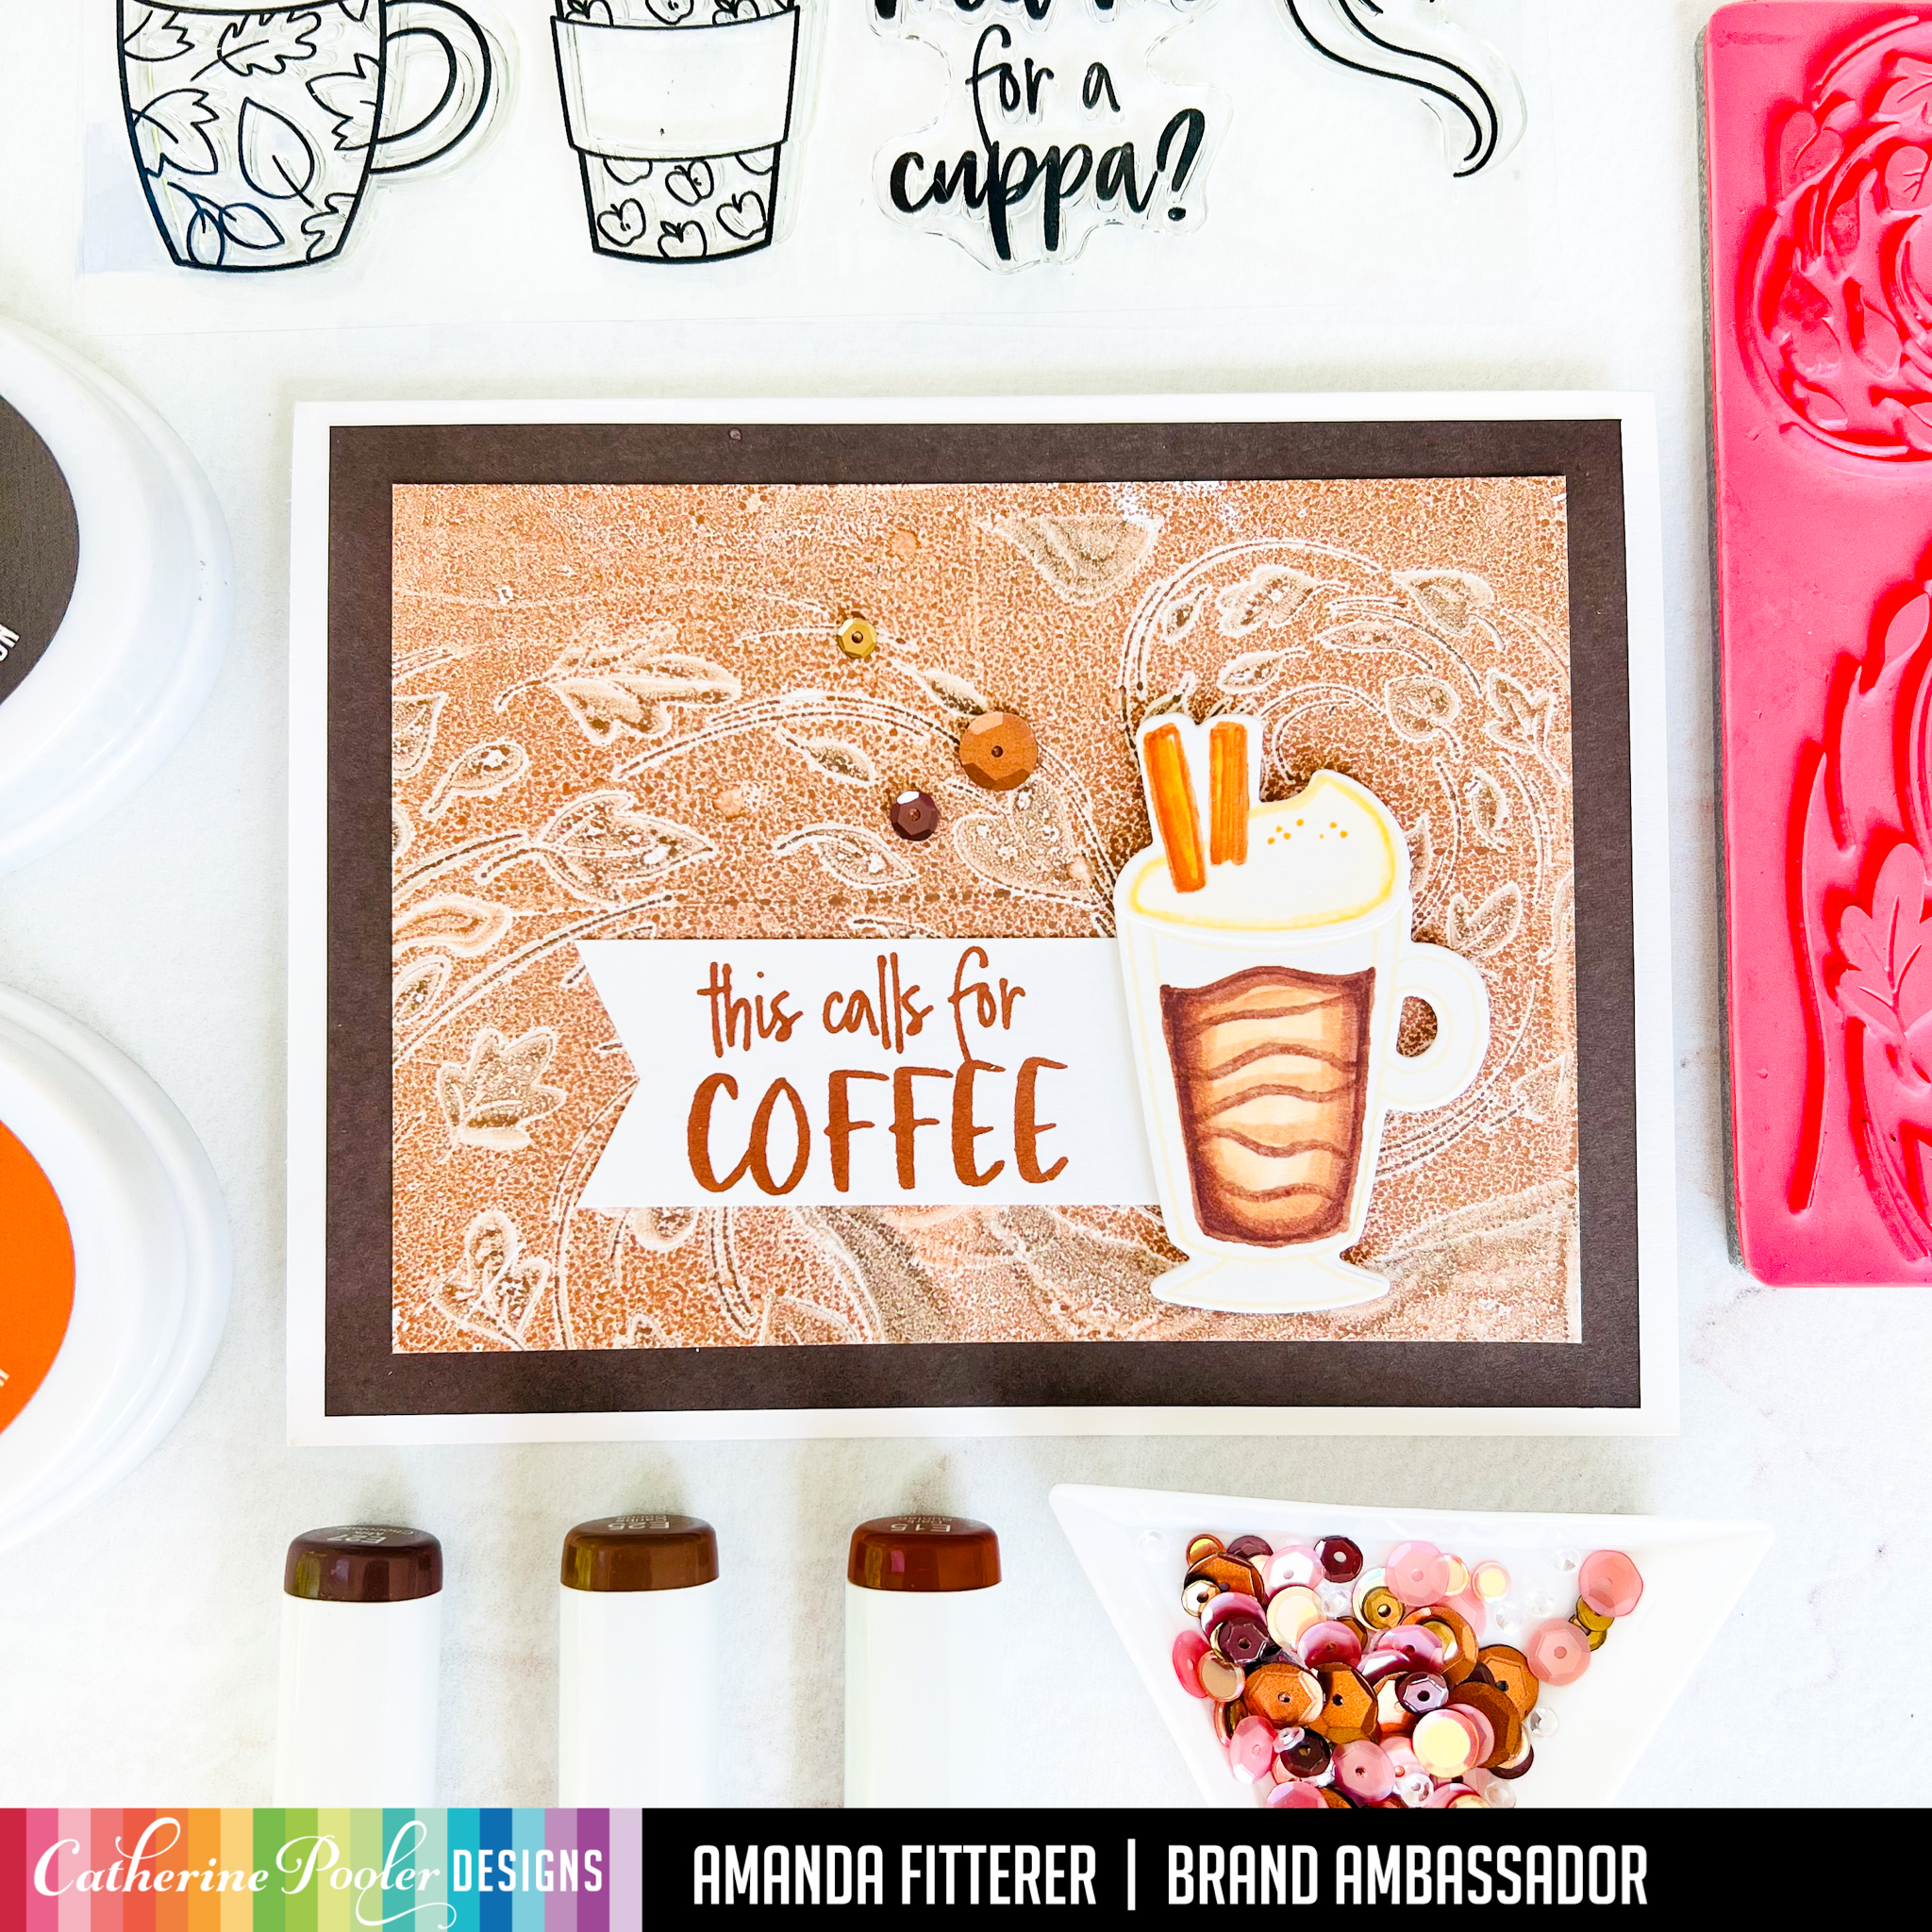
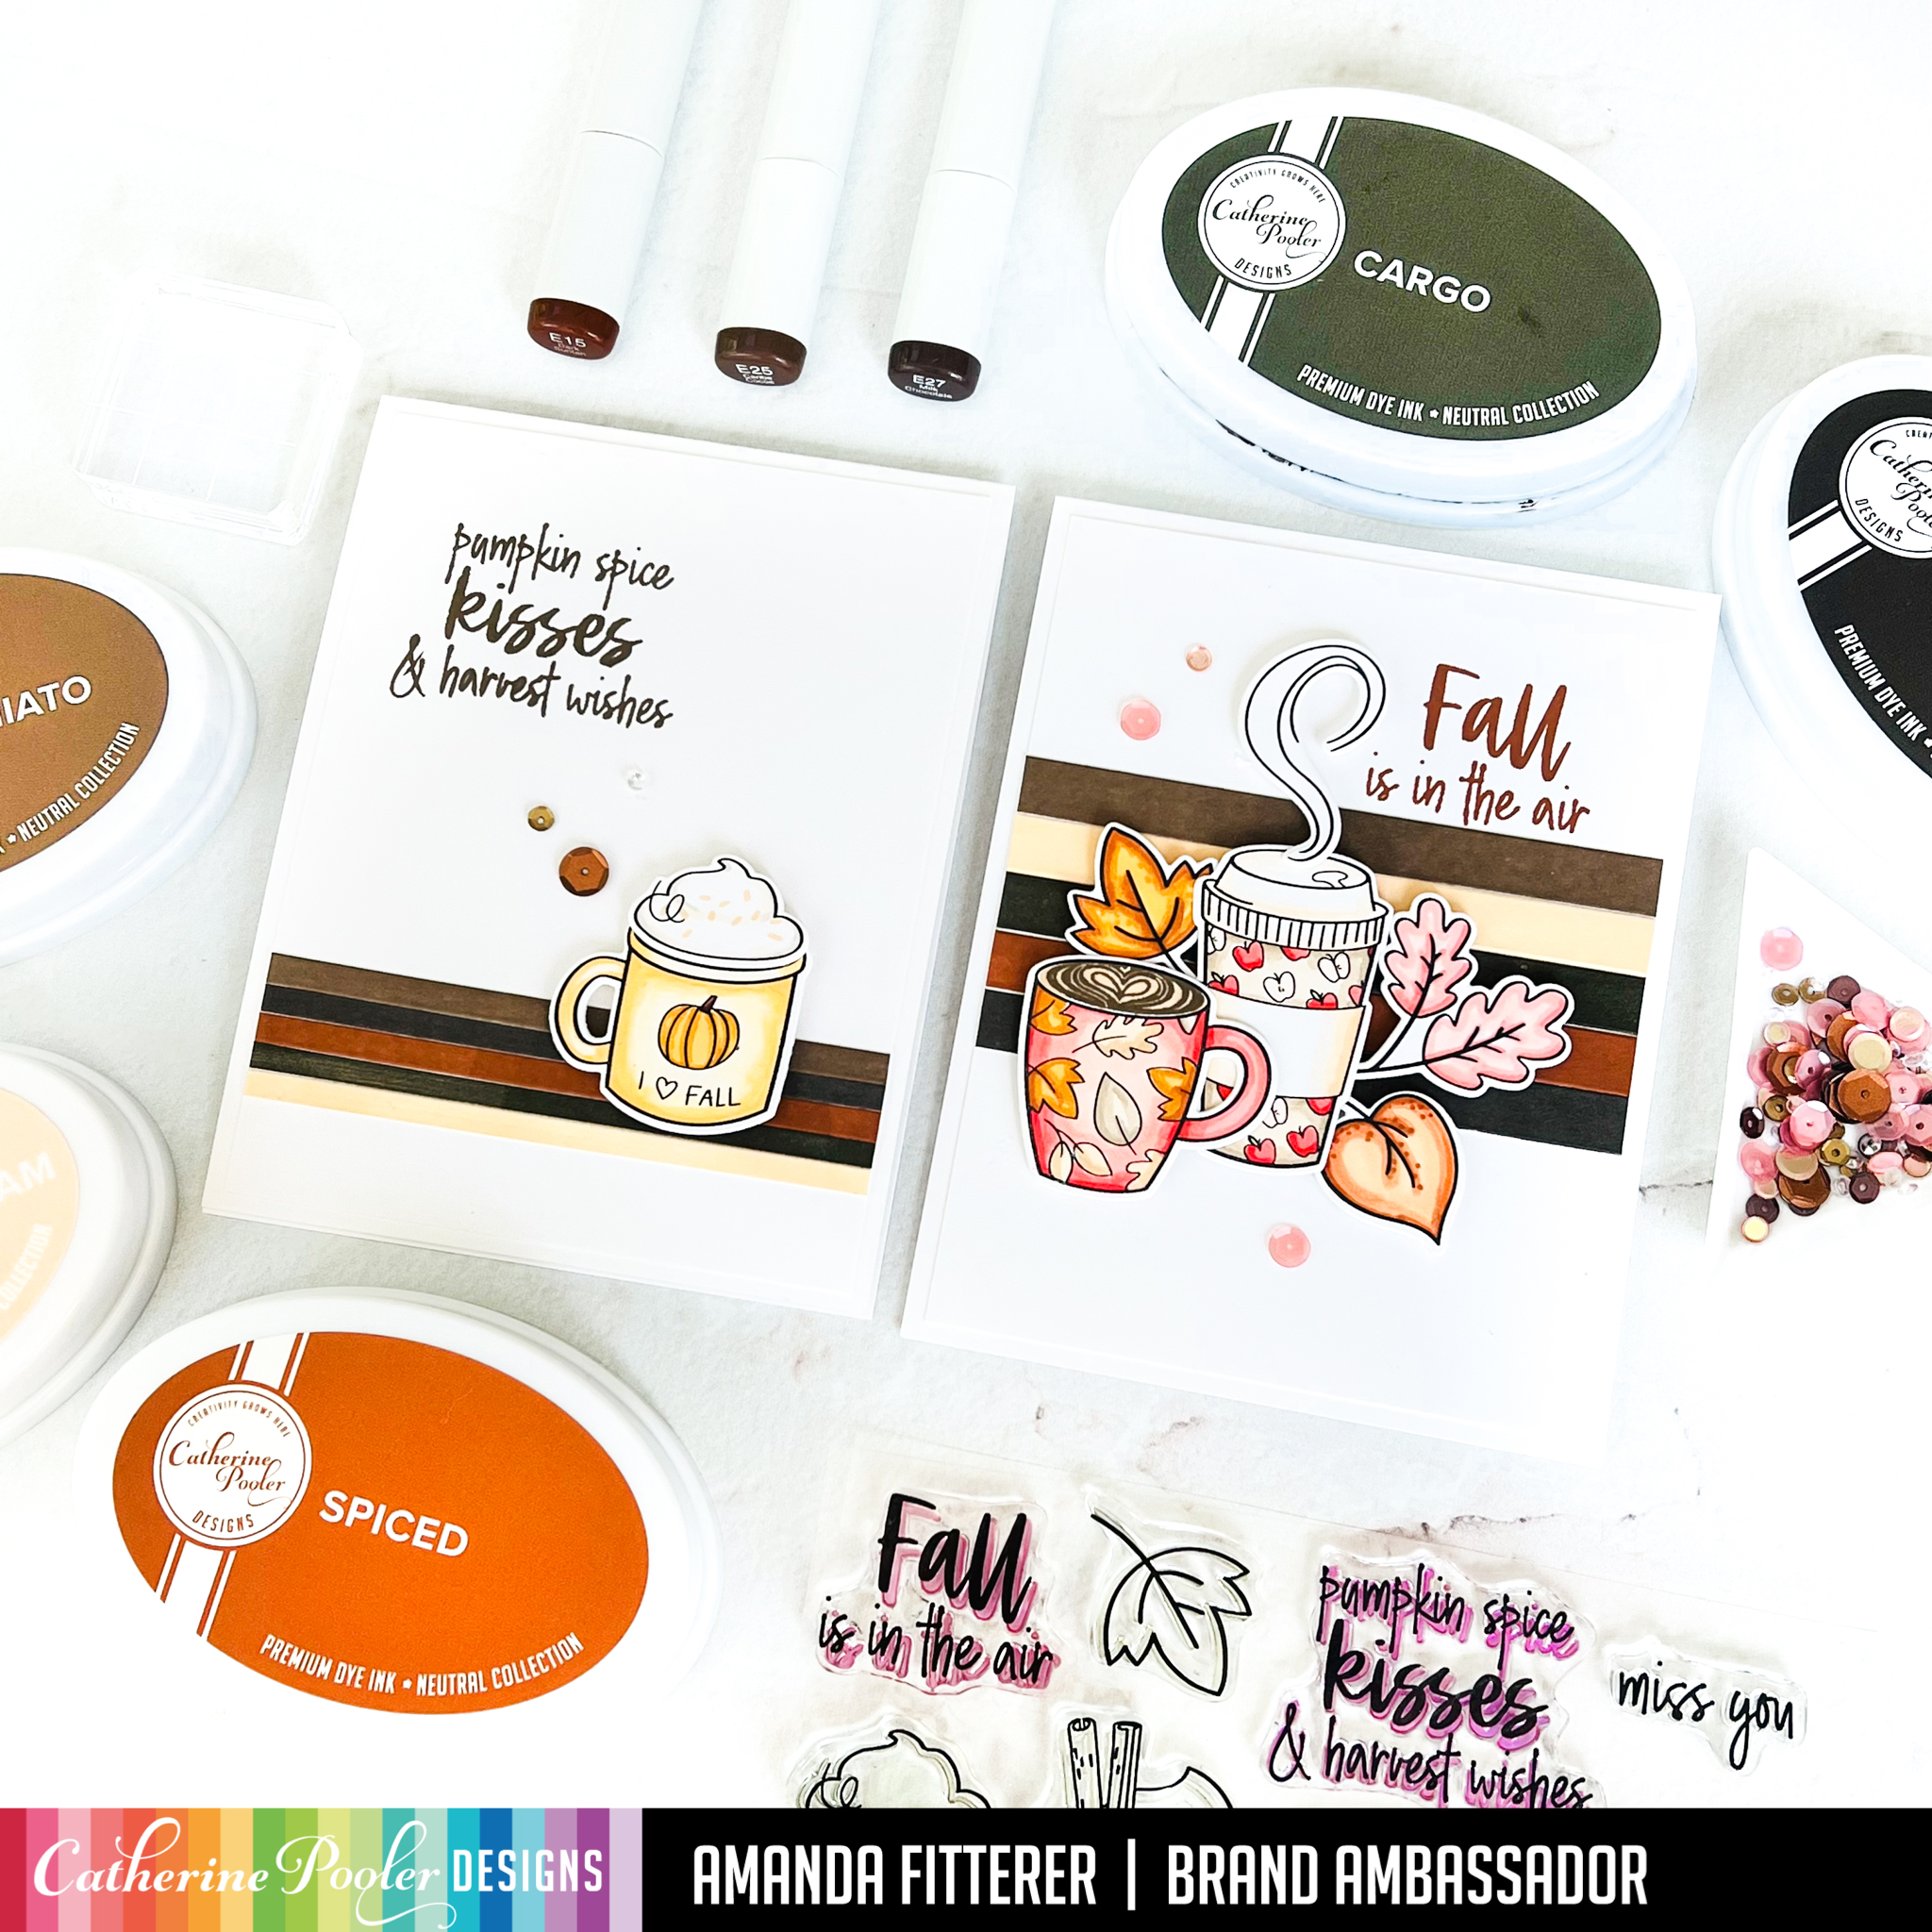
Omg omg omg omg! Did you SEE the sneak peek of the new Catherine Pooler Lattes and Leaves Bundle in the All Things Fall Collection!? And the NEW BROWN INKS!! Eeeeeek!! So much goodness to share!!!
I’m excited to share more sneak peeks with you in the upcoming days! This new release will be available for StampNation members to purchase on Aug 2nd. Everyone else can begin ordering on Aug 3rd! Come back here soon for more inspo using the new release!
Shop the All Things Fall Collection using my affiliate linkhere. Thanks for using this link (at no cost to you)! It helps me fund my crafty addiction and lets me share more inspiration with you!
Hey friends! Did you see that Catherine Pooler and Ellen Hutson kicked off an Instagram Hop together today!? You DO NOT want to miss out! They’re BOTH giving prizes away to 3 lucky winners! Woot!! Head to the IG Hop here.
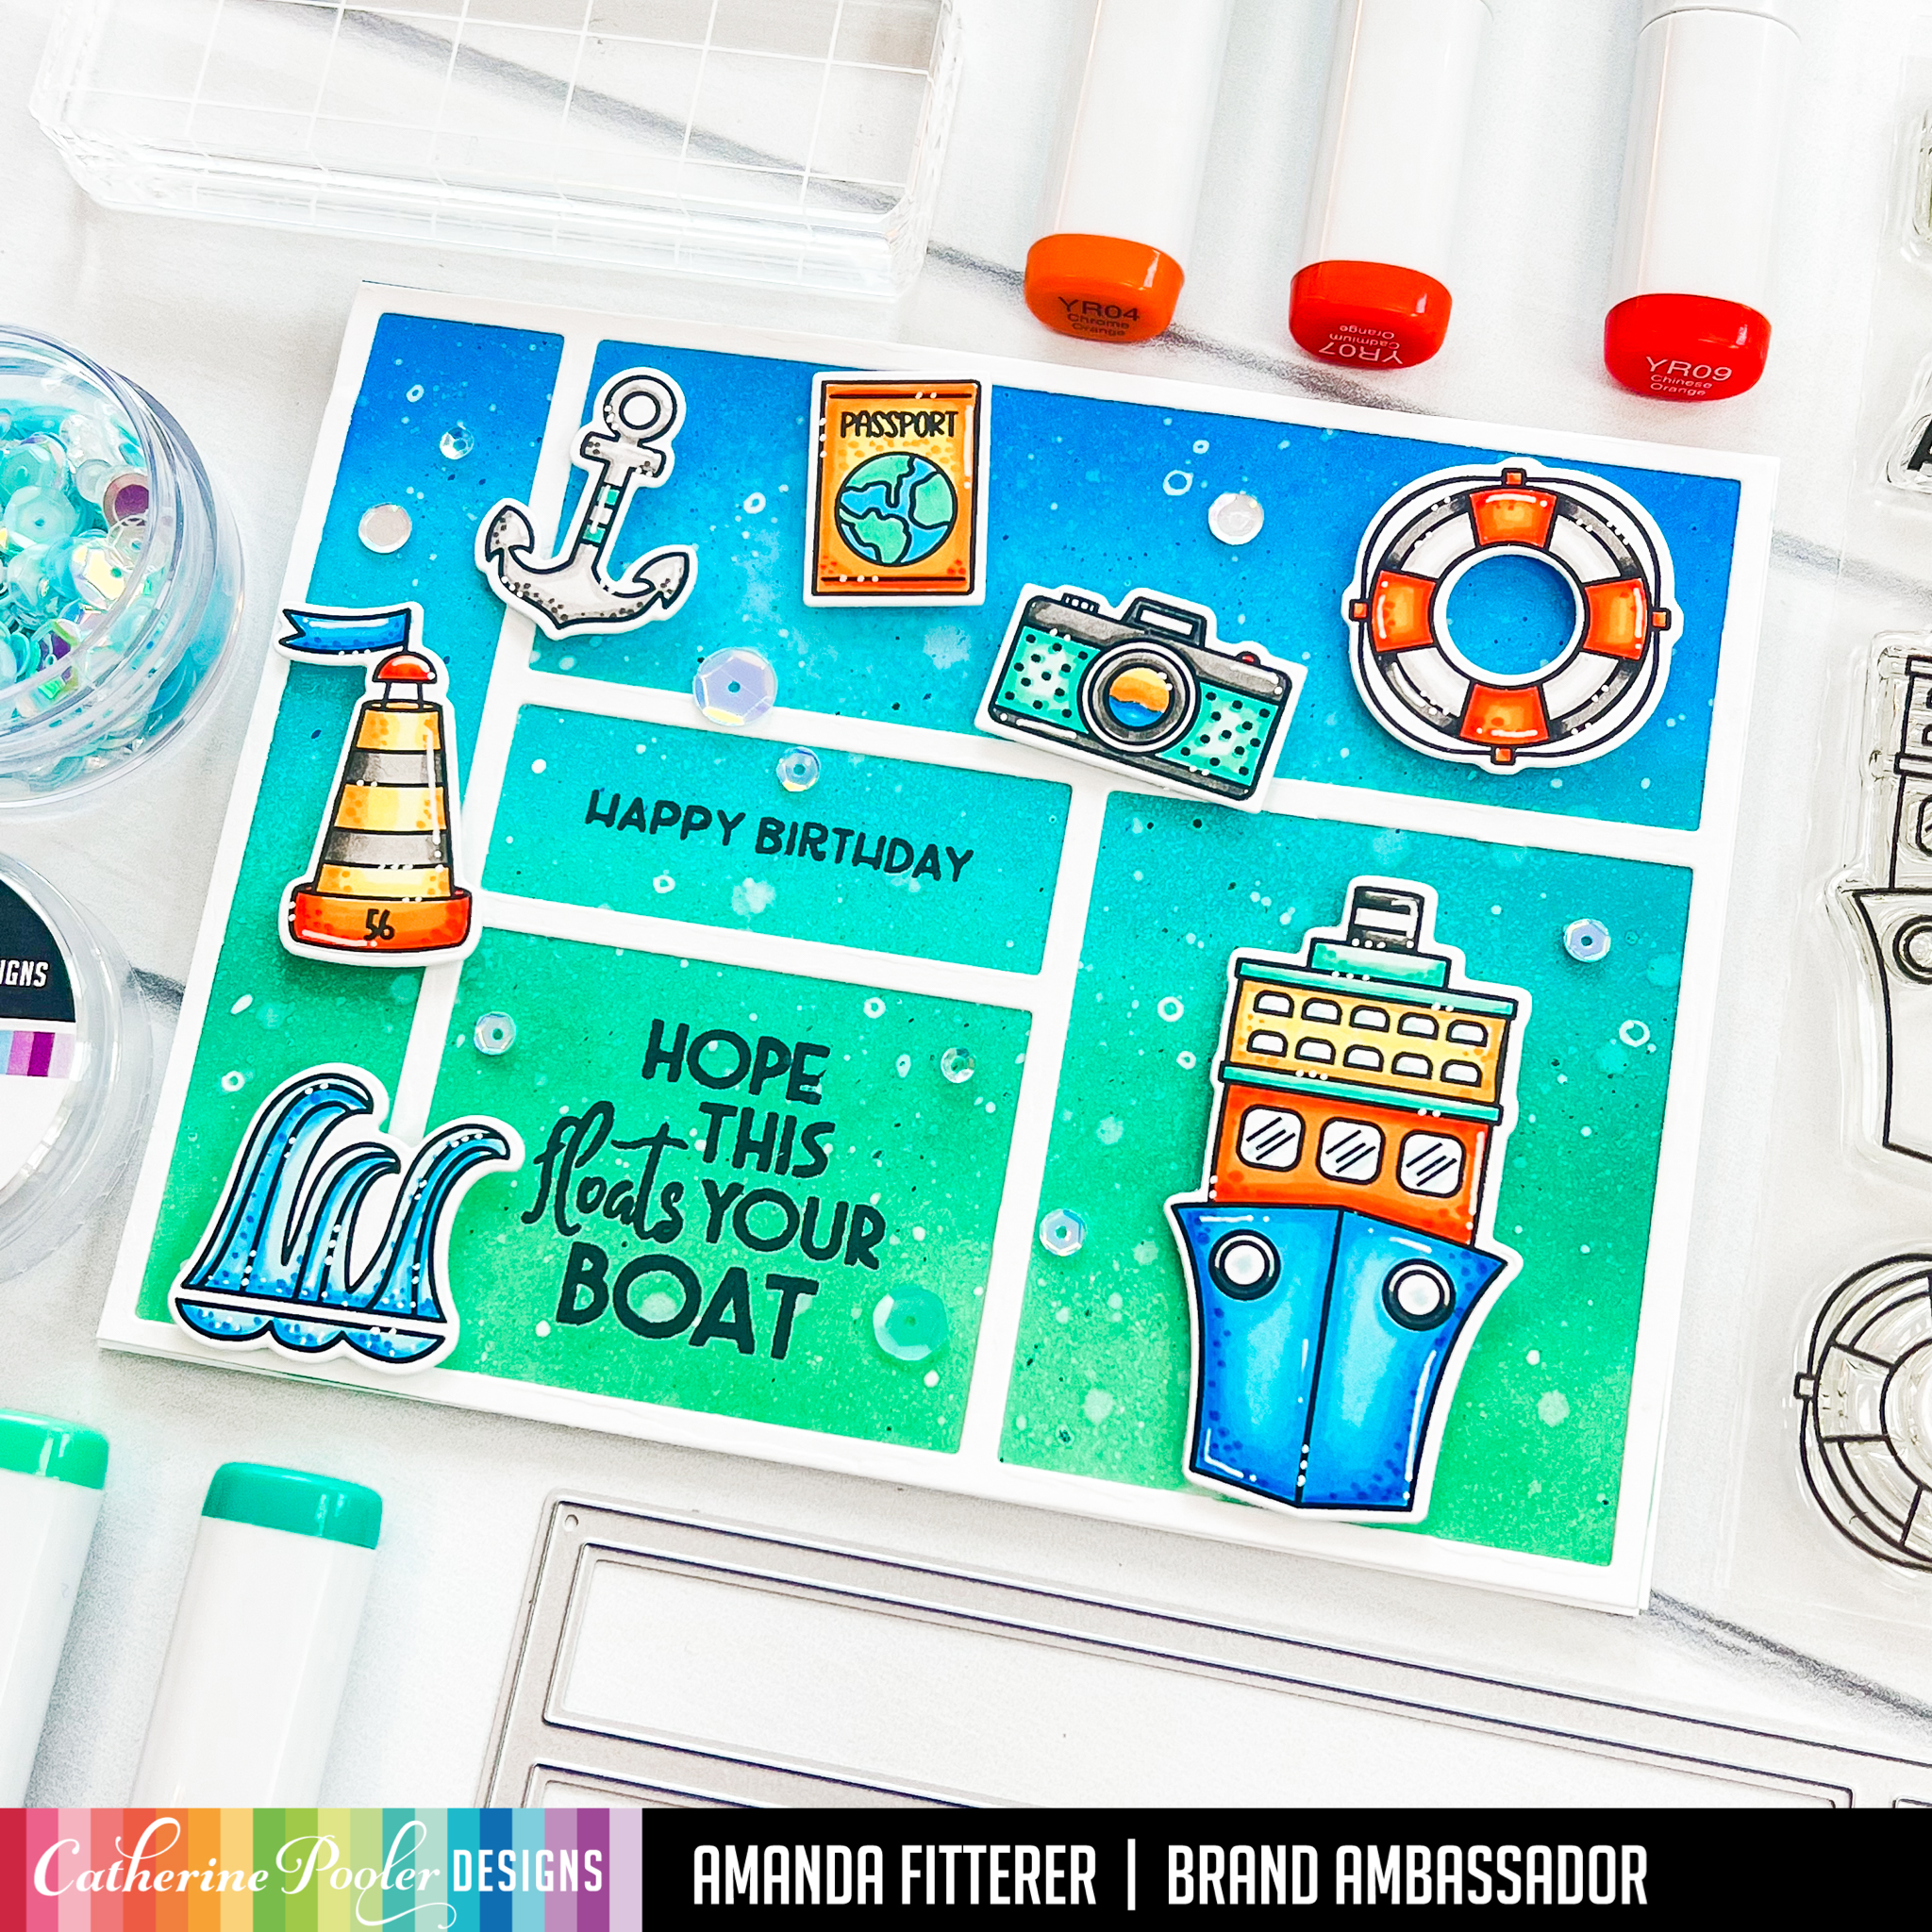
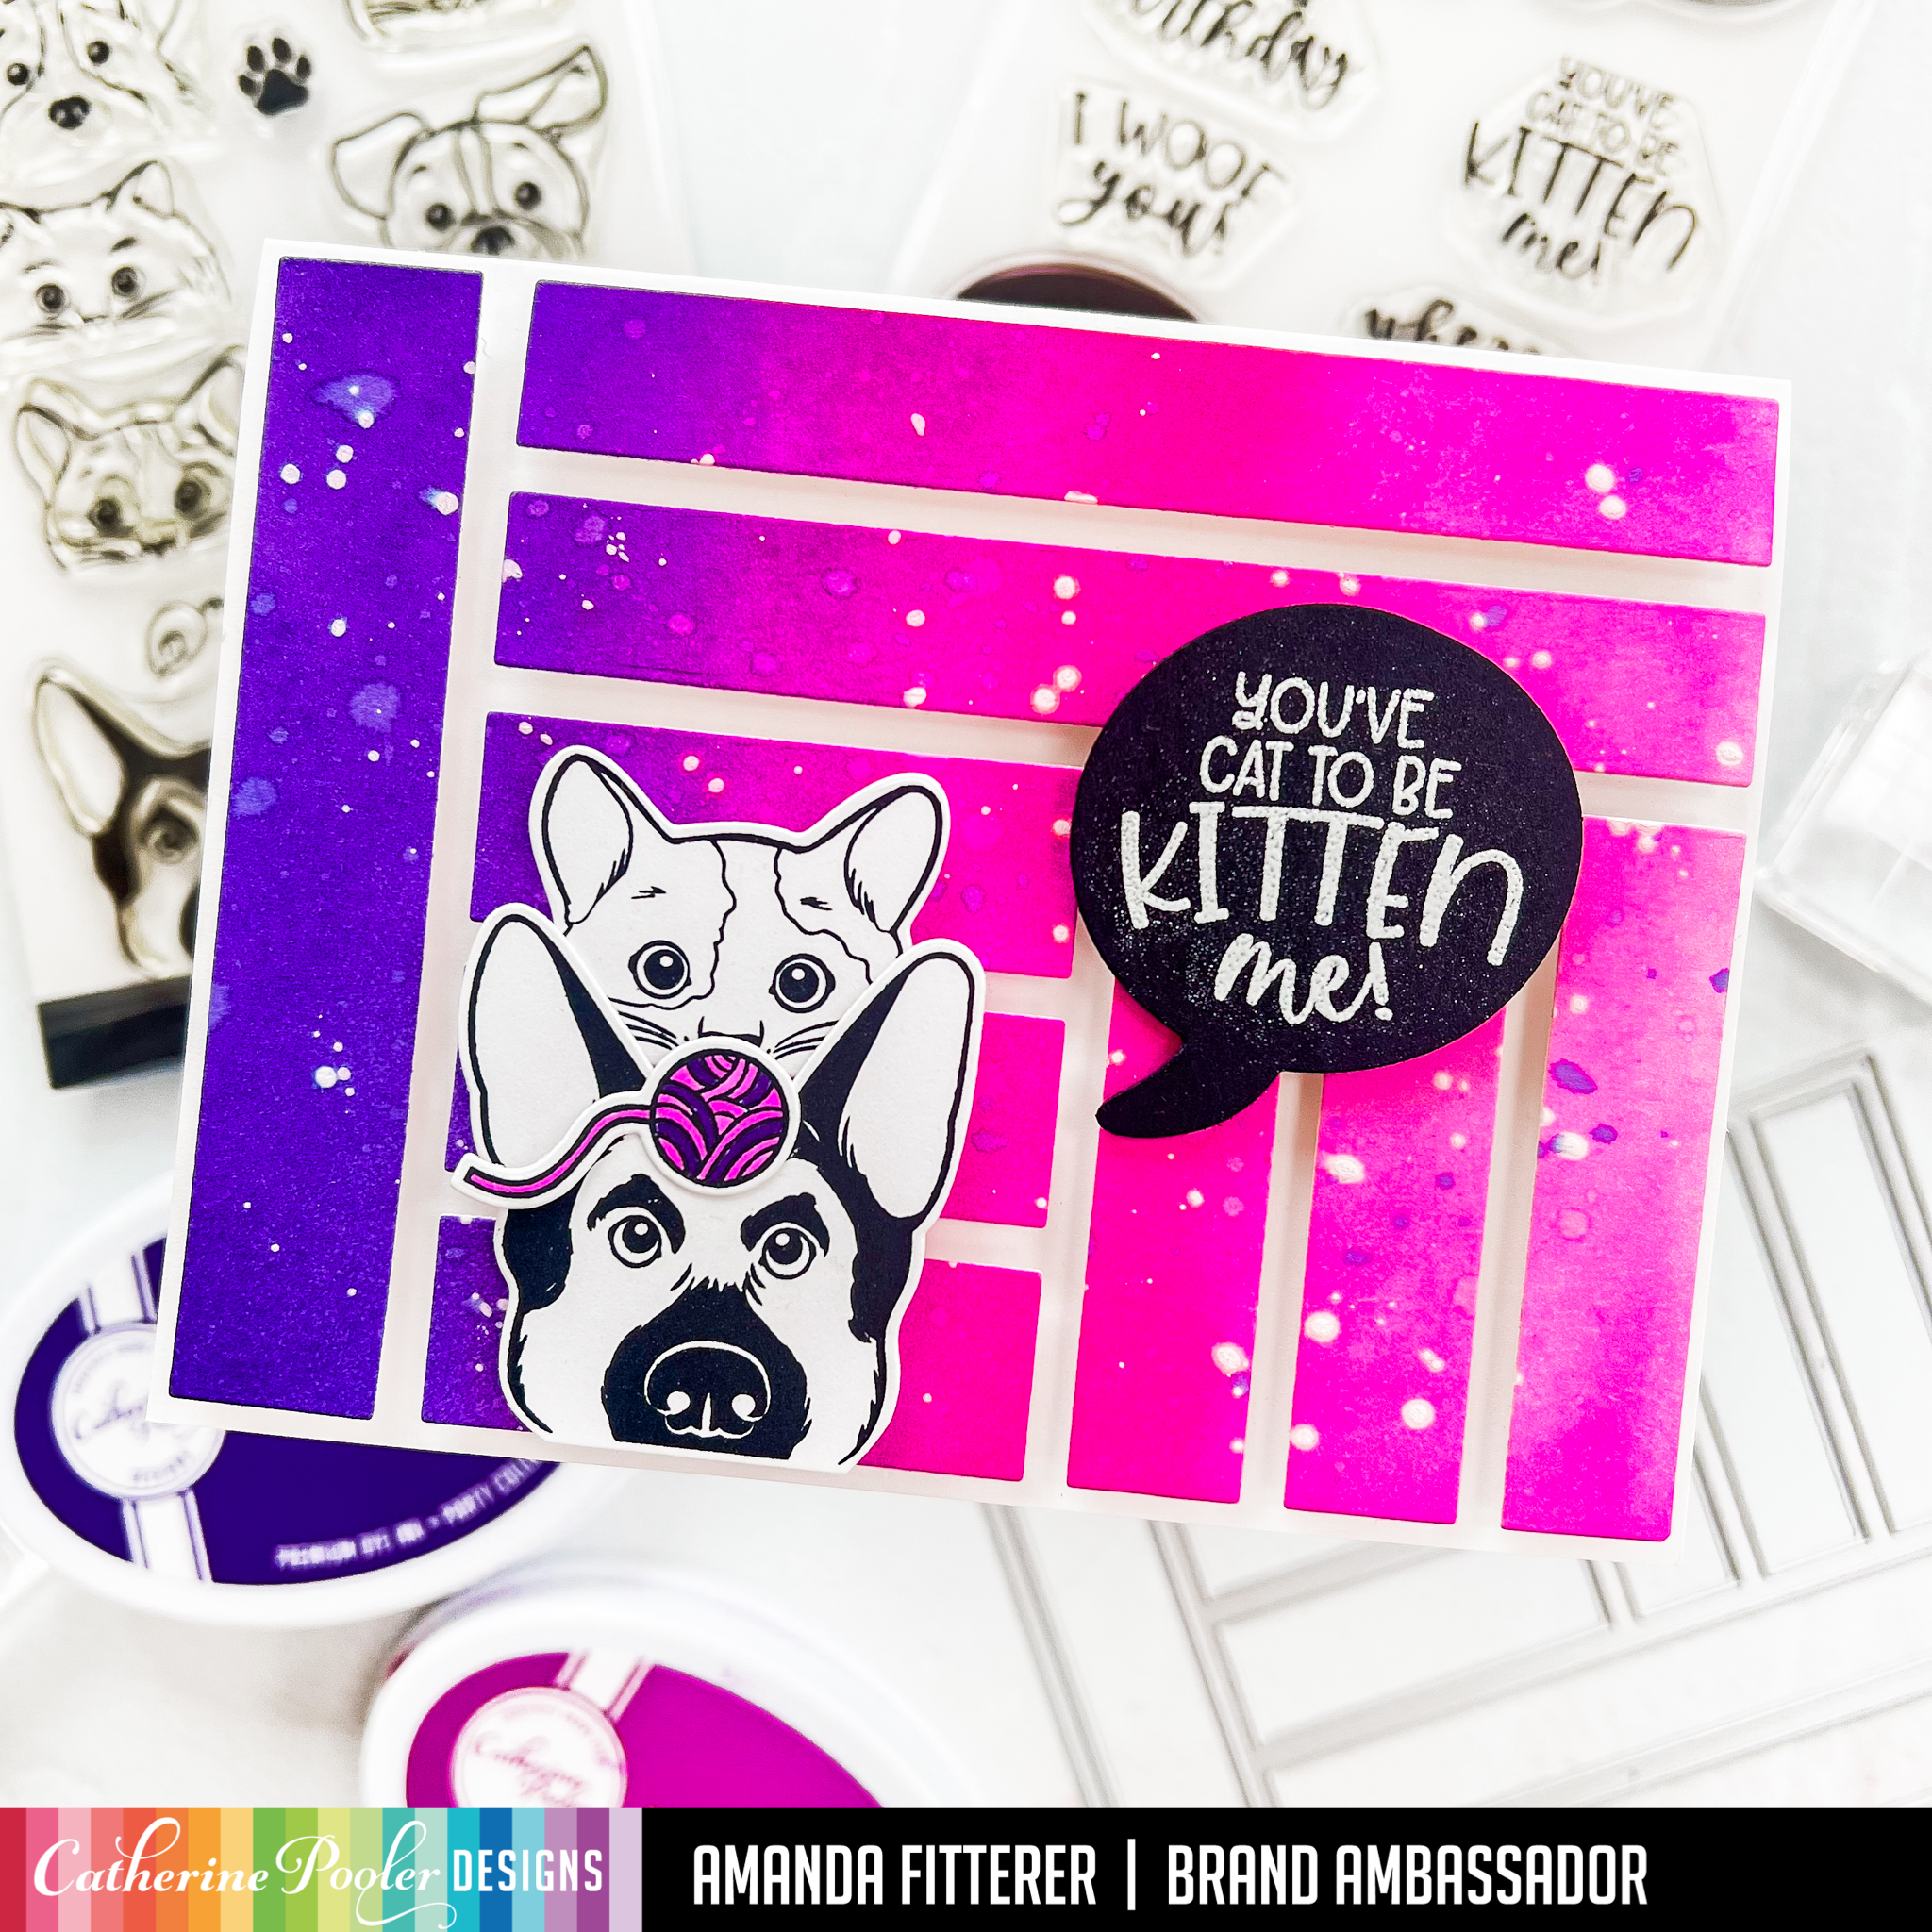
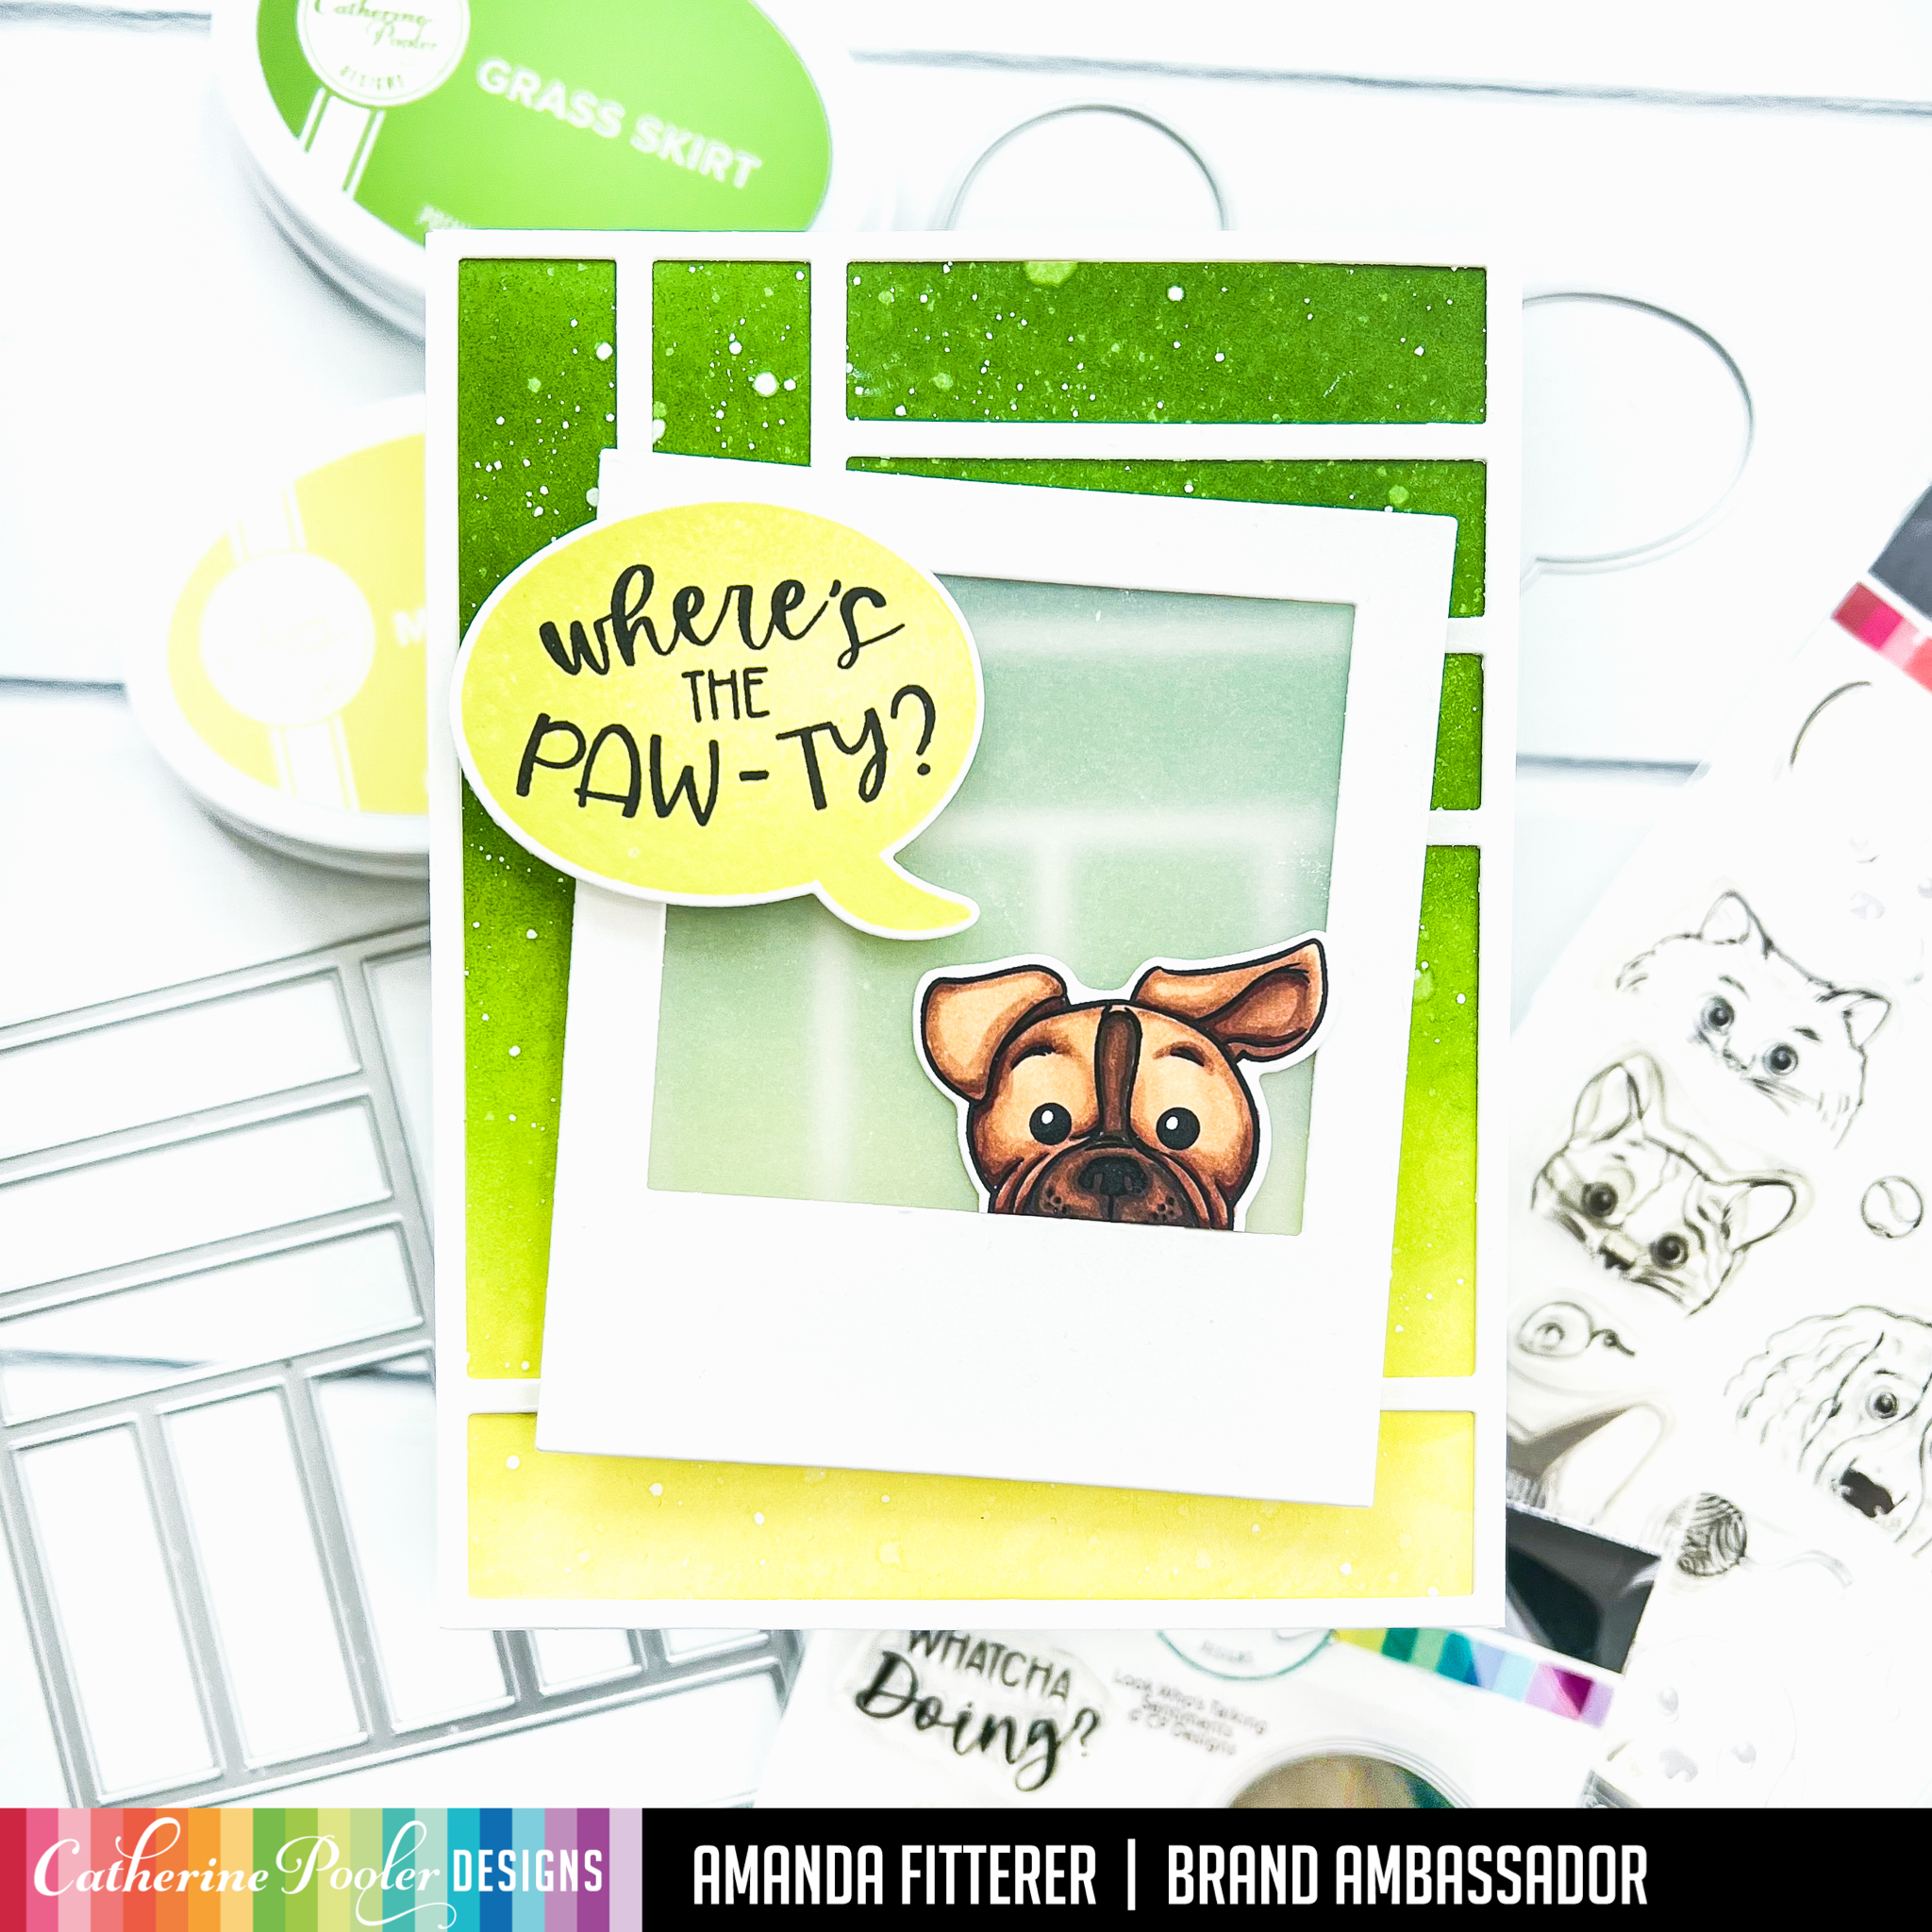
I’m sharing TWO cards I made using this amazing Float Your Boat stamp set that Catherine Pooler’s team made exclusively for Ellen Hutson. Read on to see how I created these cards!
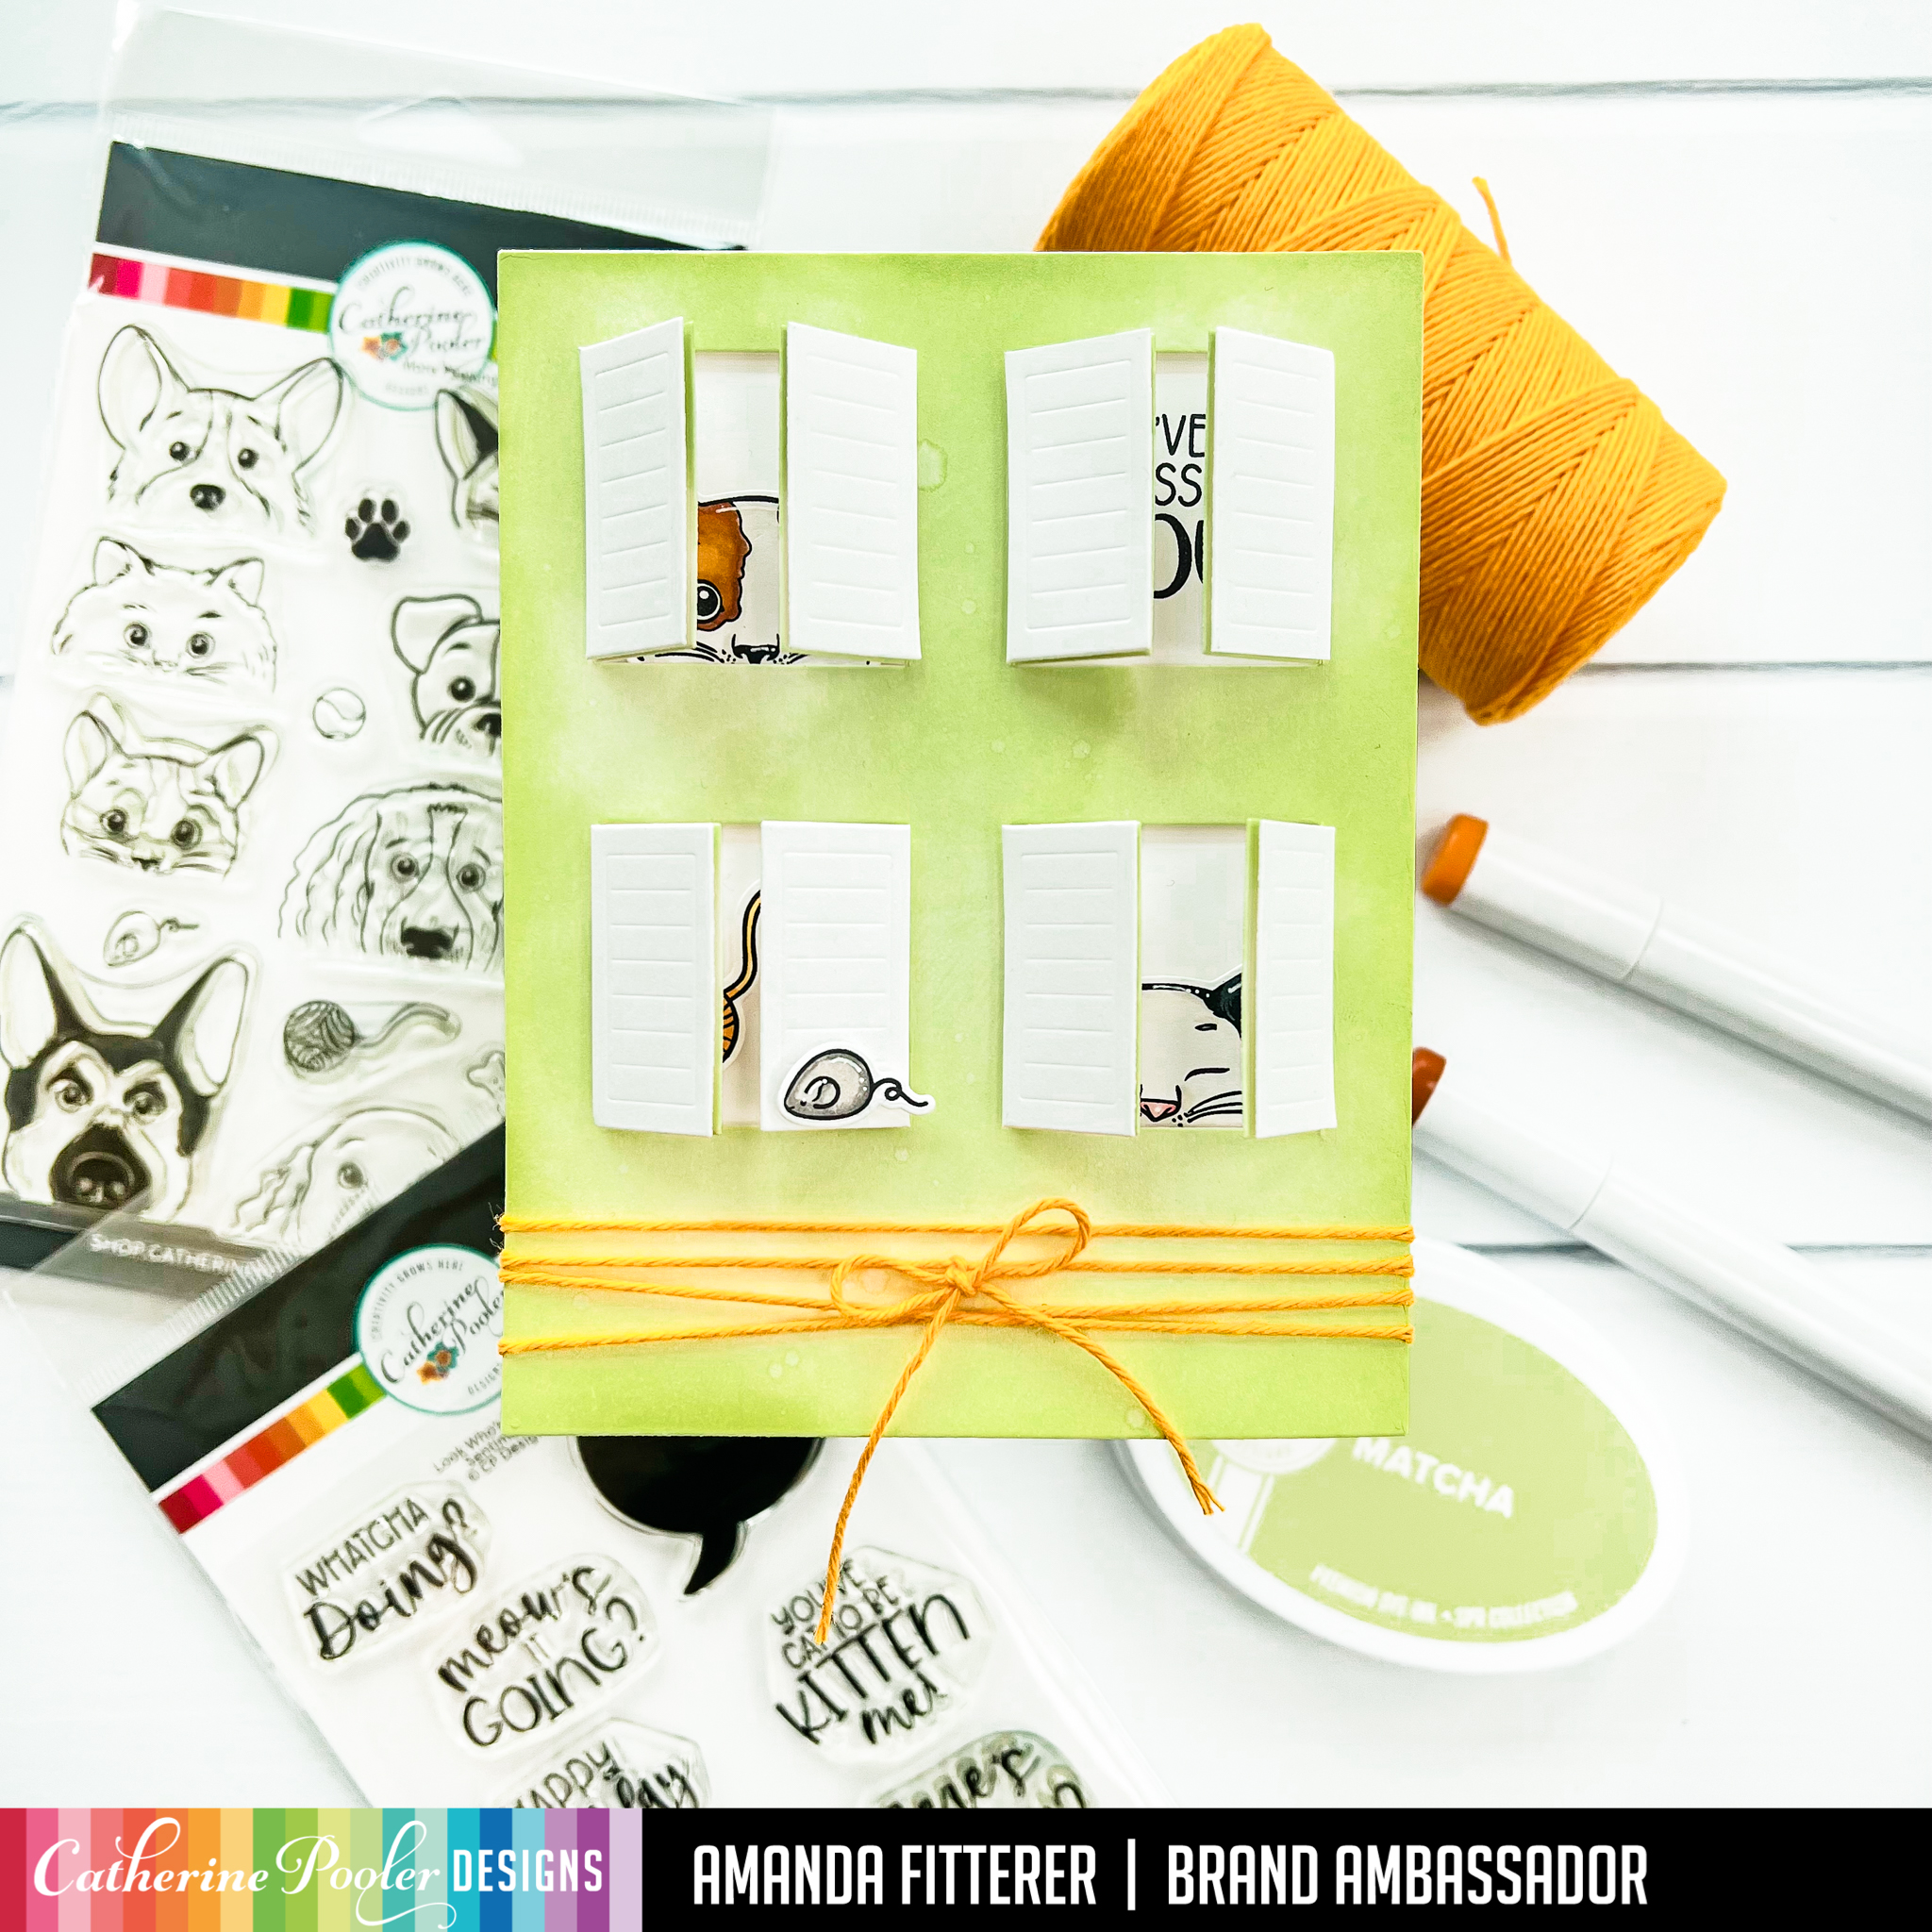
For my first card, I trimmed down my Parqs and Rec Cover Plate Die to change the sizes of the rectangles. (I love when dies can be used in different ways, don’t you?!).
Next, I glued my frame down to my background and then stamped my sentiments using Midnight Ink. I used the White Premium Cardstock to stamp my images from the new Float Your Boat stamp set. I colored my images with Copic markers and then die cut them using the coordinating dies. I used 3D foam squares to attach my stamped and cut images to the card front. I added some St. Cloud sequins at the end for a finishing touch!
For my second card, I used Heffy Memo Tape to mask off the bottom of the card front. I used Drive-In and Serenade for my background. Then, I used Black Jack on the bottom of the card for my “road”. I cut the background down using the Notecard Postage Dies. For this card, I stamped images from the Float Your Boat stamp set as well as the Special Delivery stamp set. I added some Sofia sequins to this card!
Those are my cards to share with you today for this really fun IG Hop. I hope you enjoy the Hop and GOOD LUCK!!! Remember, there will be 3 winners! Make sure to check the IG Hop for all the details.
You can shop the Catherine Pooler store using my affiliate link by clicking any of the links in this blog post or by clicking here. Using my affiliate link doesn’t cost you anything, but I do get a small percentage of your purchase. This helps me provide you with more tutorials! So please feel free to come back and use it anytime! THANK YOU!! Xx, Amanda
Also, don’t forget that you can use my affiliate link to shop the entire Catherine Pooler store. All you have to do is click this link, shop, and then I’ll get a tiny percentage of your sale to help buy new goodies to share in tutorials with you! It doesn’t cost you anything at all!
Welcome to the Heffy Doodle and Pawsome Stamps Collaboration Blog Hop! Design Team members from both companies are sharing inspiration using products from both companies! Plus, you have a chance to win prizes from both companies!
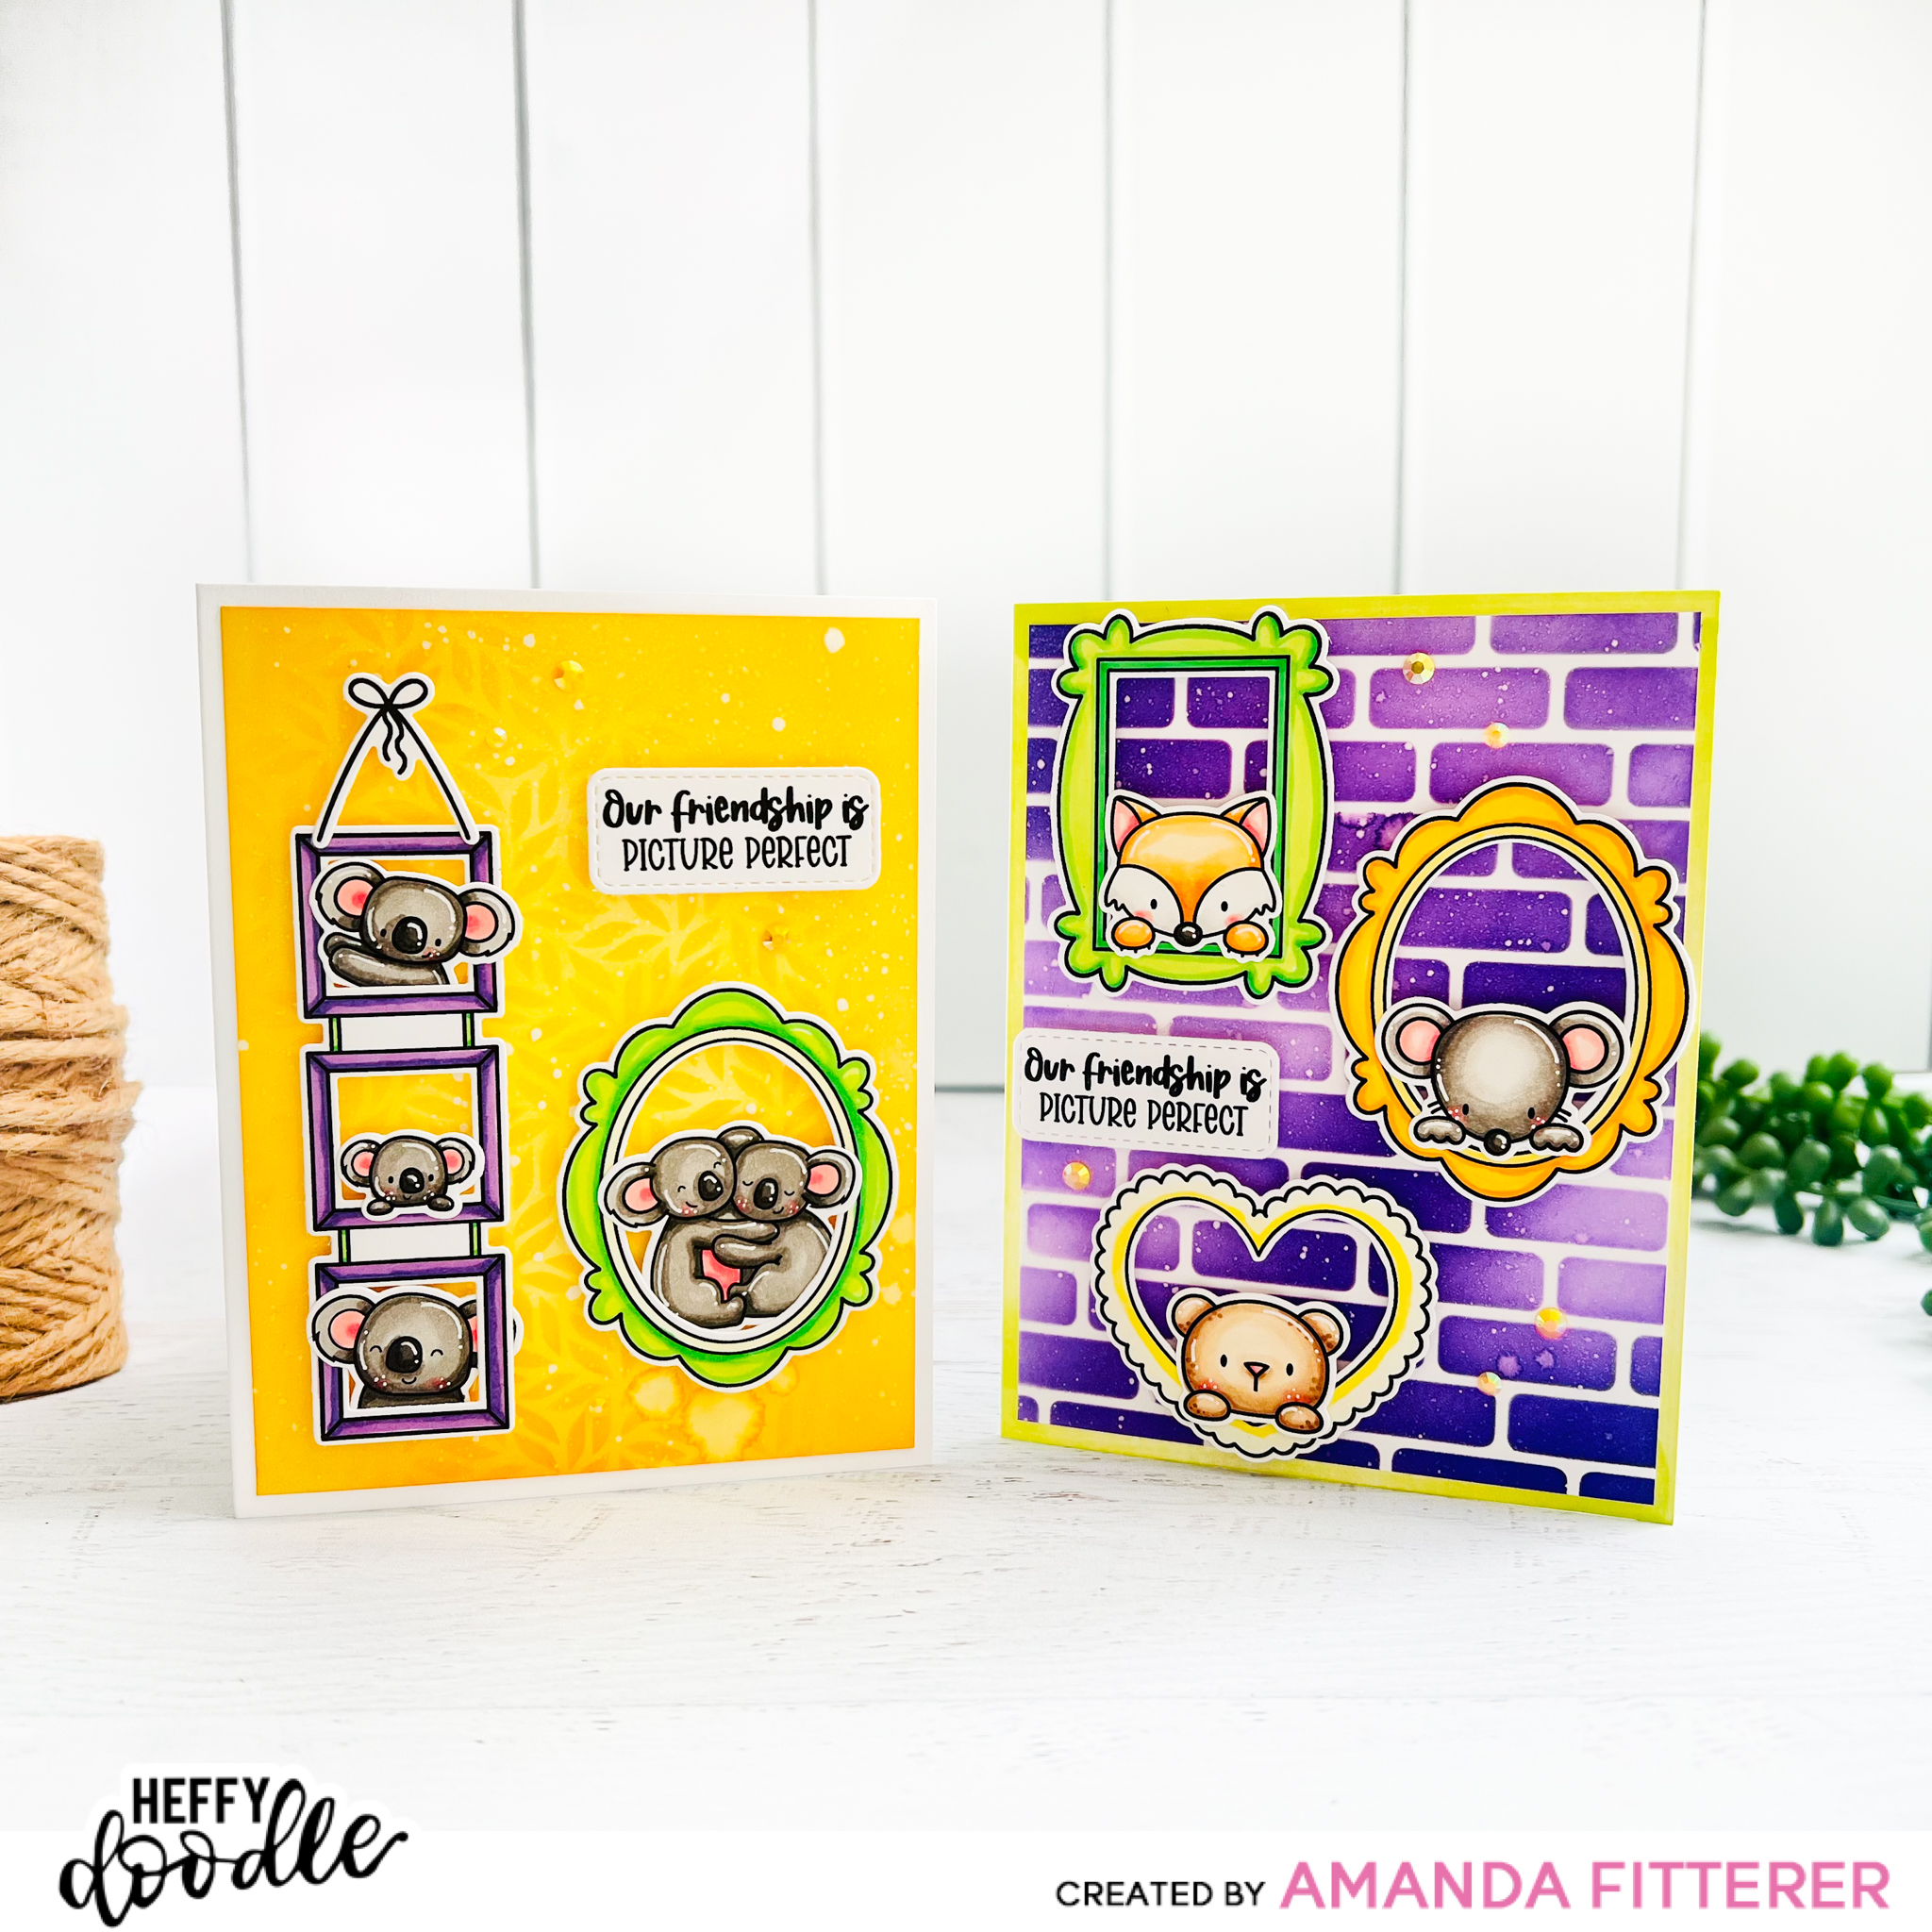
I have 2 cards to share with you today that I made using products from both companies!
For my first card, I’m going to start off with the Heffy Doodle Brick by Brick Stencil. I’m blending Catherine Pooler’s Grape Crush and Pixie Dust inks through the stencil and then spritzing with water and flicking on some white paint/water mix onto my background.
Next, I’m grabbing the Pawsome Stamps Picture Perfect Stamp Set, stamping my images and then coloring them with Copic markers.
Now I’m ready to assemble my card! I’m using 3D foam squares to adhere my stamped images onto my card front. I’m using Glubert Glue to adhere some gems as well!
For my second card, I’m grabbing my Heffy Doodle Fancy Foliage Stencil and Catherine Pooler’s Chiffon, Glitz, and Limoncello inks. I’m blending the inks, then spritzing the background with water and flicking on some white paint mixed with water.
After stamping and die cutting my images, I’m using 3D foam squares to adhere my stamped images onto my card front. I’m using Glubert Glue to adhere some gems on this card as well!
I hope you loved my 2 cards I made using products from both companies! Now, onto the GIVEAWAY INFORMATION!!
To be entered to win the giveaway, all you need to do is comment at each stop along the Blog Hop! Pawsome Stamps will be giving away $30 and Heffy Doodle will be giving away £25 to their respective stores! Be sure to comment before 11:59 PM EST on June 24th to be entered to win! Each company will post their random winner on June 25th at 10AM EST! Make sure to check the Heffy Doodle Blog and Pawsome Stamps Blog to see if you’re a winner!
Check out these little More Peeking Pets from the Peeking In Bundle! Oh, and that SUPER FUN Parqs and Rec Cover Die! Eek!
Also, don’t forget that you can use my affiliate link to shop the entire Catherine Pooler store. All you have to do is click this link, shop, and then I’ll get a tiny percentage of your sale to help buy new goodies to share in tutorials with you! It doesn’t cost you anything at all!
Also, don’t forget that you can use my affiliate link to shop the entire Catherine Pooler store. All you have to do is click this link, shop, and then I’ll get a tiny percentage of your sale to help buy new goodies to share in tutorials with you! It doesn’t cost you anything at all!
For my background, I blended the new Whipped Honey all around my card base. Then, I used the Parisian Portico Background Stamp and stamped with the Whipped Honey as well!
Also, don’t forget that you can use my affiliate link to shop the entire Catherine Pooler store. All you have to do is click this link, shop, and then I’ll get a tiny percentage of your sale to help buy new goodies to share in tutorials with you! It doesn’t cost you anything at all!
For my background, I blended Melon Ice and Grass Skirt inks and then splattered with water and white paint.
Are you looking forward to more sneak peeks?! ME TOO!! Make sure you’re subscribed to my blog so you’re emailed when I put out the next sneaky peek!
Also, don’t forget that you can use my affiliate link to shop the entire Catherine Pooler store. All you have to do is click this link, shop, and then I’ll get a tiny percentage of your sale to help buy new goodies to share in tutorials with you! It doesn’t cost you anything at all!
Don’t you just LOVE New Releases?! It’s always so fun and exciting to see the new products in the crafting industry! Today, I get to give you a sneak peek of the new Quint-Essentials Peeking In Bundle!
I blended Limoncello and Glitz for my background and then spritzed some water and white paint onto it to create some texture.
To create my paw print pattern on the bottom, I’ve used the little paw included in the More Peeking Pets Stamp Set and some clear glue ink. I’ve added a little sparkle to each paw print for a subtle shimmery pattern.
Are you looking forward to more sneak peeks?! ME TOO!! Make sure you’re subscribed to my blog so you’re emailed when I put out the next sneaky peek!
Also, don’t forget that you can use my affiliate link to shop the entire Catherine Pooler store. All you have to do is click this link, shop, and then I’ll get a tiny percentage of your sale to help buy new goodies to share in tutorials with you! It doesn’t cost you anything at all!
Hey friends! I’m so glad you’re here! I have a super fun (and much easier than it looks!) project to share with you today! I created this Masculine Trifold a while ago and received many requests for a tutorial! So, that’s what I’m sharing today!
I have step-by-step images for you to follow! Let’s get ready to craft!!
I’ve decorated my pocketfold with Time for Tea’s New Release, but you could use anything to decorate these! I hope you’ve enjoyed this blog post and learned how to make this project! Please let me know if you have any questions or comments by commenting on this post, or messaging me on Instagram!
I prefer using Catherine Pooler Inks and Maker Forte Inks for my projects. My GO-TO ink for coloring with Copic/alcohol markers is the reMARKable Eclipse Black Ink. (Trust me, it’s the best I’ve used so far.) If you’d like to shop using my affiliate links, I’d appreciate that! (It doesn’t cost you anything, it just gives me a small portion back to help me fund my passion!)
Thanks for stopping by my blog today!!! Xx, Amanda
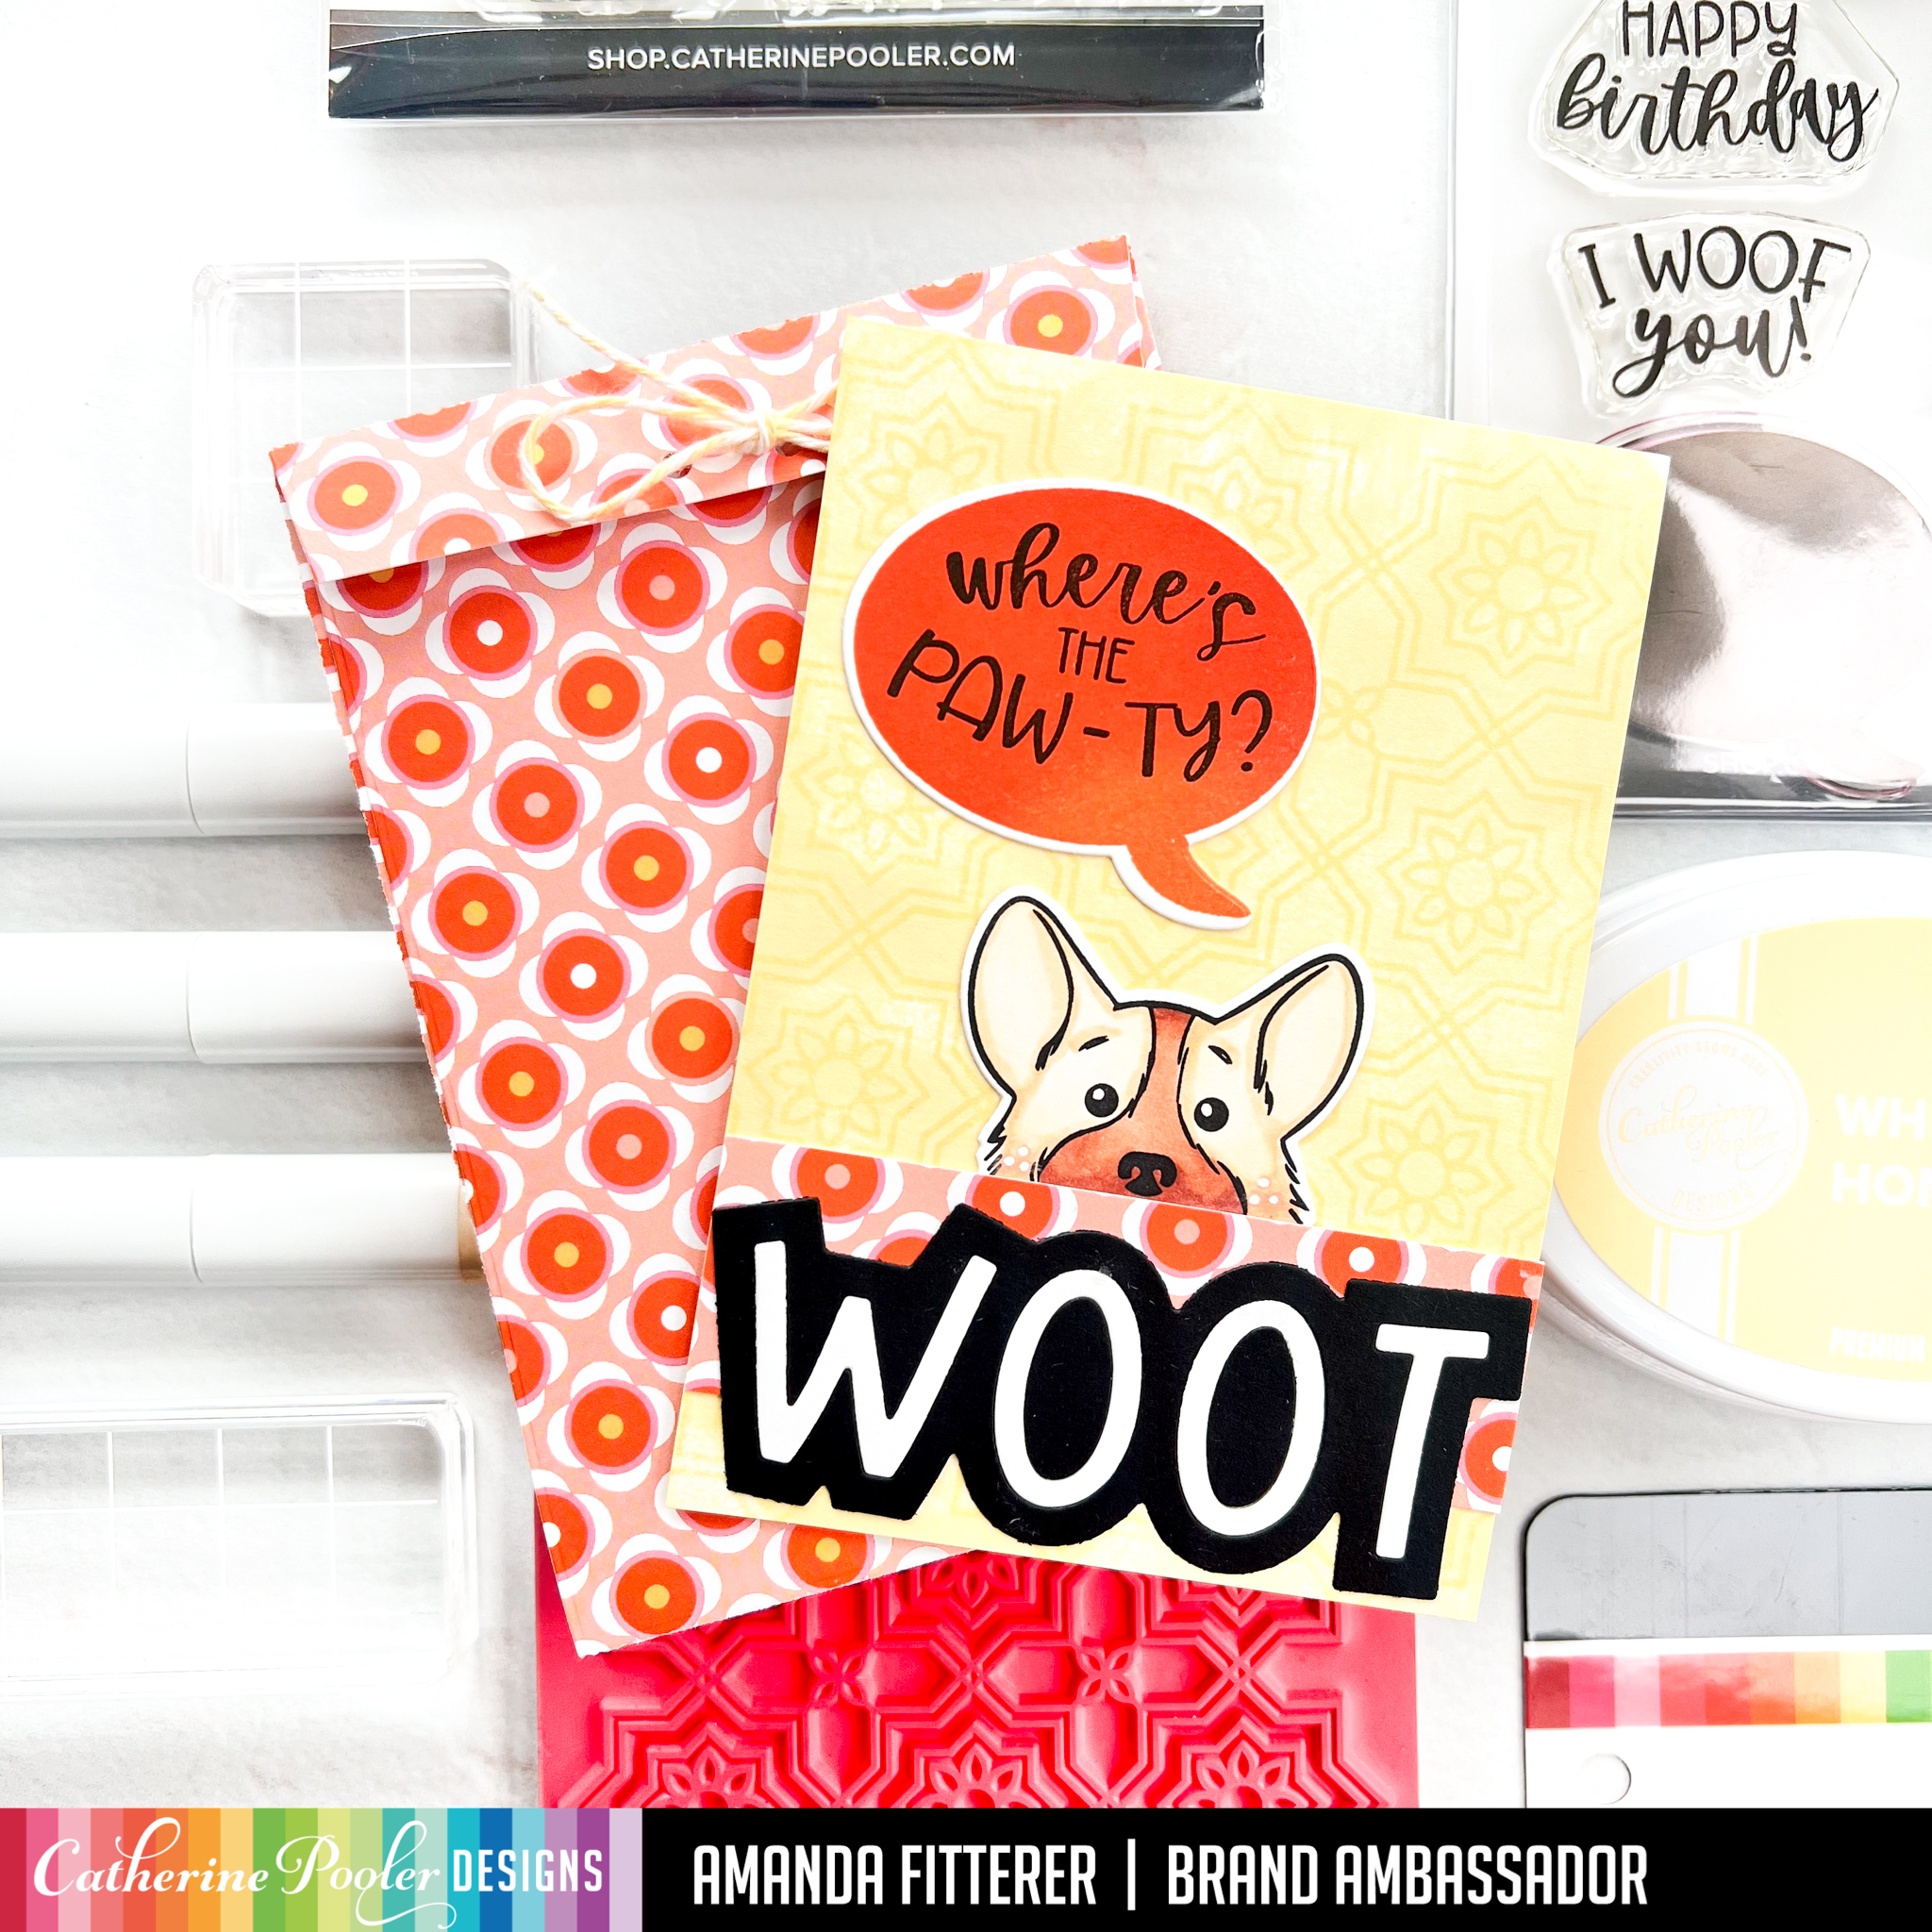
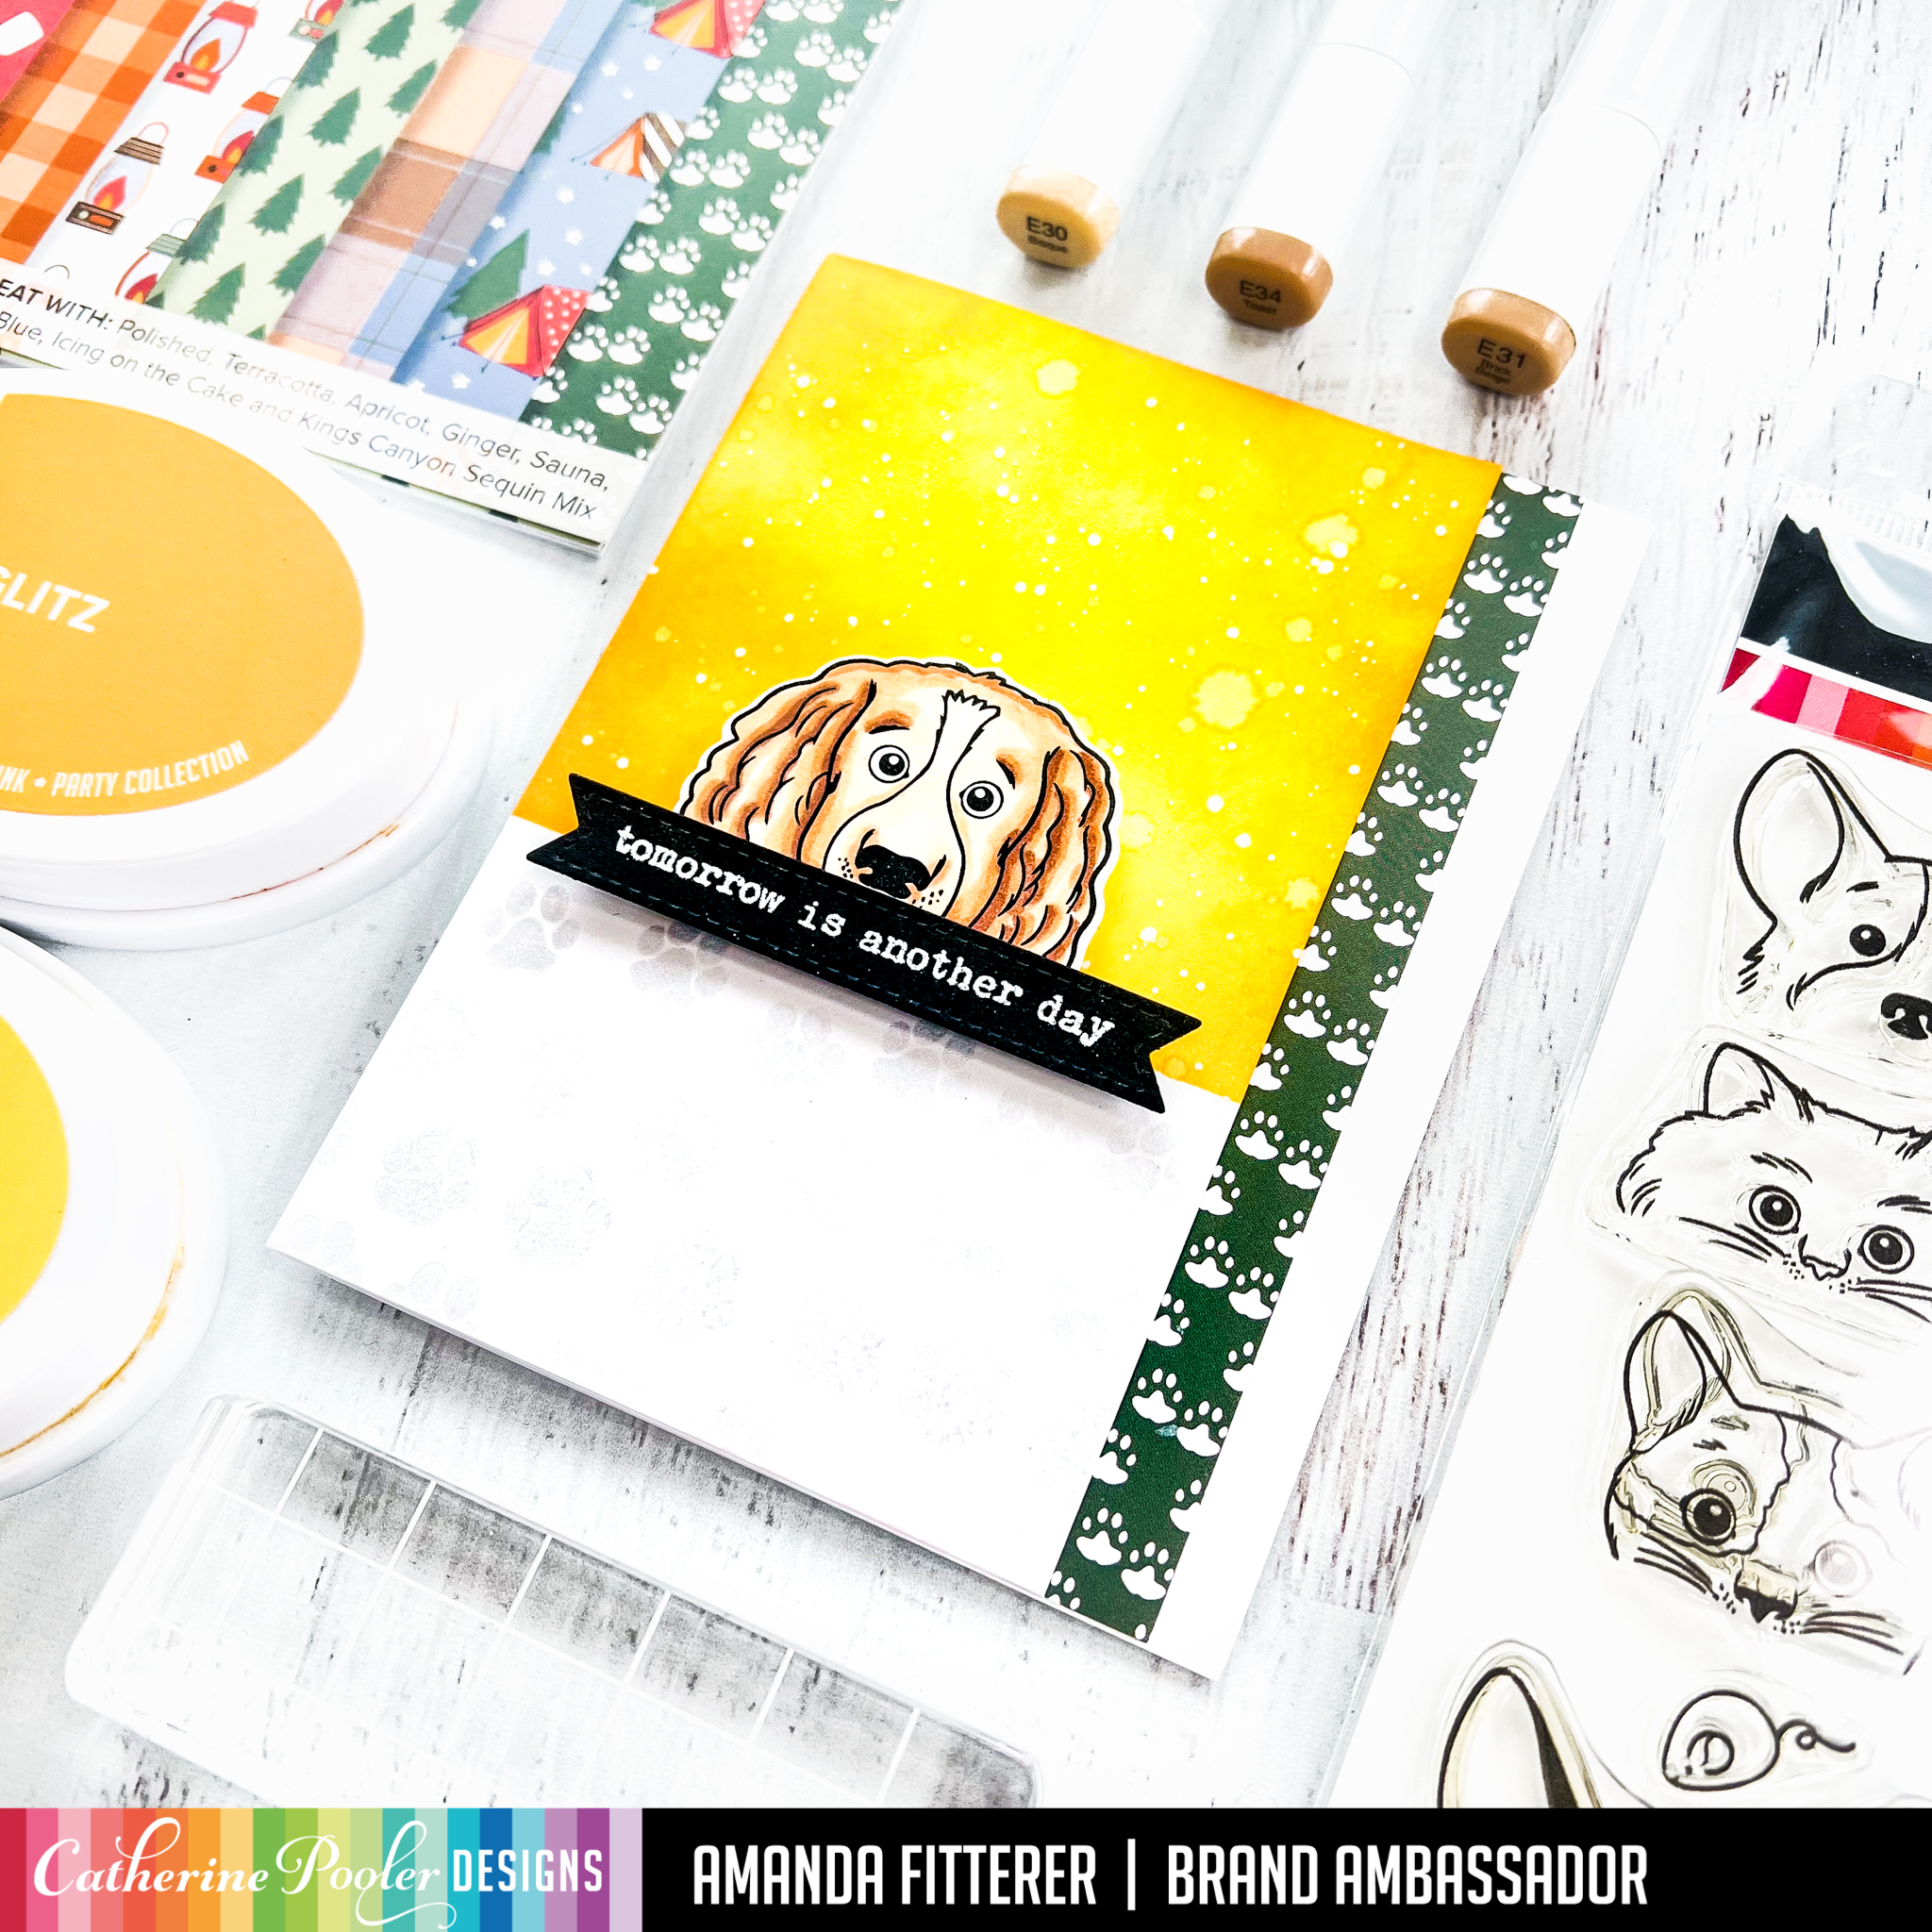
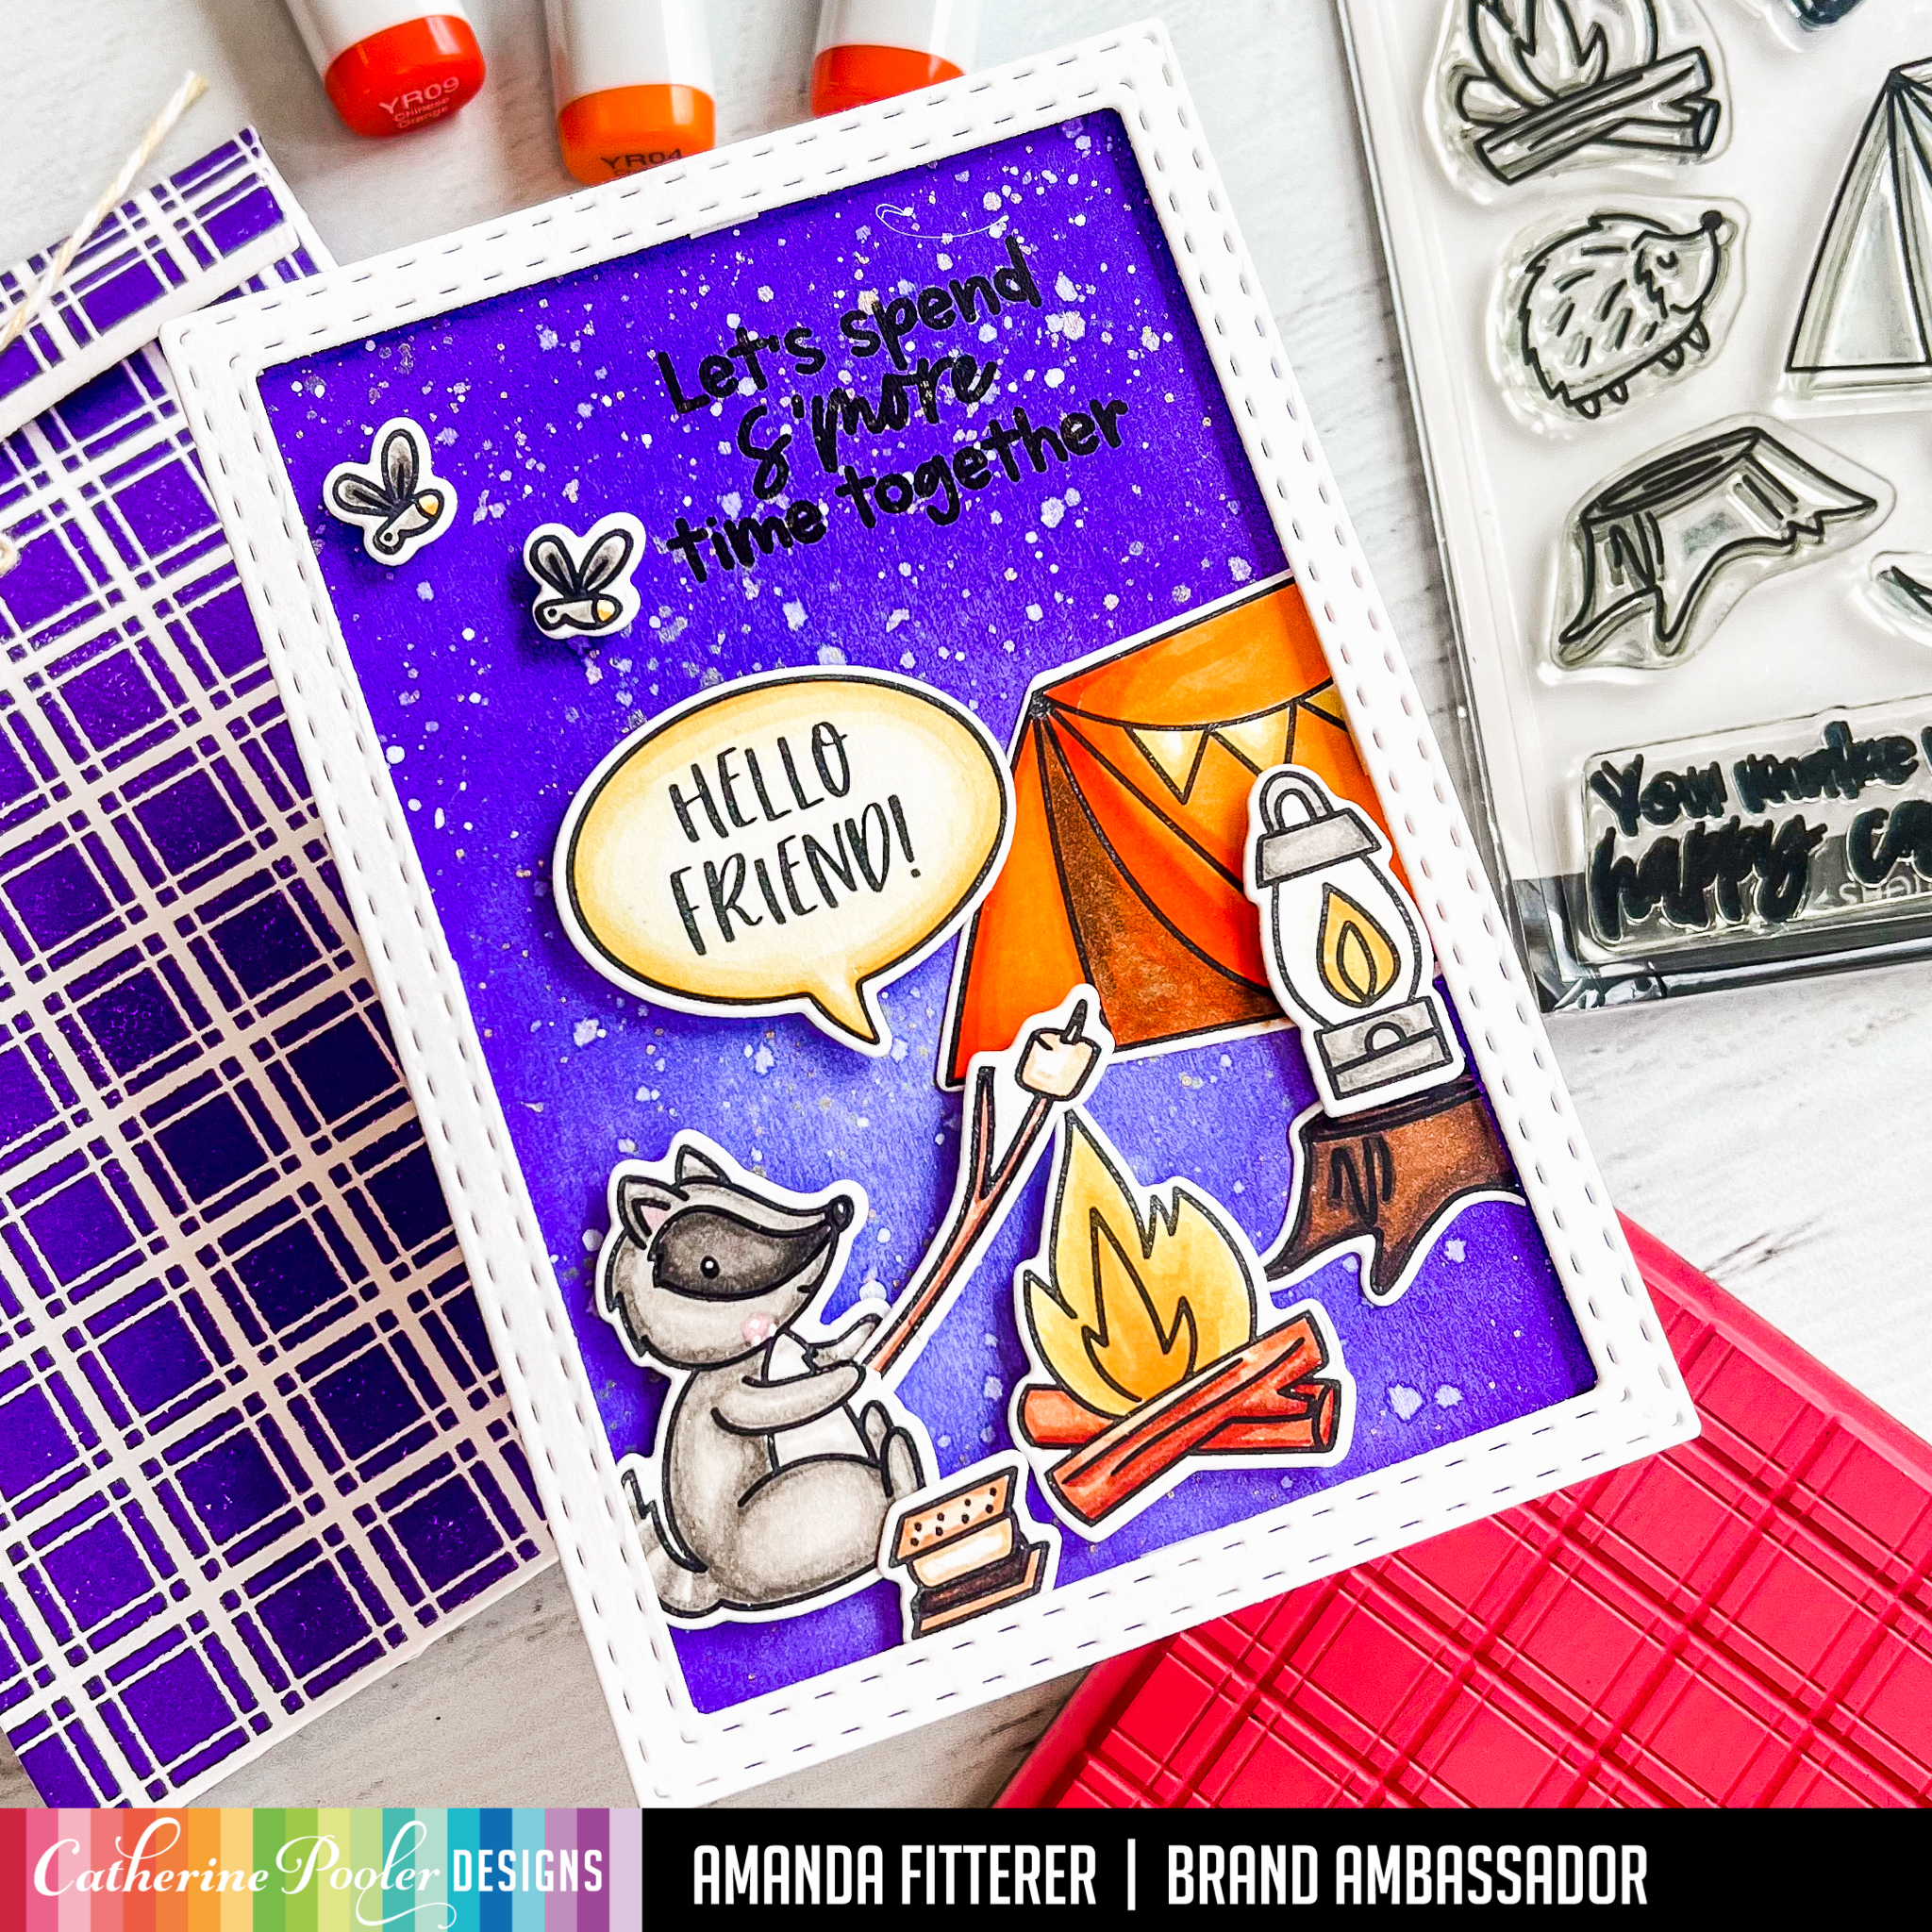
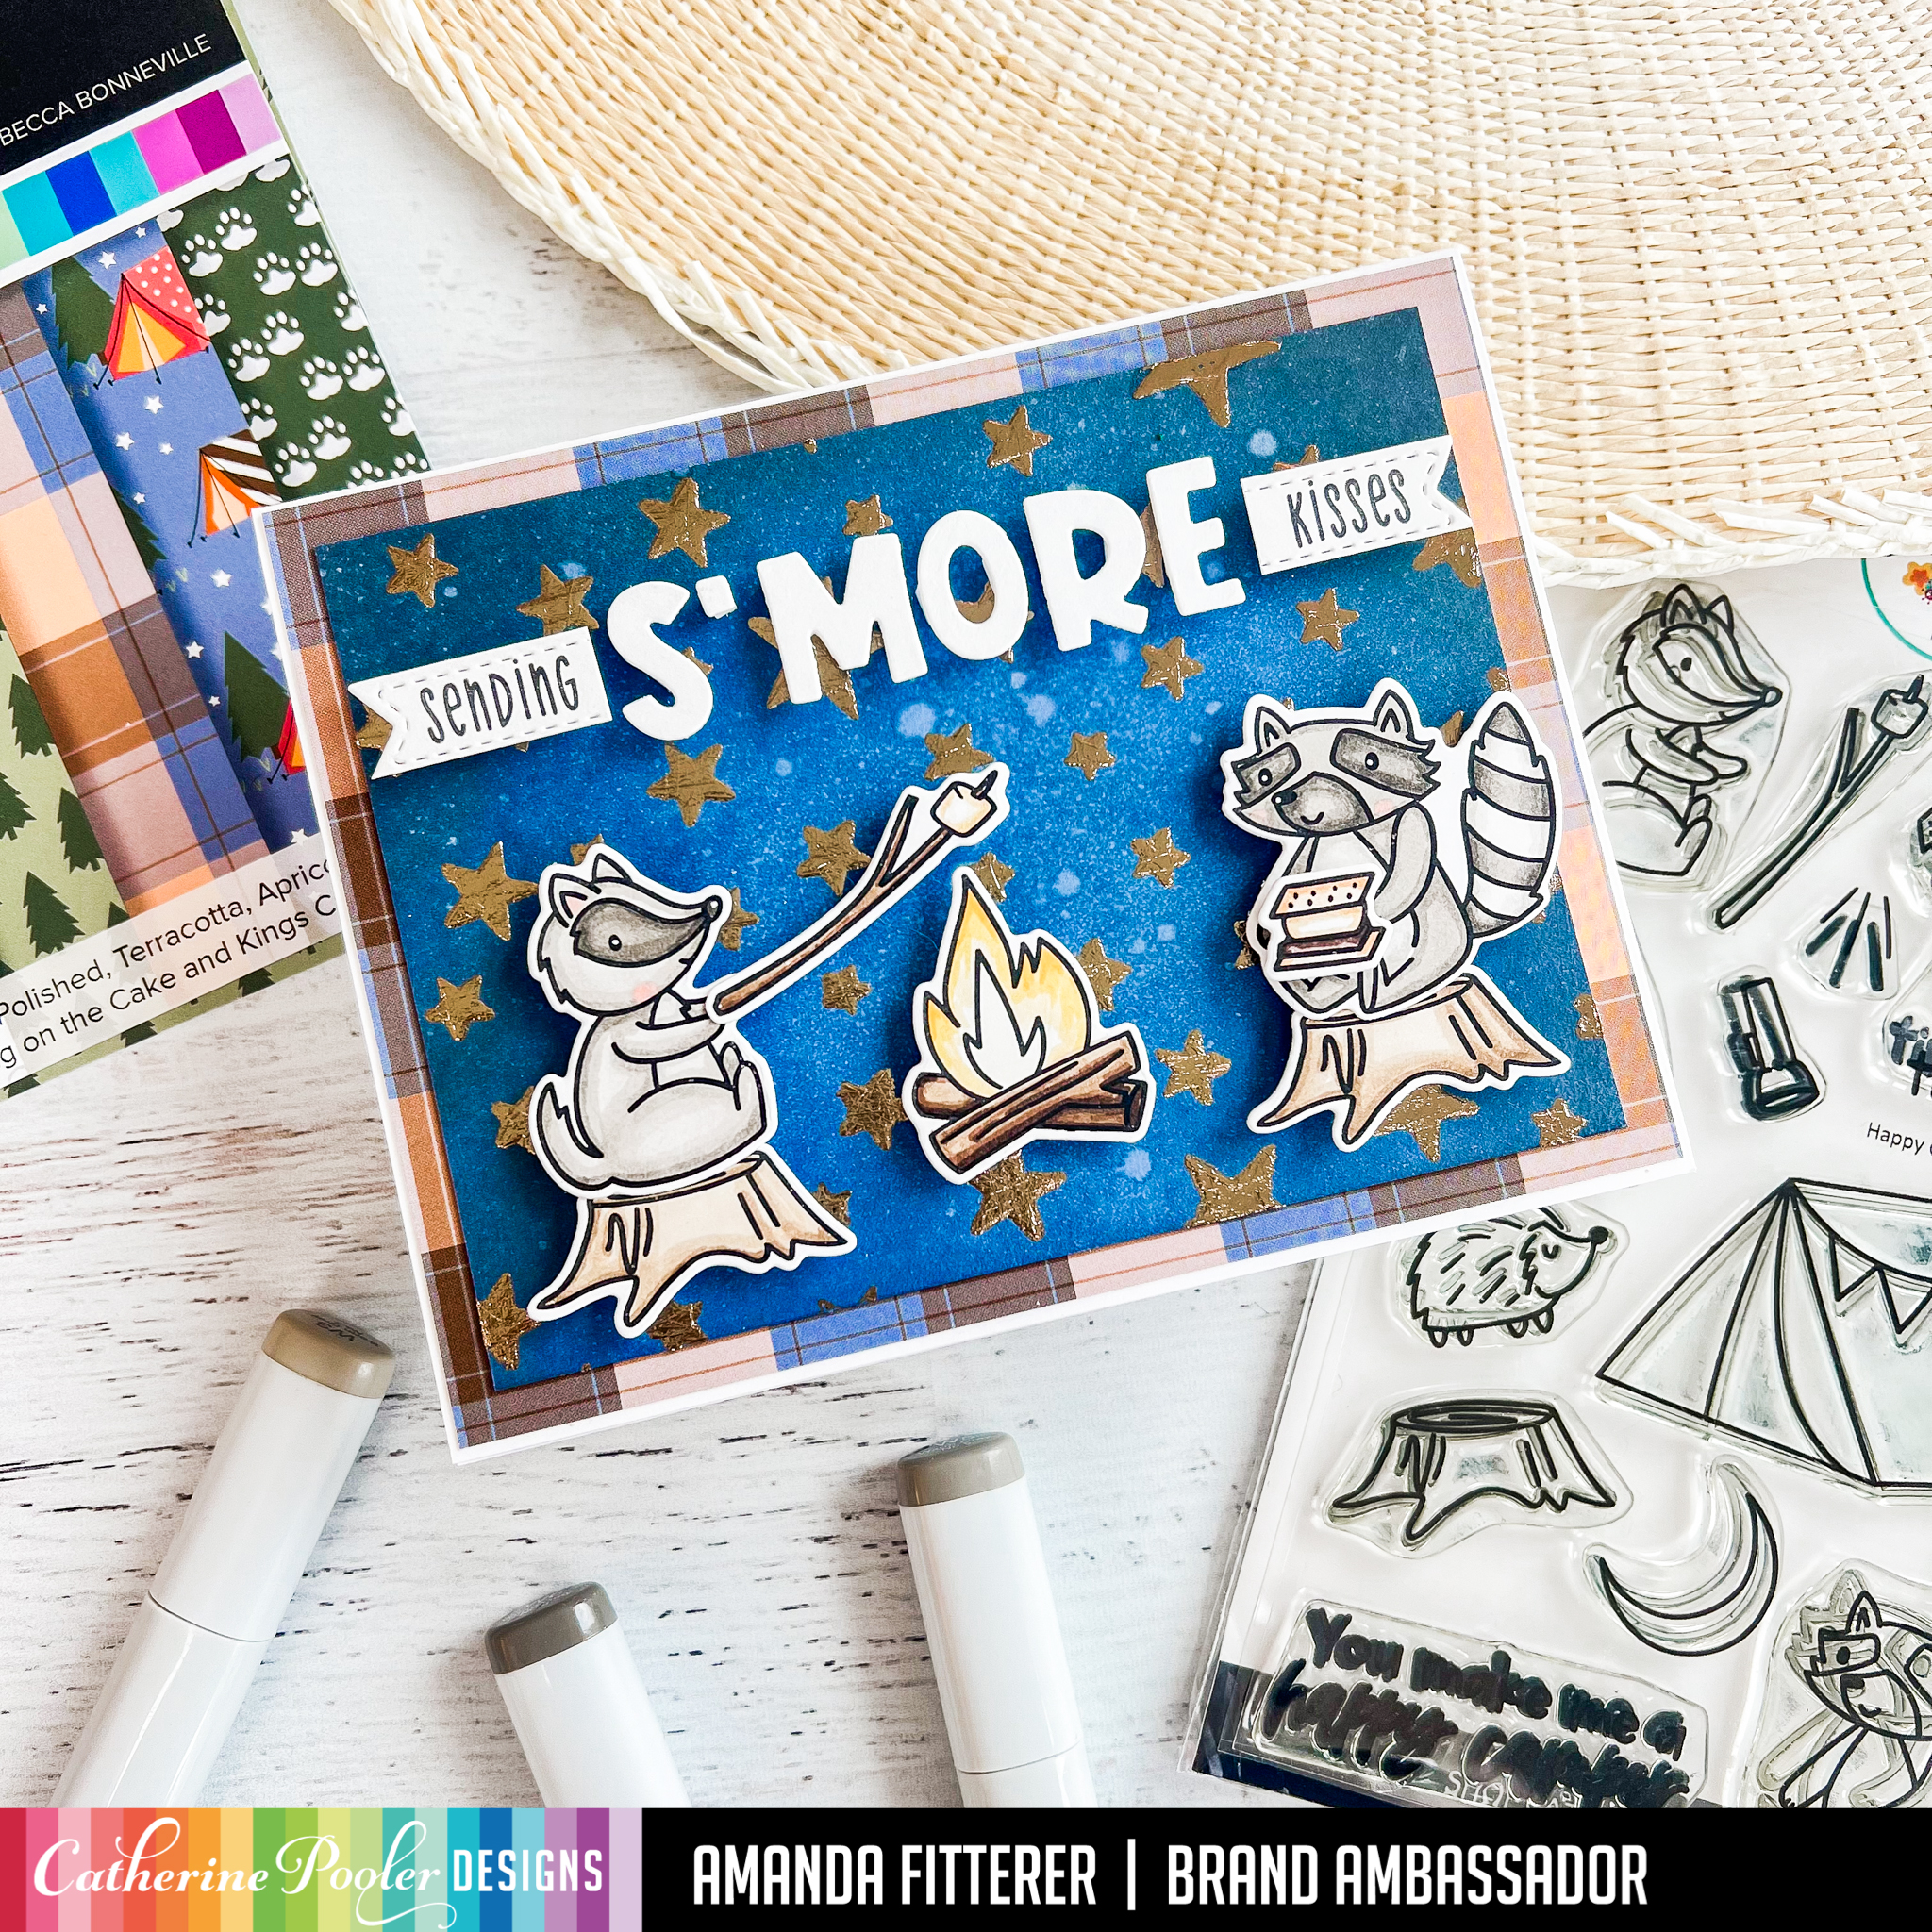
The new Catherine Pooler S’mores Please Collection and the rest of the Summer Nights New Release is available for purchase NOW!! I’m sharing this notecard I made using the new Happy Camper Stamp Set and the S’mores Please Patterned Paper.
The cute little tag comes from the Notecard Frame & Tag Dies. The sentiment comes from the NEW Roundabout Message Stamps.
If you want to shop the New Release with my affiliate link to help me out, I’d appreciate it! It doesn’t cost you anything, but gives me a teeny percentage of your sale! Click here to start shopping the Catherine Pooler site or use any of the links in this post! It’s SO appreciated! 🙂
If you’re looking for other cardmaking supplies, you can shop using my affiliate link for Scrapbook.com below!
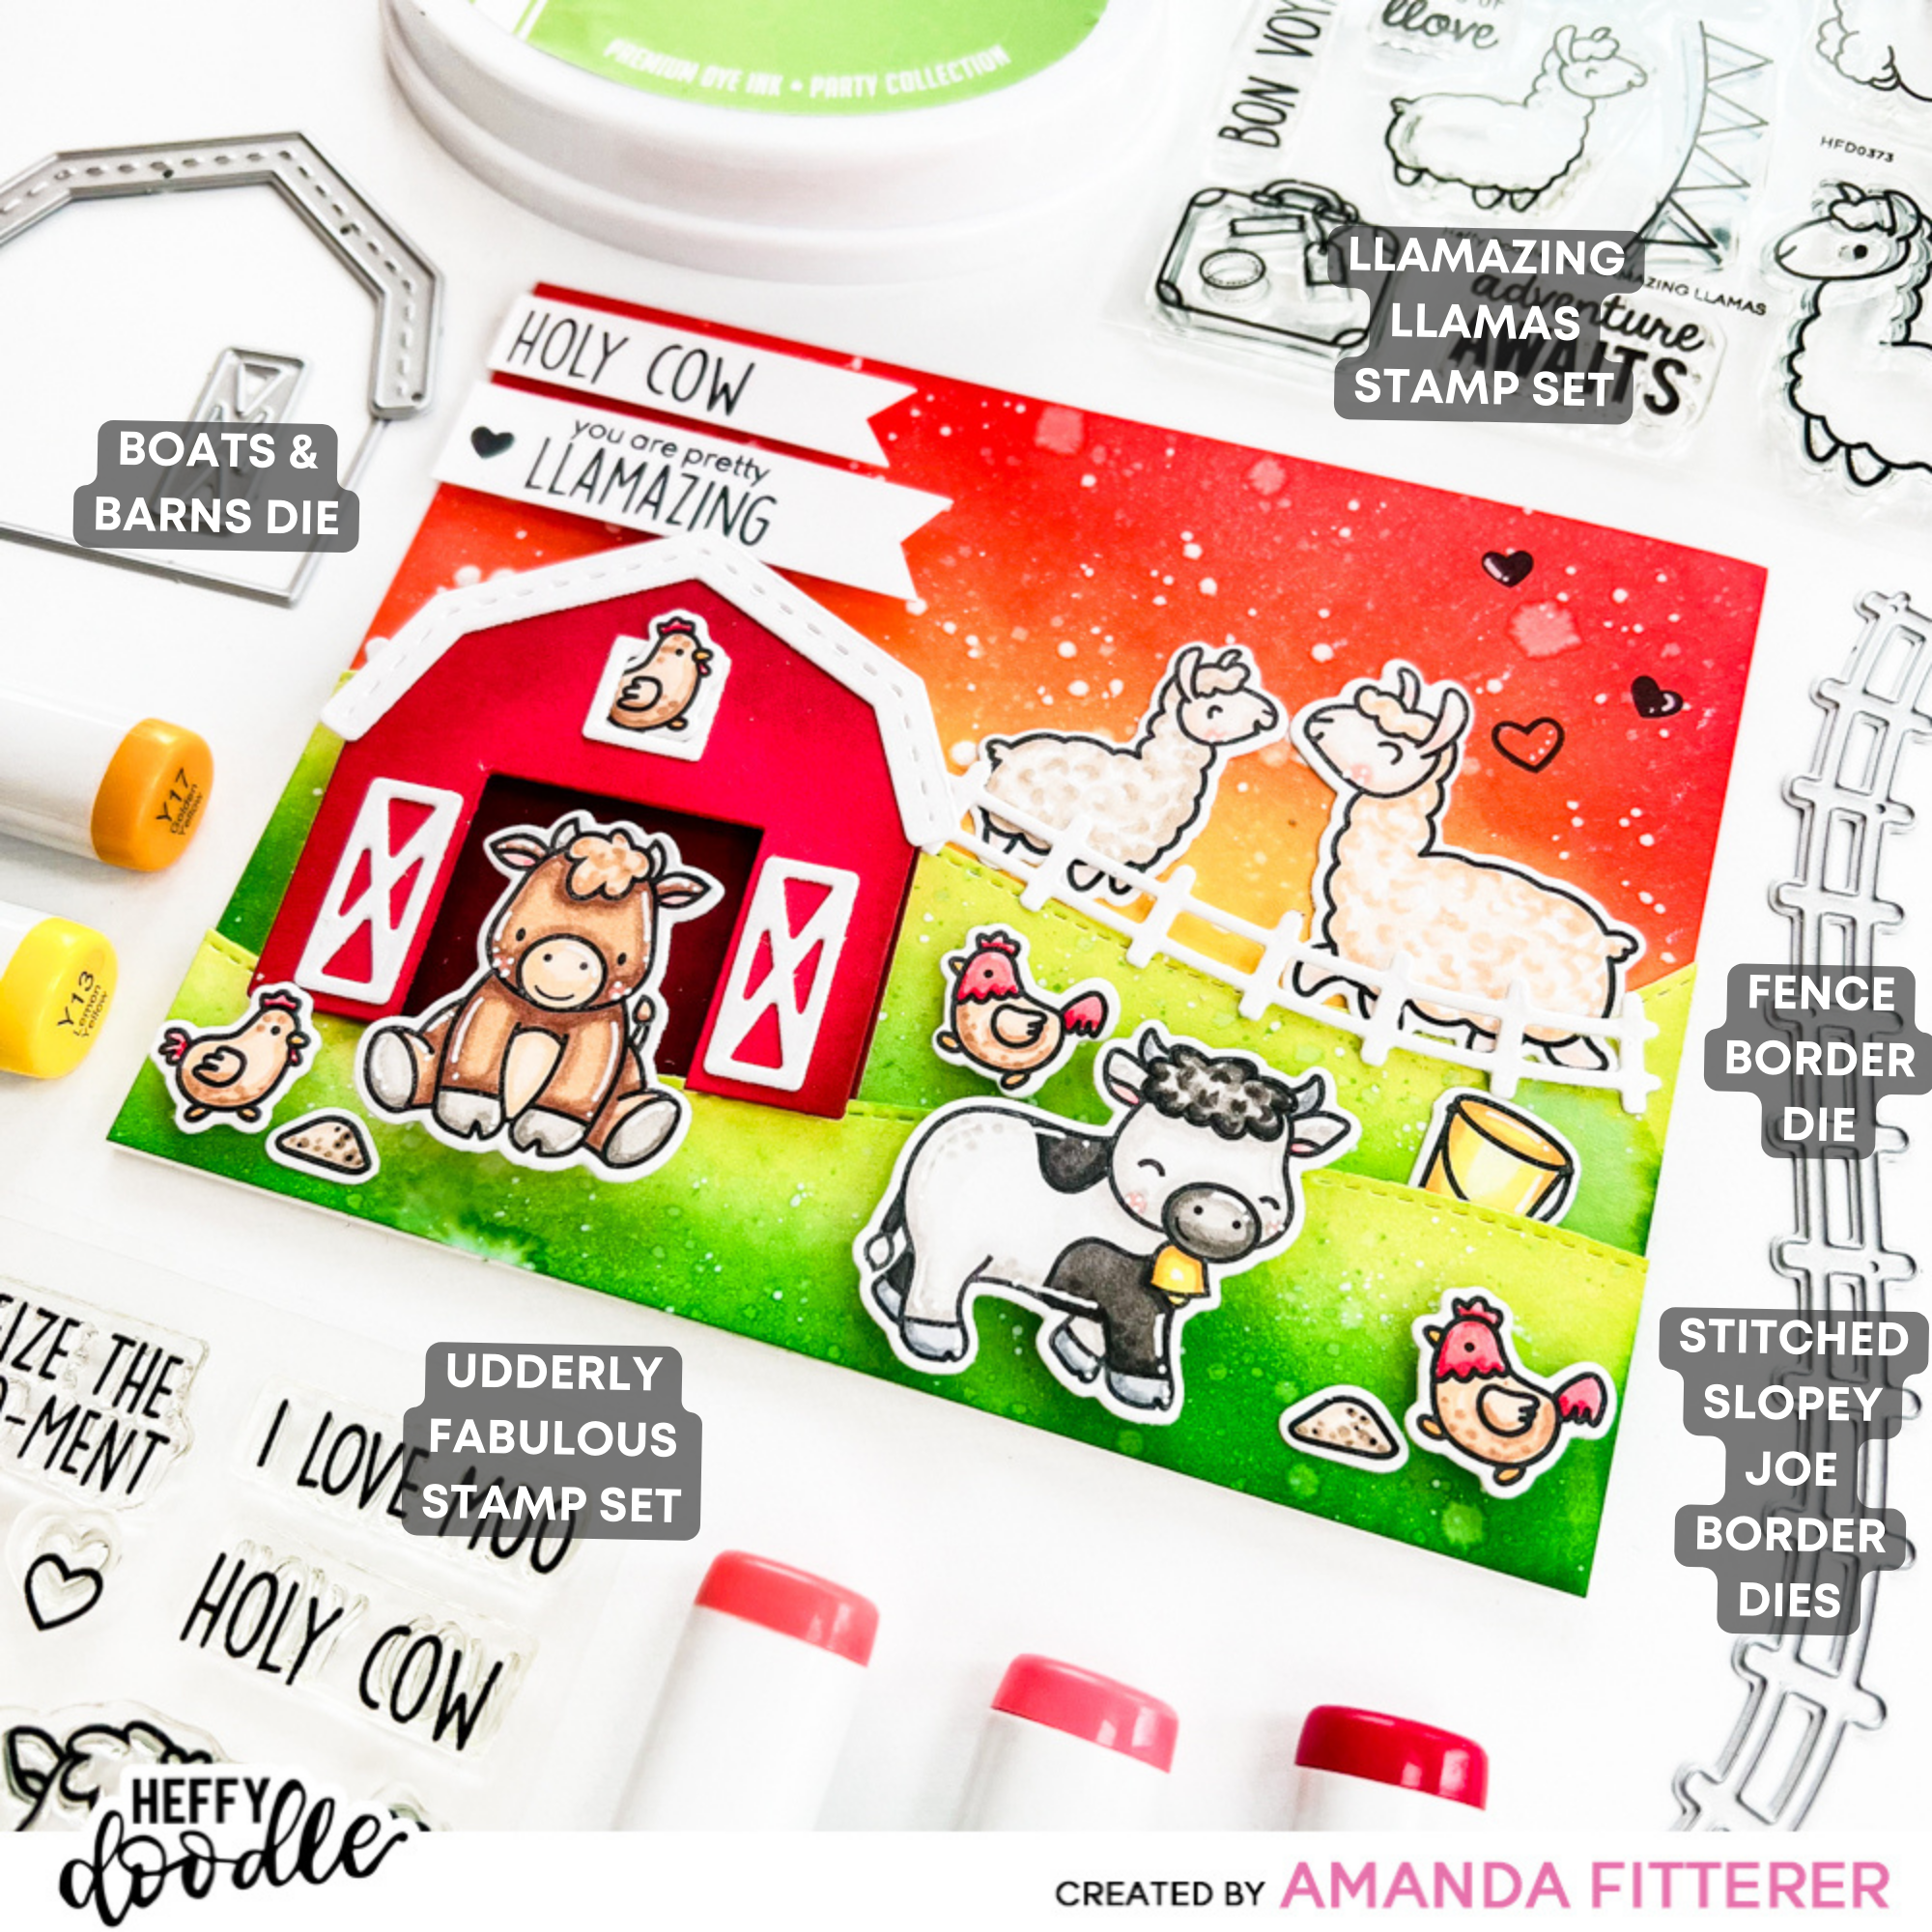
Hello, crafty friends! I hope your week is off to an amazing start!! If it’s not, hopefully this bright and happy card will cheer you right up!
To make this card, I started by blending my beautiful sky background on a piece of A2 cardstock. I spritzed it with water and added some white paint drops. Next, I used my Stitched Slopey Joe Border Dies and blended them with inks as well.
I just love that the Fence Border Die works with the Slopey Joe Dies! So, I just cut that guy out with white cardstock and didn’t add anything to it.
Next, I cut my pieces from the Boats and Barns Die, including 2 barn structures. I ink blended one of the barn structures very dark red and the other barn a lighter red. I placed my darker one behind to be the “inside” of the barn. The lighter red die cut, I cut out the barn door opening and the window opening and added my other die cut pieces with glue.
Once I had my background all set, I stamped my images from the Llamazing Llamas and Udderly Fabulous Stamp Sets. Then, I colored them with Copic markers and die cut them out with the coordinating dies.
The last step is to assemble the card! I grabbed my Glubert Glue and 3D foam squares and strips and got to work!
That’s it for me today! I hope you enjoyed this post! Enjoy the rest of your week!
Just a note to say that by clicking the links in my blog post, you may be using my affiliate link! This is great for me, because I get a teeny percentage of your sale. And it’s great for you because it doesn’t cost you anything at all and you’re helping a friend!
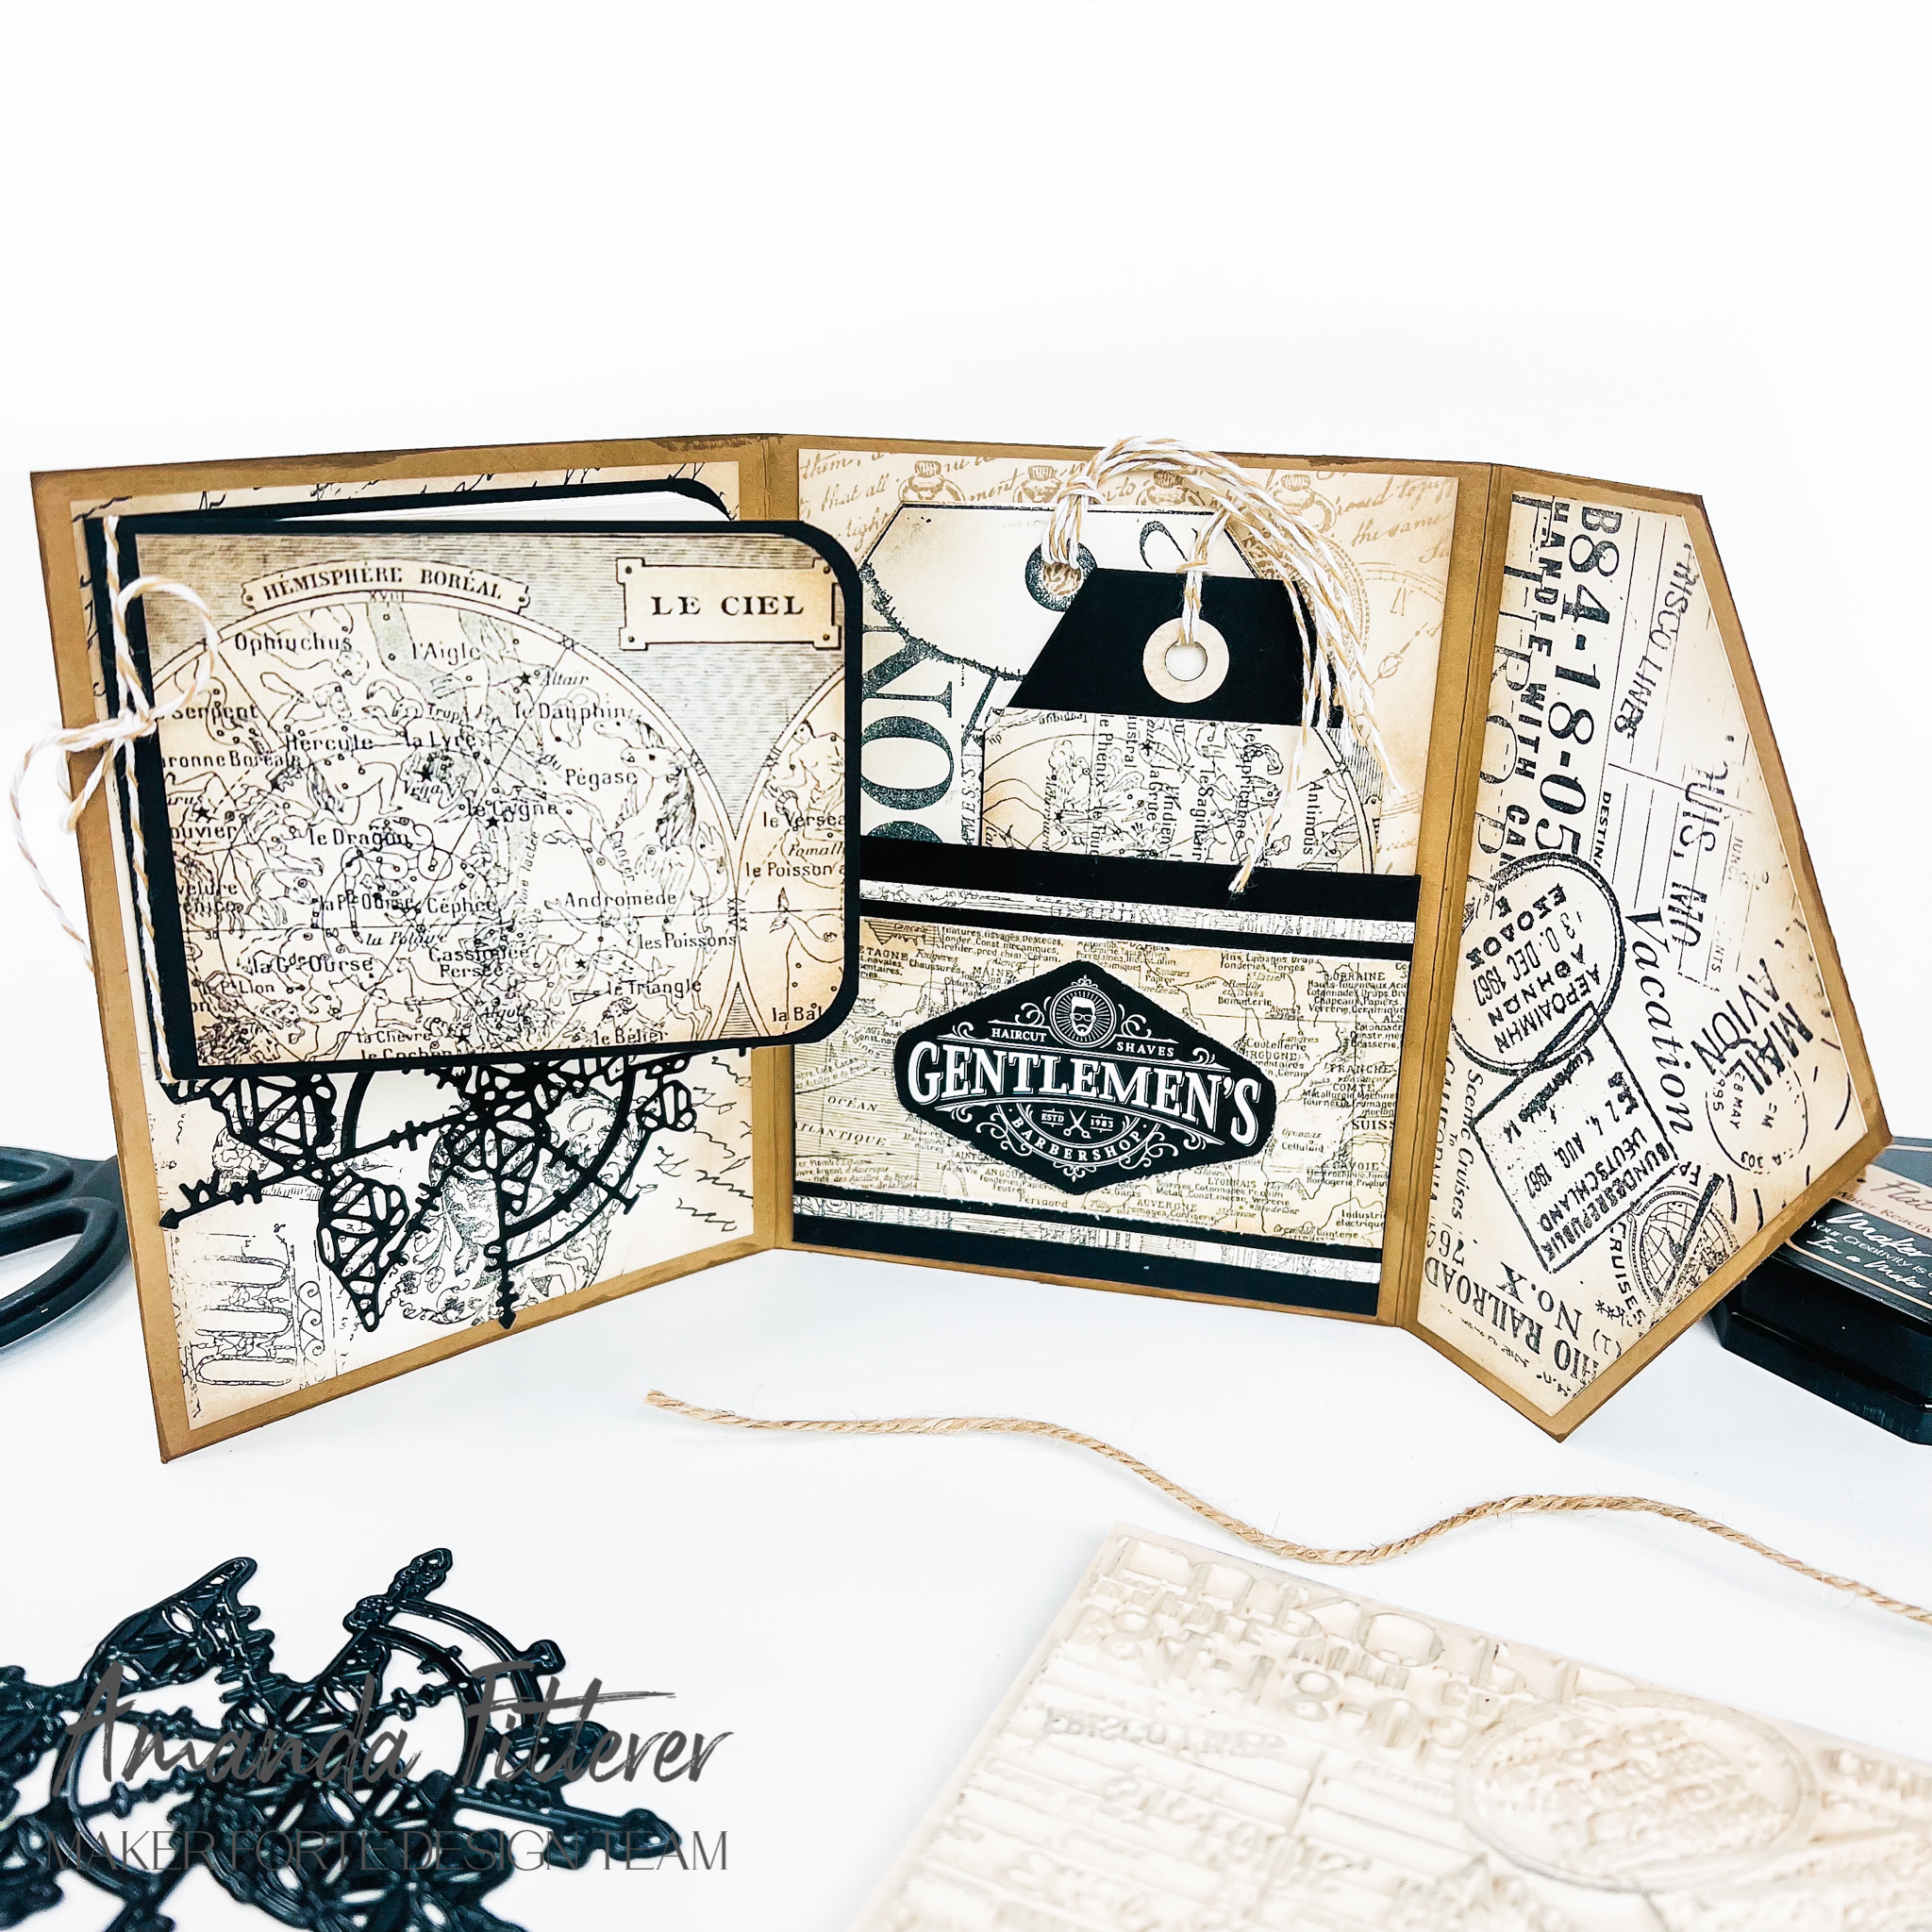
Hey friends! Today I am sharing this really fun tri-fold journal and tag holder! I love how masculine it is! This Mister Maker line of products are all masculine, which makes it so much easier!
Check out this image to see which products I used:
You can shop all the Mister Maker products using my affiliate link (at no charge to you.. I just get a small percentage of your sale, which helps me fund my craftiness!)
Thank you so much for your love and support! If you would like me to do a tutorial on how I made this tri-fold, just leave a comment!
The new Catherine Pooler S’mores Please Collection and the rest of the Summer Nights New Release is available for purchase NOW!! I’m sharing this card I made using the new Happy Camper Stamp Set! Plus, I’ve used Cozy Plaid Background Stamp for my coordinating envelope!
If you want to shop the New Release with my affiliate link to help me out, I’d appreciate it! It doesn’t cost you anything, but gives me a teeny percentage of your sale! Click here to start shopping the Catherine Pooler site or use any of the links in this post! It’s SO appreciated! 🙂
If you’re looking for other cardmaking supplies, you can shop using my affiliate link for Scrapbook.com below!
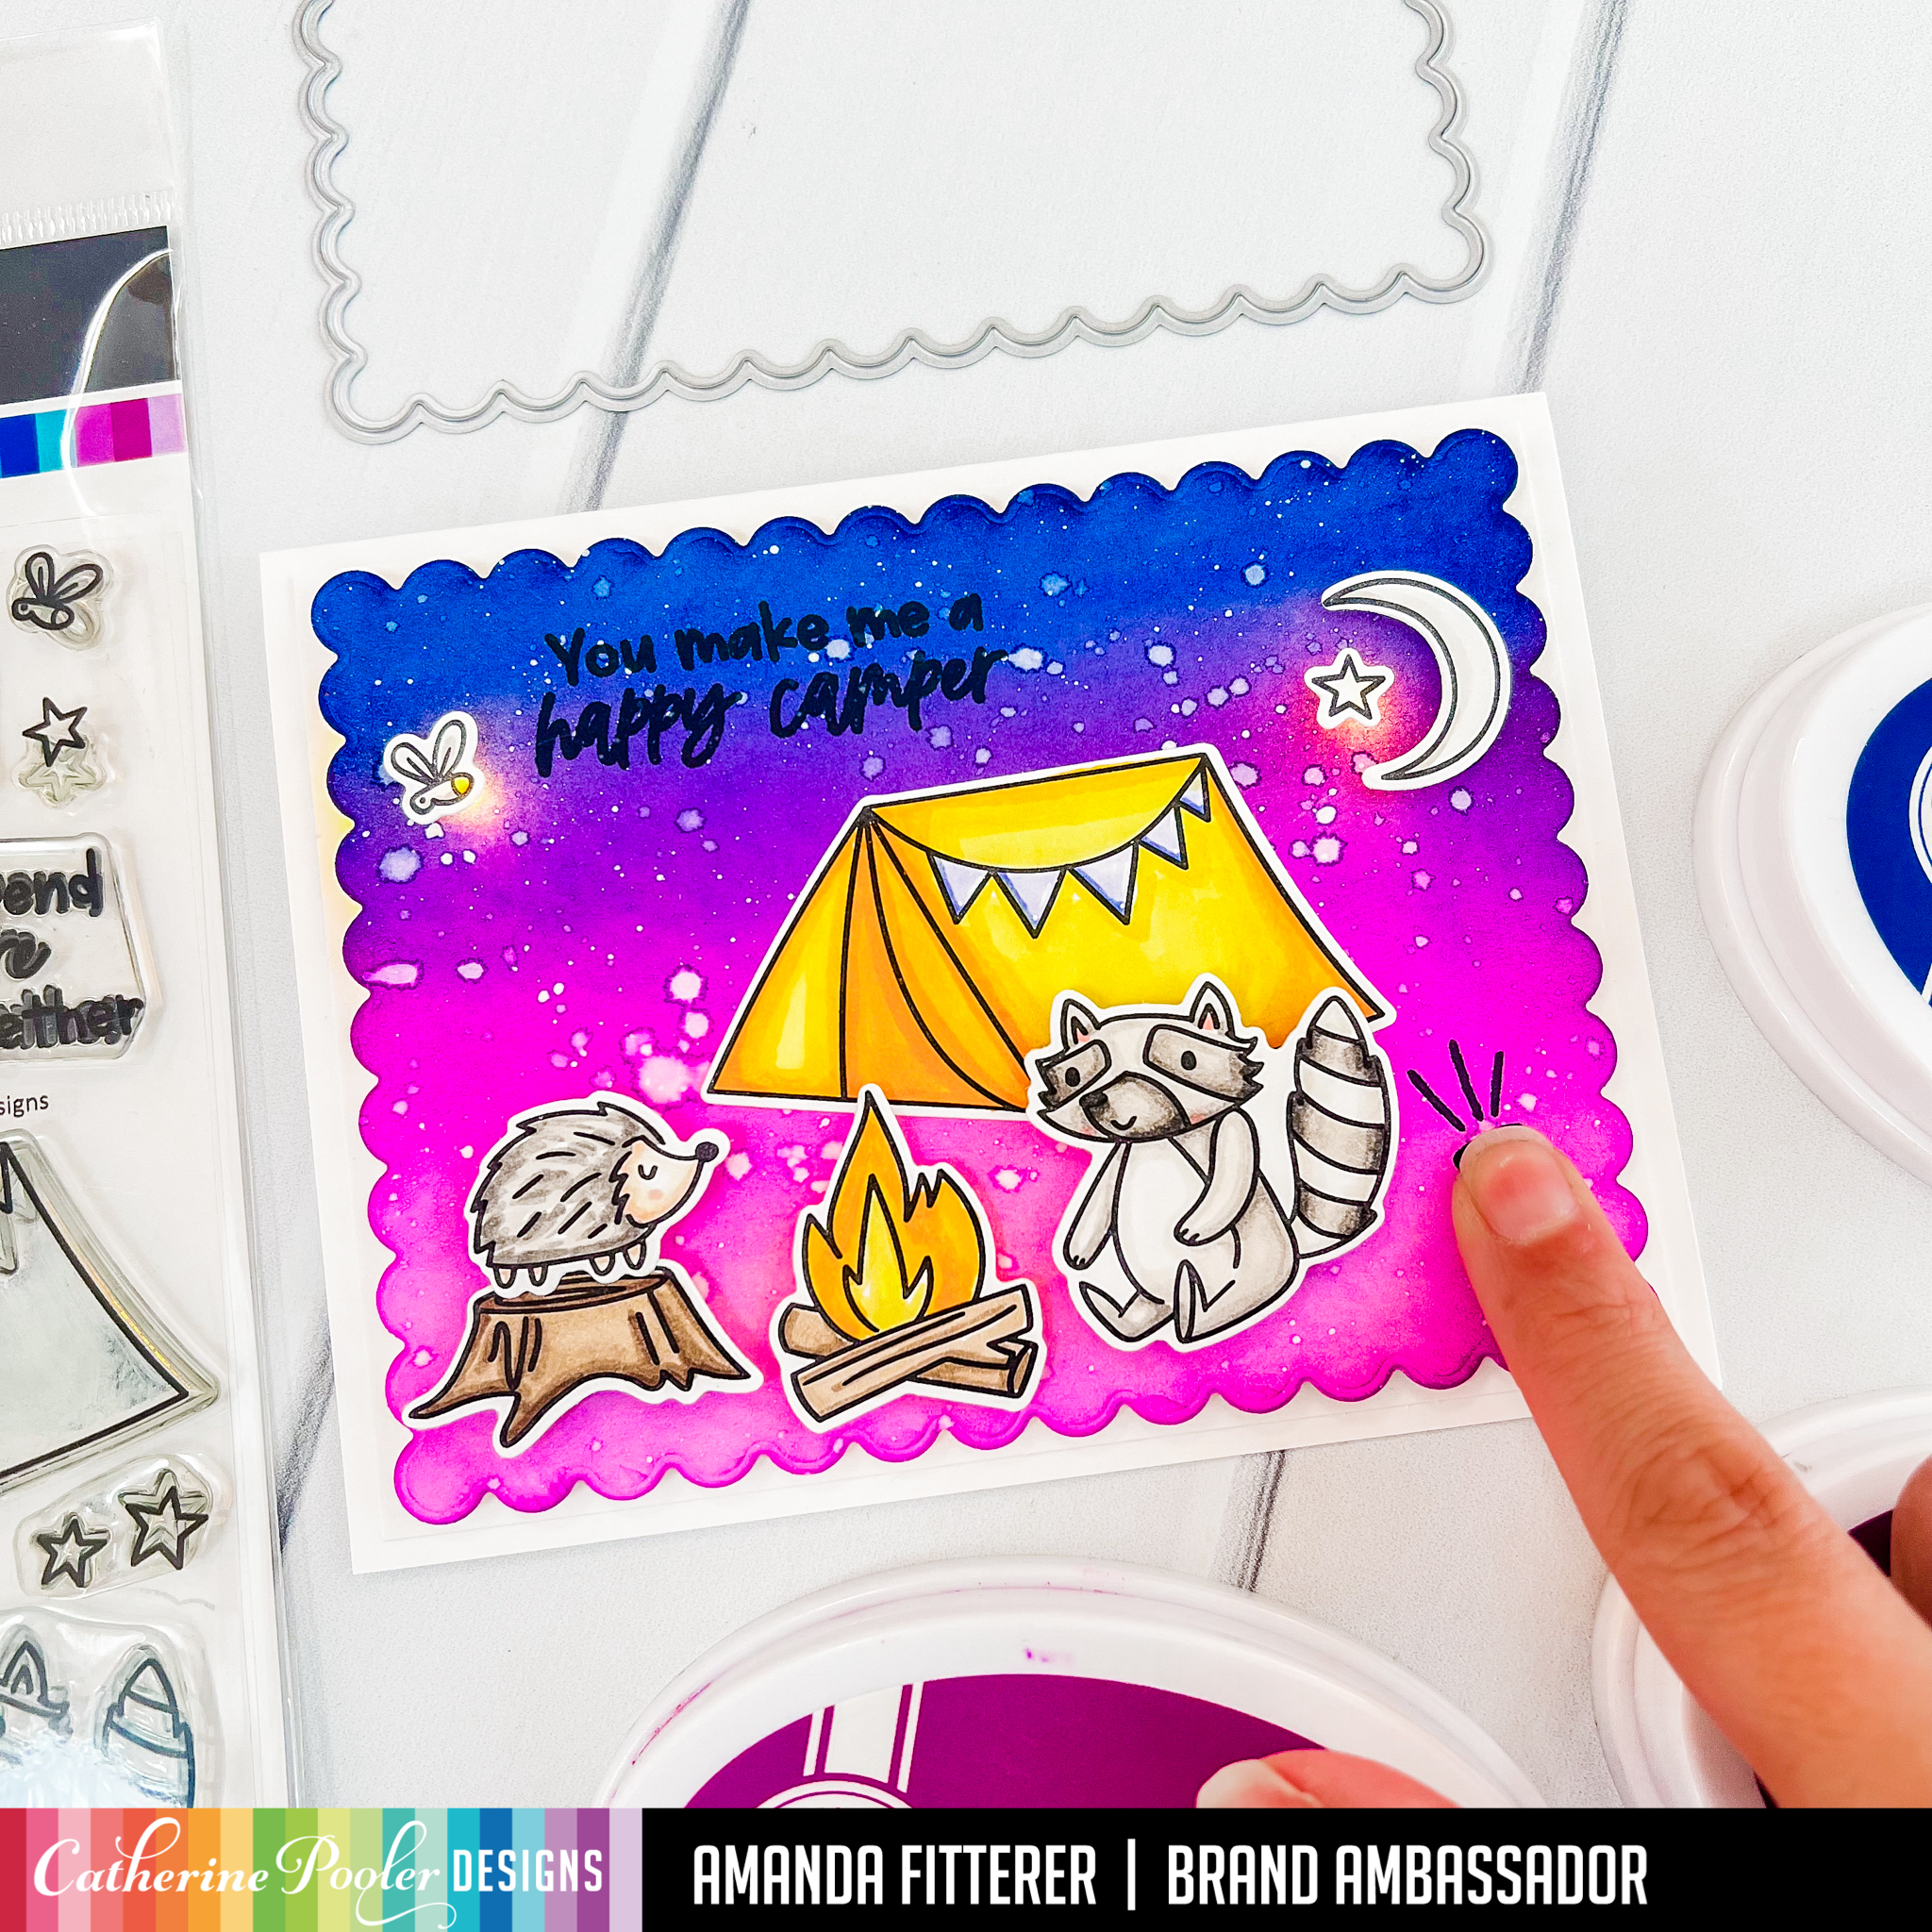
The new Catherine Pooler S’mores Please Collection and the rest of the Summer Nights New Release is available for purchase NOW!! Yipee!! Check out this light up card I made using the new Happy Camper Stamp Set!
These EZ-Lights make it so easy to make you cards light up! No wiring required – the work has been done for you!
If you want to shop the New Release with my affiliate link to help me out, I’d appreciate it! It doesn’t cost you anything, but gives me a teeny percentage of your sale! Click here to start shopping the Catherine Pooler site or use any of the links in this post! It’s SO appreciated! 🙂
Want to make your cards light up? You can buy these EZ-Lights from my friend Amanda at Pear Blossom Press! You can use this affiliate link or the link above!
Eeek, I get to sneak peek another card I made using Catherine Pooler S’mores Please Collection from the Summer Nights Release showcasing the Happy Camper Stamp Set, the S’mores Please Patterned Paper, and the Roundabout Messages Stamp set and Roundabout Dies!
If you want to shop the New Release and all the CP goodies with my affiliate link to help me out, I’d appreciate it! It doesn’t cost you anything, but gives me a teeny percentage of your sale (so I can buy more goodies to share with you!) Click here now to start shopping!
Did you see the new Catherine Pooler S’mores Please Collection from the Summer Nights New Release? Oh my! It makes me SO ready for summer! Check out those little campers from the Happy Camper Stamp Set!
If you want to shop the New Release with my affiliate link to help me out, I’d appreciate it! It doesn’t cost you anything, but gives me a teeny percentage of your sale! Click here to shop!
Welcome to the Heffy Doodle New Release Inspiration Blog Hop! We are so excited to share amazing cards from 8 Design Team members using the new release! For today’s special Blog Hop, you can win a £50 voucher to the Heffy Doodle store!
As part of the Blog Hop, I get to share this fun and happy card showcasing some of the brand new products!! Read on to see how I made this card!
To create this card, I am blending a piece of A2 white cardstock with Drive-In, Flirty Fuchsia, Party Dress, and Bellini inks. I am using the brand new Heffy Doodle Stitched Birthday Trio Frame Dies to create a frame for my A2 card.
Next, I’m going to place my stamps where I think I’ll want them to go. This helps me see the finished card without committing to anything just yet!
Once I have my selected stamps from the NEW Safari Animals, Koality Hugs, and Mane Squeezestamp sets, I am coloring them in with Copic markers and then cutting them out with the coordinating die sets.
My final step is to assemble the card and add some accents! I’m using the Heffy Doodle Deep Foam Tape to adhere my trio frame to the ink blended background. I’m using 3D foam squares to attach my stamped images and sentiment. For my sequins, I’m using Glubert glue to hold them down.
Here are some close-ups of the finished card!
To be entered to win the giveaway, all you need to do is comment at each stop along the Blog Hop before May 4th, 2022 at 11:59 PM EST. The winner will be announced on the Heffy Doodle Blog on May 5th at 10:00 AM EST!
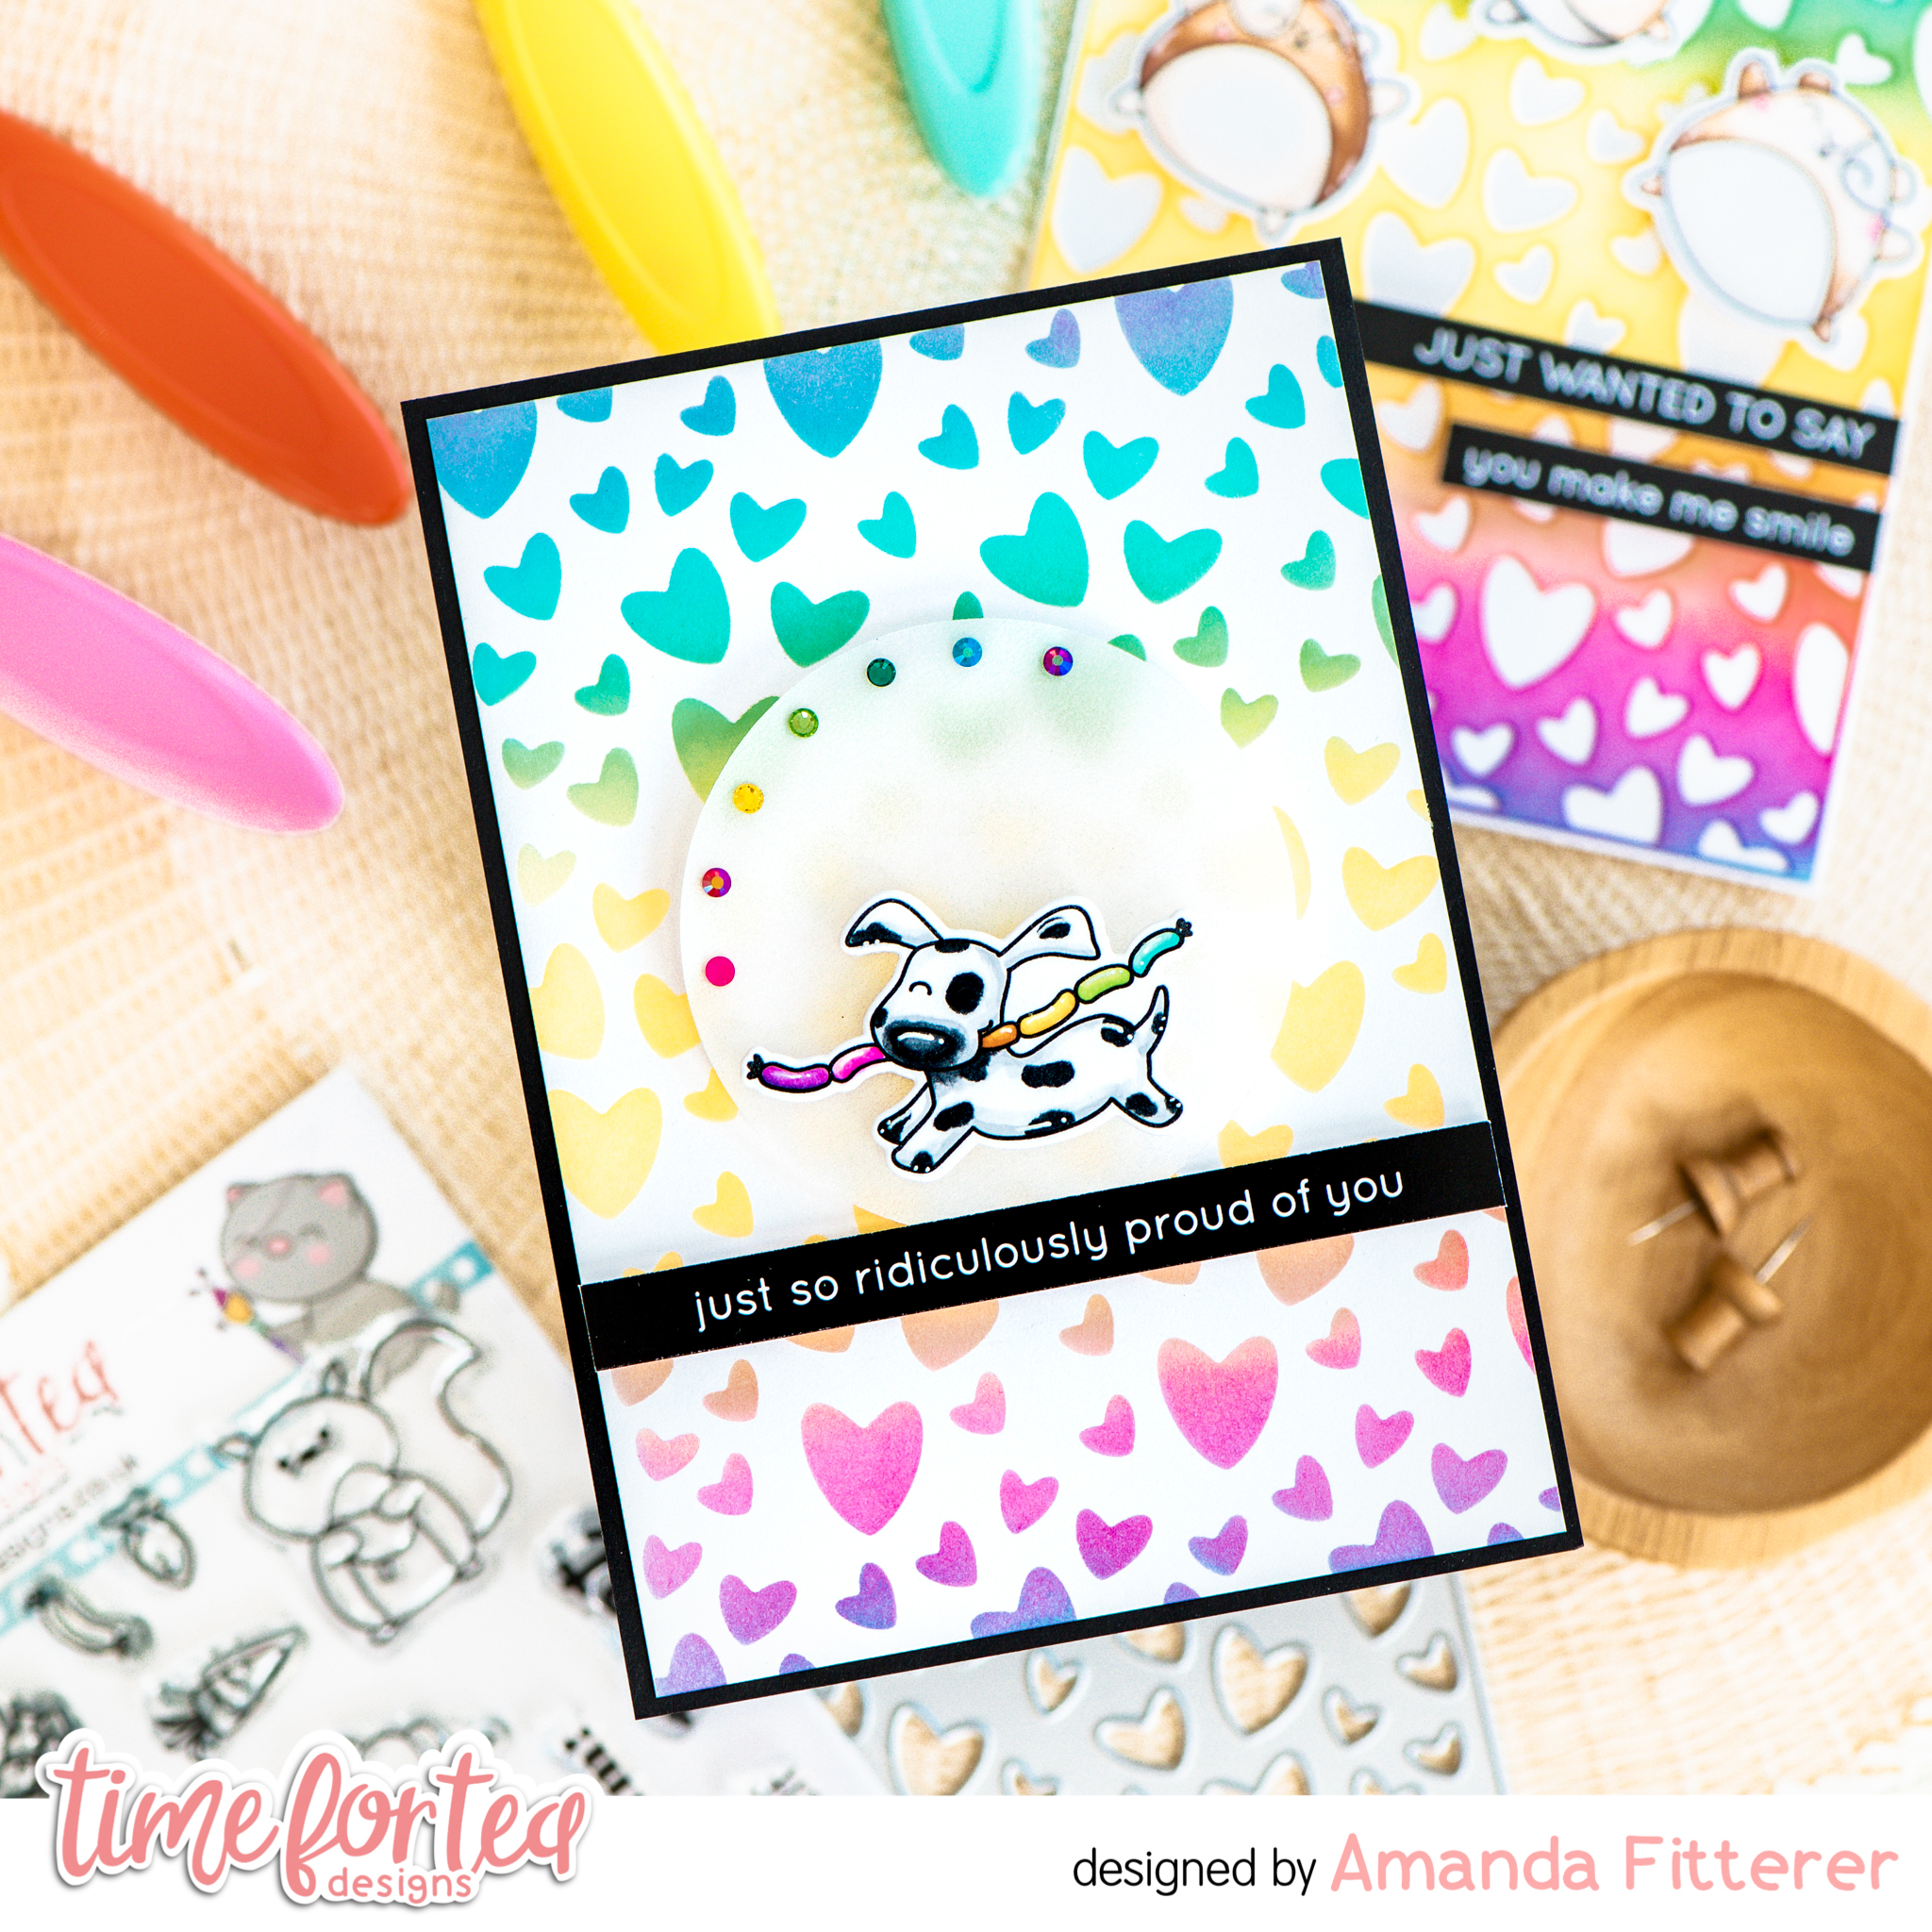
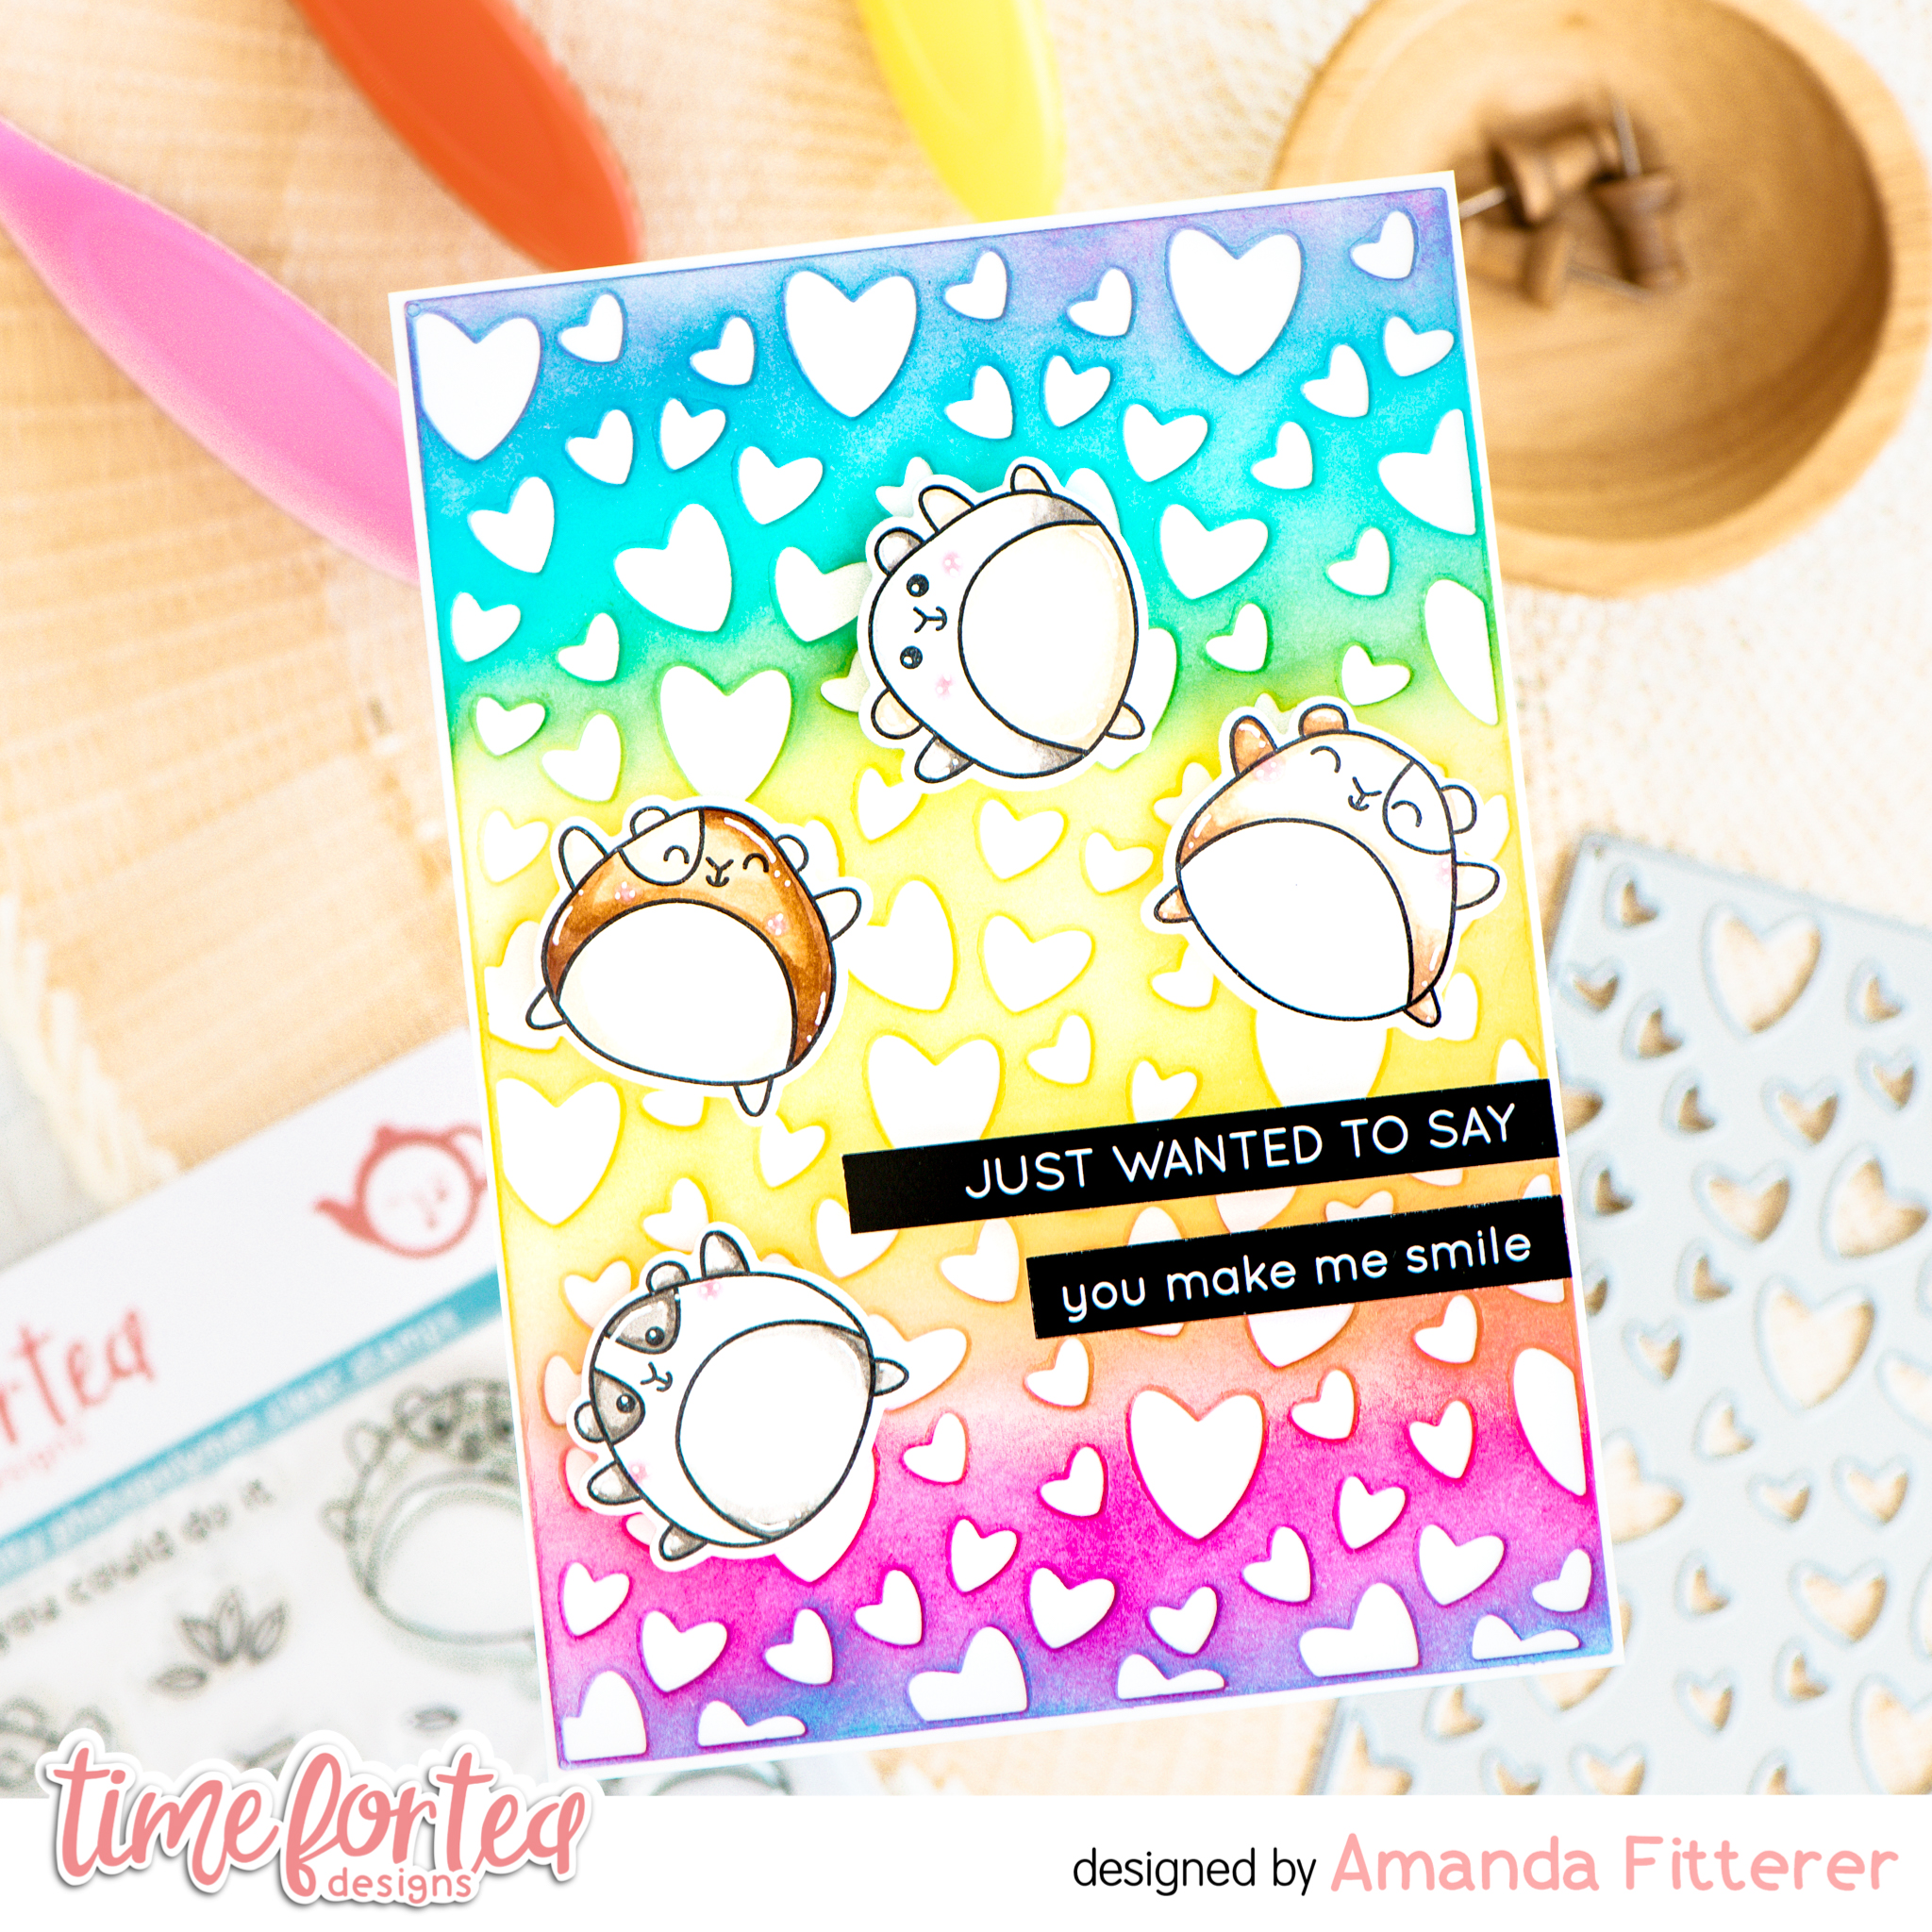
Did you see my last post where I created that beautiful rainbow background with the Scattered Hearts Cover Plate?? Today, I’m going to share the card I made using it!
To make this card, I die cut the Scattered Hearts Cover Plate on a piece of white cardstock. Once cut, I grabbed another piece of white cardstock and placed it underneath my die cut piece. Then, I blended a rainbow with Maker Forte Flamingo, Yellowstone, and Neon Lights inks. This gives me TWO backgrounds at once!
For my sweet pup, I used Enjoy the Little Things stamp set. I colored him with Copic markers and then die cut him with the coordinating dies. I propped him up with 3D foam squares and put him on a piece of round vellum.
For my sentiment, I grabbed my Brighter Days Sentiment Cards and trimmed out the “just so ridiculously proud of you” sentiment.
For the finishing touch, I added some rainbow colored gems!
The next step was to attach my heart background to a black card base with liquid glue.
Don’t forget, you can use code T4TAMANDA10 to get 10% off your purchase!
Well hey there, crafty friend! Today I’m sharing this fun rainbow card I made using the Hooray Hamster stamp set!
To make this card, I die cut the Scattered Hearts Cover Plate on a piece of white cardstock. Once cut, I grabbed another piece of white cardstock and placed it underneath my die cut piece. Then, I blended a rainbow with Maker Forte Flamingo, Yellowstone, and Neon Lights inks. This gives me TWO backgrounds at once!
Then, I was ready for my hamsters! I stamped them with black ink and then colored them in with Copic markers. I used the coordinating dies to cut them out.For my sentiments, I grabbed my Brighter Days Sentiment Cards and trimmed out 2 sentiments.
The next step was to attach my heart background to a white card base with liquid glue. For my hamsters and sentiments, I propped them up with 3D foam squares and strips.
Stay tuned for a card using the extra rainbow background NEXT WEEK! Woot woot! Use code T4TAMANDA10 to get 10% off your purchase! See you next week!
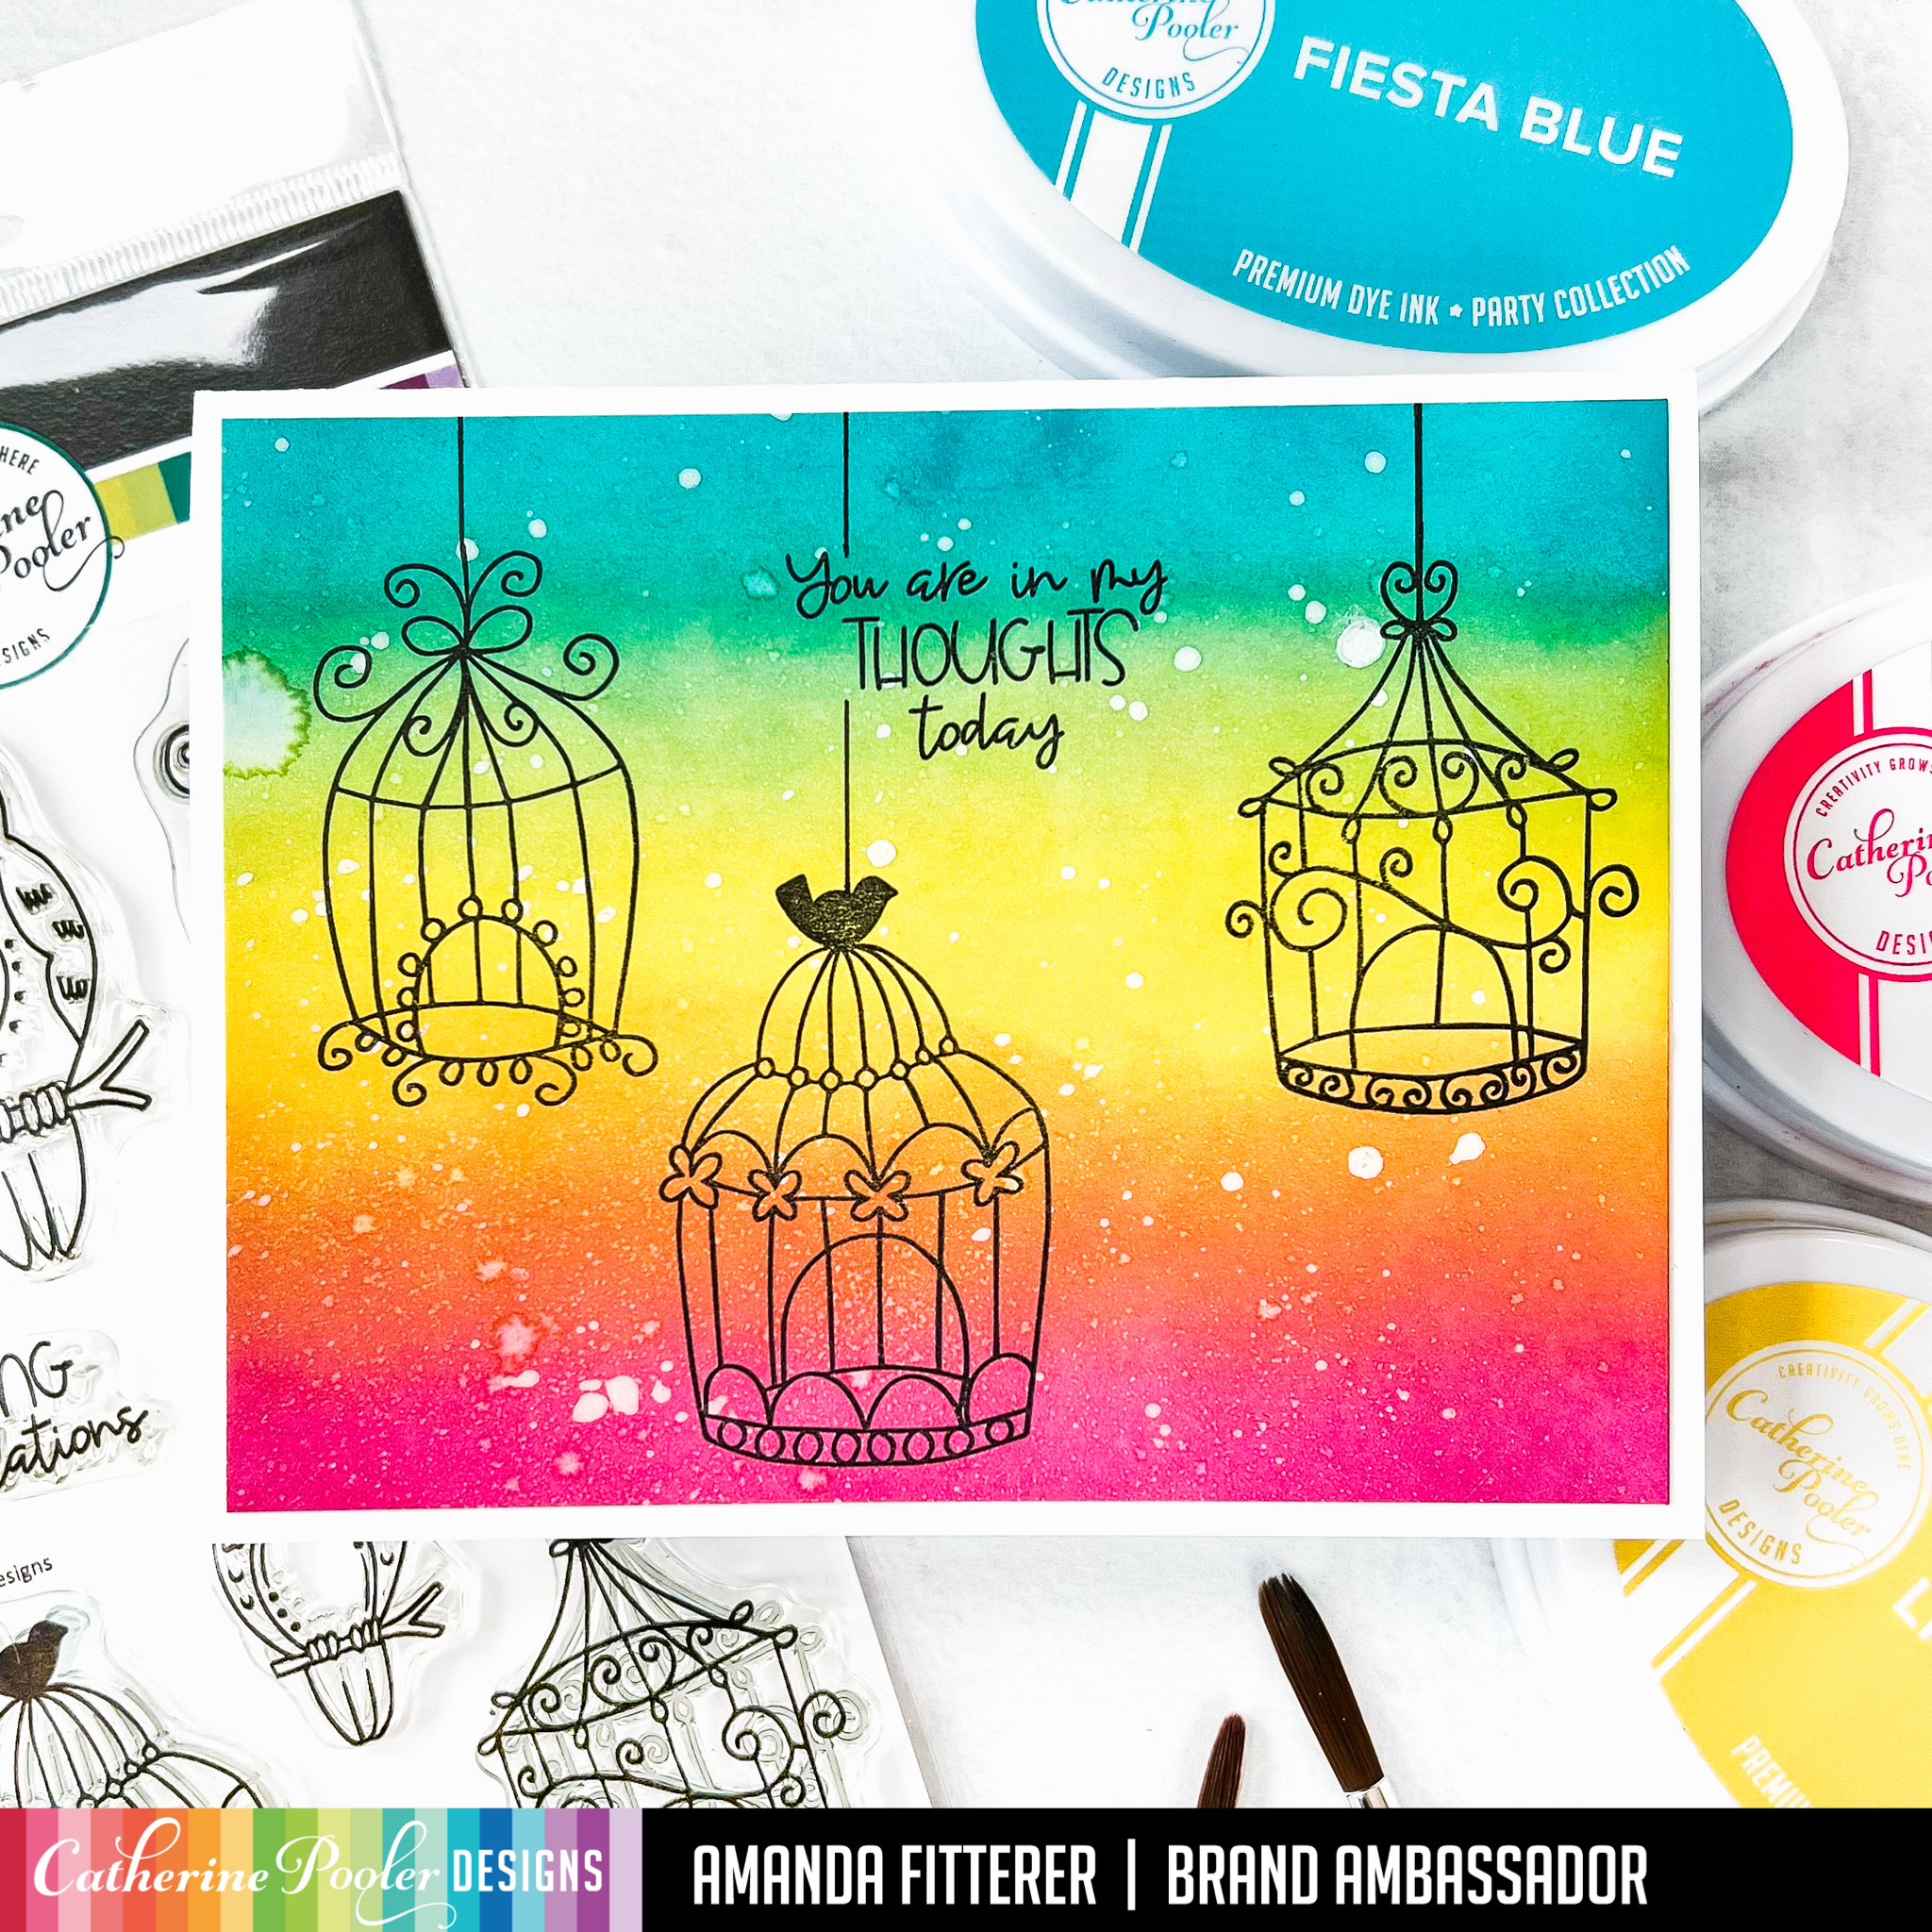
Oh my gosh! I love the new Lovebirds Stamp Set, don’t you?! The whole Ex Libris Collection is finally available for purchase now! Woot woot!
Although I ADORE the new ink colors, I am a Party Collection girl myself! So, I wanted to showcase this stamp set using a Party rainbow blended background. I blended Party Dress, Limoncello, and Fiesta Blue to create a gorgeous rainbow background. I also spritzed the background with water to create some texture!
Once I had my background blended, I stamped my birdcages and sentiment straight onto my background. Then, I used a ruler and black Copic pen to draw lines from my birdcages to the top of the card.
You can shop using my affiliate link if you want to help me get a small percentage of the sale! If you would like to, click here.
I’ll be back soon with more inspiration!! Xx, Amanda
I have step-by-step instructions on creating this mini journal.. so read on!
I’m starting out with my uber-professional looking template! 😉 1. Cut a piece of white cardstock down to 4.75″ x 7.25″. 2. Score it at 3.5″ and 3.75″. 3. Round off your corners with a corner punch, if desired.
Grab your patterned paper – I’m using the new Twilight Reading Paper Pack. 4. Cut down smaller pieces of cardstock that are approximately .25″ less for each layer. I’m using the Scallops and Dots Dies and a paper trimmer. 5. If you rounded your edges on your white cardstock base, you’ll probably want to round these off as well. I’m only rounding the right corners.
6. Use a small hole punch or poker tool to create a small hole for a brad. 7. Place a brad in the hole, giving yourself room to wrap twine around a few times.
8. On the inner flap, tape a piece of twine that’s long enough to wrap around your mini journal 2-4 times, depending on what you want it to look like.
9. Glue a piece of patterned cardstock on the front flap to cover the tape and brad. My piece of paper is 3.25″ x 4.5″. I’m also using the same size and paper for the other flap.
I’m going to add a little more interest on the front of mine by stamping some birdcages from the Lovebirds stamp set with the new Apricot ink. Im going to trim that down and glue it to the front.
Now we’re ready to work on the inside! 10. Grab a piece of patterned paper and trim it down to 3.75″ x 2.5″. 11. Score at .5″ and 3.5″. Turn 90 degrees and score at .5″.
12. Use some scissors to cut triangles out of the flaps.
13. Use red tape to secure the pocket to your mini journal.
14. Grab some computer paper. Trim strips that are 8″ x 2.75″. Fold them in half and secure them together with a stapler. Stamp an image in the corner on one or all of the pages. 15. Use red tape to secure it to the inside of your journal.
16. Create some tags out of coordinating patterned paper and stick them in your pocket!
That’s it!
I hope you enjoyed this post and try to make your own mini journal!
You can start shopping the New Release on Tues, April 5th if you’re a StampNation member! Everyone else gets to start shopping on Weds, April 6th!
You can shop using my affiliate link if you want to help me get a small percentage of the sale! If you would like to, click here.
I’ll be back soon with more inspiration!! Xx, Amanda
Hey friends! It’s that time again! A NEW RELEASE from Catherine Pooler is coming out!! Yippee!! And I get to share the Lovebirds Bundlewith you! Plus, the NEW INKS! I’m SOOO in love with this release!
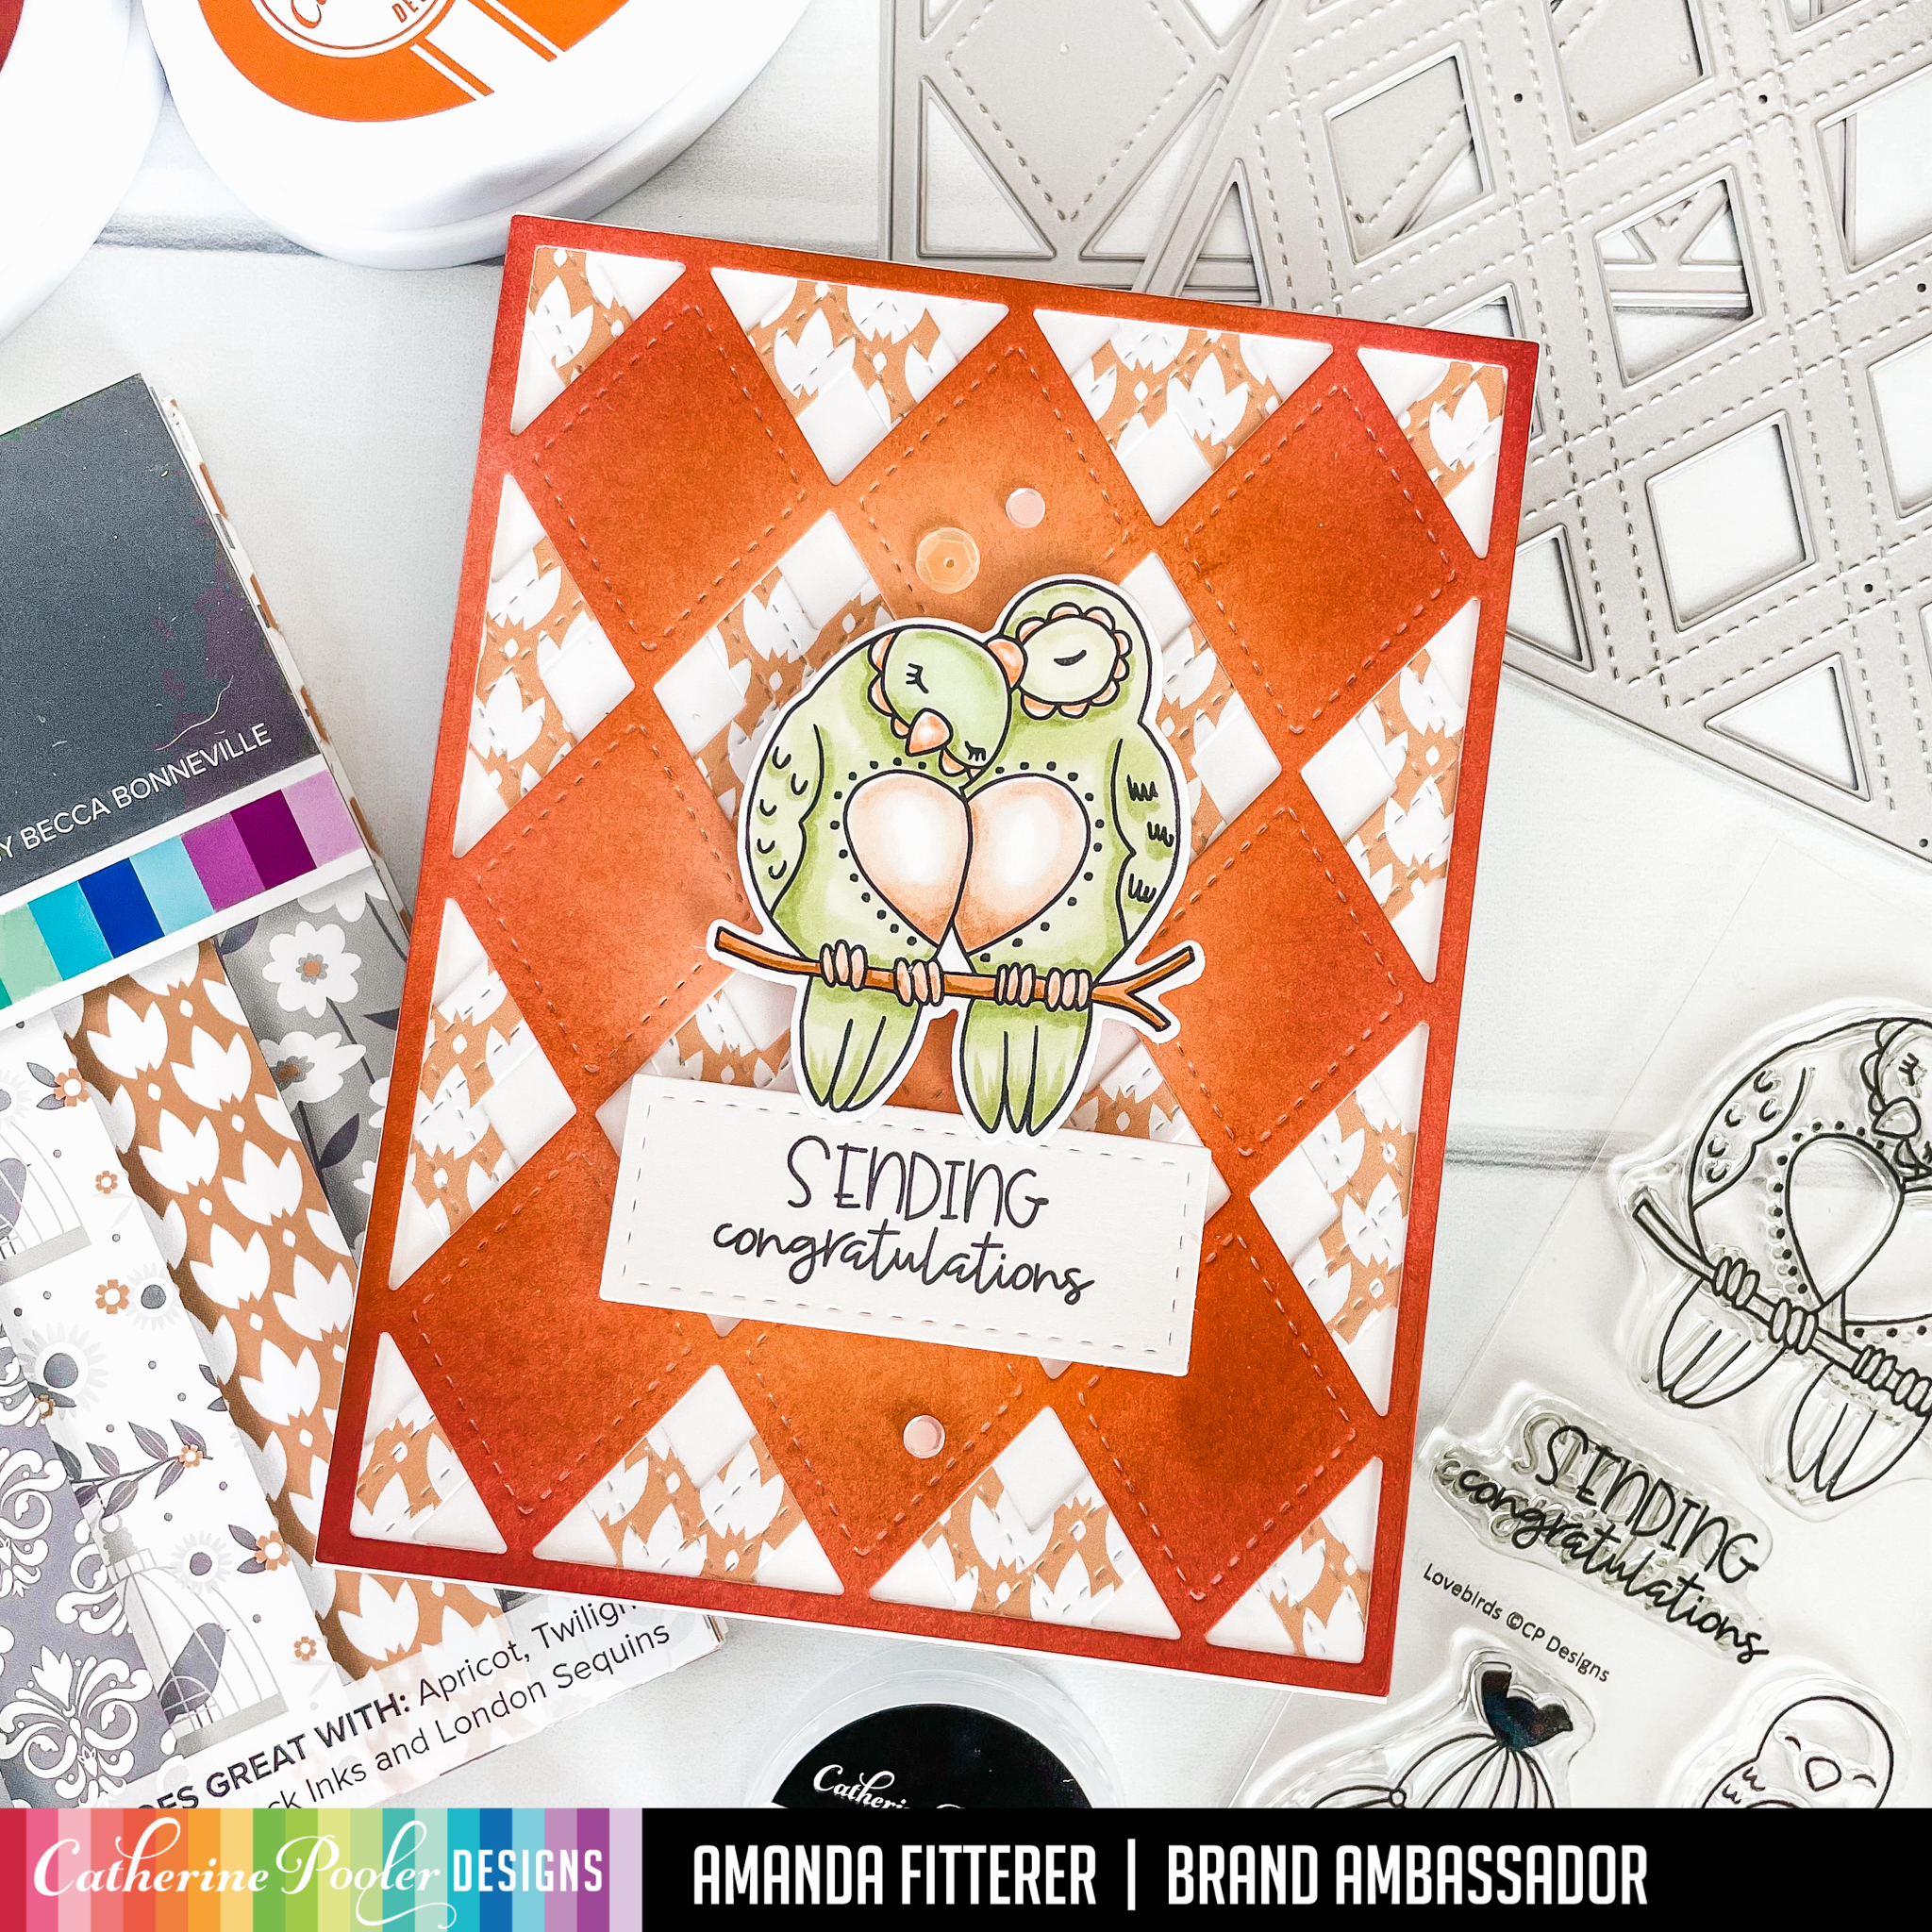
To make this card, I used the Stitch Your Diamonds Die on white cardstock. Then, I ink blended it with Apricot, Ginger, and Terracotta inks. For my background, I used a piece of the Twilight Reading paper and die cut it with the Cross Your X’s Die. I layered them on top of each other and adhered them with liquid glue to my card base.
I stamped my Lovebirds and sentiment with black ink and then used Copic markers to color them in. I cut them out using the coordinating dies. I added some London Mix sequins to finish the card off!
Can you tell how much I love this release?! You can start shopping the New Release on Tues, April 5th if you’re a StampNation member! Everyone else gets to start shopping on Weds, April 6th!
You can shop using my affiliate link if you want to help me get a small percentage of the sale! If you would like to, click here.
I’ll be back soon with more inspiration!! Xx, Amanda
Hey friends! It’s that time again! A NEW RELEASE from Catherine Pooler is coming out!! Yippee!! And I get to share the Lovebirds Bundlewith you! Plus, the NEW INKS! I’m SOOO in love with this release!
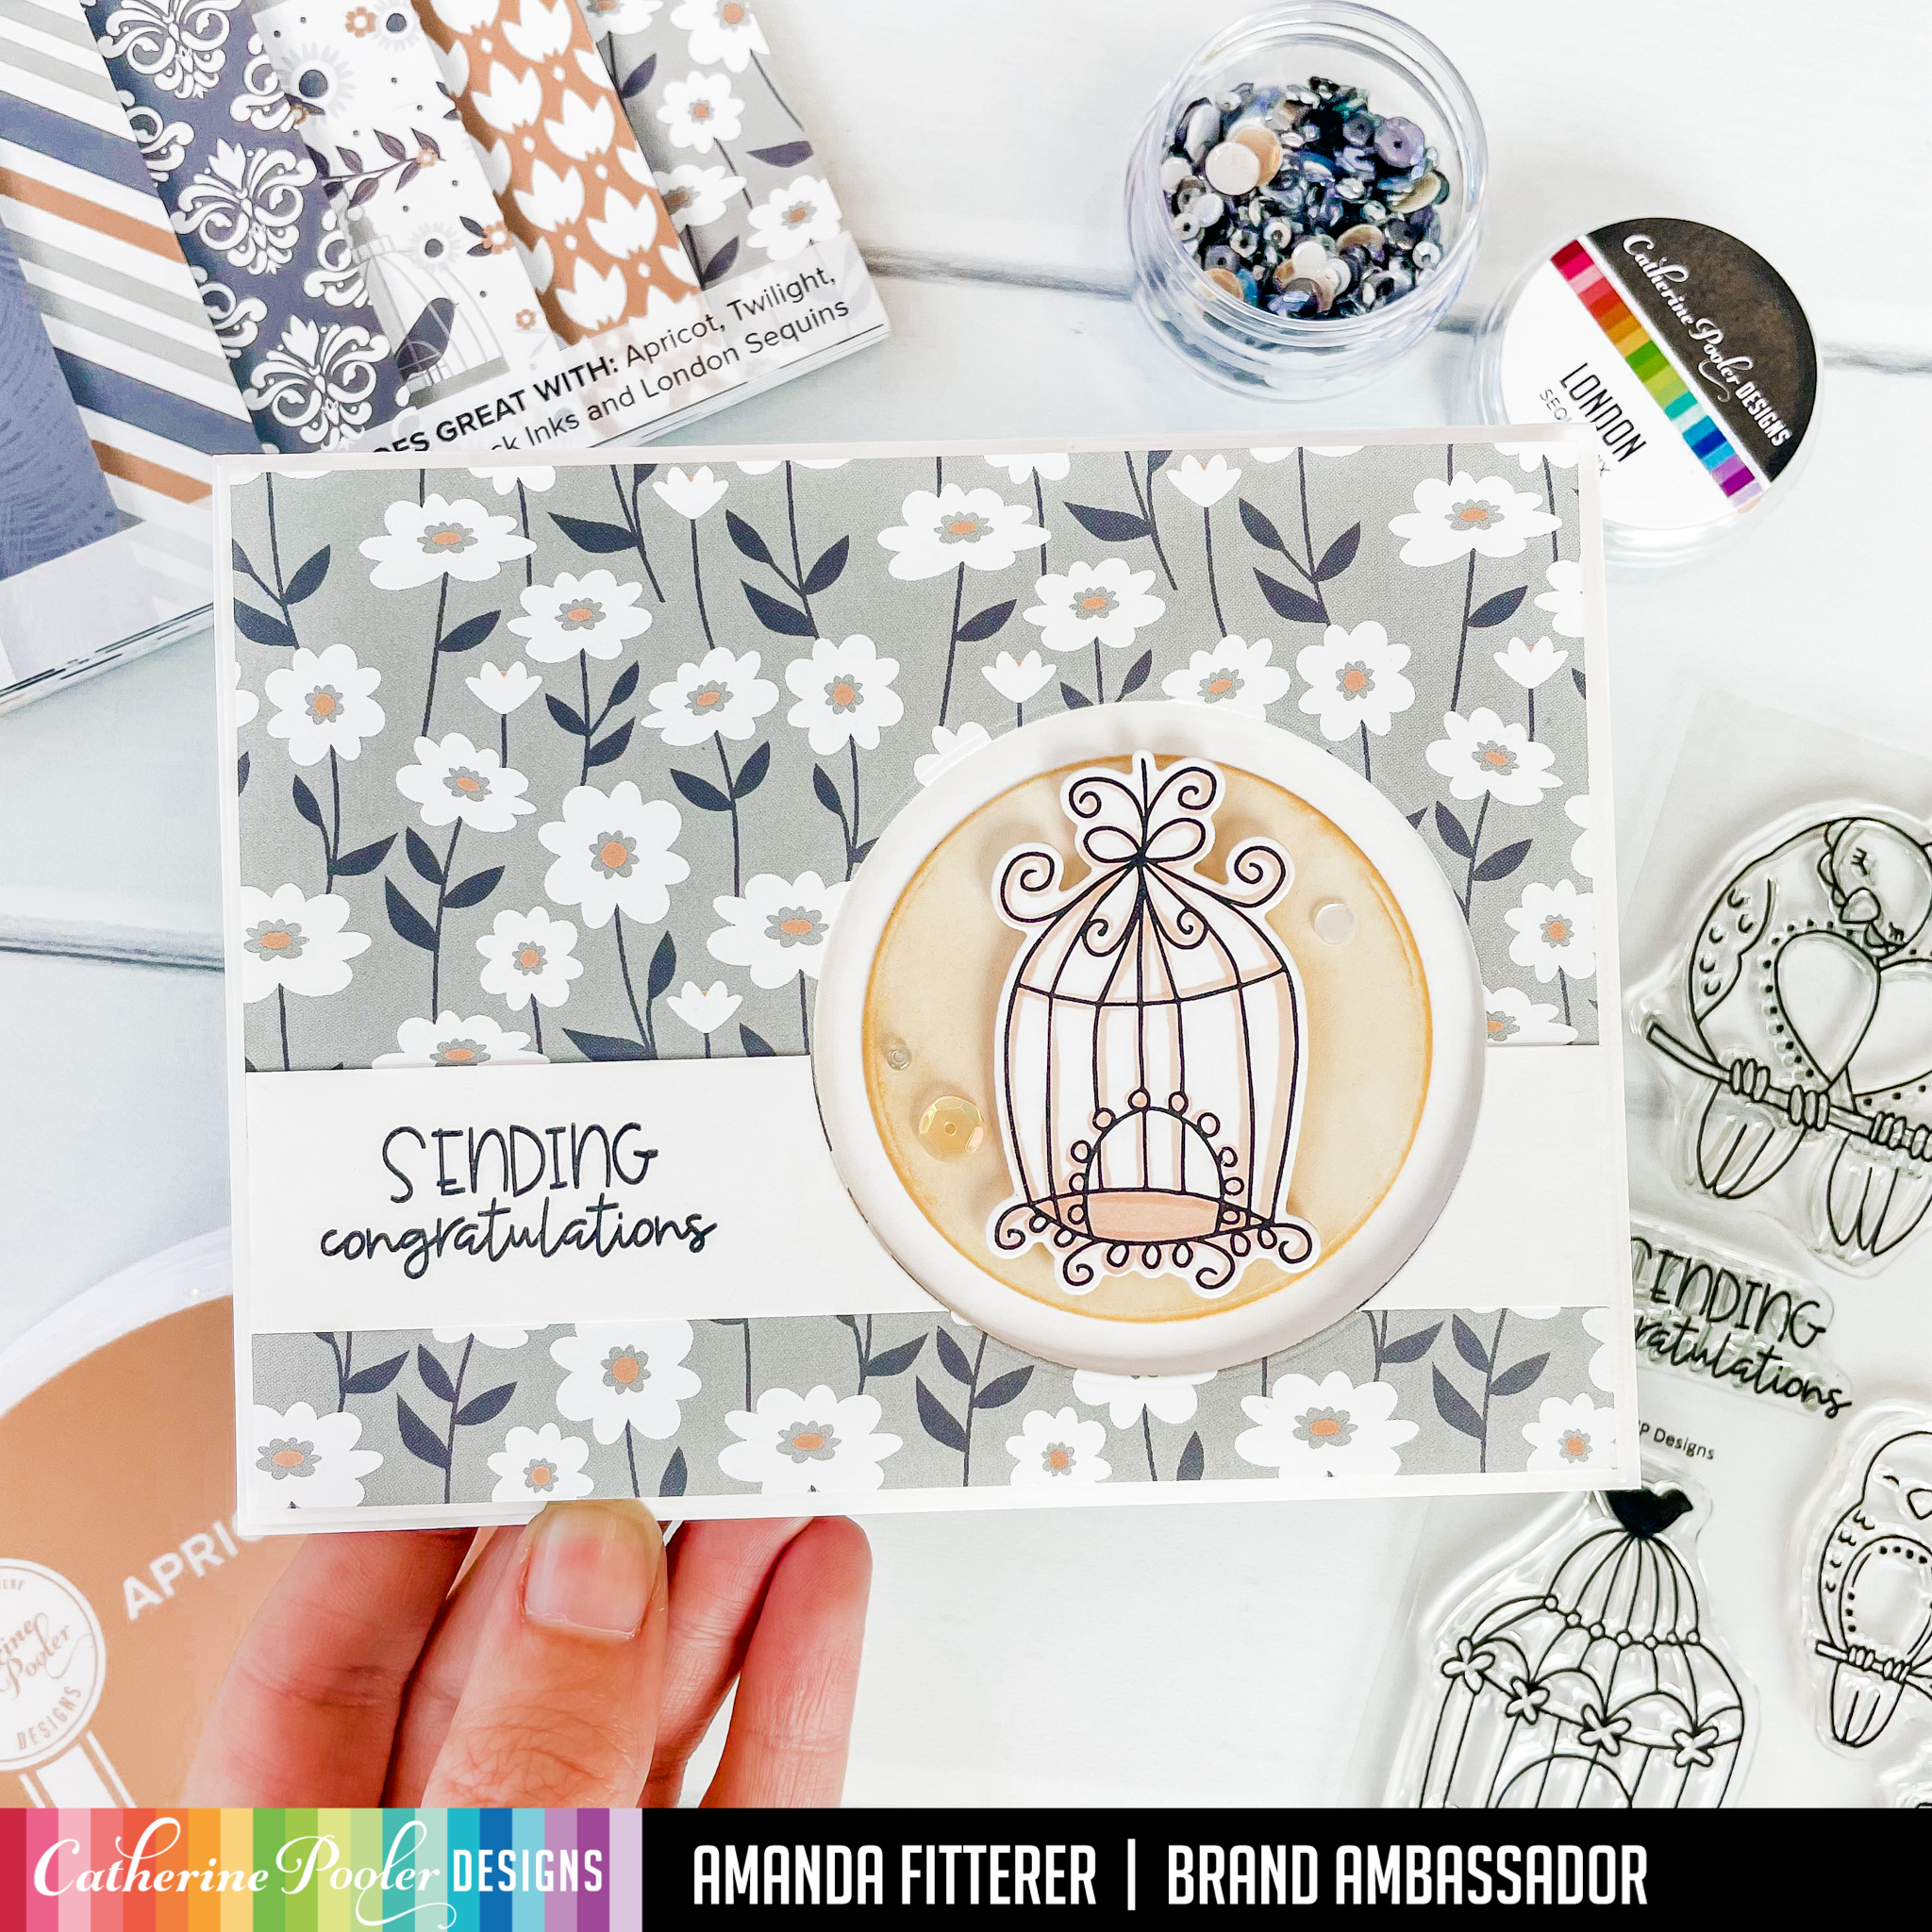
The first card I get to share with you showcase the new Twilight ReadingPaper Pack, the new Apricot Ink, and the new Lovebirds Stamp Set!
I used the Circle Dies to cut out a circle in the bottom right portion of my patterned paper. I blended my circle cutout with the new Apricot ink. I trimmed down a piece of white cardstock and used my circle die to remove that section of my white strip. I stamped my sentiment from the Lovebirds stamp set in the open space on the left side.
I stamped my birdcage with black ink and then used a Copic marker to lightly color it in. I propped my patterned paper up with 3D foam tape to create more dimension. I added some London Mix sequins to finish the card off!
Are you as excited about this release as I am?! You can start shopping the New Release on Tues, April 5th if you’re a StampNation member! Everyone else gets to start shopping on Weds, April 6th!
You can shop using my affiliate link if you want to help me get a small percentage of the sale! If you would like to, click here.
I’ll be back soon with more inspiration!! Xx, Amanda
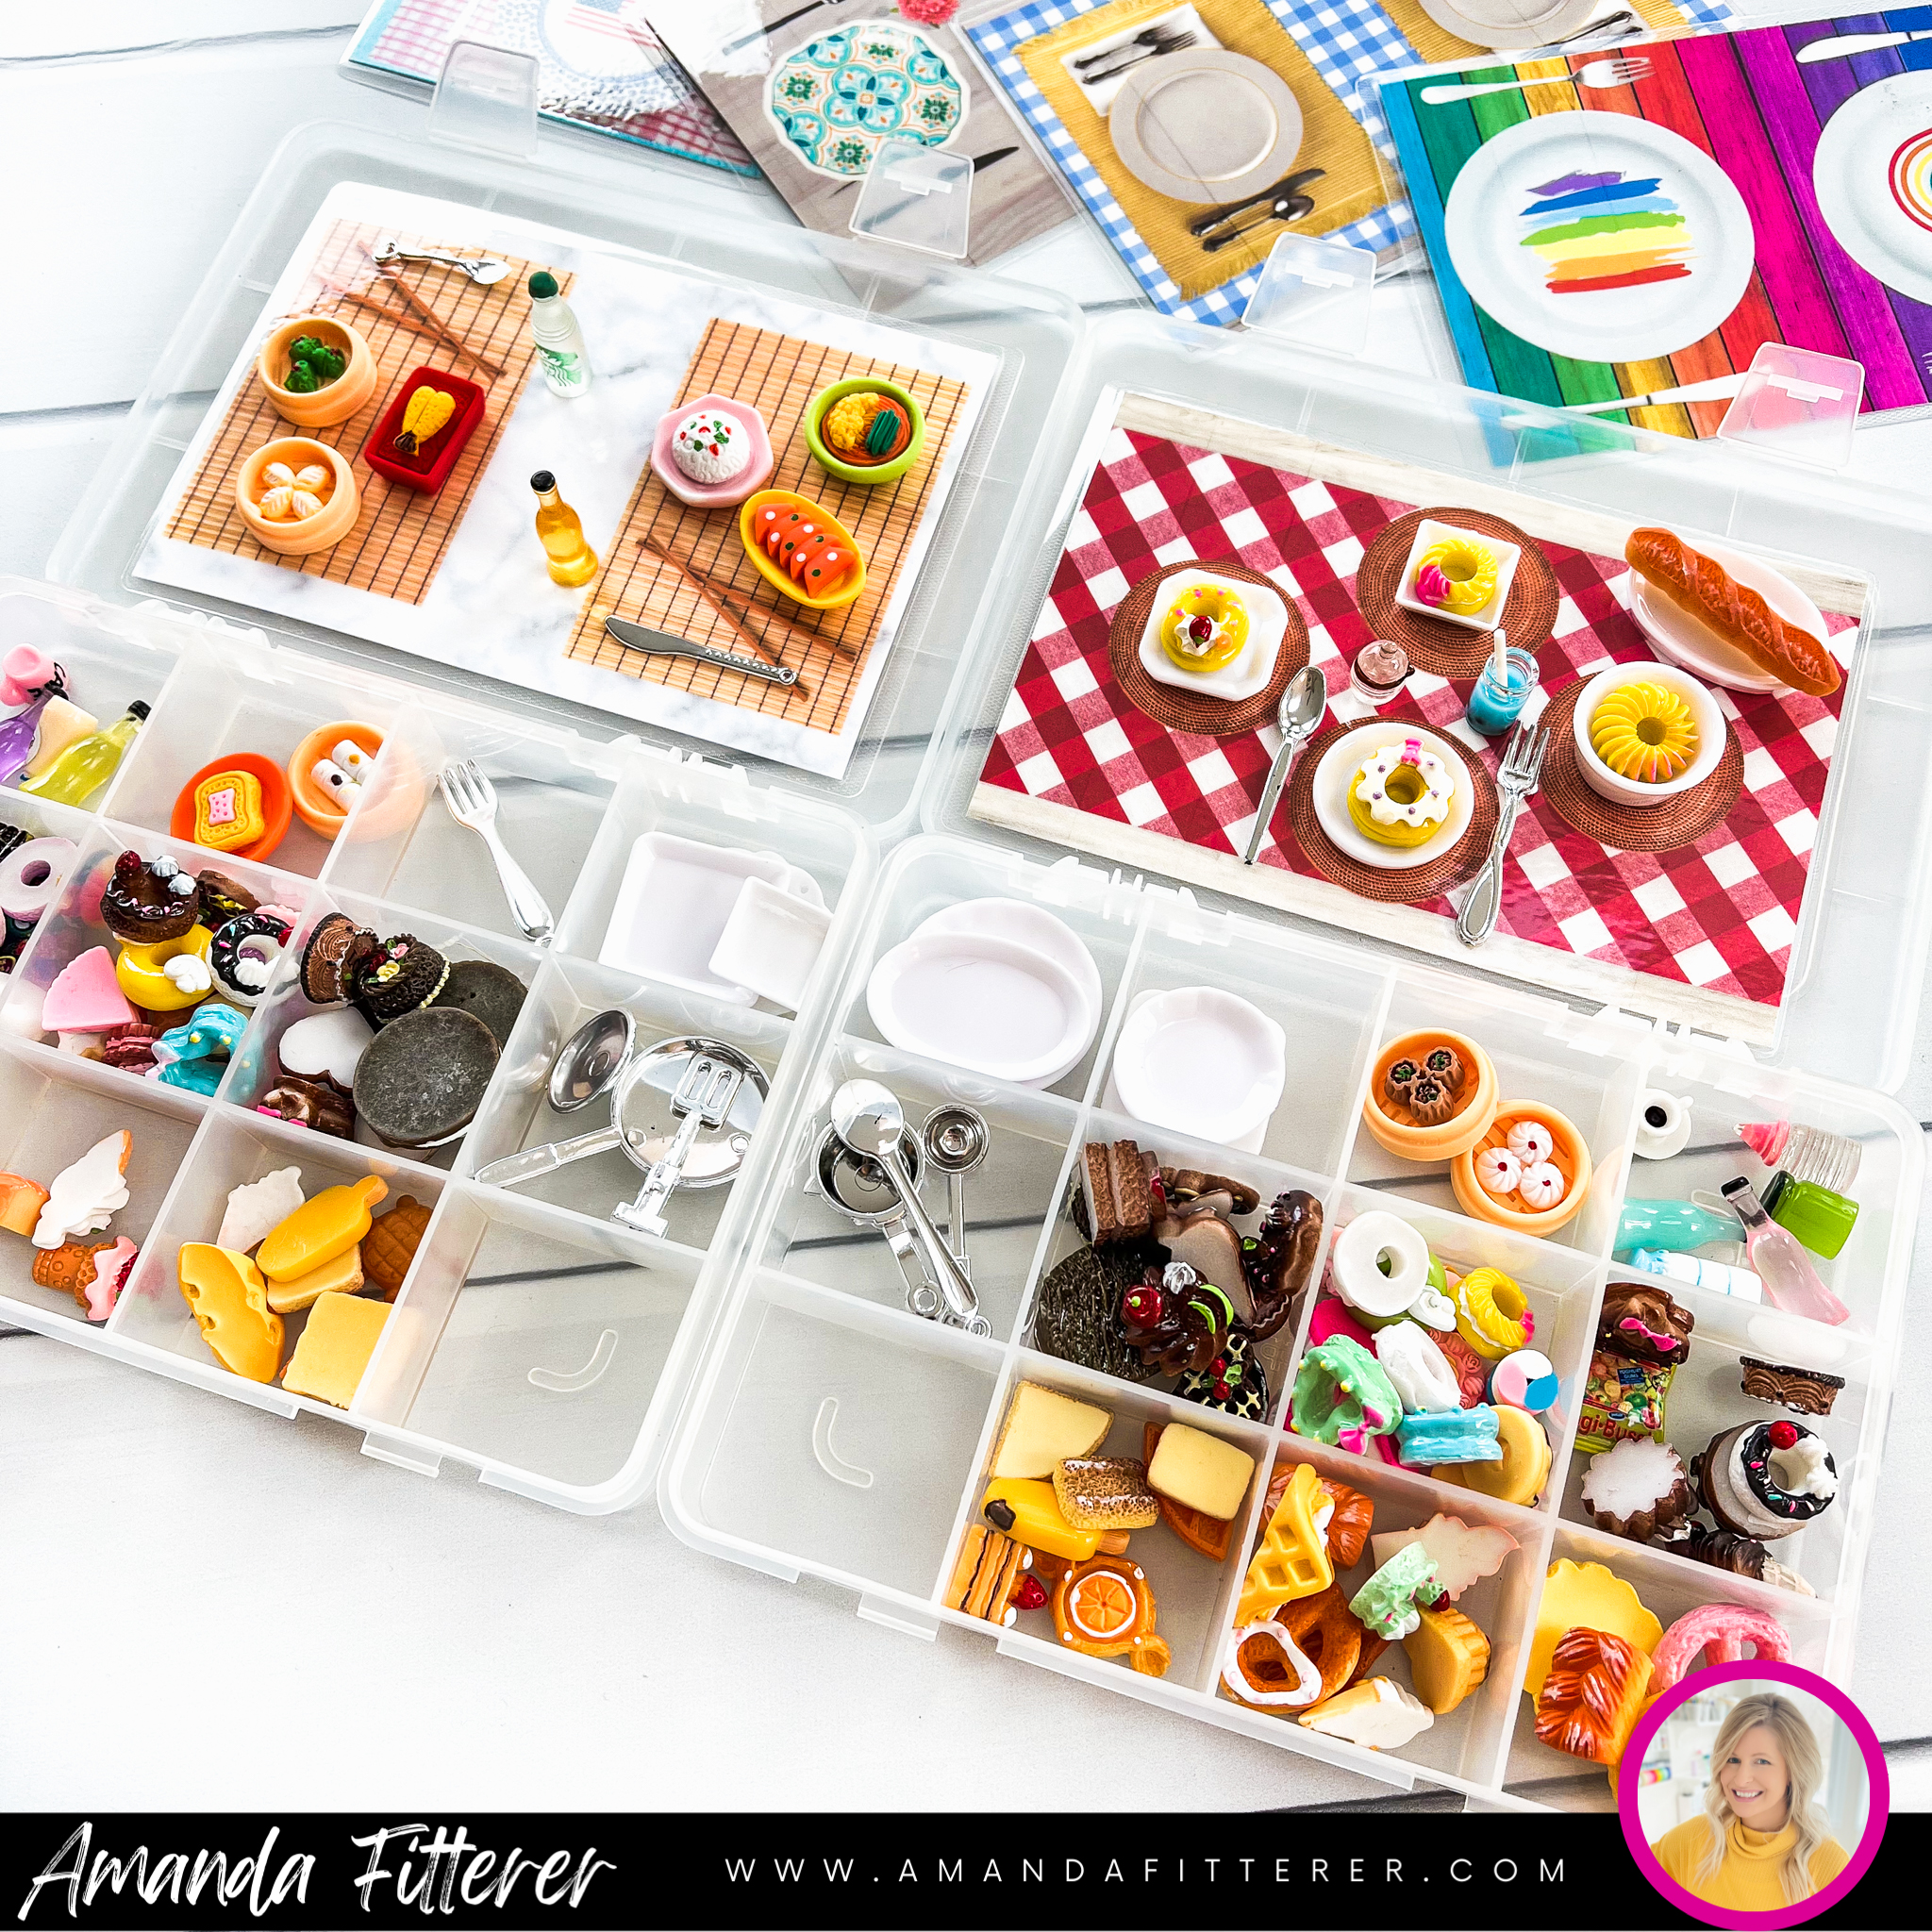
Hey friends! I have a different kind of post to share with you today! Spring Break is coming up and we have a 10 hour drive ahead of us! My little ones are 6 and 8 and need some car activities to keep them occupied. Finding unique travel toys for kids older than 3 seems to be quite the challenge!
So… I’ve created this Travel Size Play Food Kit for my kiddos using some crafty creativity! Want to make your own kit? I’ve got a FREE DOWNLOAD for you!
If you want to get notified of new posts in the future, I would LOVE it if you subscribed! I’m going to be doing some more DIY crafts for this trip coming up in the next few days!
Each kit contains 3 double-sided laminated “tables”, mini cutlery and dishes, and mini foods and drinks. (Anything mini is just THE CUTEST, isn’t it!?)
Here are the items you’ll need to make your own travel kits:
A laminator – the best (and cheapest!) is this one.
Laminating pouches – I like to have a variety on hand at all time, so I have this kit.
A printer – I have used this HP 8600 printer for the last 15 years! It is my absolute fav and prints up to 100# cardstock!!!
Cardstock or paper – I prefer cardstock for this project so that you can print on both sides. But you could use 8.5″x11″ computer paper and then put them back to back in your laminating pouch.
Printable Table settings – that’s where I’ve got your FREE DOWNLOAD! Click on the download button:
Instructions: 1. Gather all your supplies. 2. Print your table settings from your FREE DOWNLOAD. The instructions for printing are in your download. 3. Laminate your table settings to make them more durable and pretty! 3. Place all your supplies in your organizer (or let the kids help!) 4. ENJOY with your kiddos!
Here’s what they look like when they’re closed up! So portable and easy to travel with! (And, obviously, SO CUTE!)
There are some affiliate links in this post! I’d be so happy if you used them to make this project – it doesn’t cost you anything, but it allows me to get a small percentage of funds to help me make more stuff to share with you! THANK YOU!
Xx, Amanda
If you want to get notified of new posts in the future, I would LOVE it if you subscribed! I’m going to be doing some more DIY crafts for this trip coming up in the next few days!
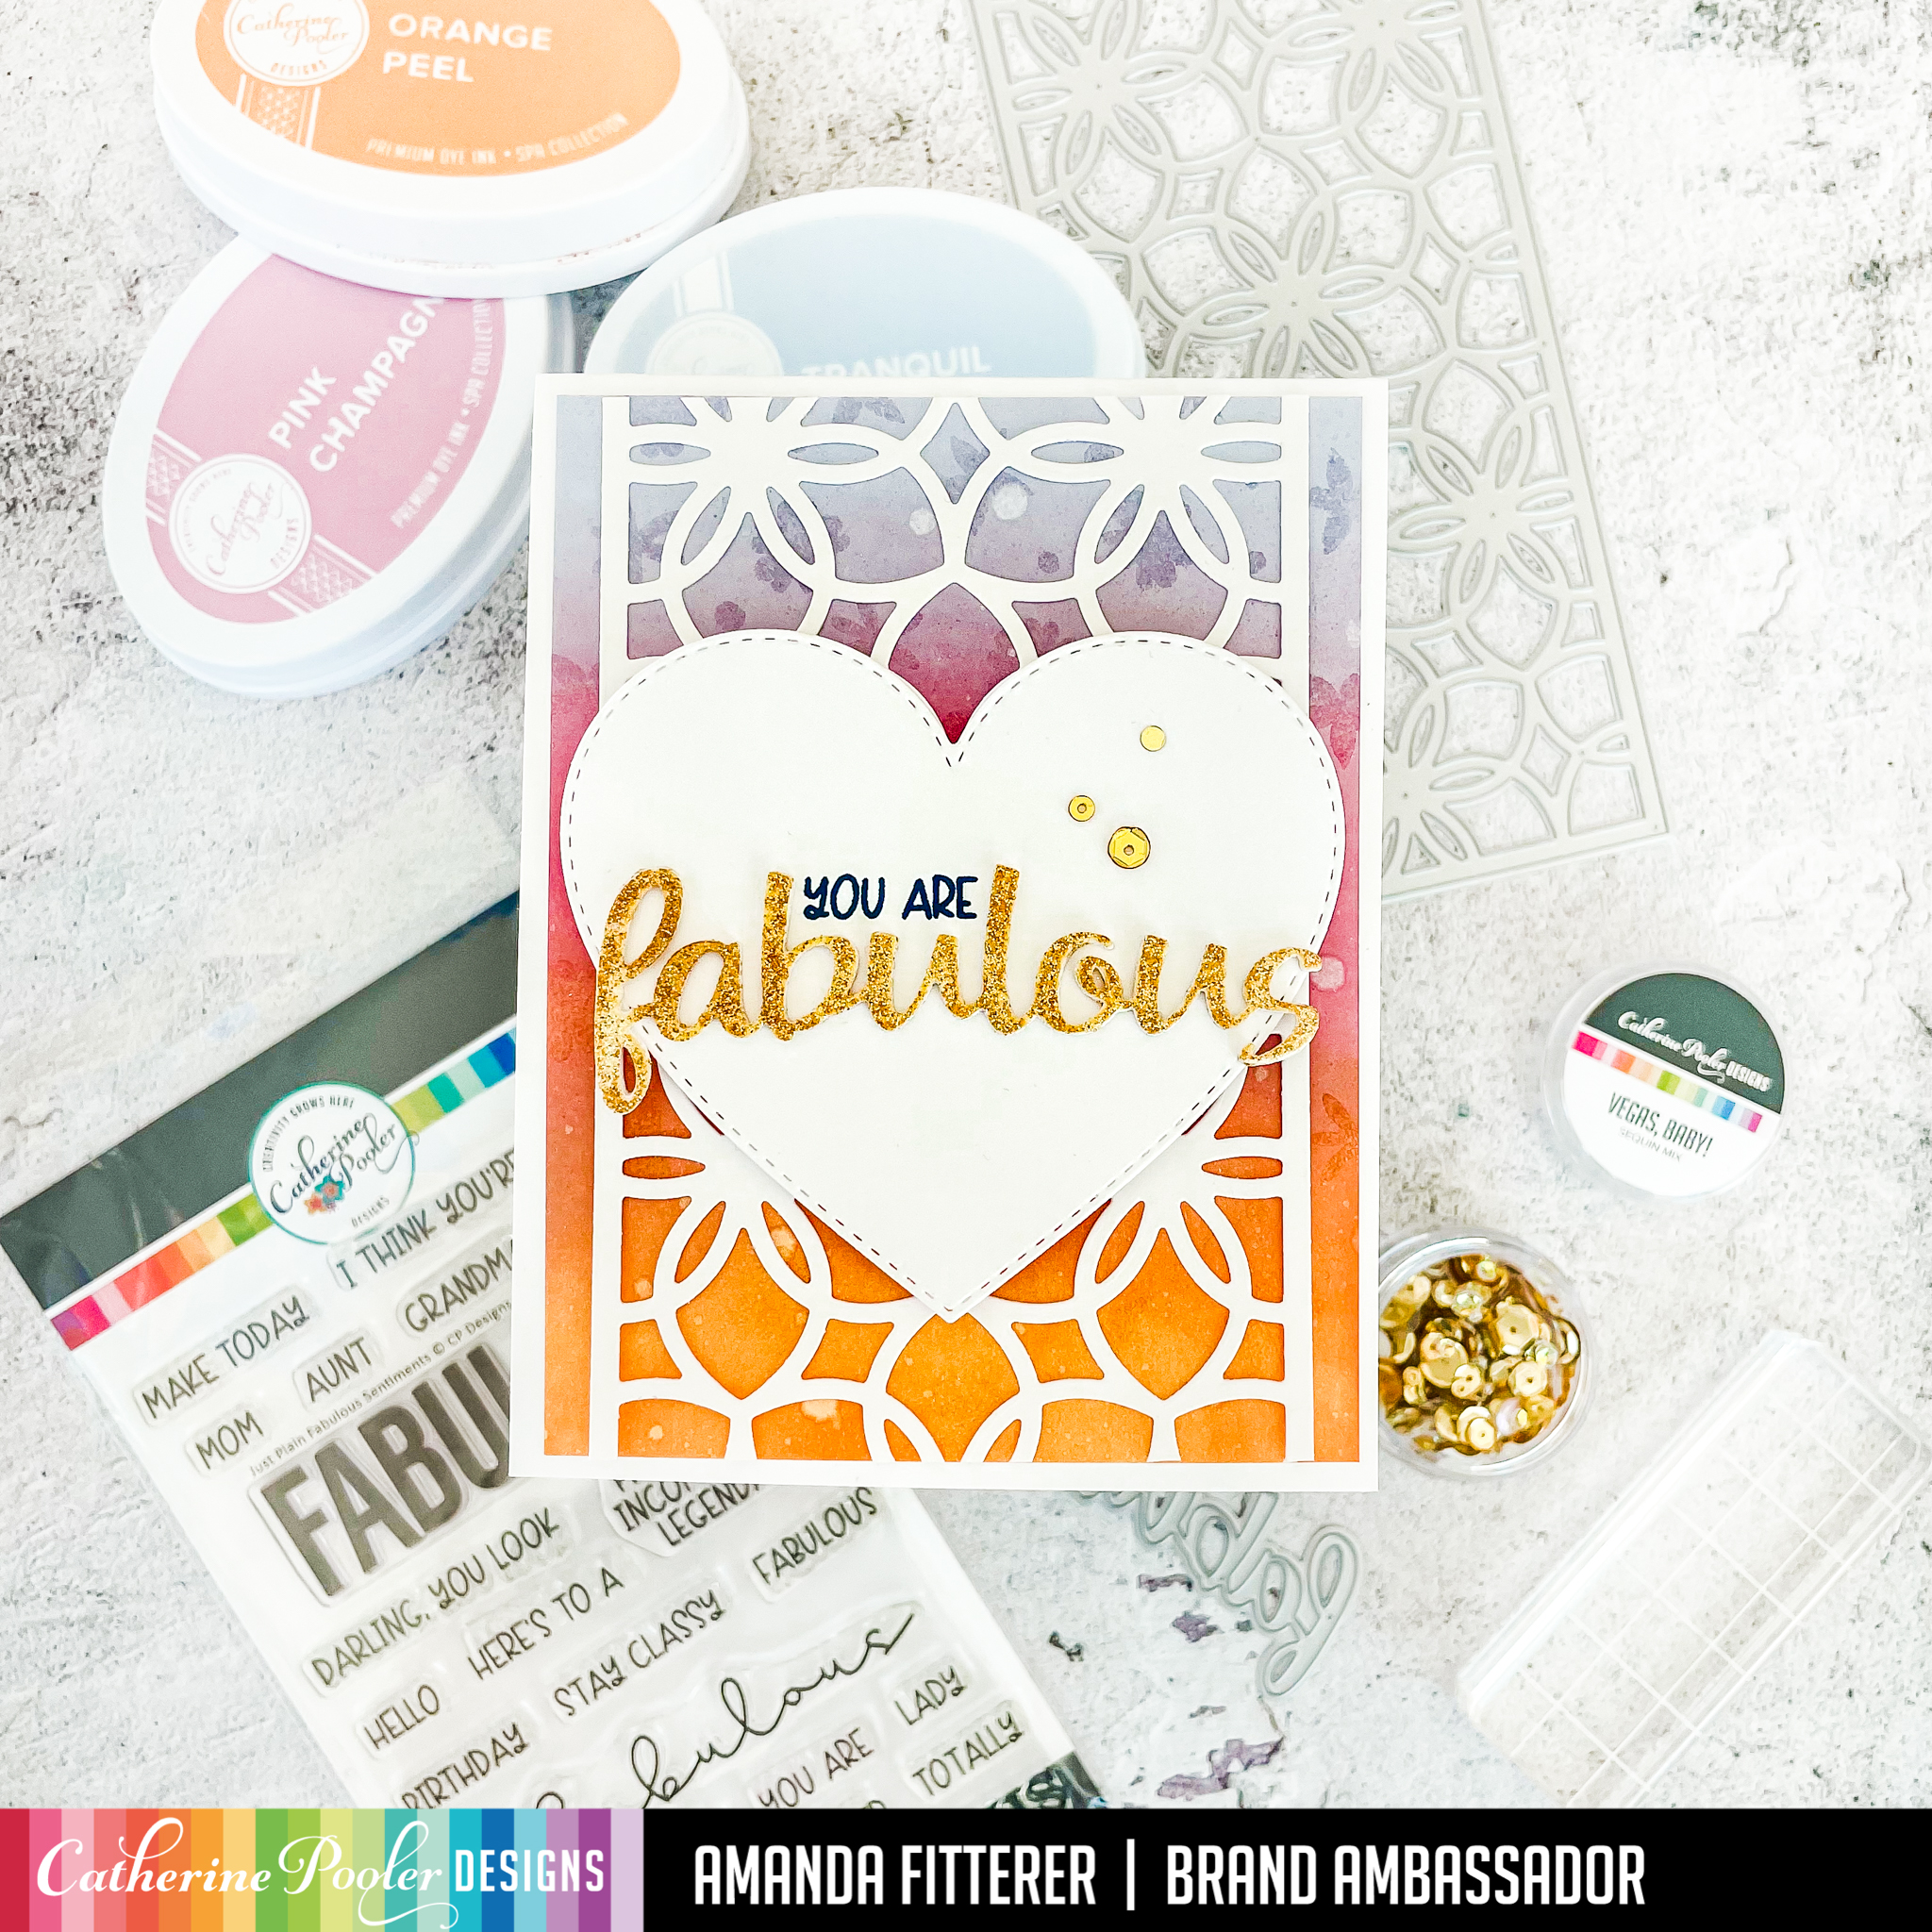
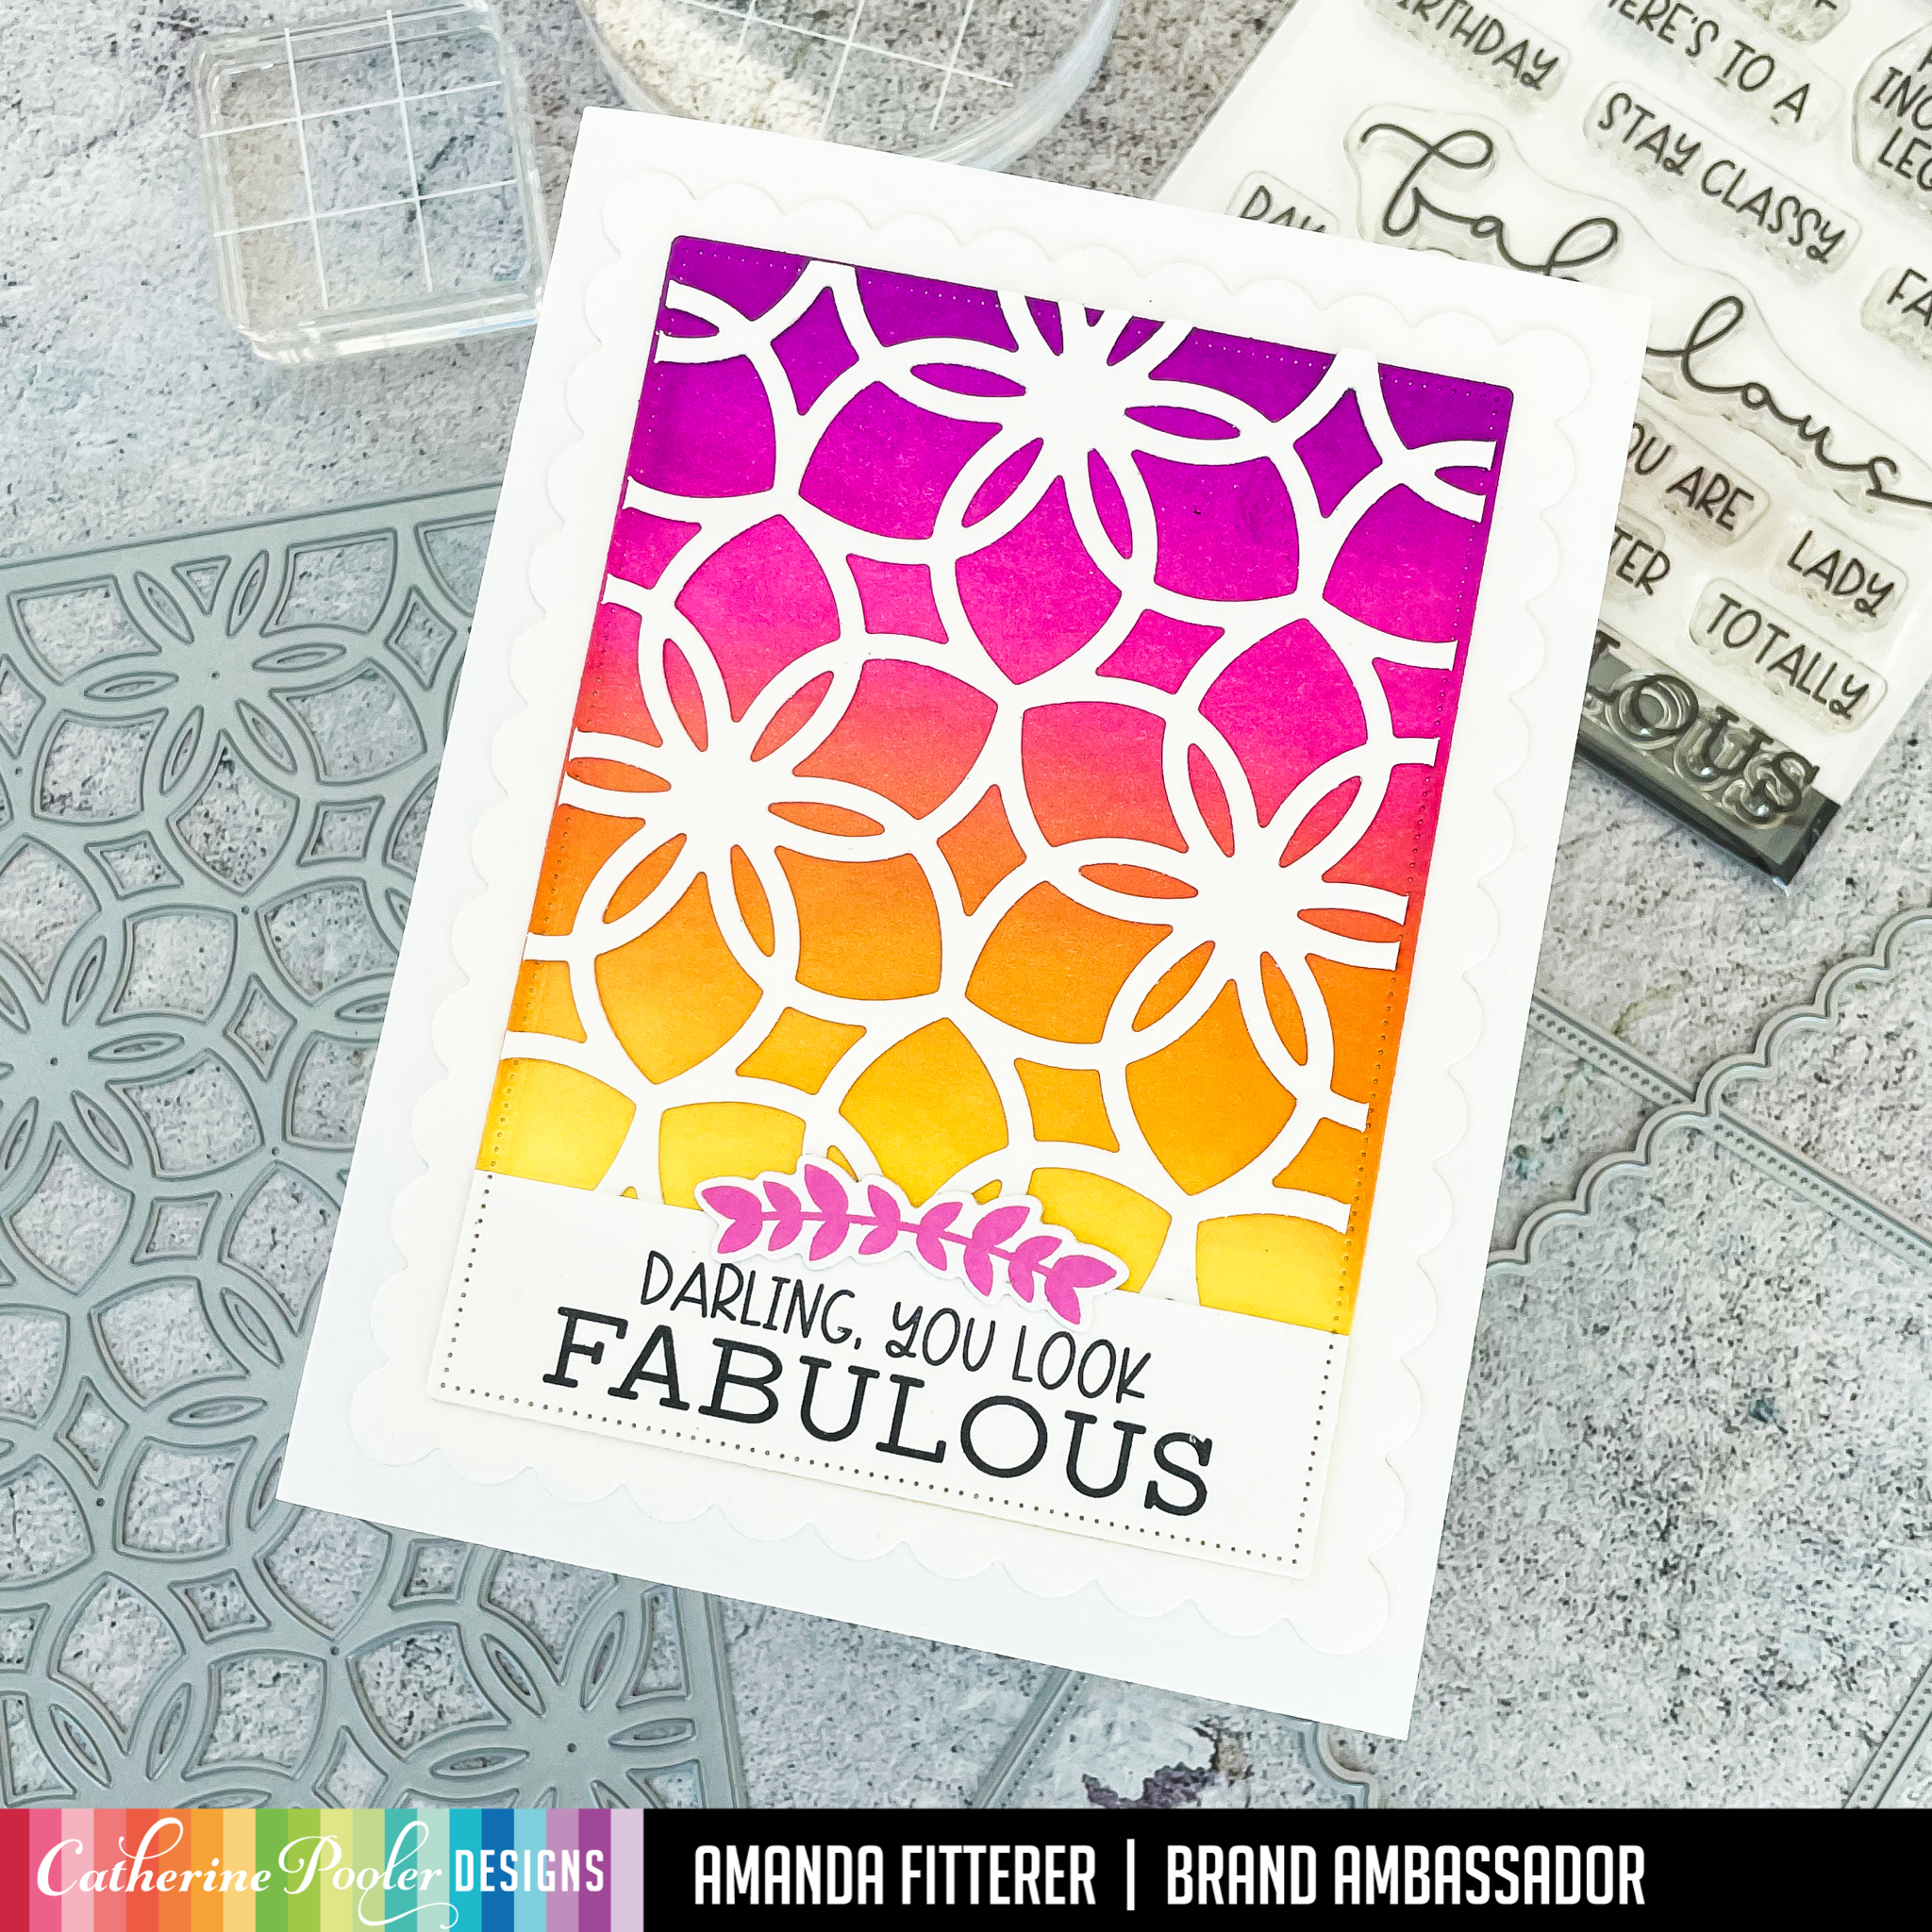
To make this card, I cut 4 of the Fabulous Word Die out of white cardstock.
I glued each of them on top of one another. Then I dabbed the die cut onto a Embossing Ink. I added Glitz Wow! Embossing Powder to it and then used a heat tool to melt the powder.
I ink blended Orange Peel, Pink Champagne, and Tranquil onto a piece of white cardstock. I die cut a panel using the Flower Power Slimline Die and then cut it down to fit onto my blended panel. I also die a Nested Stitched Heart out.
I used glue and 3D foam squares to adhere my card to my card base.
You can shop the new release using my affiliate link here or by clicking on the links in this post! It doesn’t cost you anything, but it does allow me to buy more crafty goodies to share more projects with you!
I hope you love this card as I much as I loved making it! Xx, Amanda
To choose my colors, I’m using the FREE Color Wheel download! I’ve ended up using Party Dress, It’s a Girl, Limoncello, Something Borrow, and Suede Shoes.
I stamped my sentiment from the Just Plain Fabulous Stamp Set on my white panel and stamped a smaller sentiment on black cardstock with Versamark Watermark ink and then added white embossing powder. After heat embossing with my heat tool, I trimmed my sentiment down and used a 3D foam strip to prop it up on in the center.
You can shop the new release using my affiliate link here or by clicking on the links in this post!
I cannot wait to share more cards showcasing this amazing release! See you back here soon!!! Xx, Amanda
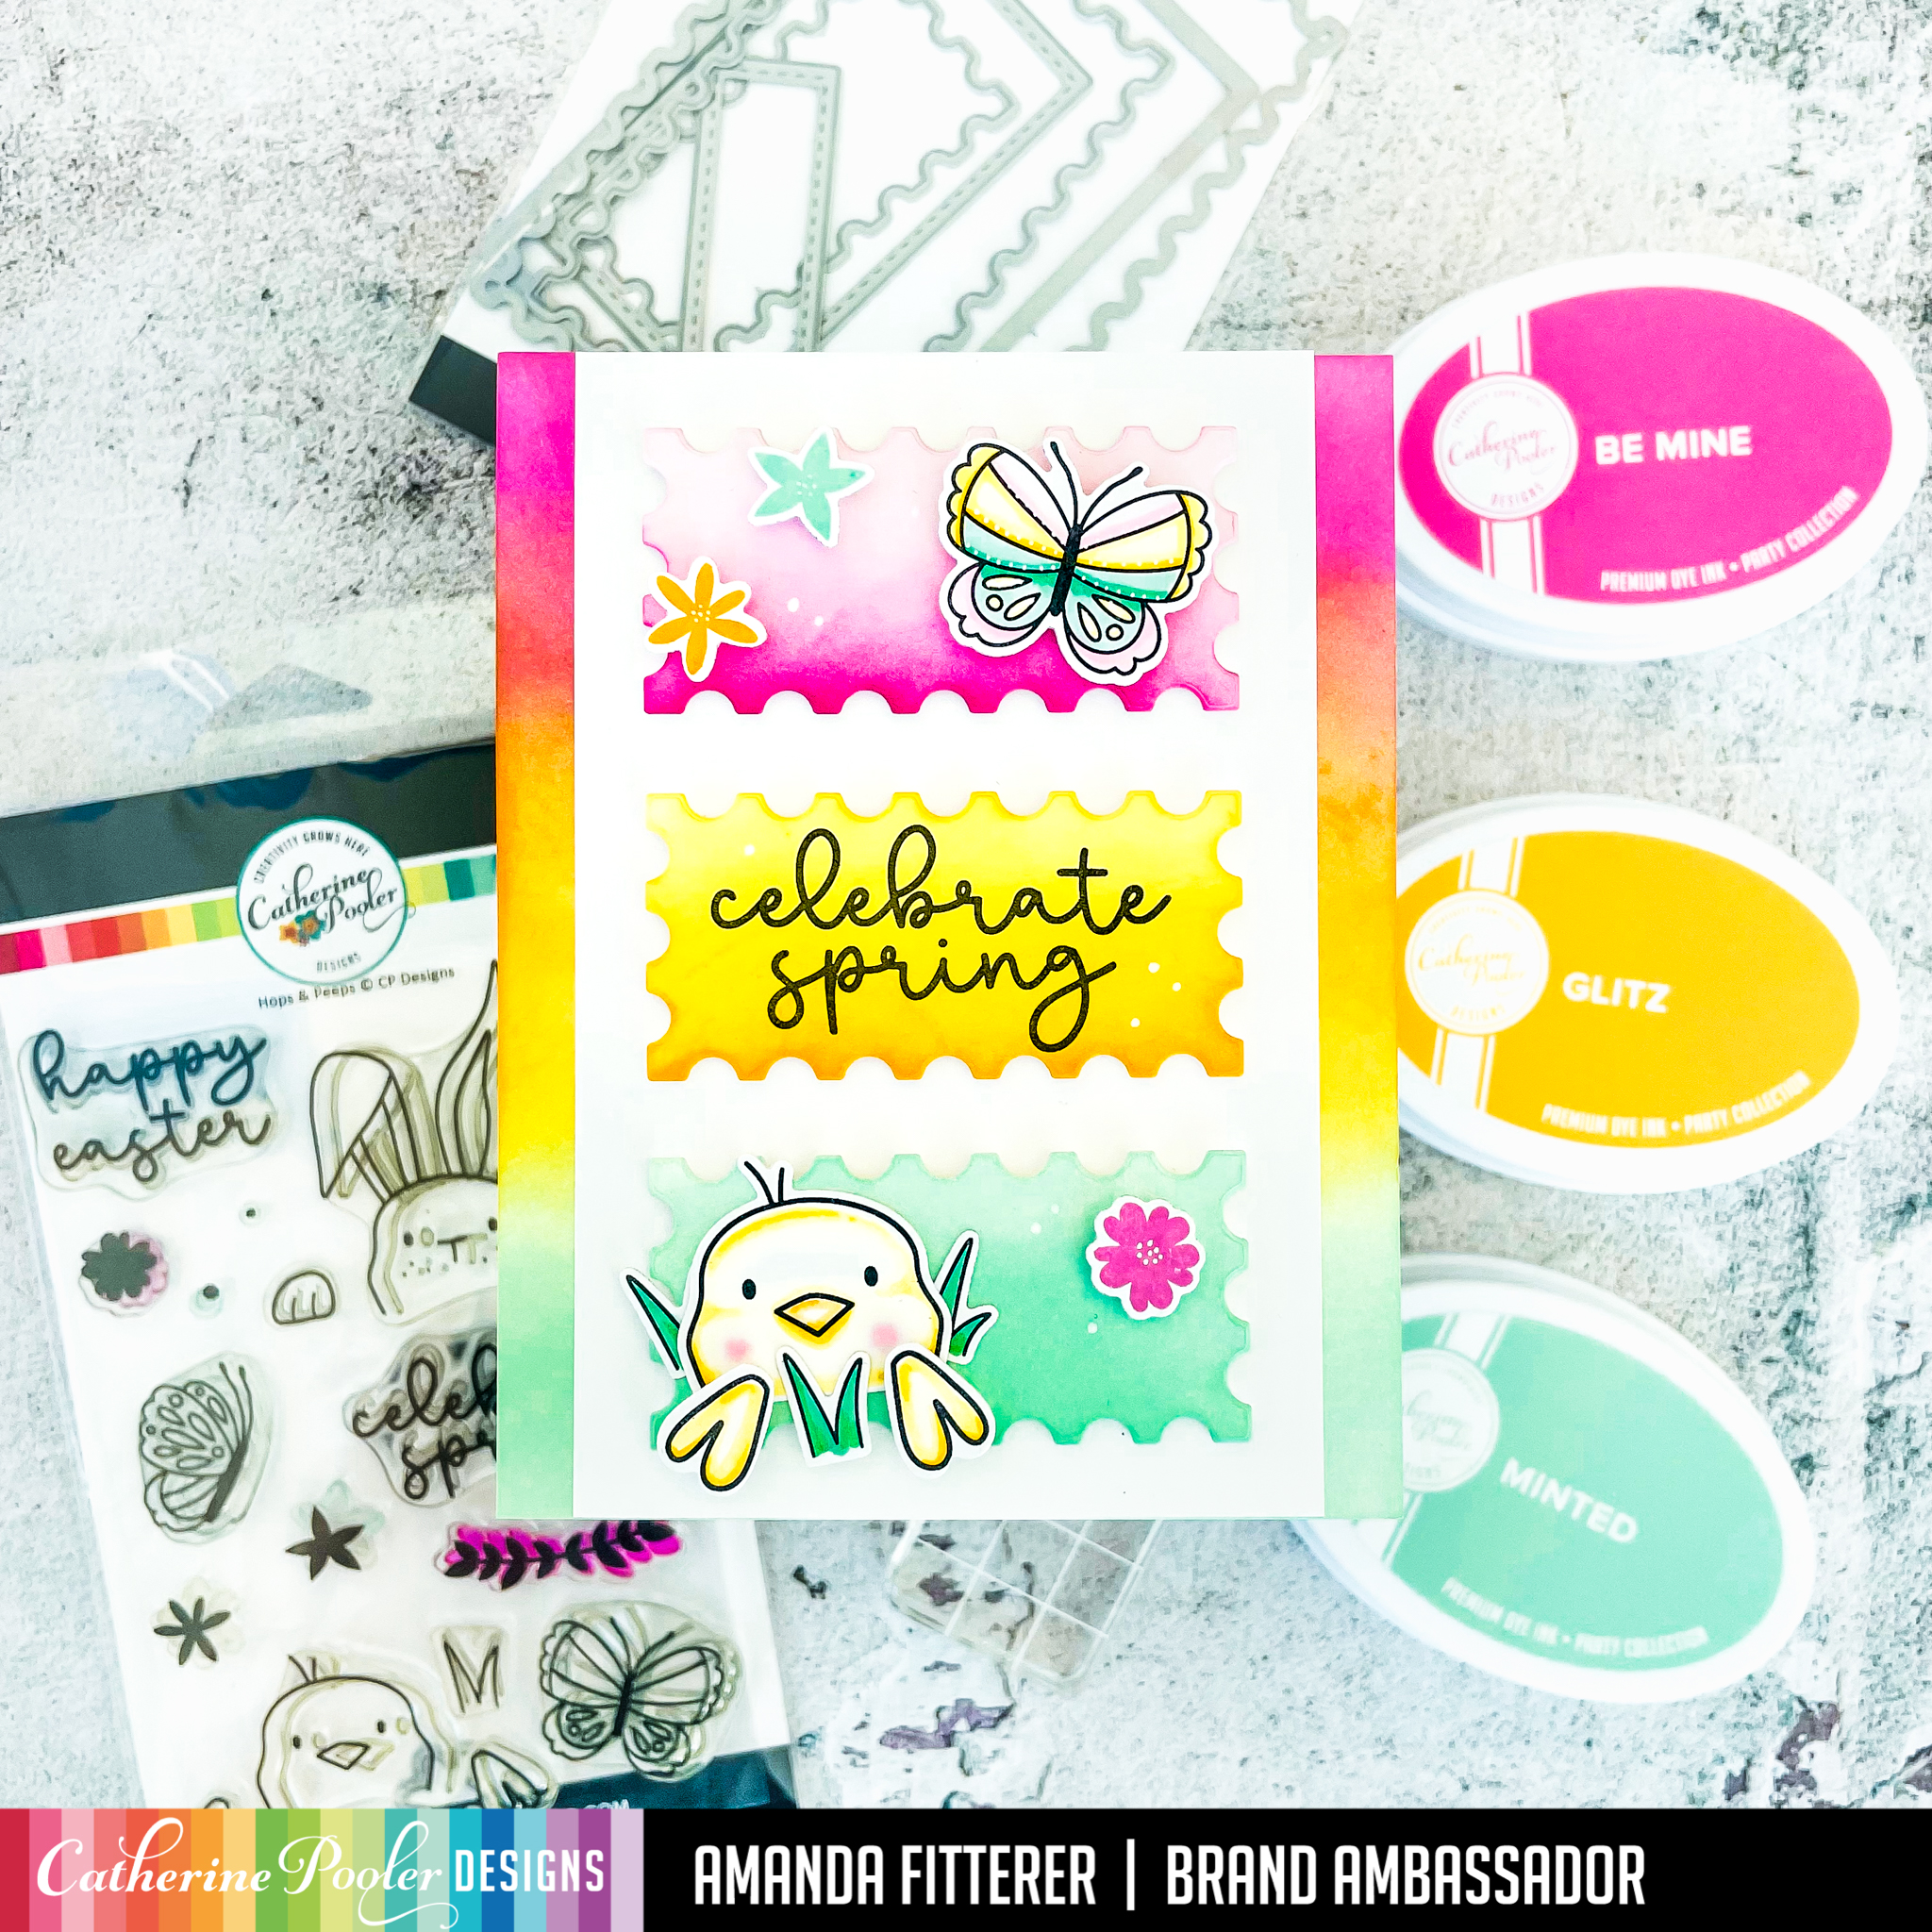
Hey crafty friends! Are you a StampNation member?! If so, you can buy this release Celebrate Spring Release NOW! If you’re not, that’s ok! You can purchase starting tomorrow!
I die cut 3 of the small Notecard Postage Dies and then ink blended them with Be Mine, Glitz, and Minted. I used the same colors to blend my background.
I stamped my Hops & Peeps Stamp Set images out, colored them with Copic markers, and then die cut them with the coordinating dies. I propped everything up with 3D foam squares!
The new Celebrate Spring Release will be available to StampNation members TODAY at Noon EST! For everyone else, you can purchase starting Weds 3/9/22 at 9 AM EST!
You can shop the new release using my affiliate link here or by clicking on the links in this post!
I cannot wait to share more cards showcasing this amazing release! See you back here soon!!! Xx, Amanda
I cut out my layers using the Scallops & Dots Dies. I ink blended Flirty Fuchsia, Pucker Up, Tiki Torch, and Limoncello on my dotted layer. I cut out my Flower Power Slimline Die in white cardstock and then trimmed it to the same dimensions as my ink blended layer. I also cut a small panel of white using the dotted layer for my sentiment.
The new Celebrate Spring Release will be available to StampNation members TOMORROW 3/8/22 at Noon EST! For everyone else, you can purchase starting Weds 3/9/22 at 9 AM EST!
You can shop the new release using my affiliate link here or by clicking on the links in this post!
I cannot wait to share more cards showcasing this amazing release! See you back here soon!!! Xx, Amanda
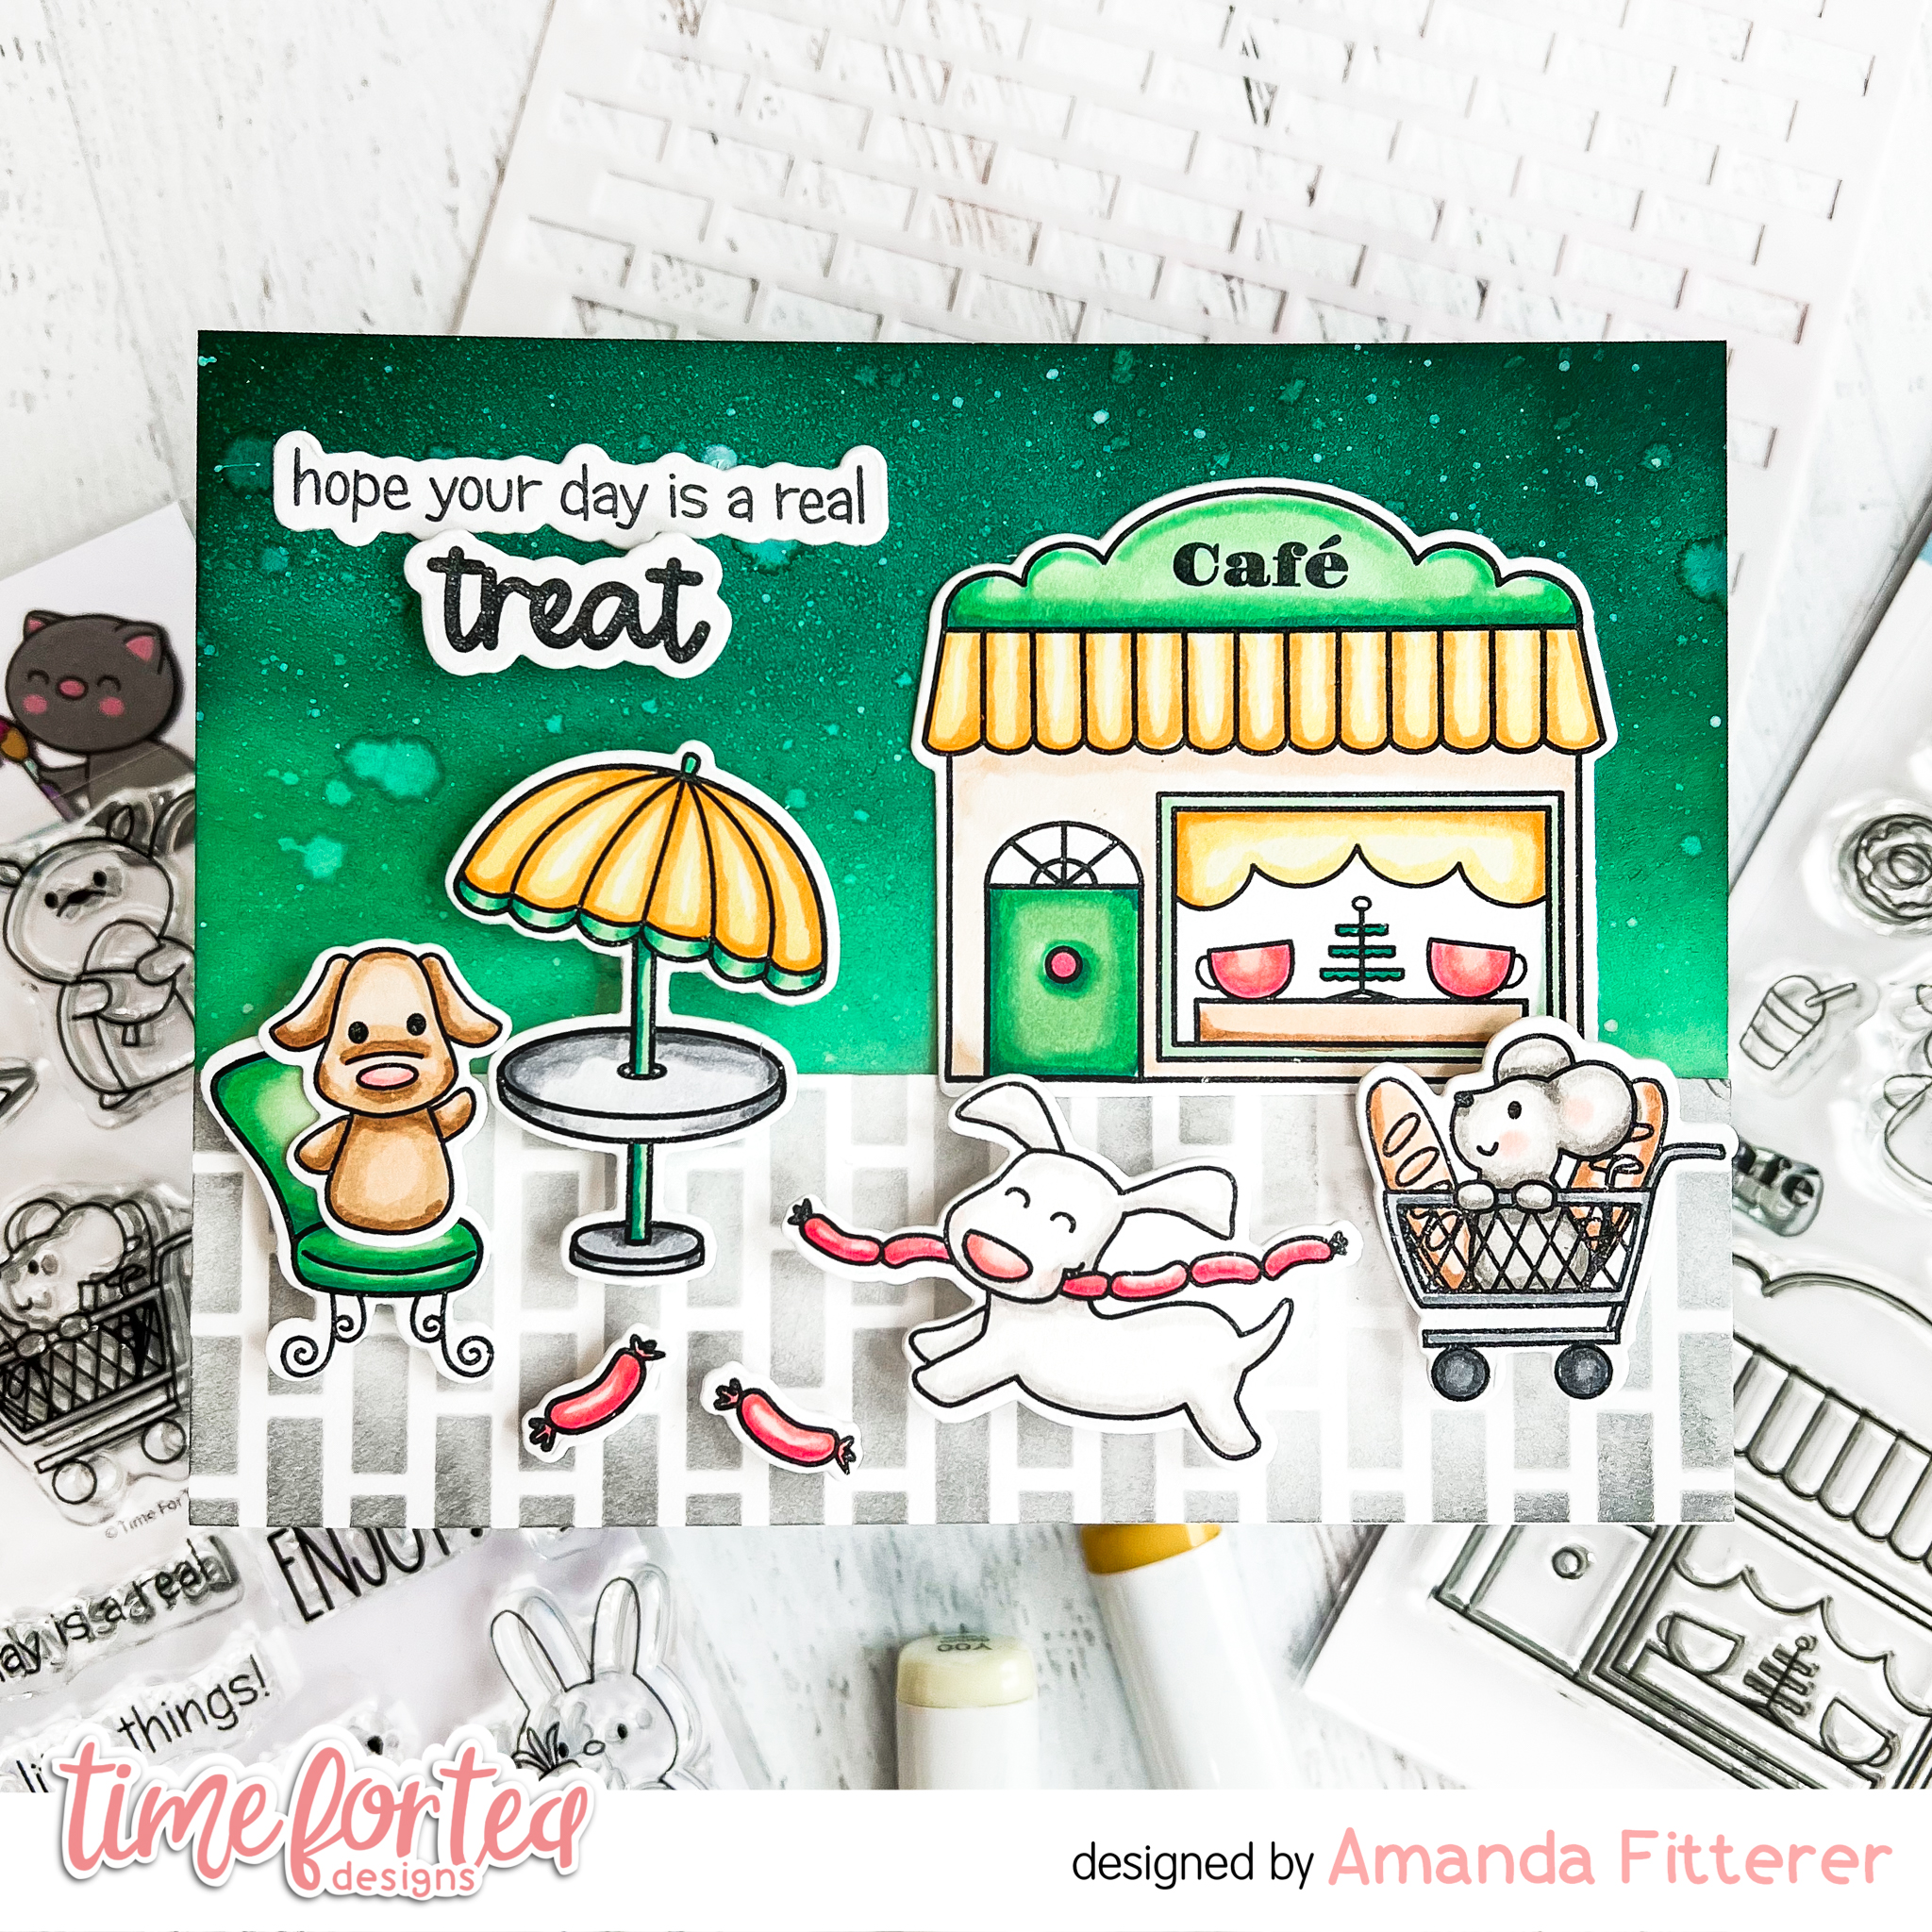
While waiting for that to dry, I cut a panel of white cardstock for the ground. I used the Tiled Wall Stencil and Twilight ink to create little pavestones.
Next, I stamped my images from the Enjoy the Little Things and Cafe Critters stamp sets, colored them with Copic markers, and then cut them out using the coordinating dies.
Finally, I assembled my card using liquid glue and 3D foam squares.
Thank you so much for stopping by my blog today! Please feel free to use any of the affiliate links below to purchase these cuties! It won’t cost you anything, but it WILL help fund my crafting addiction! :). Xx, Amanda
Welcome to the Heffy Doodle and Time for Tea Collaboration Blog Hop! Design Team members from both companies are sharing inspiration using products from both companies!
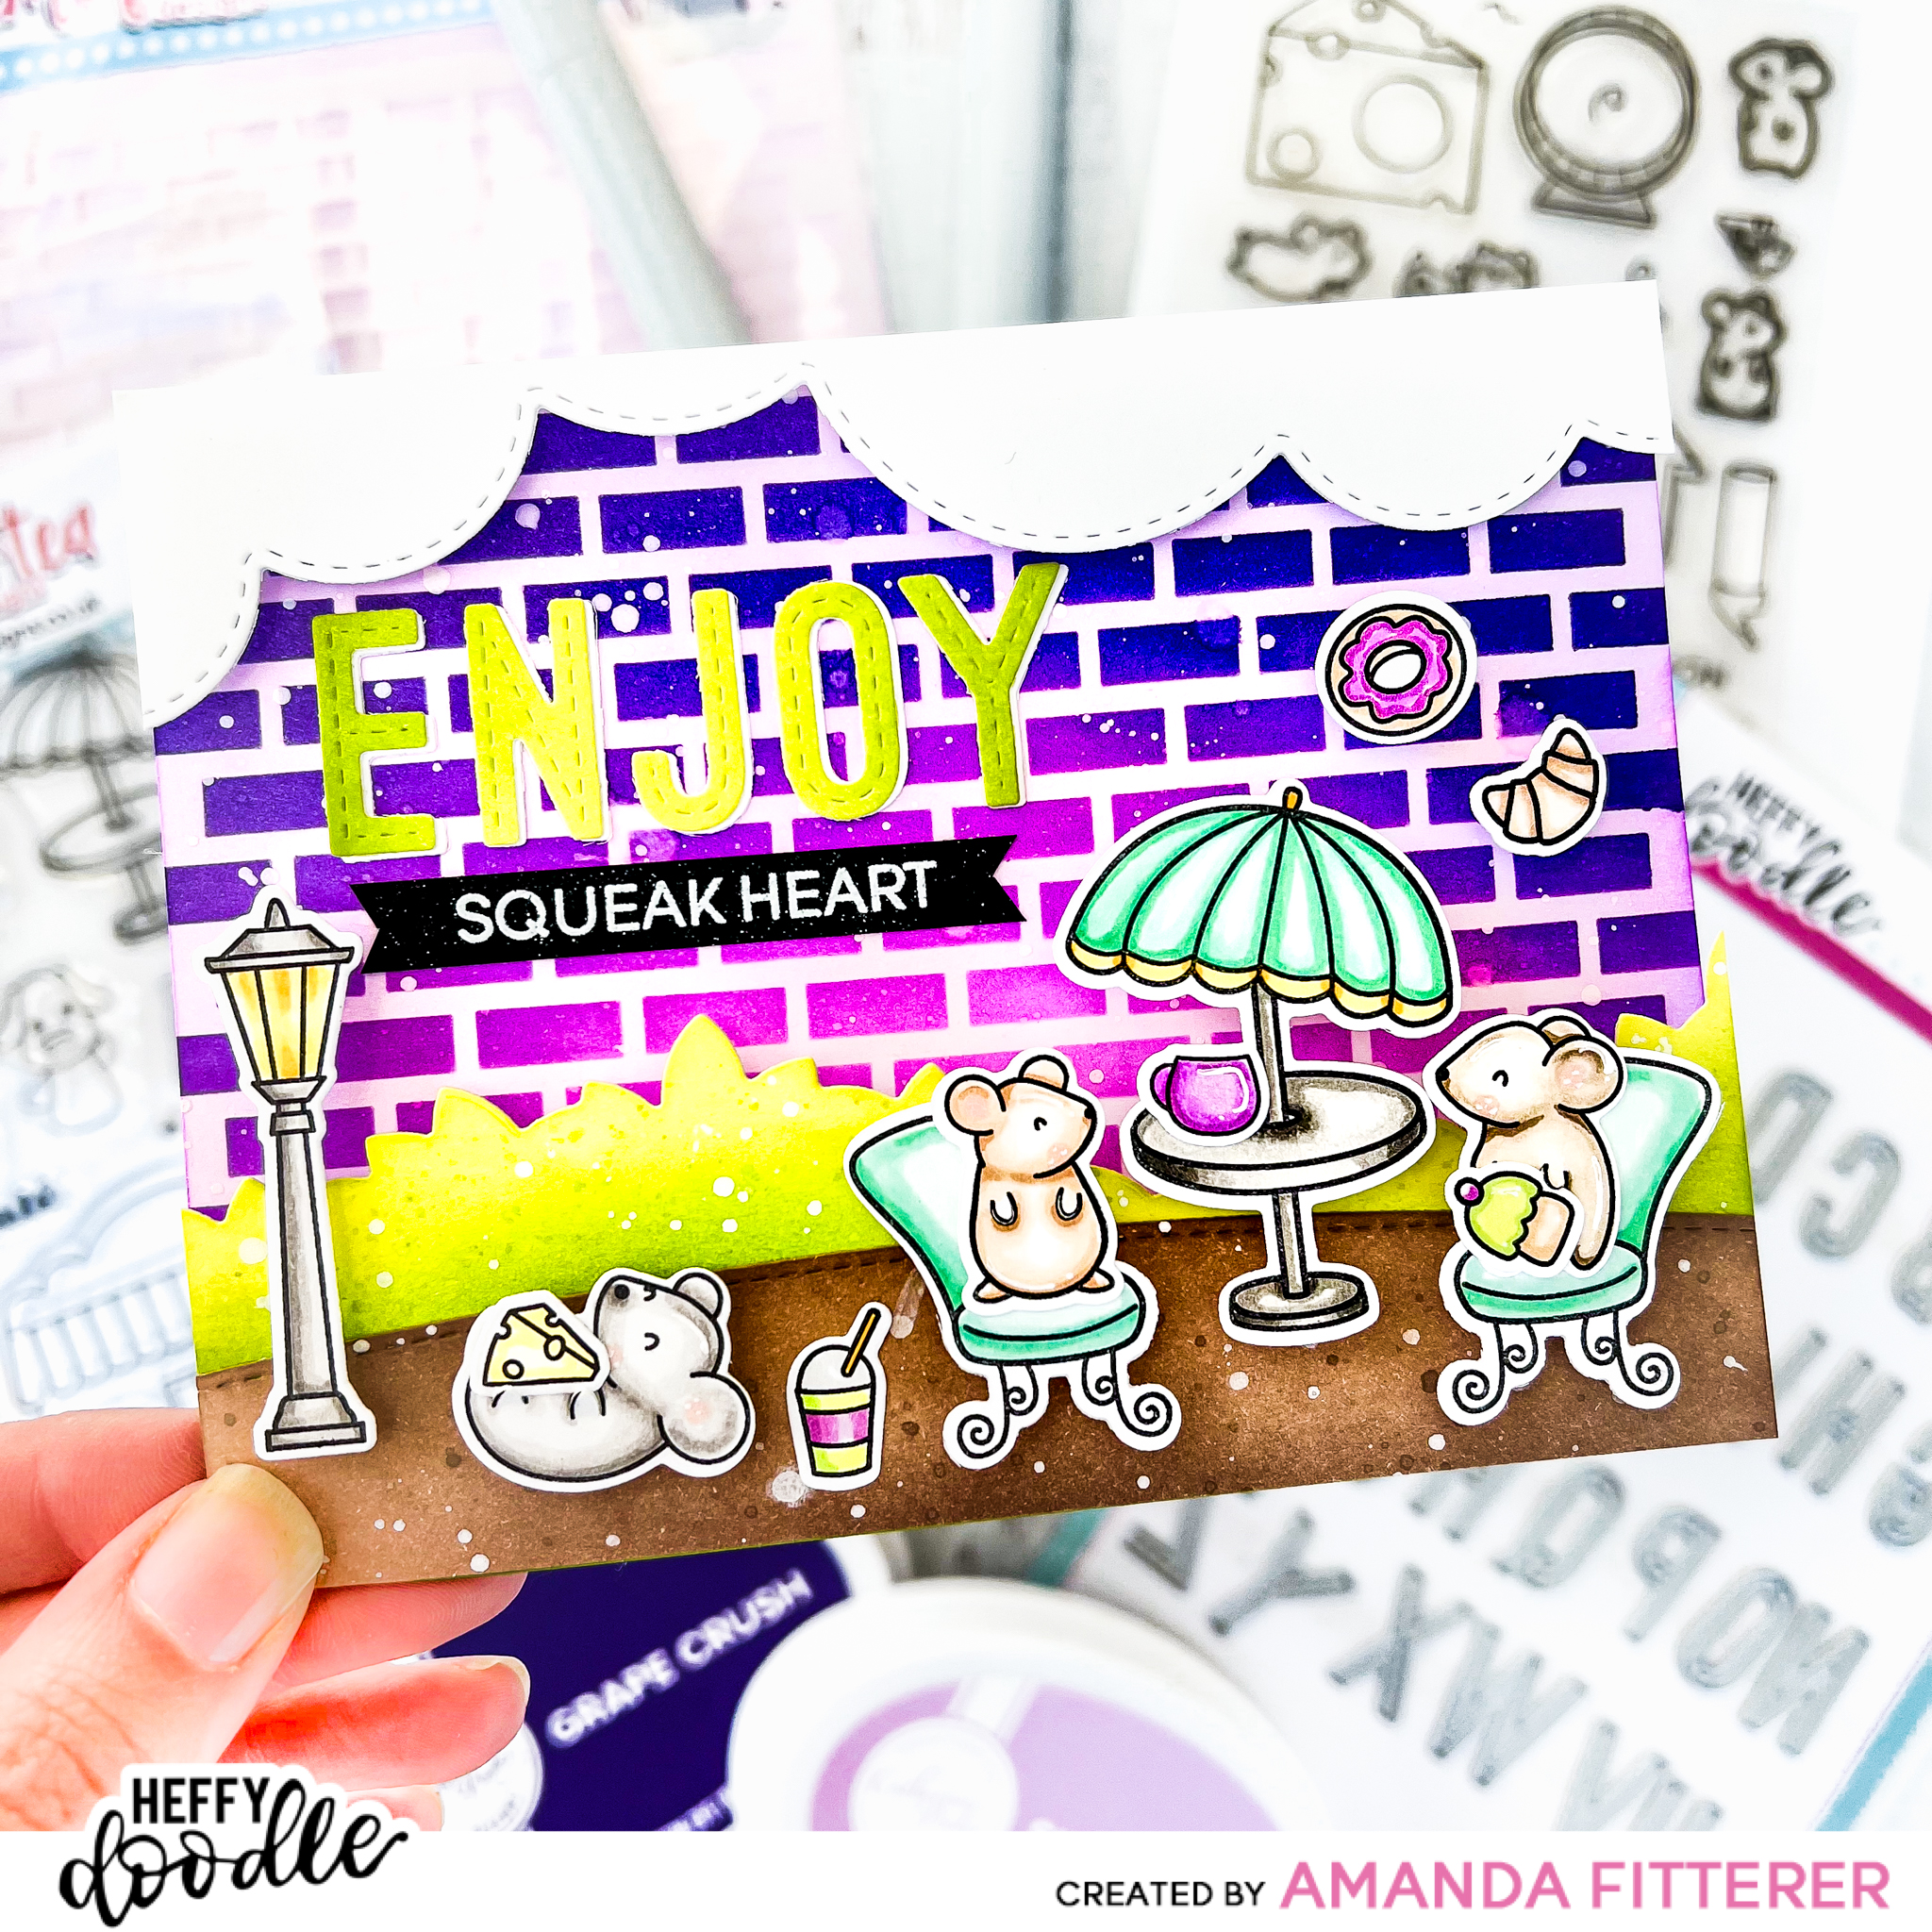
I’m so excited to share this card I made with you! I absolutely adore both of these companies’ products! They work SO WELL together! Can you guess which products are from which company? Read on to see!
To create my super vibrant background, I am blending Sixteen Candles, Pixie Dust and Grape Crush through the Time for Tea Tiled Wall Stencil. Once that’s done, I am going to very gently go over the entire background with a blending brush that has leftover Sixteen Candles ink on it.
To create the forefront of my scene, I am using the leaves from the Heffy Doodle Tree-mendous Peekaboo Tree Die and blending Melon Ice and Lime Rickey onto my cutout. For the dirt hill, I am using the Heffy Doodle Slimline Scenery Dies and blending Sand Castle and Over Coffee ink onto it. I am then splattering some white acrylic paint mixed with water using a small paintbrush. I’ve also used the Silver Linings Border Dies to create some clouds for the top portion of my scene and have left them white.
Now I’m ready to stamp my little cuties! I am grabbing the Heffy Doodle Hello Squeakheart Stamp Set and the Time for Tea Cafe Critters Stamp Set. I’m coloring them with my Copic markers using purples, greens, and yellows.
I’ve cut out the word “ENJOY” using the Heffy Doodle Stitched Alphabetters Dies and used Melon Ice and Lime Rickey to color them. Once I’ve cut my stamped images out using the coordinating dies, I’m ready to start assembling my card! I’m using Heffy Doodle’s Deep Foam Tape and Glubert Glue. I’m also creating one last sentiment by stamping the word “SQUEAKHEART” from the Hello Squeakheart stamp set on black cardstock with Versamark watermark ink. Then, I’m applying white embossing powder to it and cutting the sentiment into a ribbon using my scissors.
And, voila! Don’t those little cuties look so cute?! 🙂
That’s it for me on this Hop! I hope you enjoyed my card and all the love I put into it!
GIVEAWAY INFO: To be entered to win the giveaway, all you need to do is comment at each stop along the Blog Hop! Time for Tea will be giving away £25 and Heffy Doodle will be giving away £25 to their respective stores! Be sure to comment before 11:59 PM EST on Mar 2nd to be entered to win!
Each company will post their random winner on Mar 3rd at 10AM EST! Make sure to check the Heffy Doodle Blog and Time for Tea Blog to see if you’re a winner!
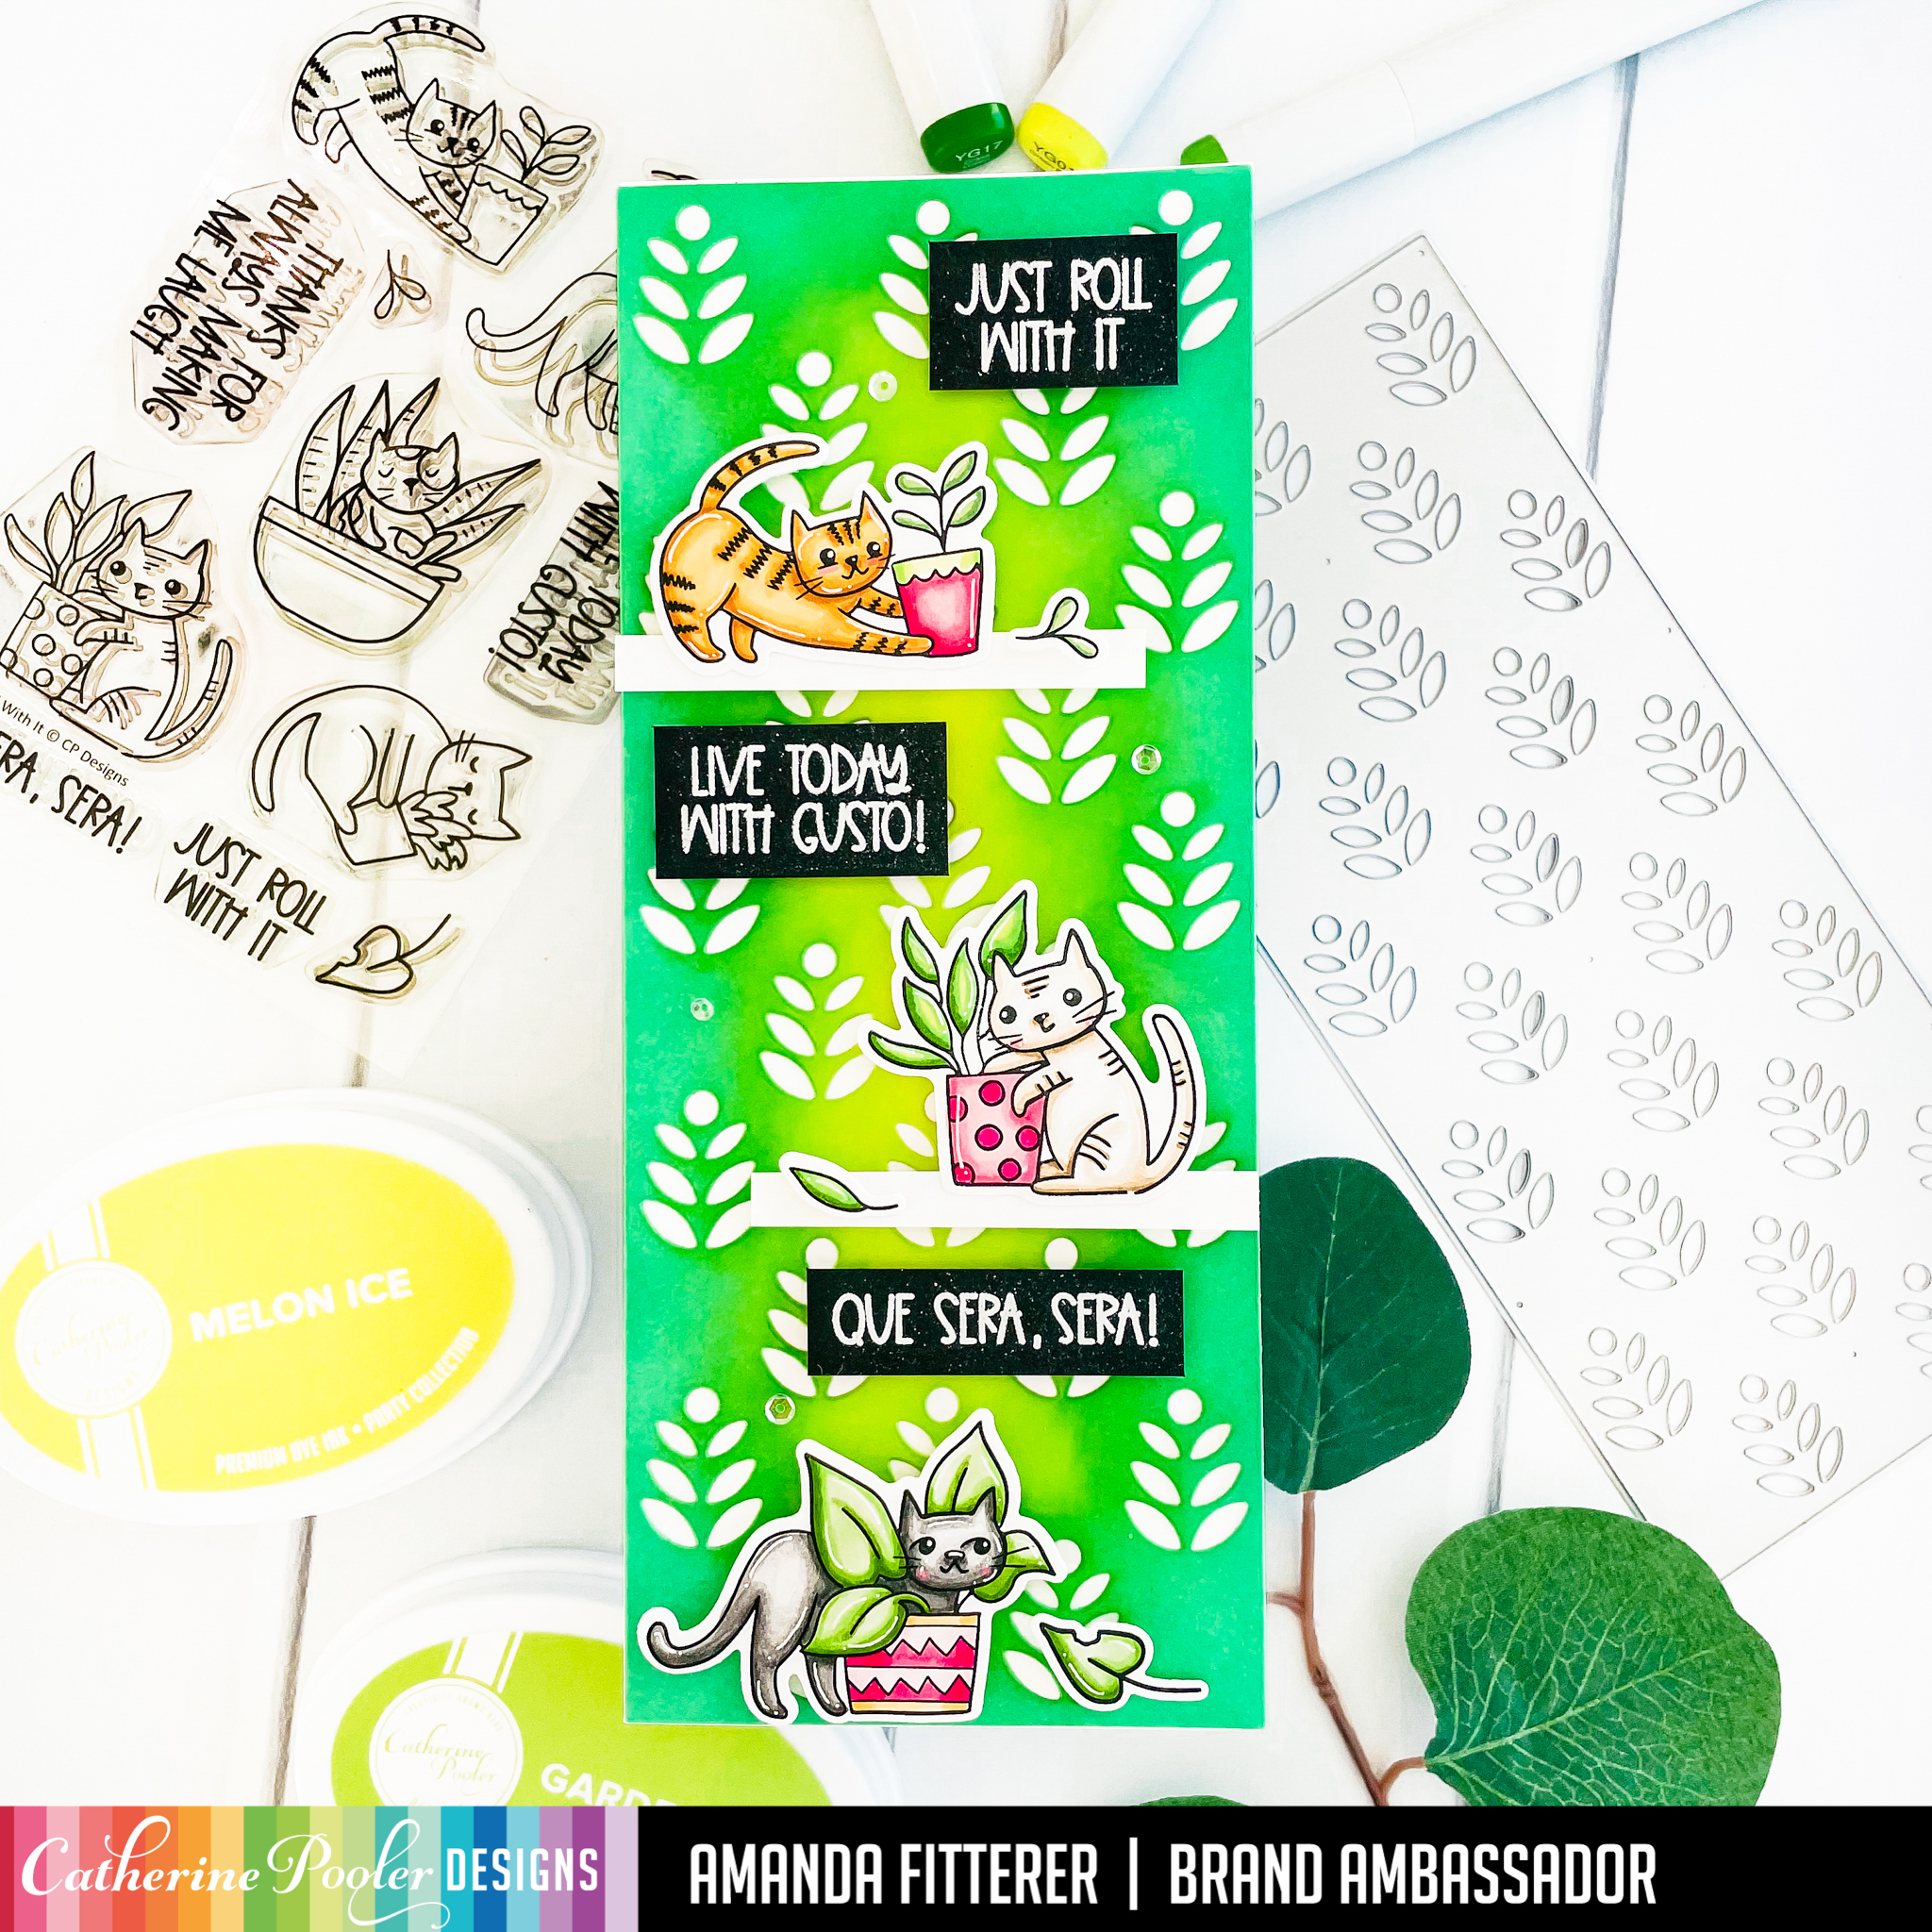
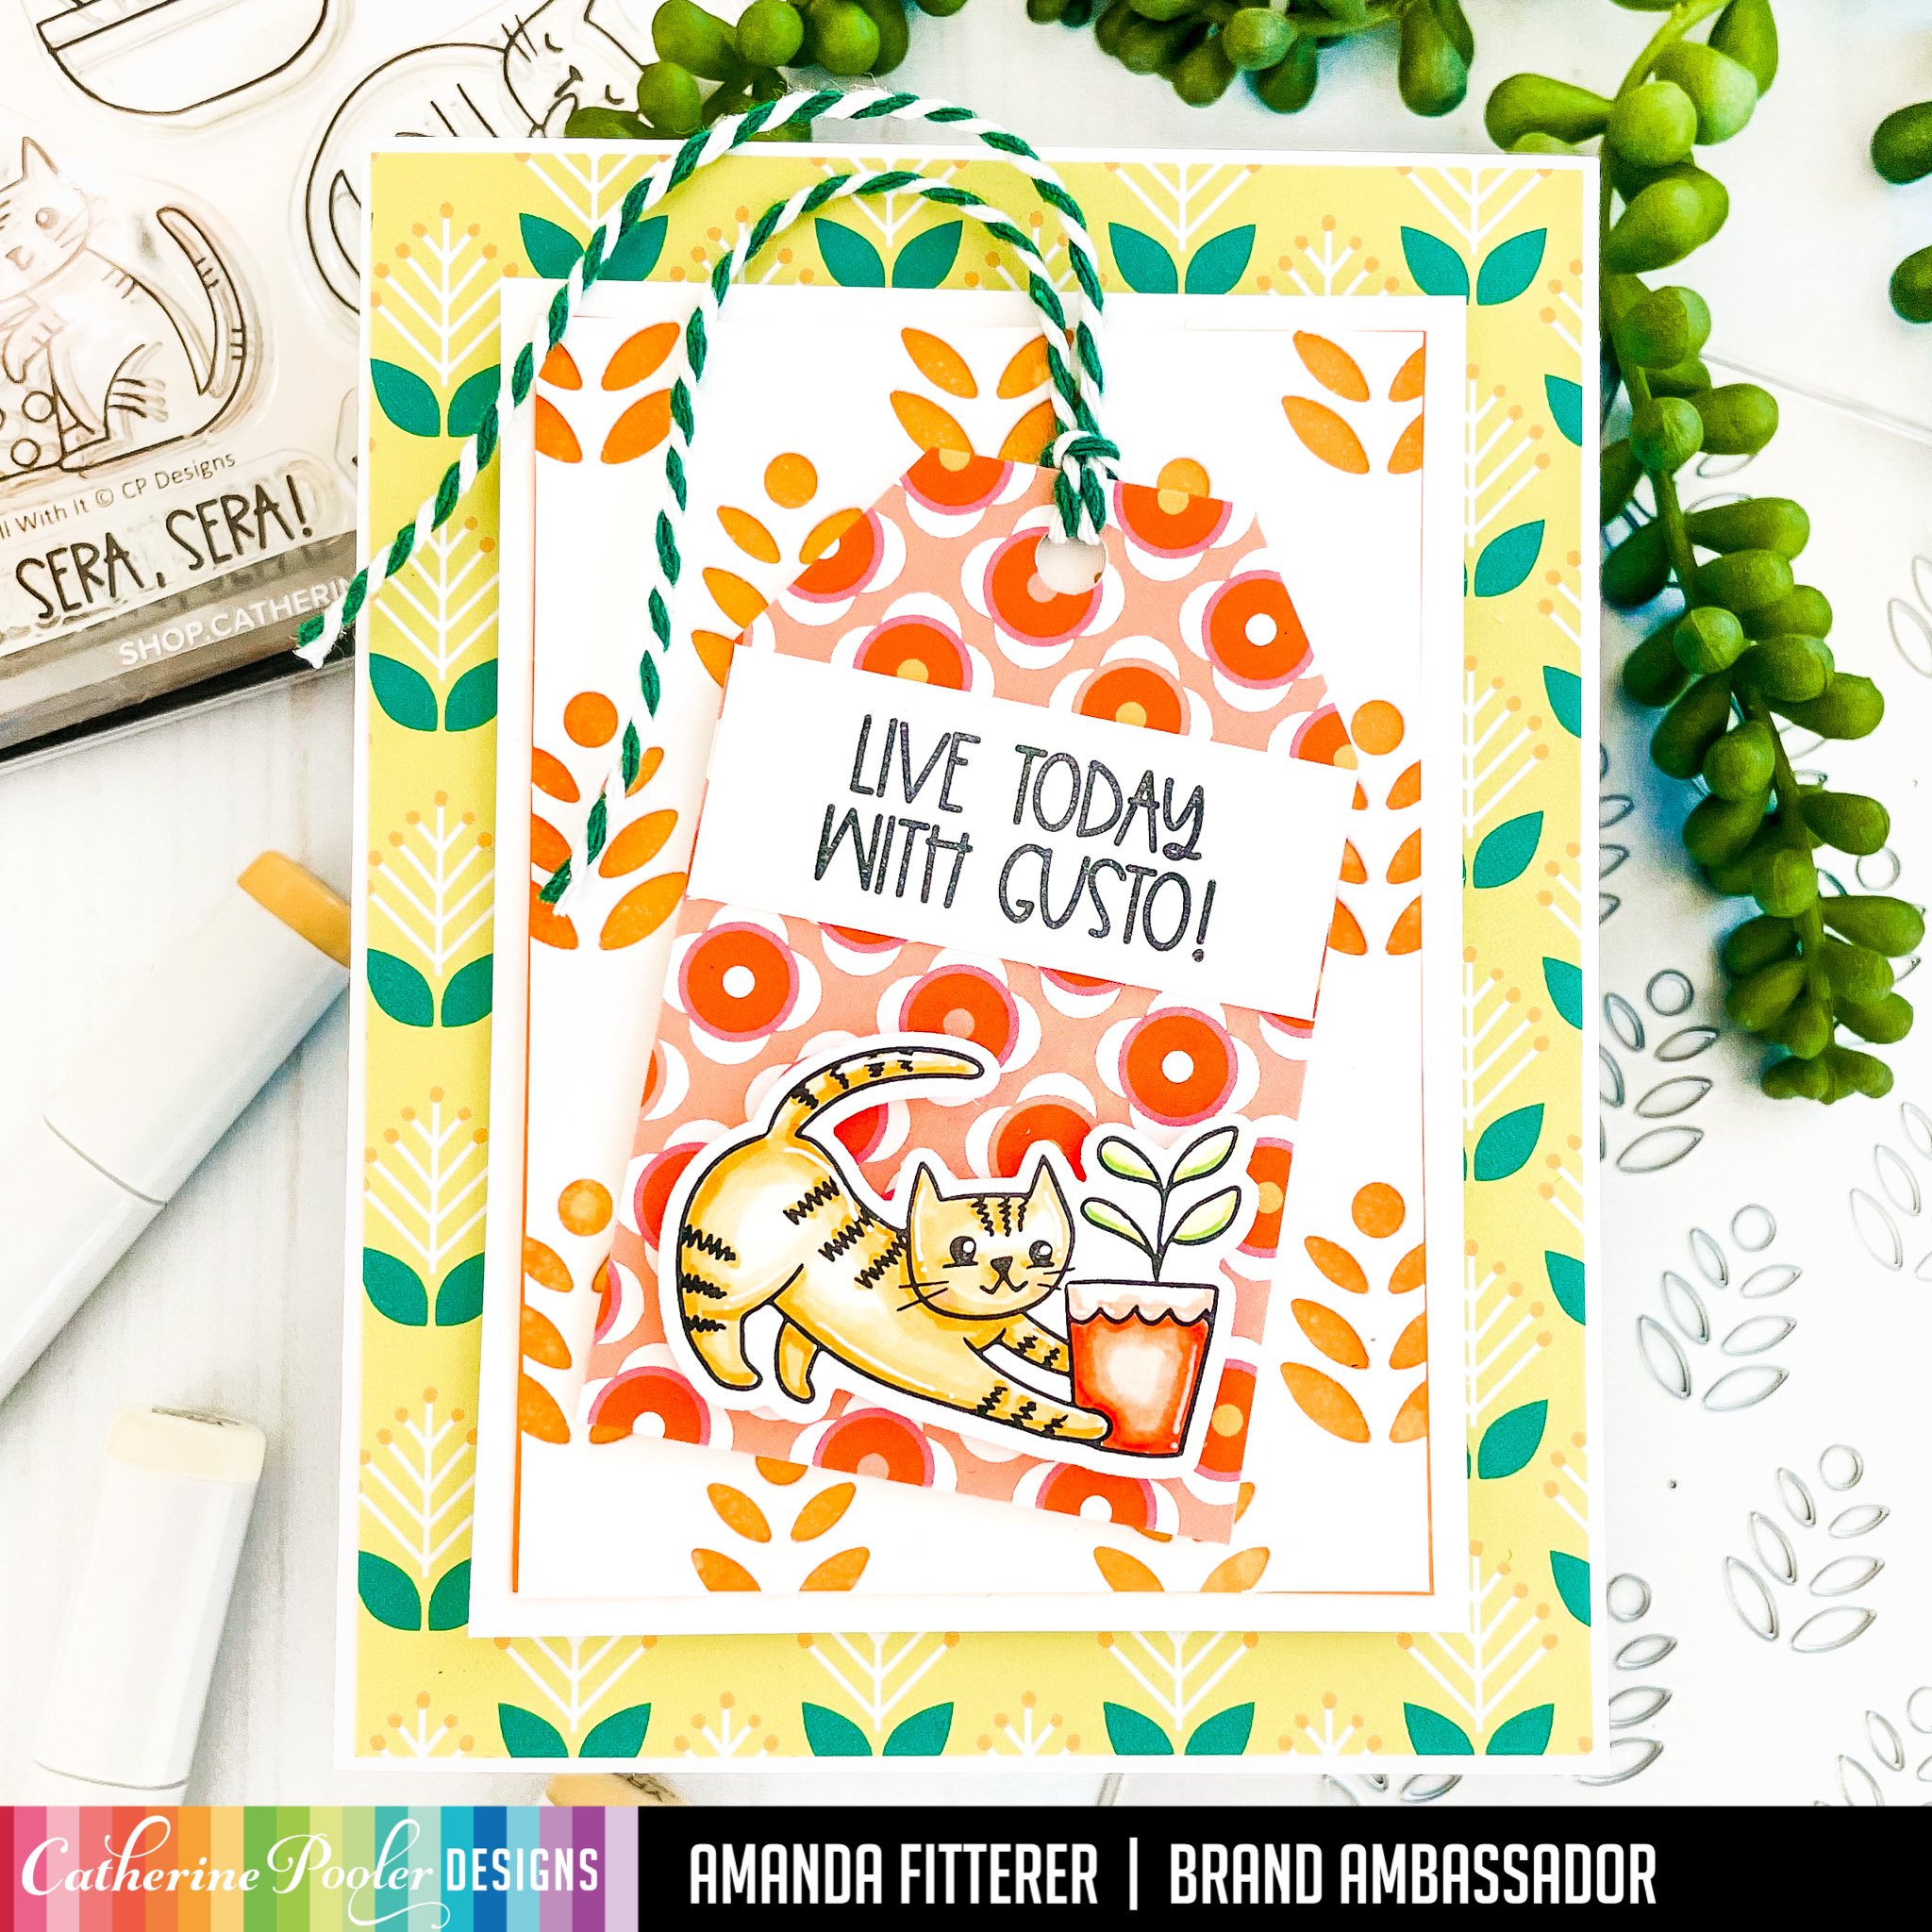
The Catherine Pooler New At Home Collection Release is available for purchase!! I am in love with the Just Roll With It stamp set! Those little kitties are quite the mischievous little ones!! Plus, I just love potted plants! They’re so much fun to color!
You can shop the entire Just Roll With It Collectionhere. I used the Plant Stand Slimline Die for my background and blended Melon Ice and Garden Party. I created some cute little shelves for my kitties using white cardstock. I stamped my images from Just Roll With It Stamp Set and colored those cuties with Copic markers. I used the coordinating dies to cut them out. Finally, I used 3D foam squares to attach everything to the front of my card!
If you shop with my affiliate link, I can earn a little extra money at no extra cost to you. All you have to do is click here and start shopping or use the links in this post!
Thank you so much for stopping by my blog today!! Hope you have a wonderful weekend!
I have another fun card to share using the Just Roll With It Collection. I used the Potted Patterned Paper, the Plant Stand Slimline Die, and the Just Roll With It stamp set to create this card!
If you shop with my affiliate link, I can earn a little extra money at no extra cost to you. All you have to do is click here and start shopping or use the links in this post!
If you shop with my affiliate link, I can earn a little extra money at no extra cost to you. All you have to do is click here and get shopping or use the links in this post!
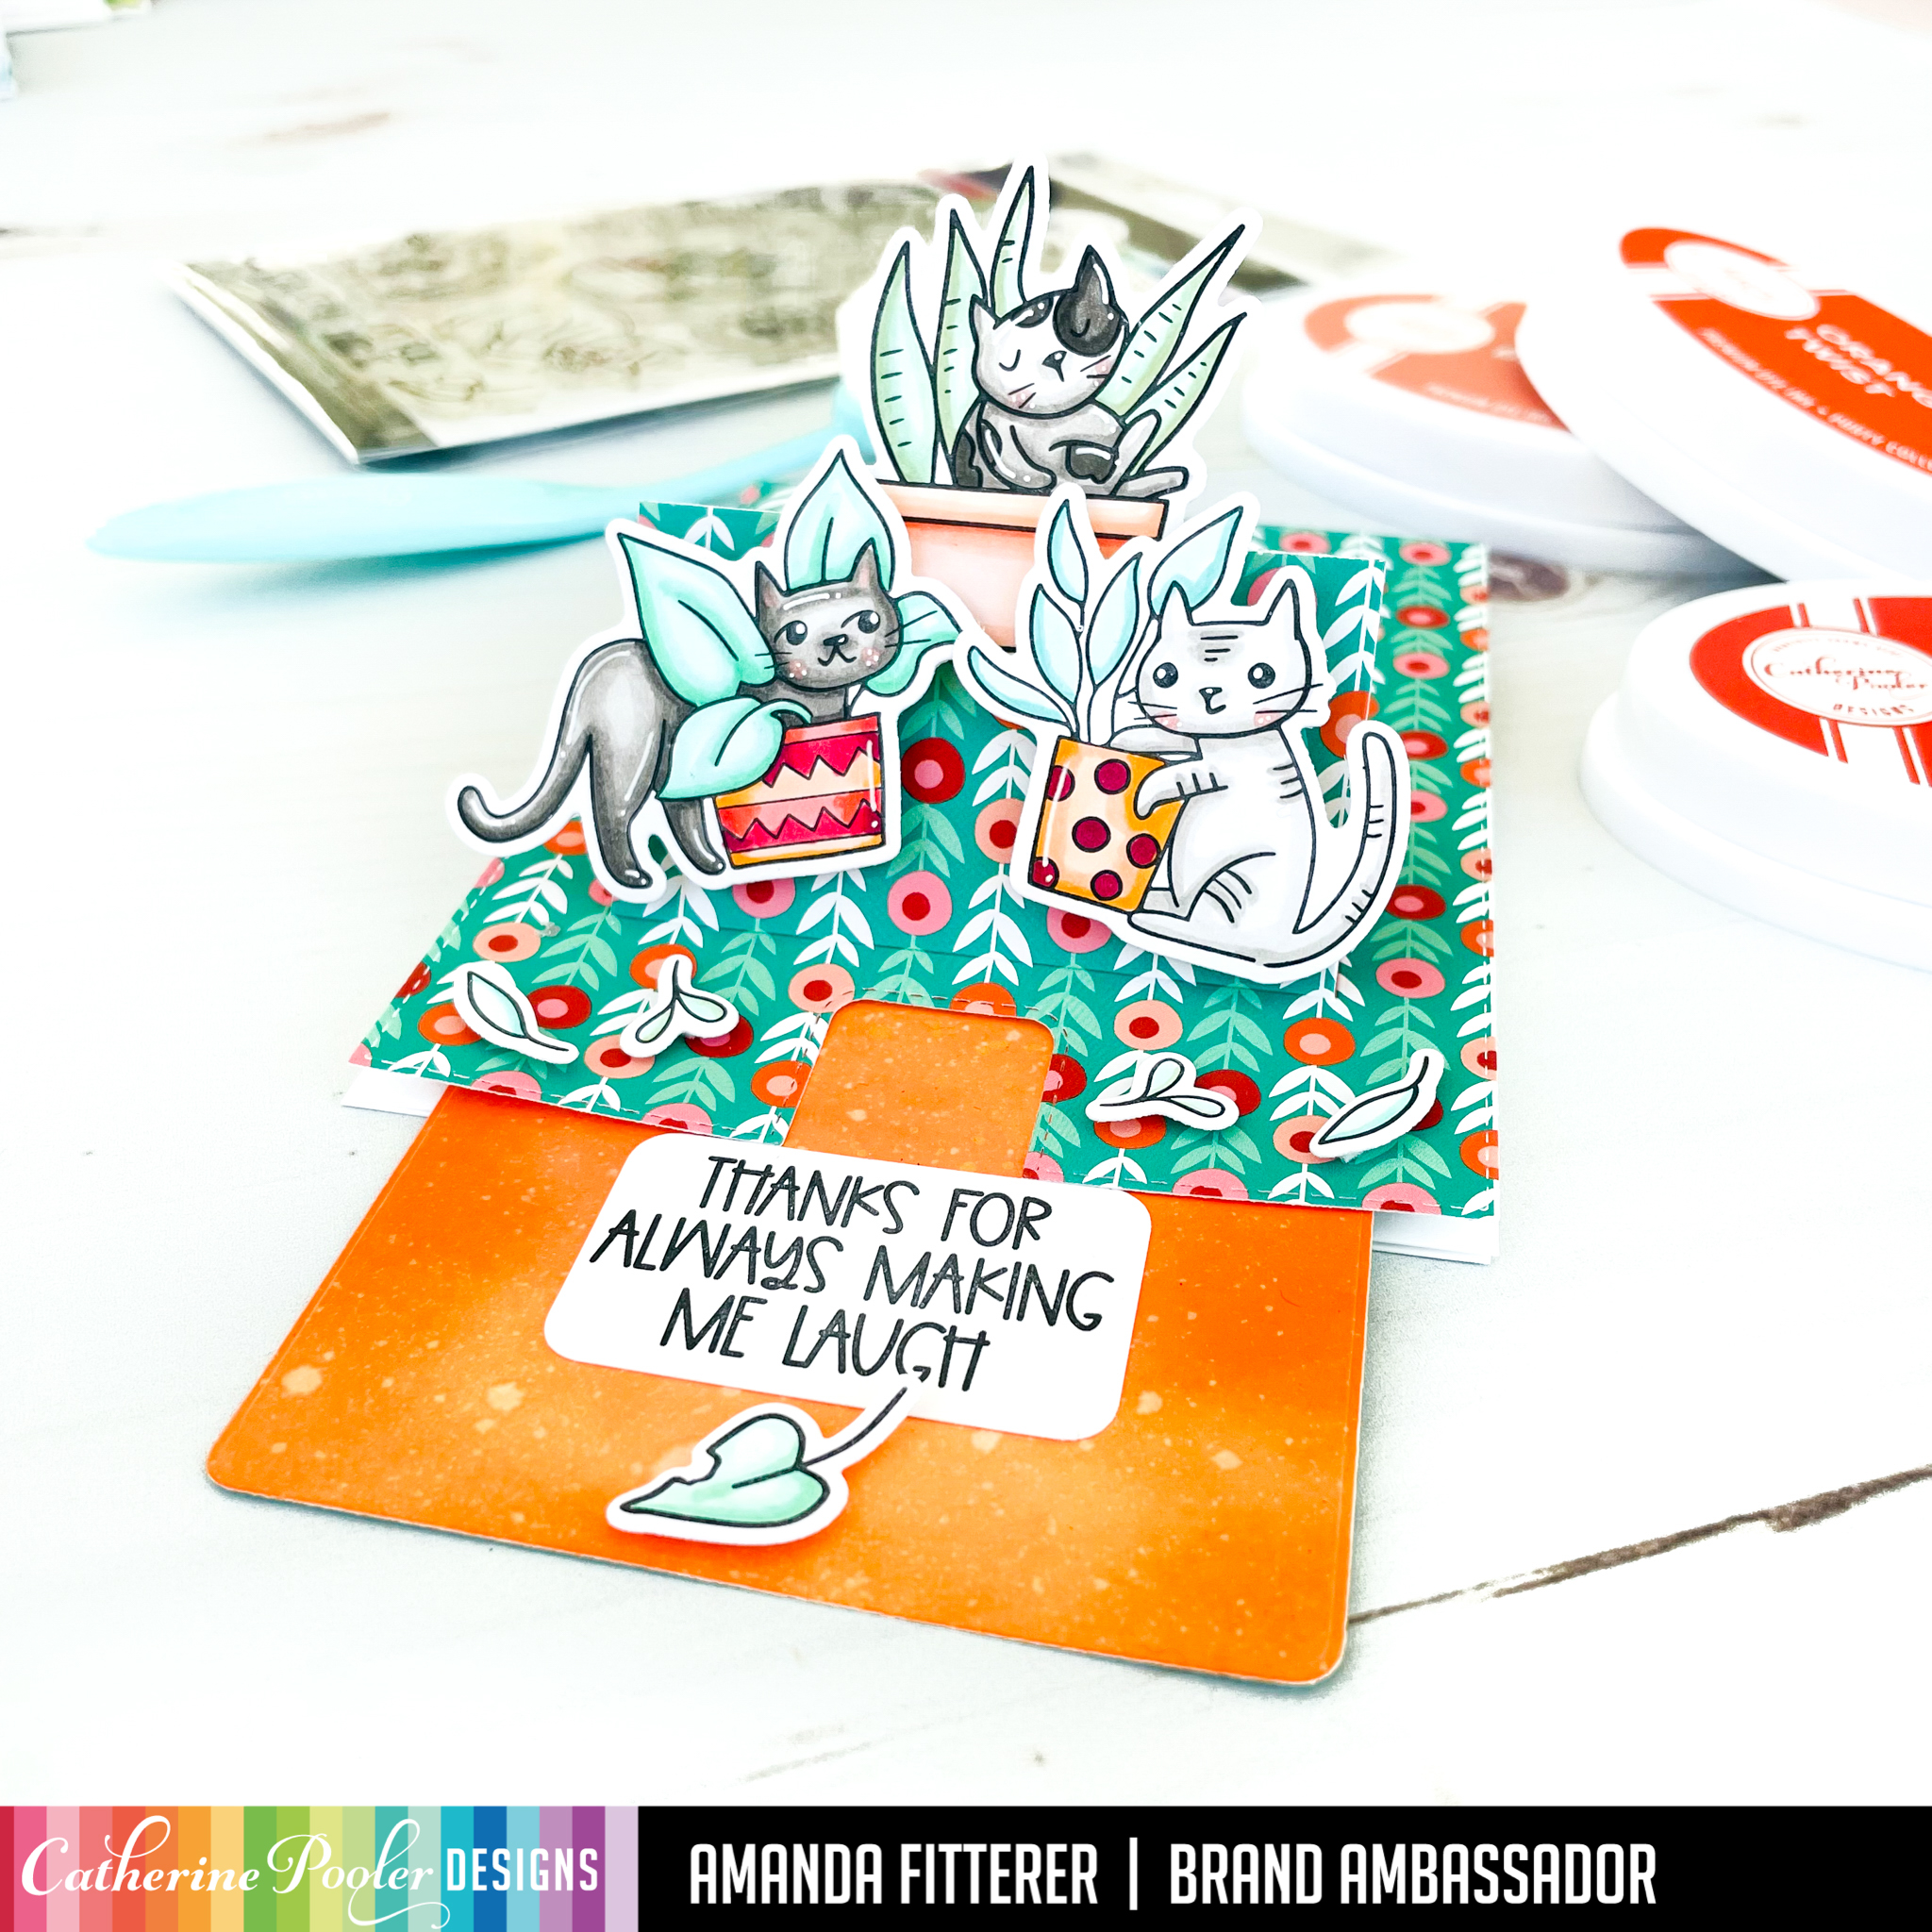
To create this card, I started with the Slider Pop-up Dies from Heffy Doodle. I love using this die to create an easy interactive card! I cut the card front with the Potted Patterned Paper.
For the inner panel, I blended Bellini, Orange Twist, and Flame.
Next, I stamped my images from the Just Roll With It stamp set and colored them with Copic markers. Then, I die cut them with the coordinating dies. I stamped a sentiment on a piece of white cardstock and then rounded the corners.
I assembled the card using 3D foam tape. I attached my kitties and leaves with foam squares and liquid glue.
And that’s it for me today! Thanks so much for stopping by!
To shop with my affiliate link and help me earn a little extra cash (at no cost to you) to buy more crafty goodies to share more projects with you, click here or use the links in this post!
Today, I’m making a card with my leftover piece from yesterday’s card. If you missed my post yesterday, you can see it here. I’m using the Just Roll With It Collection for this release!
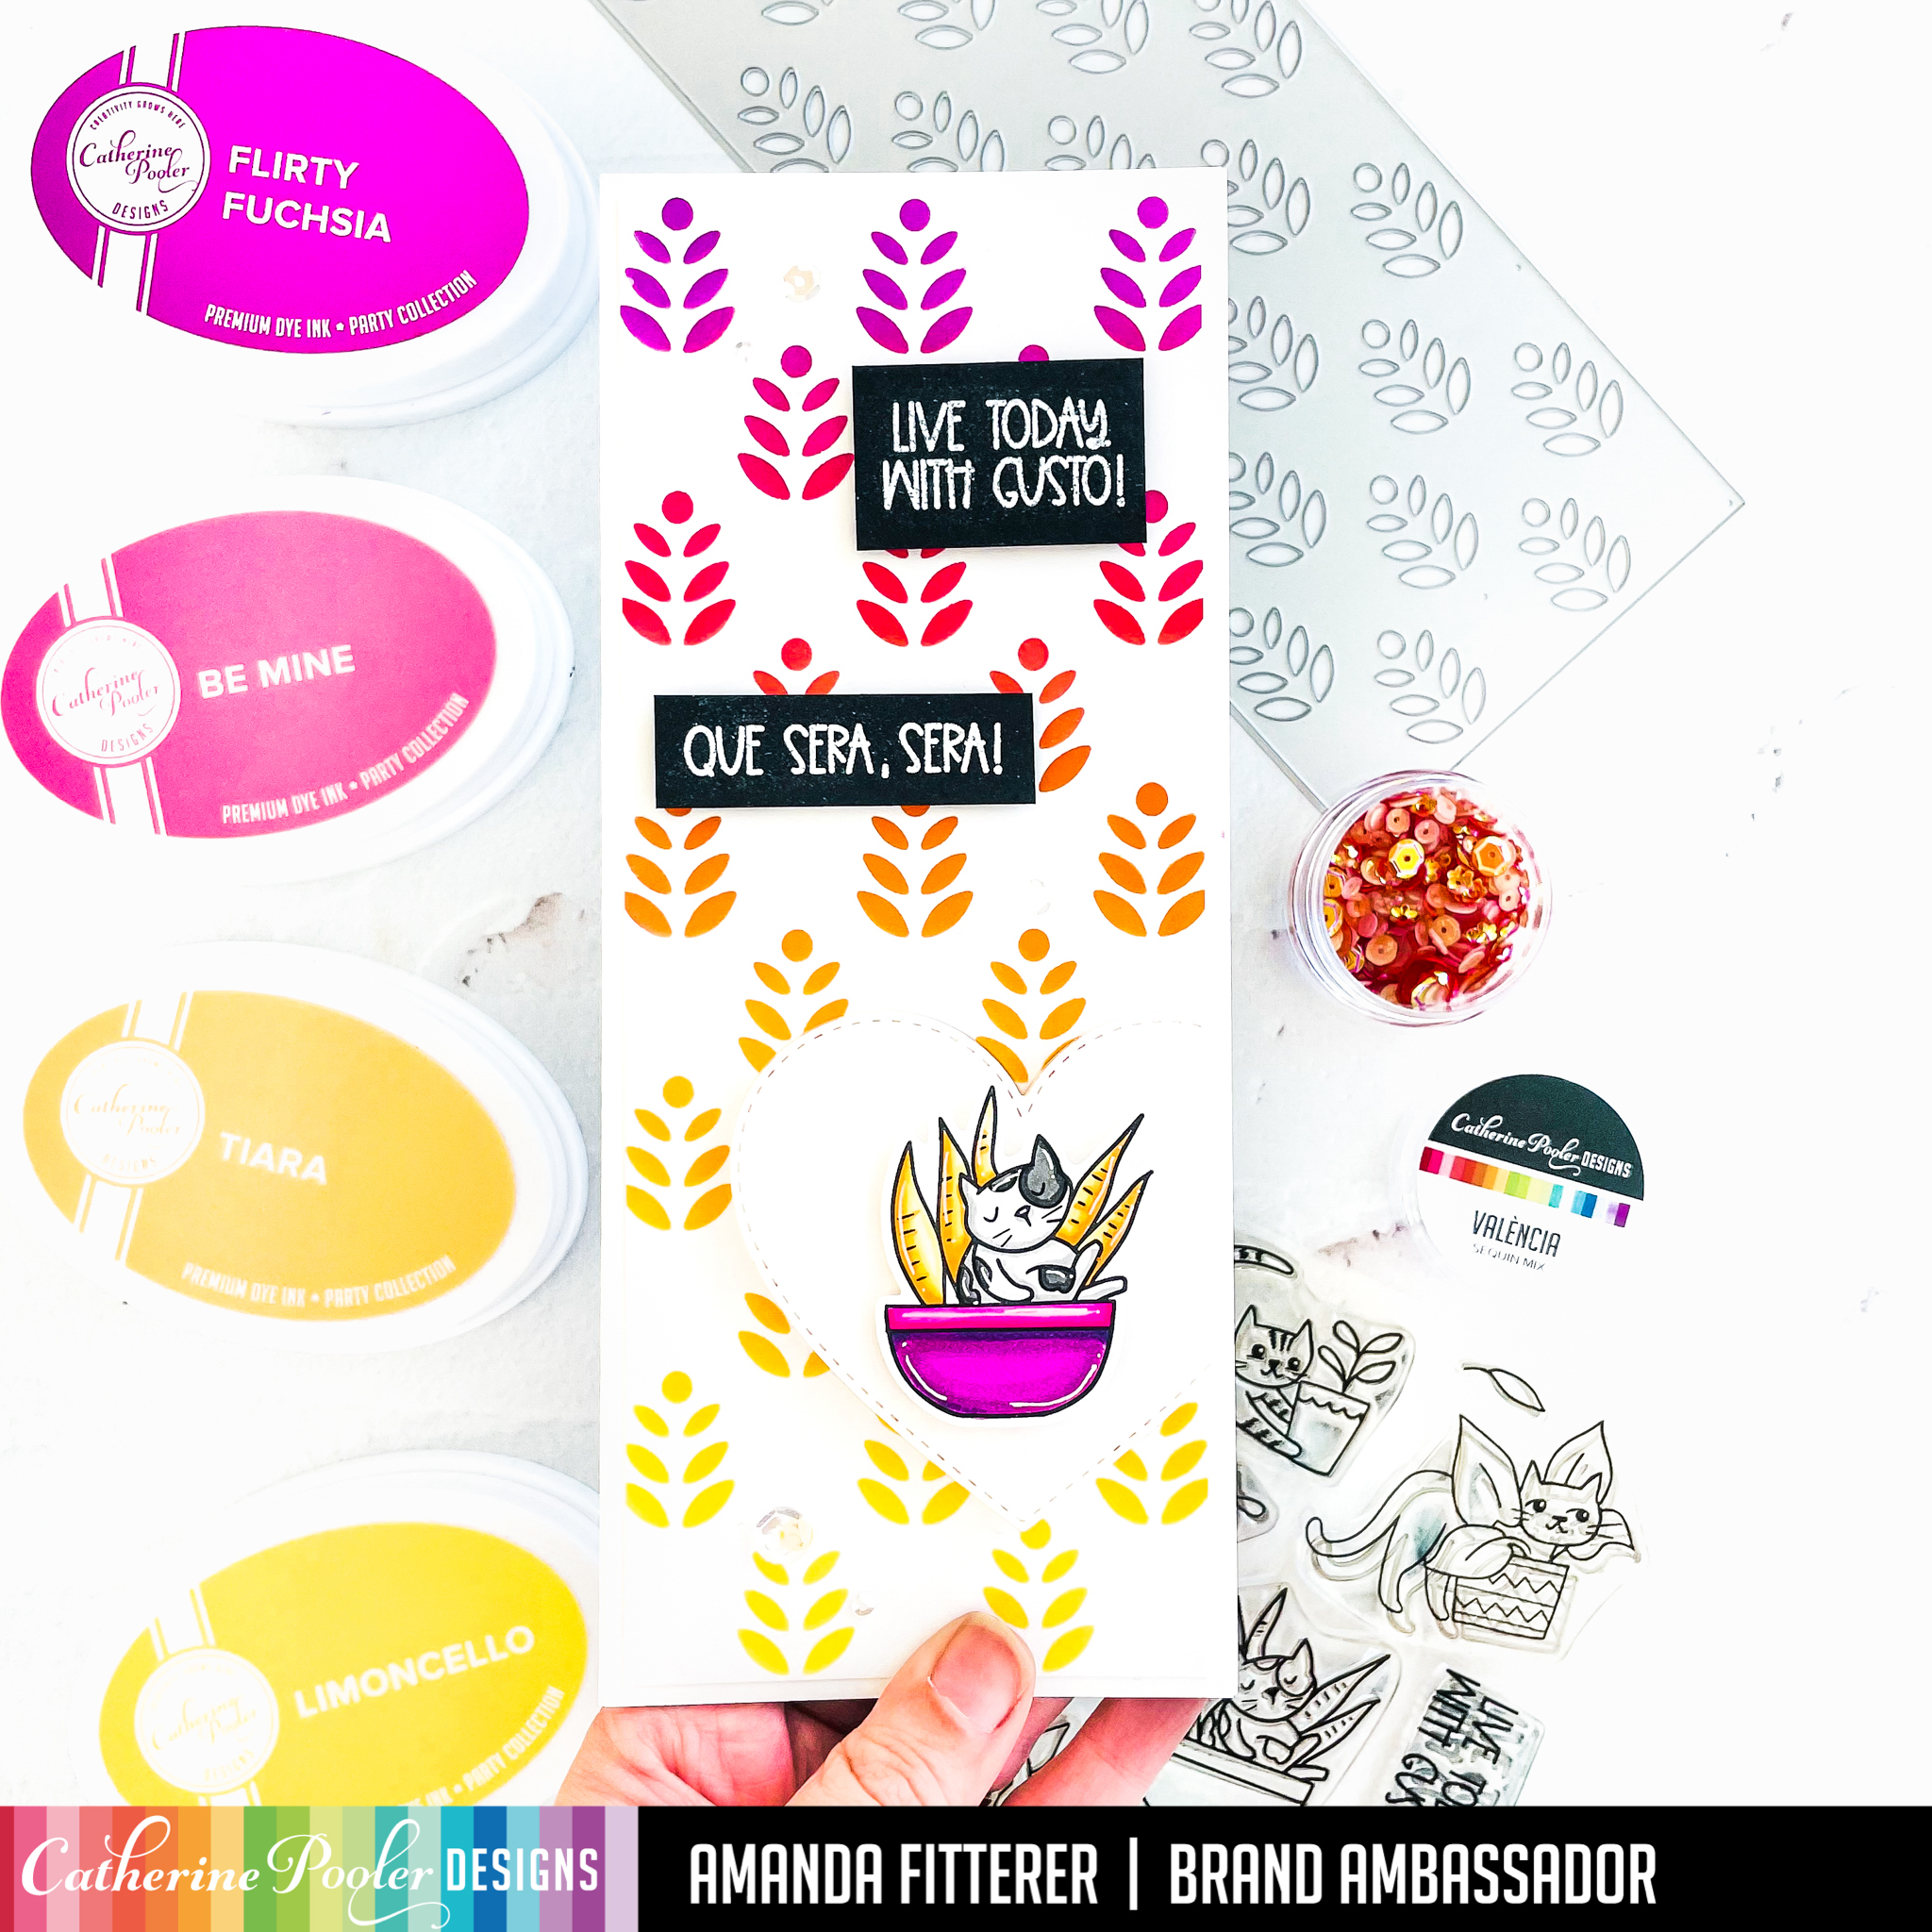
I ran a slimline card front through my die cutting machine with the Plant Stand Slimline Die. I placed the die cut card front on top of another slimline card front. Then, I blended Limoncello, Glitz, Party Dress, Pucker Up and Flirty Fuschia inks onto both card fronts. This gives me 2 different card fronts to use!
Next, I stamped my kitty from the Just Roll With It stamp set and then colored her with Copic markers. I also stamped my sentiments on black cardstock nd then used white embossing powder on them. I used the Nested Stitched Heart Dies and then trimmed off one edge of the heart and propped it up with foam squares.
Thank you so much for hanging out with me today! I can’t wait to share more cards with you from this collection!
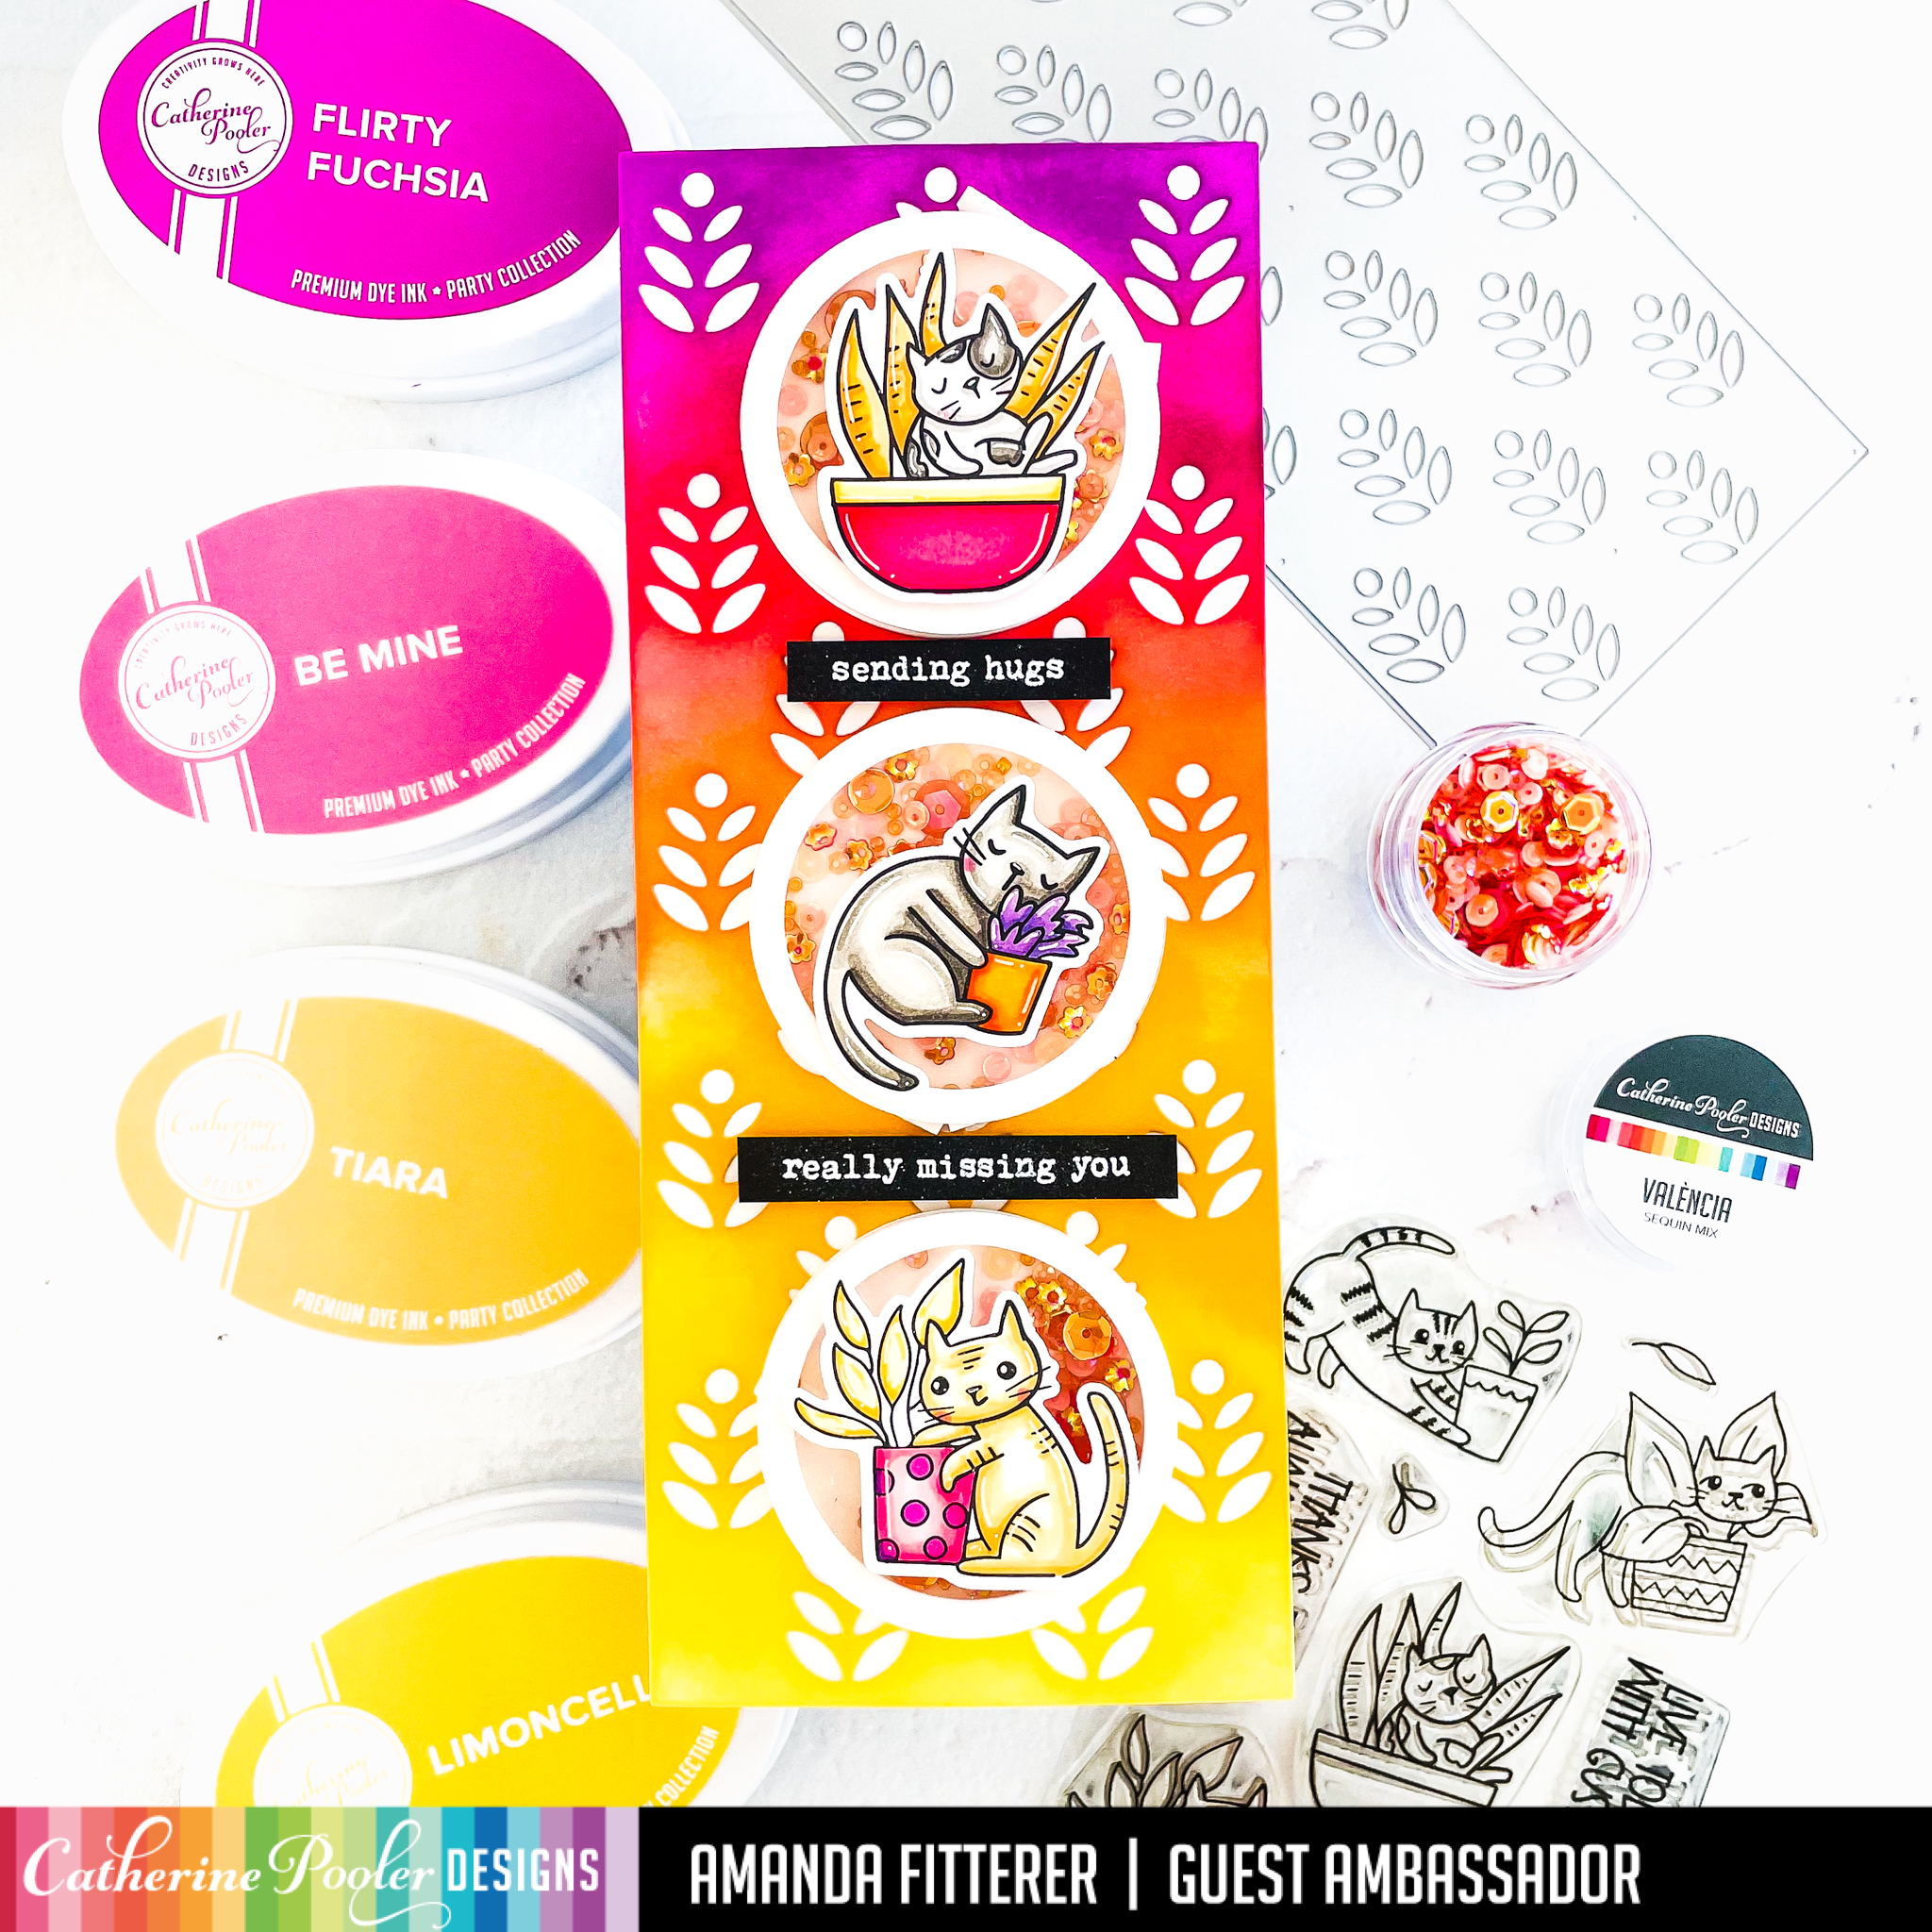
I ran a slimline card front through my die cutting machine with the Plant Stand Slimline Die. I placed the die cut card front on top of another slimline card front. Then, I blended Limoncello, Glitz, Party Dress, Pucker Up and Flirty Fuschia inks onto both card fronts. This gives me 2 different card fronts to use!
Next, I stamped my images from the Just Roll With It stamp set and colored them with Copic markers. Then, I die cut them with the coordinating dies.
I created shaker elements by cutting some Circle Dies, adding some 3D foam tape, acetate, and Valencia sequins.
Thank you so much for hanging out with me today! I can’t wait to share more cards with you from this collection!